
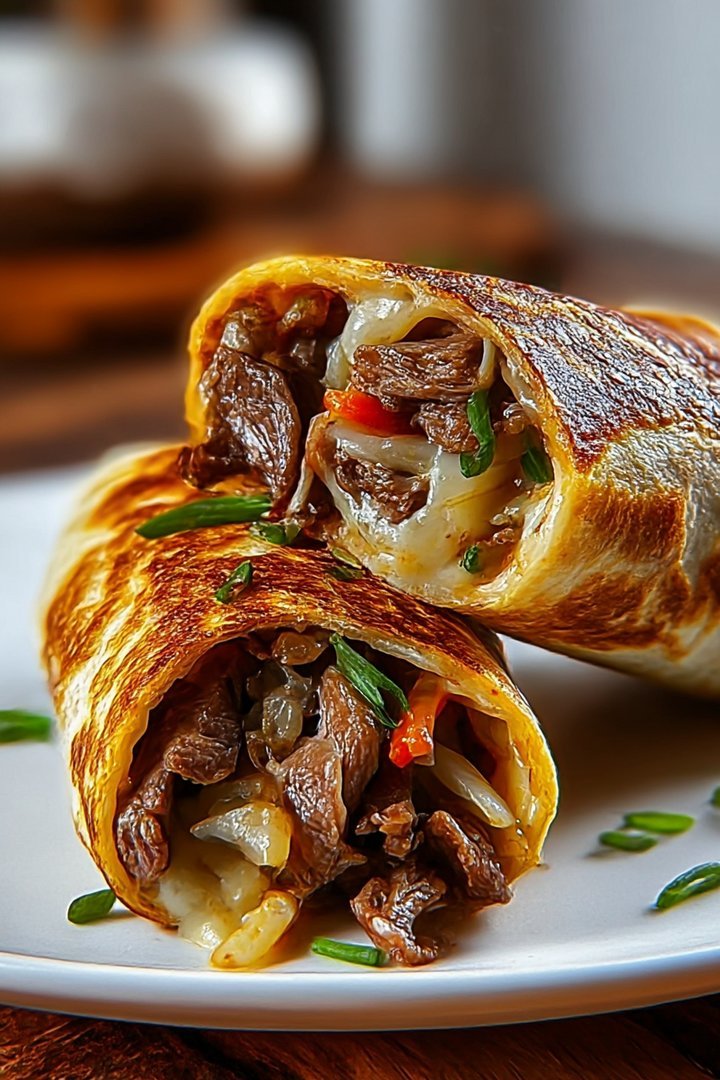
The aroma of sizzling steak mingling with melted cheese is enough to make anyone’s stomach rumble. Imagine that, but intensified and nestled in a perfectly grilled wrap.
These Crispy Philly Cheesesteak Grilled Wraps are a flavor explosion, combining the iconic taste of a Philly cheesesteak with the convenience and fun of a handheld wrap. Get ready for a culinary adventure that’s both comforting and exciting!
Here are a few reasons why you’ll absolutely adore these Crispy Philly Cheesesteak Grilled Wraps:
They offer a symphony of flavors, blending savory steak, gooey cheese, and crisp vegetables for a taste sensation.
With easy-to-find ingredients and straightforward steps, they’re perfect for a quick weeknight dinner or weekend treat.
The golden-brown, perfectly grilled wrap encases a delicious filling, making it visually appealing and irresistible.
Whether you’re feeding a crowd or enjoying a solo meal, these wraps are versatile and customizable to your liking.
Ingredients for Crispy Philly Cheesesteak Grilled Wraps
Here’s what you’ll need to make this delicious dish:
The full ingredients list, including measurements, is provided in the recipe card directly below.
How to Make Crispy Philly Cheesesteak Grilled Wraps
Follow these simple steps to prepare this delicious dish:
Step 1: Prepare the Steak and Vegetables
Heat olive oil in a large skillet over medium-high heat. Add thinly sliced steak and cook until browned, about 3-5 minutes. Season with garlic powder, onion powder, salt, and pepper. Remove steak from the skillet and set aside. Add sliced bell peppers and onions to the skillet and cook until softened and slightly caramelized, about 5-7 minutes.
Step 2: Combine Ingredients
Return the cooked steak to the skillet with the peppers and onions. Stir in a splash of beef broth to deglaze the pan, scraping up any browned bits from the bottom. This adds extra flavor.
Step 3: Add Cheese
Reduce the heat to low. Top the steak and vegetable mixture with slices of provolone cheese. Cover the skillet and allow the cheese to melt completely, about 2-3 minutes.
Step 4: Assemble the Wraps
If using hoagie rolls, slice them open. If using tortillas, lay them flat on a clean surface. Spoon the cheesesteak mixture evenly into each roll or onto each tortilla.
Step 5: Grill the Wraps
Preheat a grill pan or outdoor grill to medium heat. Place the assembled wraps on the grill and cook for 2-3 minutes per side, or until golden brown and crispy. For tortillas, you can also use a panini press for a quicker grilling process.
Step 6: Serve and Enjoy
Remove the Crispy Philly Cheesesteak Grilled Wraps from the grill and let them cool slightly. Slice in half and serve immediately. Enjoy these flavorful wraps as a satisfying lunch or dinner!
Variations to Spice Things Up (H2)
Want to take your Crispy Philly Cheesesteak Grilled Wraps to the next level? Here are a few delicious variations to try:
Spicy Kick (H3)
Add a pinch of red pepper flakes to the steak and vegetable mixture for a little heat. You could also incorporate some sliced jalapeños or a drizzle of hot sauce before grilling.
Mushroom Madness (H3)
Sauté sliced mushrooms along with the bell peppers and onions for an earthy, savory addition. Cremini or button mushrooms work great in this recipe.
Creamy Dreamy (H3)
Stir in a spoonful of cream cheese or a dollop of sour cream to the filling for extra creaminess. This adds a rich and tangy flavor that complements the other ingredients perfectly.
Southwest Flair (H3)
Add a can of drained and rinsed black beans and some corn kernels to the filling. Season with chili powder and cumin for a Tex-Mex twist. Top with a dollop of salsa and guacamole after grilling.
Tips for Achieving Crispy Perfection (H2)
To ensure your Crispy Philly Cheesesteak Grilled Wraps are absolutely perfect, here are a few helpful tips:
Use a Hot Grill (H3)
Make sure your grill is hot enough before adding the wraps. This will help create a crispy exterior and prevent the filling from getting soggy.
Don’t Overfill the Wraps (H3)
Overfilling the wraps can make them difficult to handle and grill evenly. Be mindful of the amount of filling you add to each wrap.
Press Gently (H3)
When grilling, use a spatula or panini press to gently press down on the wraps. This helps them cook evenly and achieve maximum crispiness.
Let Them Rest (H3)
After grilling, let the wraps rest for a minute or two before slicing and serving. This allows the filling to settle and prevents it from spilling out.
Make-Ahead Tips for Crispy Philly Cheesesteak Grilled Wraps (H2)
Planning ahead can make preparing these wraps even easier. Here are a few tips for making them in advance:
Prep the Steak and Vegetables (H3)
You can slice the steak, bell peppers, and onions ahead of time and store them in the refrigerator. This will save you time when you’re ready to cook.
Cook the Filling (H3)
The cheesesteak filling can be cooked in advance and stored in the refrigerator for up to 2 days. Reheat it before assembling the wraps.
Assemble the Wraps (H3)
You can assemble the wraps a few hours before grilling. Wrap them tightly in plastic wrap and store them in the refrigerator until ready to cook.
Grilling Time (H3)
For best results, grill the wraps just before serving to ensure they are hot and crispy.
Serving Suggestions for Crispy Philly Cheesesteak Grilled Wraps (H2)
These Crispy Philly Cheesesteak Grilled Wraps are delicious on their own, but here are a few serving suggestions to complete your meal:
Classic Sides (H3)
Serve with classic sides like french fries, onion rings, or coleslaw for a complete and satisfying meal.
Fresh Salad (H3)
Pair with a fresh salad like a simple green salad, Caesar salad, or tomato and cucumber salad for a lighter option.
Dipping Sauces (H3)
Offer a variety of dipping sauces like ketchup, mustard, ranch dressing, or barbecue sauce for added flavor.
Spicy Accompaniments (H3)
Serve with sliced jalapeños, hot sauce, or a side of spicy coleslaw for those who like a little heat.
Why This Recipe Works (H2)
This recipe for Crispy Philly Cheesesteak Grilled Wraps is a winner for several reasons:
Flavor Combination (H3)
The combination of savory steak, sweet peppers and onions, and melted cheese creates a harmonious blend of flavors that is incredibly satisfying.
Ease of Preparation (H3)
With simple ingredients and straightforward steps, this recipe is easy to make, even for beginner cooks.
Versatility (H3)
The recipe is highly versatile and can be customized to suit your preferences. Feel free to experiment with different cheeses, vegetables, and seasonings.
Crowd-Pleaser (H3)
These wraps are a guaranteed crowd-pleaser and are perfect for parties, potlucks, or family dinners.
A Final Thought on the Perfect Wrap (H2)
These Crispy Philly Cheesesteak Grilled Wraps bring the iconic flavors of a Philly cheesesteak to your fingertips, wrapped in a crispy, grilled package. The melding of tender steak, melty provolone, and sautéed veggies creates a symphony of flavors that’s simply irresistible. This isn’t just a meal; it’s an experience that transports you straight to the bustling streets of Philadelphia, one delicious bite at a time. Whether you’re looking for a quick weeknight dinner or a crowd-pleasing party snack, these wraps are guaranteed to be a hit. So fire up the grill, gather your ingredients, and get ready to enjoy a culinary adventure that’s both easy and unforgettable.
Perfecting the Cooking Process
To maximize deliciousness and minimize kitchen chaos, sear the thinly sliced beef first to lock in those savory juices. While the beef rests, sauté the onions and peppers. Finally, assemble your cheesy masterpiece in the wrap and grill it to golden perfection. Timing is everything!
Add Your Touch
Feeling adventurous? Swap out the provolone for a spicy pepper jack for an extra kick. Not a fan of green peppers? Mushrooms or roasted red peppers make excellent alternatives. A sprinkle of garlic powder or a dash of Worcestershire sauce (ensure it’s free of prohibited ingredients!) can also elevate the flavor.
Storing & Reheating
Leftover Crispy Philly Cheesesteak Grilled Wraps can be stored in the refrigerator for up to three days. To reheat, grill them again for a few minutes on each side until warmed through and crispy. You can also microwave them, but grilling yields the best texture.
Here are a few helpful tips for making the best Crispy Philly Cheesesteak Grilled Wraps:
- Don’t overcrowd the pan when searing the beef. Sear in batches to ensure proper browning and prevent steaming, which can make the meat tough.
- Use a mandoline or very sharp knife to slice the beef thinly. This ensures it cooks quickly and evenly, resulting in a more tender and flavorful filling.
- Press the wraps down while grilling to help the cheese melt evenly and create a crispy, golden-brown exterior. A panini press works wonders!
(Personal anecdote formated as paragraph subheading)
My family raved about these wraps! My youngest even asked for them in his lunchbox the next day. It’s safe to say this recipe is a new family favorite and will make repeat appearances on our dinner table.
The aroma of sizzling beef, caramelized onions, and melting cheese wafting through the kitchen is enough to make anyone’s stomach rumble. Crispy Philly Cheesesteak Grilled Wraps are the answer to those cravings. They are easy to make, customizable to your taste, and deliver a satisfying crunch with every bite. But before we dive in, let’s address the elephant in the room… or rather, the question on everyone’s mind: Can we *really* capture the authentic Philly Cheesesteak experience without using certain traditional ingredients? The answer, my friends, is a resounding YES! We’re about to embark on a flavor journey that will have you questioning everything you thought you knew about this iconic sandwich.
Understanding the Anatomy of a Perfect Crispy Philly Cheesesteak Grilled Wrap
Forget the soggy sandwiches of your past. These wraps are all about texture, flavor, and a little bit of culinary wizardry. It’s a symphony of crispy tortilla, juicy beef, melty cheese, and perfectly cooked veggies all harmonizing in one delicious bite. The goal is to build layers of flavor that complement each other, creating a satisfying and craveable meal. The beauty of this recipe lies in its simplicity. You don’t need fancy equipment or Michelin-star skills to create a restaurant-quality dish at home. All you need is a little patience, a love for good food, and this trusty recipe as your guide. We’re creating flavor explosions in every bite.
Selecting Your Star Ingredients for Crispy Philly Cheesesteak Grilled Wraps
The quality of your ingredients will make or break this recipe. Let’s start with the star of the show: the beef. I recommend using thinly sliced ribeye for its rich flavor and tender texture. If ribeye is unavailable, sirloin or flank steak are excellent alternatives. For the cheese, provolone is the classic choice, but feel free to experiment with other melty cheeses like mozzarella or Monterey Jack. The vegetables are just as important. Onions and green peppers are staples, but you can also add mushrooms, roasted red peppers, or even a touch of jalapeno for a spicy kick. Remember, fresh is always best. This will make sure your Crispy Philly Cheesesteak Grilled Wraps reach its maximum flavor.
The Art of Thinly Slicing Your Beef Like a Pro
Achieving that perfect, melt-in-your-mouth texture starts with thinly slicing the beef. The best way to accomplish this is to partially freeze the meat for about 30 minutes before slicing. This firms it up, making it easier to cut into even, thin strips. Use a sharp knife or a meat slicer for the best results. Remember to slice against the grain to maximize tenderness. If you’re short on time, you can often find pre-sliced steak at your local butcher or grocery store. However, slicing it yourself ensures you get the perfect thickness for optimal cooking.
Crafting the Flavor Base for Exceptional Crispy Philly Cheesesteak Grilled Wraps
Now that we’ve got our ingredients prepped, it’s time to build the flavor. The key to a great Philly Cheesesteak is the balance of savory, sweet, and slightly tangy notes. We’ll achieve this by layering flavors throughout the cooking process. This isn’t just about throwing ingredients together; it’s about understanding how they interact and complement each other. Every step, from searing the beef to caramelizing the onions, is designed to enhance the overall taste experience.
Searing the Beef to Perfection for Unmatched Flavor
Searing the beef is crucial for developing that rich, savory flavor we all crave. Heat a large skillet or griddle over high heat until it’s smoking hot. Add a tablespoon of oil (vegetable or canola oil works well) and then add the thinly sliced beef in a single layer. Don’t overcrowd the pan, as this will lower the temperature and prevent proper searing. Sear the beef for about 1-2 minutes per side, until it’s nicely browned. Remove the beef from the pan and set aside.
Caramelizing the Onions and Peppers: A Symphony of Sweetness
Caramelizing the onions and peppers adds a touch of sweetness that balances the savory beef and cheese. In the same skillet, add the sliced onions and peppers. Cook over medium heat, stirring occasionally, until they are soft and slightly caramelized, about 10-15 minutes. If the pan gets too dry, add a splash of broth (beef or vegetable broth works well). This process takes time and patience, but the result is well worth the effort. The sweetness from the onions and peppers will elevate the entire dish.
The Cheese Factor: Choosing the Perfect Melt
Choosing the right cheese is essential for achieving that gooey, melty goodness. Provolone is the classic choice for a Philly Cheesesteak, but feel free to experiment with other options. Mozzarella melts beautifully and adds a mild, creamy flavor. Monterey Jack is another great option, offering a slightly sharper taste. The key is to use a cheese that melts easily and has a good flavor profile. Make sure you have enough to generously cover the beef and vegetables in each wrap.
Assembling Your Crispy Philly Cheesesteak Grilled Wraps with Finesse
Now for the fun part: assembling the wraps! This is where all your hard work comes together. Lay out your tortillas and start layering the ingredients. Don’t overfill the wraps, as this will make them difficult to grill and prone to falling apart. The goal is to create a well-balanced wrap that’s easy to handle and delivers a satisfying bite. Think of it as a culinary construction project; each layer contributes to the overall structure and flavor.
Layering Techniques for Maximum Flavor Distribution
Start with a layer of cheese on the bottom of each tortilla. This will help to glue the wrap together and prevent it from becoming soggy. Next, add the seared beef, followed by the caramelized onions and peppers. Top with another layer of cheese. Make sure the cheese is evenly distributed to ensure every bite is cheesy and delicious. Remember, balance is key. You want each ingredient to shine without overpowering the others.
The Art of the Wrap: Securing Your Culinary Masterpiece
Folding the wrap correctly is essential for preventing leaks and ensuring a crispy, even grilling. Fold in the sides of the tortilla, then fold the bottom up and over the filling. Roll the wrap tightly, tucking in the edges as you go. If you’re having trouble keeping the wrap closed, you can use a toothpick to secure it. However, grilling it properly will usually keep it sealed. Practice makes perfect, so don’t be discouraged if your first few wraps aren’t perfect. You’ll get the hang of it in no time.
Grilling to Golden Perfection: Achieving the Ultimate Crisp
Grilling is the final step in creating your Crispy Philly Cheesesteak Grilled Wraps. This is where the magic happens, transforming the soft tortilla into a crispy, golden-brown delight. You can use a panini press, a grill pan, or even a regular skillet for this step. The key is to apply gentle pressure and cook the wraps until they are heated through and the cheese is melted and bubbly.
Choosing Your Grilling Weapon of Choice
A panini press is ideal for grilling wraps, as it applies even pressure and creates those signature grill marks. If you don’t have a panini press, a grill pan or a regular skillet will work just fine. Heat the pan over medium heat and lightly grease it with oil or butter. Place the wraps in the pan and press down with a spatula or another heavy pan. This helps to flatten the wraps and ensure even cooking.
Achieving the Perfect Golden-Brown Crisp
Cook the wraps for about 3-4 minutes per side, or until they are golden brown and crispy. Keep an eye on them to prevent burning. If the cheese starts to ooze out, that’s a good sign that they’re ready. Remove the wraps from the pan and let them cool slightly before slicing and serving. The crispy texture is the ultimate reward for your hard work.
Serving Suggestions and Creative Pairings
Crispy Philly Cheesesteak Grilled Wraps are delicious on their own, but they can also be paired with a variety of sides and condiments to create a complete meal. Consider serving them with a side of coleslaw, potato salad, or French fries. For dipping, try a classic cheese sauce, ranch dressing, or even a spicy sriracha mayo. The possibilities are endless.
Side Dish Sensations: Completing the Meal
A simple salad with a light vinaigrette is a refreshing counterpoint to the richness of the wraps. Coleslaw adds a creamy, crunchy texture that complements the savory flavors. French fries are always a crowd-pleaser and pair perfectly with the cheesy goodness. Don’t be afraid to get creative and experiment with different side dishes.
Dipping Delights: Adding Extra Zest
A classic cheese sauce elevates the cheesesteak experience to a whole new level. Ranch dressing adds a creamy, tangy flavor that complements the beef and vegetables. Sriracha mayo provides a spicy kick that will awaken your taste buds. Consider offering a variety of dipping sauces to cater to different preferences.
Nutritional Information and Dietary Considerations
This recipe can be adapted to meet various dietary needs and preferences. By using lean beef, whole-wheat tortillas, and plenty of vegetables, you can create a healthy and satisfying meal. Be mindful of portion sizes and adjust the ingredients as needed to fit your specific dietary requirements.
Making it Lighter: Healthier Swaps
Use lean beef or even ground turkey to reduce the fat content. Choose whole-wheat tortillas for added fiber. Load up on vegetables to increase the nutritional value. Use reduced-fat cheese to lower the calorie count. These simple swaps can make a big difference in the overall healthfulness of the dish.
Allergen Awareness: Customizing for Sensitivities
If you have any allergies, be sure to carefully read the labels of all ingredients. You can easily substitute ingredients to accommodate dietary restrictions. For example, use gluten-free tortillas for those with gluten sensitivities. Choose plant-based cheese for those who are lactose intolerant. The beauty of this recipe is its versatility.
I hope you enjoy these Crispy Philly Cheesesteak Grilled Wraps as much as my family and I do! Remember, cooking is all about having fun and experimenting with flavors. So don’t be afraid to put your own spin on this recipe and make it your own. Happy cooking!
Conclusion for Crispy Philly Cheesesteak Grilled Wraps :
These Crispy Philly Cheesesteak Grilled Wraps deliver a playful twist on a beloved classic. The combination of savory beef, melted cheese, and caramelized vegetables nestled within a crispy tortilla creates a satisfying experience. Whether you’re seeking a quick lunch, a fun dinner, or a crowd-pleasing appetizer, these wraps are sure to be a hit. Don’t be afraid to get creative with your cheese and veggie choices! Enjoy the delightful crunch and the explosion of flavors in every single bite of these incredible wraps!
Print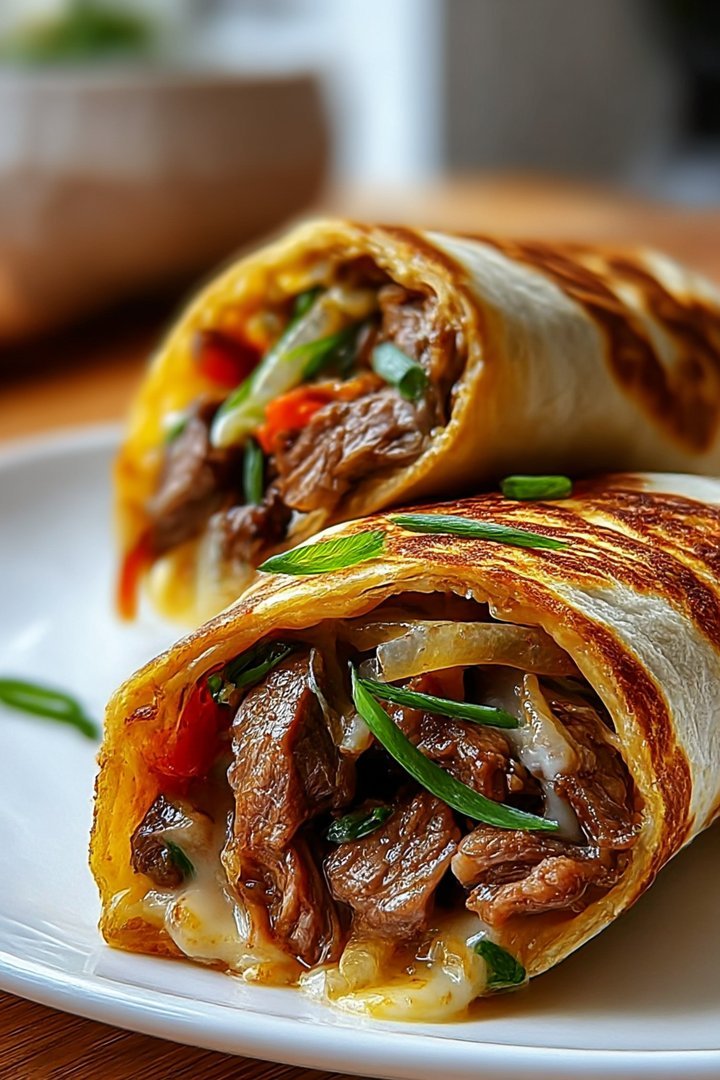
Crispy Philly Cheesesteak Grilled Wraps
Delicious crispy philly cheesesteak grilled wraps recipe with detailed instructions and nutritional information.
- Total Time: 35 minutes
- Yield: 4 servings
Ingredients
- Ribeye steak, thinly sliced: 1 pound
- Onion, thinly sliced: 1 medium
- Green bell pepper, thinly sliced: 1 medium
- Provolone cheese slices: 6-8 slices
- Hoagie rolls or large tortillas: 4
- Olive oil: 2 tablespoons
- Butter: 2 tablespoons
- Garlic powder: 1 teaspoon
Instructions
- Step 1: Heat olive oil in a large skillet or griddle over medium-high heat. Add the sliced onions and bell peppers. Cook until softened and slightly caramelized, about 8-10 minutes. Remove from the skillet and set aside.
- Step 2: Add the thinly sliced steak to the same skillet. Cook, breaking it up with a spatula, until browned and cooked through, about 5-7 minutes. Season with salt, pepper, and garlic powder.
- Step 3: Return the cooked onions and peppers to the skillet with the steak. Mix well and cook for another minute to combine the flavors.
- Step 4: Divide the steak and vegetable mixture into four equal portions in the skillet. Top each portion with provolone cheese slices. Allow the cheese to melt slightly.
- Step 5: While the cheese is melting, spread a thin layer of butter on the outside of each hoagie roll or tortilla.
- Step 6: Carefully transfer each steak and cheese portion to a hoagie roll or tortilla. If using tortillas, fold in the sides and roll up tightly. Grill the wraps in a panini press or in the same skillet (seam-side down if using tortillas) until golden brown and crispy on both sides, about 2-3 minutes per side. Serve immediately.
Notes
- For best flavor, store leftover steak filling separately from the tortillas in airtight containers in the refrigerator.
- To reheat, warm the steak filling in a skillet and crisp the assembled wrap in a dry pan or panini press for the best texture.
- Serve these wraps with a side of your favorite dipping sauce, like a creamy sriracha mayo, for an extra kick.
- Don't overcrowd the skillet when cooking the steak; work in batches to ensure proper browning and avoid steaming the meat.
- Prep Time: 15 minutes
- Cook Time: 20 minutes
- Method: Stovetop
- Cuisine: American
FAQs :
What makes these Crispy Philly Cheesesteak Grilled Wraps so special?
Well, imagine the classic Philly cheesesteak, but amped up! We’re talking thinly sliced, flavorful beef seared to perfection, melty provolone cheese oozing out, and those perfectly sauteed peppers and onions all snuggled inside a crispy, golden-brown tortilla. The grilling process is a game-changer, providing that extra crunch that takes this wrap from ordinary to extraordinary. It’s a delightful handheld meal that’s both satisfying and fun to eat, making it ideal for a quick lunch, a casual dinner, or even a game-day snack!
Can I use different types of cheese for my cheesesteak wraps?
Absolutely! Provolone is a classic choice for a Philly cheesesteak, but don’t let that stop you from experimenting. You can try using mozzarella for a milder, stretchier melt, or even pepper jack for a little kick. Havarti is another great option that melts beautifully and adds a creamy texture. Feel free to mix and match different cheeses to create your own signature blend. Just make sure the cheese you choose melts well for that gooey, cheesy goodness that everyone loves in a Crispy Philly Cheesesteak Grilled Wrap.
What are some good side dishes to serve with these delightful wraps?
These Crispy Philly Cheesesteak Grilled Wraps are fantastic on their own, but a few side dishes can really elevate the meal. A crisp garden salad with a light vinaigrette provides a refreshing contrast to the rich flavors of the wrap. Alternatively, some crispy seasoned fries or sweet potato fries always make a great accompaniment. Coleslaw is another popular choice, offering a tangy and crunchy element. If you’re looking for something lighter, consider a simple cucumber and tomato salad or a side of fruit.
How can I make these Philly-inspired wraps ahead of time?
You can definitely prep some components of these wraps in advance to save time. Slice the beef, chop the vegetables, and even sauté the peppers and onions ahead of time. Store each component separately in airtight containers in the refrigerator. When you’re ready to assemble the wraps, simply reheat the beef and vegetables, assemble the wraps with cheese, and grill them until golden brown and crispy. This makes it easy to whip up a batch of these tasty wraps even on a busy weeknight. Remember, freshly grilled is always best, but prepping ahead is a great time-saver!

Leave a Comment