
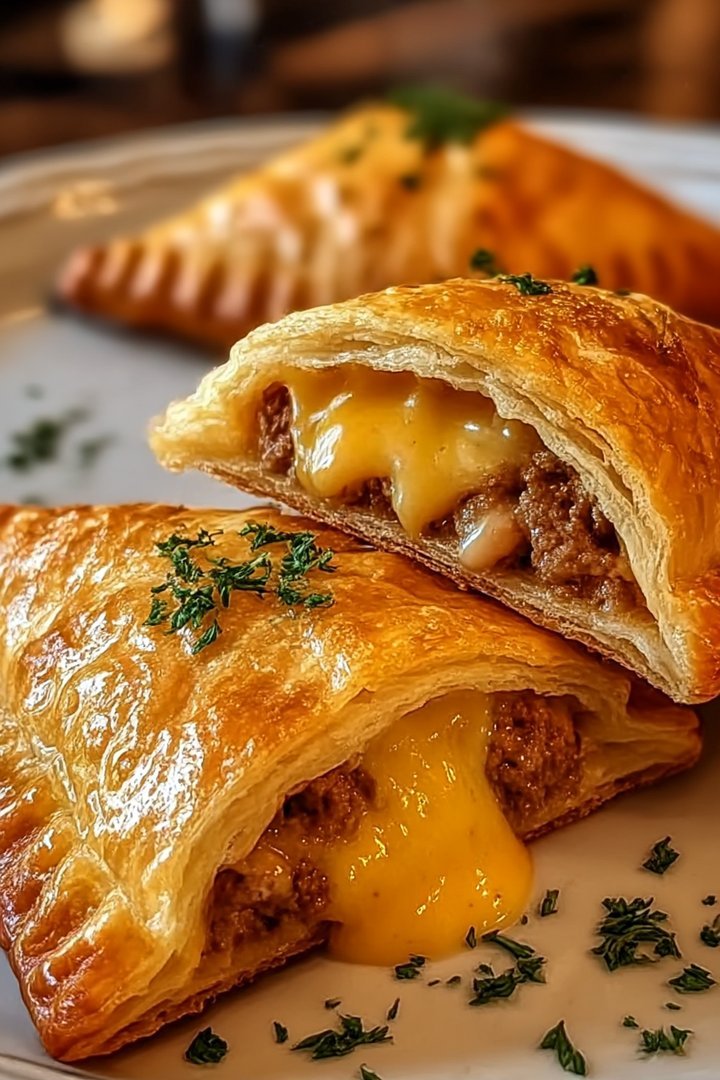
Imagine biting into a warm, golden pocket, the flaky crust giving way to a burst of savory, cheesy, beefy goodness. These Cheeseburger Pockets are like a handheld hug, a comforting taste of your favorite burger, minus the messy bun.
Forget complicated dinners; these pockets are your answer to quick, satisfying meals that bring joy to every bite. The aroma alone is enough to make mouths water, promising a delightful experience. They’re perfect for busy weeknights, potlucks, or even a fun picnic.
Here are a few reasons why you’ll fall in love with these Cheeseburger Pockets:
- Easy to make with simple ingredients and minimal prep time, perfect for a quick weeknight dinner.
- A delicious blend of seasoned ground beef, melted cheese, and flaky crust creates an irresistible flavor combination.
- The golden-brown, perfectly sealed pockets are visually appealing, making them a hit at any gathering.
- Customize with your favorite burger toppings, such as lettuce, tomato, or a tangy sauce, for a personalized touch.
Ingredients for Cheeseburger Pockets
Here’s what you’ll need to make this delicious dish:
The full ingredients list, including measurements, is provided in the recipe card directly below.
How to Make Cheeseburger Pockets
Follow these simple steps to prepare this delicious dish:
Step 1: Prepare the Beef Filling
In a large skillet, brown the ground beef over medium-high heat. Drain any excess grease. Add the diced onion and minced garlic and cook until softened, about 5 minutes.
Step 2: Season the Mixture
Stir in the tomato paste, Dijon mustard, and Worcestershire sauce. Season with salt and pepper to taste. Cook for another 2 minutes to allow the flavors to meld.
Step 3: Assemble the Pockets
Preheat your oven to 375°F (190°C). On a lightly floured surface, unfold the puff pastry sheet. Cut the puff pastry into even squares. Place a spoonful of the beef mixture and a generous amount of shredded cheddar cheese in the center of each square.
Step 4: Seal and Bake
Fold the puff pastry over to form a triangle or rectangle, pressing the edges firmly to seal. You can use a fork to crimp the edges for extra security. Brush the tops with the beaten egg.
Step 5: Bake Until Golden
Place the cheeseburger pockets on a baking sheet lined with parchment paper. Bake for 15-20 minutes, or until the puff pastry is golden brown and the filling is heated through.
Step 6: Serve and Enjoy
Let the cheeseburger pockets cool slightly before serving. These are delicious on their own or with your favorite dipping sauce, like ketchup, mustard, or a tangy burger sauce. Enjoy your homemade Cheeseburger Pockets!
Tips for Perfect Cheeseburger Pockets
Want to take your Cheeseburger Pockets to the next level? Here are some handy tips and tricks to ensure they turn out perfectly every time:
**Choosing the Right Beef: ** Opt for lean ground beef (90/10) to minimize grease. If you’re using a higher fat content beef, make sure to drain the excess fat thoroughly after browning. This will prevent your pockets from becoming soggy.
**Cheese Selection: ** While cheddar is a classic choice, feel free to experiment with other cheeses. Pepper jack will add a spicy kick, while Gruyere provides a nutty, sophisticated flavor. A blend of cheddar and mozzarella works great for a milder, meltier option.
**Puff Pastry Perfection: ** Keep your puff pastry cold until you’re ready to use it. Cold pastry is easier to work with and will result in a flakier crust. If the pastry becomes too soft, pop it back into the fridge for a few minutes to firm up.
**Sealing the Pockets: ** Ensure you seal the edges of the puff pastry pockets tightly to prevent the filling from leaking out during baking. A fork works wonders for crimping the edges and creating a secure seal.
**Egg Wash Alternatives: ** If you’re out of eggs, you can use milk or cream as an egg wash substitute. It won’t give quite the same golden shine, but it will still help the pastry brown nicely.
**Preventing Soggy Bottoms: ** To avoid soggy bottoms, bake your Cheeseburger Pockets on a baking sheet lined with parchment paper. Parchment paper helps to absorb any excess moisture and prevents the pockets from sticking.
**Customizing the Filling: ** Get creative with your fillings! Add diced pickles, sautéed mushrooms, or caramelized onions for extra flavor. A sprinkle of your favorite burger seasoning blend can also elevate the taste.
**Dipping Sauces: ** While Cheeseburger Pockets are delicious on their own, a dipping sauce can take them to the next level. Try ketchup, mustard, burger sauce, or even a creamy sriracha mayo for a spicy twist.
**Make-Ahead Option: ** Prepare the beef filling ahead of time and store it in the refrigerator for up to 2 days. When you’re ready to bake, simply assemble the pockets and pop them in the oven.
**Freezing for Later: ** Cheeseburger Pockets can be frozen for future enjoyment. Assemble the pockets, but don’t bake them. Place them on a baking sheet lined with parchment paper and freeze until solid. Then, transfer them to a freezer bag. When ready to bake, no need to thaw, simply add a few minutes to the baking time.
Cheeseburger Pockets Variations
One of the best things about Cheeseburger Pockets is their versatility. They’re a blank canvas for your culinary creativity! Here are a few exciting variations to try:
**Spicy Jalapeño Popper Pockets: ** Add diced jalapeños and cream cheese to the beef filling for a spicy, creamy twist. Top with a sprinkle of crushed tortilla chips before baking for extra crunch.
**Pizza Pockets: ** Swap out the ground beef for Italian sausage or pepperoni and add pizza sauce and mozzarella cheese. Sprinkle with Italian seasoning for an authentic pizza flavor.
**Philly Cheesesteak Pockets: ** Use thinly sliced beef and sautéed onions and peppers. Add provolone cheese for a classic Philly cheesesteak experience.
**Chicken and Ranch Pockets: ** Substitute ground beef with shredded chicken and mix in ranch dressing and cheddar cheese. Add crumbled bacon bits (or turkey bacon bits) for a smoky flavor.
**Veggie Pockets: ** For a vegetarian option, use plant-based ground meat substitute and load up on veggies like bell peppers, mushrooms, and onions. Add your favorite cheese and seasonings.
**Breakfast Pockets: ** Fill the pockets with scrambled eggs, cheese, and your choice of breakfast meat, such as sausage or turkey bacon. These are perfect for a quick and easy breakfast on the go.
**Dessert Pockets: ** Don’t forget about dessert! Fill puff pastry with fruit pie filling, chocolate chips, or Nutella for a sweet treat. Sprinkle with powdered sugar after baking for an elegant touch.
**Mini Pockets: ** Make mini versions of Cheeseburger Pockets by cutting the puff pastry into smaller squares. These are perfect for appetizers or snacks.
**Mediterranean Pockets: ** Combine ground lamb with Mediterranean spices, feta cheese, and spinach for a flavorful and healthy pocket.
**Taco Pockets: ** Fill the pockets with seasoned ground beef, black beans, corn, and salsa. Top with shredded lettuce and sour cream after baking for a taco-inspired treat.
Serving Suggestions for Cheeseburger Pockets
Cheeseburger Pockets are incredibly versatile and can be served in various ways, making them perfect for any occasion:
**Quick Weeknight Dinner: ** Serve Cheeseburger Pockets with a simple side salad or steamed vegetables for a complete and satisfying meal.
**Game Day Snack: ** These pockets are a crowd-pleaser at game day gatherings. Serve them with an assortment of dipping sauces and watch them disappear!
**Lunchbox Treat: ** Pack Cheeseburger Pockets in a lunchbox for a delicious and portable midday meal. They’re sure to be a hit with kids and adults alike.
**Party Appetizer: ** Mini Cheeseburger Pockets make fantastic party appetizers. Arrange them on a platter with toothpicks for easy grabbing.
**Picnic Fare: ** Take Cheeseburger Pockets on a picnic for a fun and easy-to-eat meal. They’re great cold or at room temperature.
**Comfort Food Night: ** Pair Cheeseburger Pockets with classic comfort food sides like mashed potatoes, mac and cheese, or coleslaw for a cozy and satisfying meal.
**Brunch Addition: ** Add Breakfast Pockets to your brunch spread for a savory and flavorful option.
**Snack Attack: ** Enjoy Cheeseburger Pockets as a quick and easy snack any time of day.
**Potluck Dish: ** Bring Cheeseburger Pockets to your next potluck and impress your friends with this delicious and crowd-pleasing dish.
**Holiday Gathering: ** Include Cheeseburger Pockets in your holiday appetizer spread for a fun and unexpected twist on traditional holiday fare.
No matter how you choose to serve them, Cheeseburger Pockets are sure to be a hit. Their delicious flavor and versatility make them a winner for any occasion.
The History of Cheeseburgers
The history of the cheeseburger is as rich and flavorful as the burger itself. While the exact origin is debated, most accounts point to the 1920s in the United States. One popular story credits Lionel Sternberger, a teenager working at his father’s sandwich shop in Pasadena, California, for inventing the cheeseburger in 1924. He reportedly experimented by adding a slice of American cheese to a hamburger, and the rest, as they say, is history.
However, other claims exist. Some say that the Humpty Dumpty Drive-In in Denver, Colorado, also served a cheeseburger in the 1920s. Regardless of the precise origin, the cheeseburger quickly gained popularity and became a staple in American cuisine.
The addition of cheese transformed the humble hamburger into a more indulgent and satisfying meal. The melted cheese added a creamy, savory element that complemented the beef perfectly. As cheeseburgers gained traction, they appeared on menus across the country, solidifying their place in American food culture.
Over the years, the cheeseburger has evolved and diversified, with countless variations and toppings. From classic cheddar and Swiss to more exotic options like Gruyere and pepper jack, the possibilities are endless. The cheeseburger has also become a symbol of American fast food, with major chains like McDonald’s and Burger King popularizing it worldwide.
Today, the cheeseburger remains one of the most beloved and iconic foods in the world. It’s a versatile and satisfying dish that can be enjoyed in countless ways, from simple backyard barbecues to gourmet restaurants. The cheeseburger’s enduring popularity is a testament to its delicious flavor and its ability to bring people together. And now, with Cheeseburger Pockets, you can enjoy this classic flavor in a fun and portable new way!
Perfecting the Cooking Process
Efficiency is key! Start by browning your ground beef. While that’s happening, prep your veggies and cheese. This streamlined approach ensures everything is ready to assemble your delightful cheeseburger pockets once the beef is cooked and drained.
Add Your Touch
Want to get adventurous? Try different cheeses like provolone or pepper jack. Swap ground beef for ground turkey for a lighter version. A dash of smoky paprika or a sprinkle of garlic powder can really elevate the flavor profile.
Storing & Reheating
Store your cooked cheeseburger pockets in an airtight container in the refrigerator for up to 3 days. Reheat them in the oven at 350°F (175°C) for about 10-15 minutes, or microwave until warmed through. They might get a little softer when reheated, but still delicious!
Here are a few insider tips to ensure your success:
- Don’t overfill the pockets! Too much filling can cause them to burst open during baking, leading to a cheesy, beefy mess (speaking from experience!).
- For extra golden-brown pockets, brush the tops with a little melted butter or olive oil before baking. It adds a lovely color and a subtle richness.
- Let the cheeseburger pockets cool slightly before serving. This allows the cheese to set a bit, preventing molten lava cheese explosions (trust me, it happens!).
(Personal anecdote formated as paragraph subheading)
My niece once declared these “the best things EVER,” which, coming from a notoriously picky eater, felt like winning a Michelin star. It’s a recipe that consistently brings smiles.
Conclusion for Cheeseburger Pockets:
So there you have it, friends! Cheeseburger Pockets: a fun, customizable, and utterly delicious way to get your burger fix without the fuss. These little pockets of flavor are a hit with kids and adults alike. They’re perfect for parties, snacks, or a quick weeknight meal. Get creative with your fillings, experiment with different cheeses, and don’t be afraid to make them your own. Whether you bake them, freeze them, or devour them straight from the oven, one thing is for sure: Cheeseburger Pockets are a guaranteed crowd-pleaser.
Print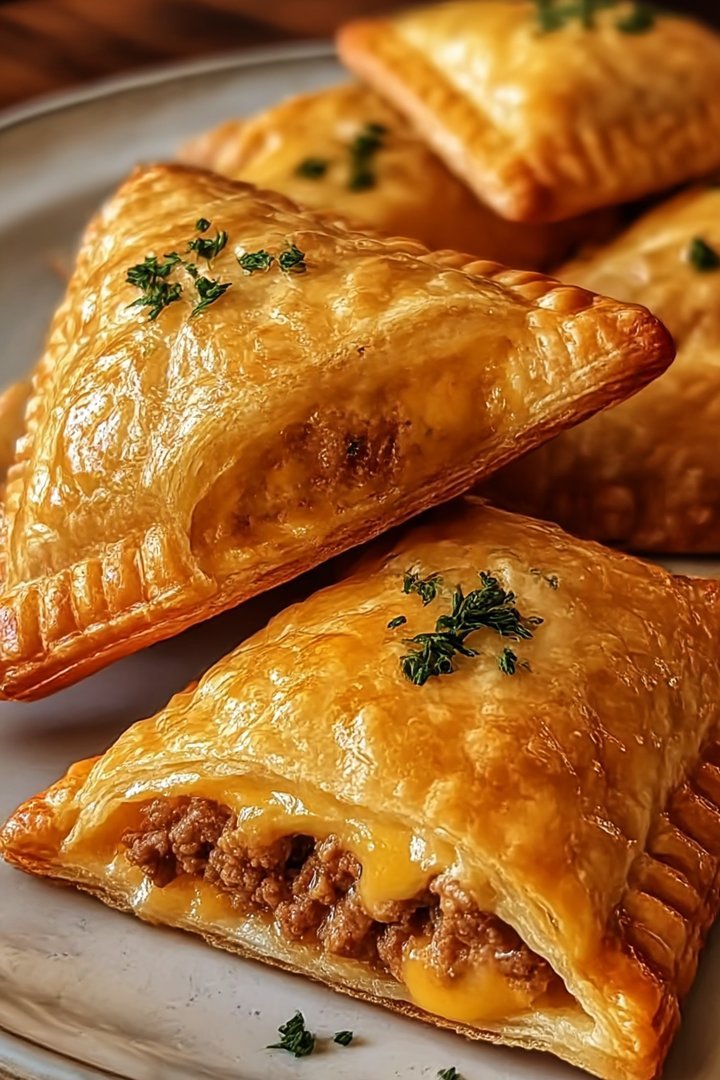
Cheeseburger Pockets
Delicious cheeseburger pockets recipe with detailed instructions and nutritional information.
- Total Time: 35 minutes
- Yield: 4 servings
Ingredients
- Ground beef: 1 pound
- Shredded cheddar cheese: 1 1/2 cups
- Refrigerated crescent roll dough: 1 (8 ounce) can
- Onion: 1/2 medium, finely chopped
- Ketchup: 1/4 cup
- Mustard: 2 tablespoons
- Dill pickle relish: 2 tablespoons
- Garlic powder: 1 teaspoon
Instructions
- Step 1: Preheat oven to 375 degrees F (190 degrees C). Cook ground beef in a skillet over medium heat until browned, breaking it up with a spoon. Drain off any excess grease.
- Step 2: Stir in the chopped onion, ketchup, mustard, pickle relish, and garlic powder into the cooked ground beef. Mix well and cook for another 2-3 minutes.
- Step 3: Unroll the crescent roll dough and separate it into 8 triangles.
- Step 4: Spoon a generous amount of the ground beef mixture onto the center of each crescent roll triangle. Top with shredded cheddar cheese.
- Step 5: Fold the corners of the dough over the filling to form a pocket, pinching the seams to seal.
- Step 6: Bake in the preheated oven for 12-15 minutes, or until the pockets are golden brown. Let cool slightly before serving.
Notes
- Store cooled cheeseburger pockets in an airtight container in the refrigerator for up to 3 days.
- For best results, reheat cheeseburger pockets in a 350°F (175°C) oven until warmed through to maintain a crispy crust.
- Serve these pockets with a side of your favorite burger toppings, like lettuce and tomato, for a customizable meal.
- To prevent soggy pockets, ensure the beef mixture is well-drained and slightly cooled before filling the crescent dough.
- Prep Time: 15 minutes
- Cook Time: 20 minutes
- Method: Stovetop
- Cuisine: American
FAQs:
Can I freeze these Cheeseburger Pockets?
Absolutely! You can totally freeze these little pockets of joy. After baking, let them cool completely. Then, wrap each one individually in plastic wrap, followed by foil, or place them in a freezer-safe bag. They’ll happily hang out in the freezer for up to 2 months. When you’re ready to devour, just thaw them in the fridge overnight and reheat them in the oven or microwave. It’s a fantastic way to meal prep or have a quick snack ready whenever a cheeseburger craving hits.
What kind of cheese works best in Cheeseburger Pockets?
Ah, the cheese question! Honestly, the sky’s the limit. But, if you’re looking for a classic cheeseburger experience, cheddar or a cheddar blend is always a winner. For something a little meltier and creamier, Monterey Jack or provolone are excellent choices. And if you’re feeling adventurous, pepper jack will give it a delightful kick! Just avoid any pre-shredded cheeses with cellulose, as those don’t melt quite as smoothly. Ultimately, it depends on your cheese preference and how melty you like your cheeseburgers.
What can I serve with Cheeseburger Pockets?
These pockets are basically a party in your hands, but they love having friends. Classic sides like crispy fries, sweet potato fries, or a fresh coleslaw are always welcome. For something lighter, a simple green salad or a vibrant fruit salad can provide a nice contrast. And if you’re feeling fancy, how about some homemade onion rings? Honestly, anything goes! Think of what you would normally enjoy with a regular cheeseburger, and you’ve got your answer. They’re also pretty great on their own!
How can I make these Cheeseburger Pockets healthier?
Want to indulge without the guilt? No problem! Use lean ground turkey or ground chicken instead of ground beef. Whole wheat dough or even cauliflower dough can replace the regular dough. Load up on the veggies! Adding finely chopped spinach, bell peppers, or mushrooms to the filling not only boosts the nutritional value but also adds extra flavor and texture. And remember, portion control is key. These small changes can make a big difference.


Leave a Comment