
Imagine biting into a sphere of pure bliss, a delightful concoction where the rich, comforting crunch of cookies meets a velvety smooth cream cheese embrace. That’s the magic of Oreo Balls, a simple treat that delivers an explosion of flavor in every single bite!
These little bites of happiness are perfect for parties, holidays, or just a sneaky afternoon indulgence when you need a little pick-me-up. They are incredibly easy to make and even easier to devour. Seriously, try to eat just one – I dare you!
Here are the reasons why you will absolutely adore this recipe:
- Effortlessly crafted with minimal ingredients and no baking required, making it the perfect last-minute treat.
- The intense chocolate cookie flavor is perfectly balanced by the creamy, tangy cheesecake filling, creating an irresistible combination.
- Visually appealing with its dark chocolate exterior and customizable decorations, these treats are sure to impress at any gathering.
- Adaptable to various dietary needs and creative twists, making them ideal for experimenting with different flavors and coatings.
Ingredients for Oreo Balls
Here’s what you’ll need to make this delicious dish:
The full ingredients list, including measurements, is provided in the recipe card directly below.
How to Make Oreo Balls
Follow these simple steps to prepare this delicious dish:
Step 1: Crush the Cookies
Place the entire package of Oreo cookies into a food processor and pulse until they are finely crushed into crumbs. If you don’t have a food processor, you can place the cookies in a resealable bag and crush them with a rolling pin.
Step 2: Mix the Filling
In a large mixing bowl, beat the softened cream cheese with an electric mixer until smooth and creamy. Add the crushed Oreo crumbs to the cream cheese and mix until well combined. The mixture should form a dough-like consistency.
Step 3: Roll into Balls
Using a tablespoon or a small cookie scoop, roll the mixture into 1-inch balls. Place the balls on a baking sheet lined with parchment paper. This prevents sticking and makes cleanup easier.
Step 4: Chill
Place the baking sheet in the freezer for at least 30 minutes. This helps the Oreo balls firm up and makes them easier to dip in the melted chocolate.
Step 5: Melt the Chocolate
In a heat-safe bowl set over a saucepan of simmering water (double boiler method), combine the chocolate chips and vegetable shortening. Stir constantly until the chocolate is completely melted and smooth. Alternatively, you can melt the chocolate in the microwave in 30-second intervals, stirring in between, until melted.
Step 6: Dip and Decorate
Remove the Oreo balls from the freezer. Dip each ball into the melted chocolate, ensuring it is fully coated. Use a fork or dipping tools to lift the coated ball and gently tap off any excess chocolate. Place the dipped balls back on the parchment-lined baking sheet. Immediately sprinkle with your favorite sprinkles, if desired.
Transfer to the refrigerator for at least 15-20 minutes to allow the chocolate to fully set. Once the chocolate is firm, transfer the Oreo balls to a serving platter and enjoy!
Perfecting the Cooking Process

To ensure the most delightful outcome, start by chilling the cream cheese. This helps with the mixing consistency. Then, finely crush your Oreos before combining. Coat the **Oreo Balls** after they are fully chilled for easier handling.
Add Your Touch
Feel free to experiment with different Oreo flavors! Consider adding a dash of vanilla extract to the cream cheese mixture for extra flavor. You can also roll the finished **Oreo Balls** in sprinkles, cocoa powder, or chopped nuts for a festive look.
Storing & Reheating
Store your **Oreo Balls** in an airtight container in the refrigerator. They are best enjoyed cold. There’s no need to reheat them; simply grab one straight from the fridge for a sweet treat! They’ll last for about a week, if they aren’t devoured first!
Helpful Tips for Perfect Oreo Balls:
- Ensure the cream cheese is softened to room temperature for smoother mixing and a lump-free filling for your **Oreo Balls**.
- Use a food processor to crush the Oreos for a uniformly fine texture, which helps the **Oreo Balls** hold their shape better.
- Chill the **Oreo Balls** for at least 30 minutes before dipping to prevent them from crumbling and to help the coating adhere better.
(Personal anecdote formated as paragraph subheading)
I remember making these for a friend’s birthday, and they were gone in minutes! Everyone loved the simple, sweet treat. One friend even asked for the recipe on the spot!
The Curious Case of the Missing Oreos
Okay, let’s talk about **Oreo Balls**. I know, I know, they sound almost *too* simple, right? Just a few ingredients, a little rolling action, and BAM! You’ve got yourself a bite-sized piece of happiness. But trust me, these little guys are more than the sum of their parts. They’re like tiny ambassadors of joy, perfect for parties, potlucks, or just a “treat yourself” kind of day. And let’s be honest, we all deserve more of those days.
Now, I’m not going to lie. The first time I heard about **Oreo Balls**, I was skeptical. I mean, Oreos are already pretty perfect on their own. Why mess with a good thing? But then I saw them at a bake sale, all cute and neatly arranged on a plate, and I couldn’t resist. One bite, and I was hooked. The creamy, chocolatey goodness was an instant mood booster. And that’s when I knew I had to learn how to make them myself.
Gathering Your Arsenal: Ingredients You’ll Need
So, what do you need to embark on this **Oreo Balls** adventure? Fear not, my friend, the list is short and sweet:
- One package of your favorite Oreos (the classic kind works best, but feel free to get wild with the flavors!)
- Eight ounces of cream cheese, softened (this is crucial! Nobody wants lumpy **Oreo Balls**.)
- Chocolate for melting (milk, dark, white – whatever floats your boat!)
- Optional toppings: sprinkles, chopped nuts, coconut flakes, sea salt (because everything’s better with a little salt, right?)
That’s it! Seriously. You probably already have most of these ingredients in your pantry. Now, let’s get to the fun part: making these delectable **Oreo Balls**!
The Great Oreo Crush: Preparation is Key
First things first, we need to crush those Oreos. Now, you can do this the old-fashioned way, by putting them in a zip-top bag and whacking them with a rolling pin. It’s a great stress reliever, I must admit. But if you’re feeling fancy (or lazy, no judgment), a food processor will do the job in seconds. Just pulse until you have fine crumbs.
Once the Oreos are crushed, combine them with the softened cream cheese in a bowl. Mix well until everything is evenly combined. This is where you might need to get your hands dirty (literally!). Just make sure everything mixes properly.
Rollin’, Rollin’, Rollin’: Shaping Your Oreo Balls
Now comes the fun part: rolling the **Oreo Balls**. Grab a spoonful of the Oreo-cream cheese mixture and roll it into a ball, about an inch in diameter. Place the balls on a baking sheet lined with parchment paper. This prevents sticking and makes cleanup a breeze.
Once all the **Oreo Balls** are rolled, pop them into the freezer for about 30 minutes. This will help them firm up and make them easier to dip in chocolate. Trust me, this step is important. Nobody wants melty, misshapen **Oreo Balls**.
Chocolate Nirvana: Dipping and Decorating
While the **Oreo Balls** are chilling, melt your chocolate. You can do this in a double boiler or in the microwave, in 30-second intervals, stirring in between. Be careful not to overheat the chocolate, or it will seize up and become unusable.
Once the chocolate is melted and smooth, it’s time to dip those **Oreo Balls**. Use a fork or dipping tool to carefully coat each ball in chocolate. Let the excess chocolate drip off, then place the dipped **Oreo Balls** back on the parchment-lined baking sheet.
Now, here’s where you can get creative! Sprinkle the **Oreo Balls** with your favorite toppings while the chocolate is still wet. Sprinkles, chopped nuts, coconut flakes, sea salt – the possibilities are endless!
Once the **Oreo Balls** are decorated, put them back in the freezer for another 15-20 minutes to allow the chocolate to set completely. Then, they’re ready to be devoured!
Flavor Adventures: Variations on a Theme
The beauty of **Oreo Balls** is that they are incredibly versatile. You can easily customize them to suit your taste. Here are a few ideas to get you started:
- Peanut Butter **Oreo Balls**: Add a spoonful of peanut butter to the cream cheese mixture for a delicious peanut butter twist.
- Mint Chocolate **Oreo Balls**: Use mint-flavored Oreos and add a few drops of peppermint extract to the cream cheese mixture.
- Cookies and Cream **Oreo Balls**: Use white chocolate for dipping and sprinkle with crushed Oreos for a double dose of Oreo goodness.
- Birthday Cake **Oreo Balls**: Use birthday cake-flavored Oreos and dip in white chocolate, then sprinkle with colorful sprinkles.
Troubleshooting Tips: Avoiding Oreo Ball Disasters
Even though **Oreo Balls** are easy to make, there are a few things that can go wrong. Here are some common problems and how to fix them:
- **Problem:** The **Oreo Balls** are too soft and fall apart.
- **Solution:** Make sure the cream cheese is softened, but not melted. Also, chill the **Oreo Balls** in the freezer for longer before dipping.
- **Problem:** The chocolate is seizing up and becoming grainy.
- **Solution:** Be careful not to overheat the chocolate. Melt it in 30-second intervals in the microwave, stirring in between. You can also add a tablespoon of vegetable shortening to the chocolate to help it melt smoothly.
- **Problem:** The toppings are not sticking to the chocolate.
- **Solution:** Make sure the chocolate is still wet when you sprinkle on the toppings. If the chocolate has already set, you can lightly re-melt it with a hairdryer.
The Final Verdict: Oreo Balls are Always a Good Idea
So, there you have it: everything you need to know to make the perfect **Oreo Balls**. They’re easy, delicious, and endlessly customizable. Whether you’re making them for a party, a potluck, or just a quiet night in, **Oreo Balls** are always a good idea.
And who knows, maybe you’ll even start a new **Oreo Balls** obsession, like I did. Just be warned: they’re highly addictive!
Beyond the Ball: Creative Uses for Oreo Crumbs
Okay, so you’ve made your **Oreo Balls** and you have some leftover Oreo crumbs. Don’t throw them away! These precious crumbs are like gold in the baking world. Here are some creative ways to use them:
- **Oreo Crust:** Use Oreo crumbs as a base for pies, cheesecakes, or tarts. Just mix them with melted butter and press into the bottom of a pan.
- **Oreo Milkshake:** Add a spoonful of Oreo crumbs to your favorite milkshake recipe for a cookies and cream twist.
- **Oreo Ice Cream Topping:** Sprinkle Oreo crumbs on top of ice cream for a crunchy, chocolatey topping.
- **Oreo Parfait:** Layer Oreo crumbs with whipped cream and pudding for a decadent dessert parfait.
The possibilities are endless! So get creative and let your inner baker shine!
The History of Oreos: A Sweet Story
Did you know that Oreos have been around for over 100 years? They were first introduced in 1912 by Nabisco and quickly became one of the most popular cookies in the world. And while the recipe has changed slightly over the years, the basic concept has remained the same: two chocolate wafers with a sweet cream filling. It’s a classic for a reason! And now you can turn that classic into delicious **Oreo Balls**!
Conclusion for Oreo Balls :
These Oreo Balls are the ultimate no-bake treat that’s as simple to make as they are fun to eat. With just a few ingredients, you can create a dessert sensation that will impress your friends, delight your family, and satisfy your sweet tooth. Whether you stick to the classic recipe or get adventurous with different flavors and coatings, these little spheres of joy are sure to be a hit. So, get in the kitchen, get rolling, and prepare to be amazed by how easily you can create these delectable treats.
Print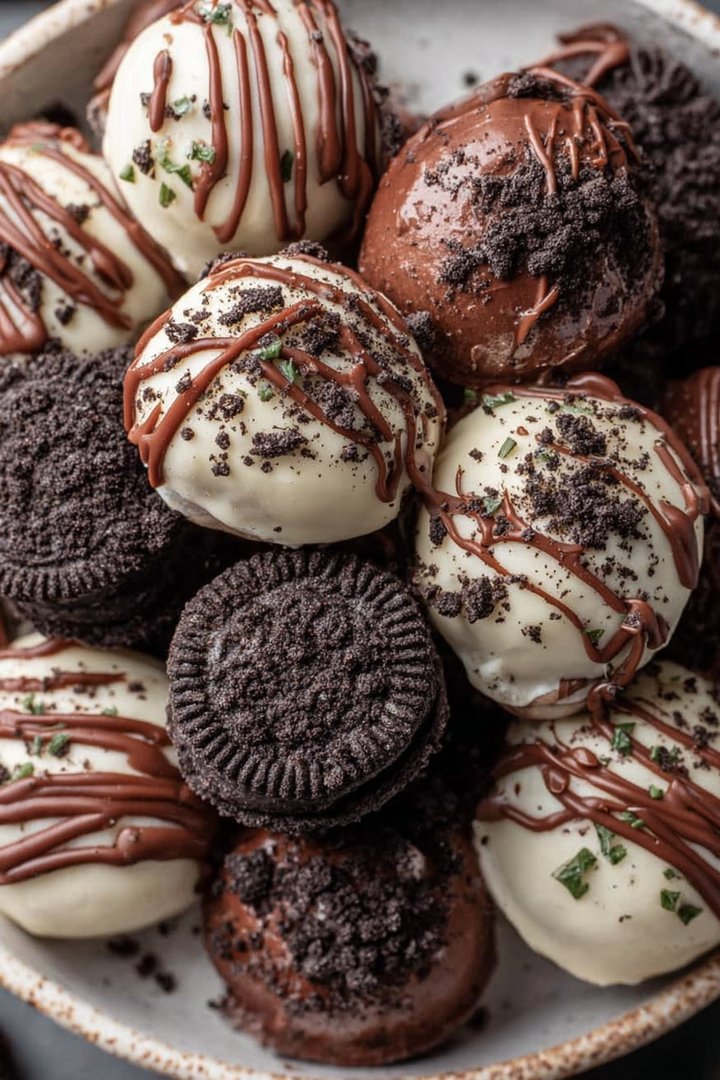
Oreo Balls
Delicious oreo balls recipe with detailed instructions and nutritional information.
- Total Time: 35 minutes
- Yield: 4 servings 1x
Ingredients
- 1 package (14.3 ounces) Oreo cookies
- 8 ounces cream cheese, softened
- 12 ounces semi-sweet chocolate chips
- 1 tablespoon vegetable shortening
- Sprinkles (optional)
- Candy Melts (optional)
- White Chocolate Chips (optional)
Instructions
- Step 1: Crush the Oreo cookies into fine crumbs. You can use a food processor or place them in a resealable bag and crush them with a rolling pin.
- Step 2: In a large bowl, combine the crushed Oreo crumbs and softened cream cheese. Mix until well combined and a dough-like consistency is achieved.
- Step 3: Roll the Oreo mixture into 1-inch balls. Place the Oreo balls on a baking sheet lined with parchment paper.
- Step 4: Place the baking sheet with the Oreo balls in the freezer for at least 30 minutes to firm up.
- Step 5: While the Oreo balls are chilling, melt the semi-sweet chocolate chips and vegetable shortening in a microwave-safe bowl in 30-second intervals, stirring in between, until smooth.
- Step 6: Remove the Oreo balls from the freezer and dip them in the melted chocolate, coating them completely. Place them back on the parchment paper-lined baking sheet. Add sprinkles or drizzle with melted candy melts immediately after dipping, if desired.
Notes
- Store Oreo balls in an airtight container in the refrigerator for up to a week to keep them fresh and firm.
- These are best served chilled or at room temperature; no reheating is necessary!
- Garnish your Oreo balls with a sprinkle of sea salt after dipping for a sweet and salty flavor boost.
- For easier dipping, make sure your Oreo balls are thoroughly chilled before coating in melted chocolate.
- Prep Time: 15 minutes
- Cook Time: 20 minutes
- Method: Stovetop
- Cuisine: American
FAQs :
What makes this Oreo Balls recipe so irresistible?
Oh, let me tell you! It’s the sheer simplicity combined with the “Oh my goodness, these are amazing!” factor. Imagine: crunchy Oreo cookies mingling with creamy goodness, all rolled into a delightful little sphere. They’re perfect for parties, potlucks, or those moments when you need a little something sweet. Plus, they require absolutely no baking, which makes them ideal for warm weather or when you’re feeling a bit lazy in the kitchen. They’re so easy; even I, with my sometimes-questionable cooking skills, can whip them up without setting off the smoke alarm!
Can I customize these Oreo Balls with different flavors?
Absolutely, you creative culinary genius! The beauty of these treats is their versatility. Want a minty kick? Use mint Oreos! Craving some peanut butter action? Add a spoonful or two of peanut butter to the cream cheese mixture. Feeling extra fancy? Drizzle them with white chocolate instead of milk chocolate. The possibilities are as endless as your imagination (and the flavors of Oreos available). So, go wild, experiment, and create your signature Oreo Ball flavor sensation.
How long do Oreo Balls last, and what’s the best way to store them?
If these little gems last more than a day in your house, I salute your willpower. But, theoretically, they can last in the fridge for up to a week. To keep them at their best, store them in an airtight container. This prevents them from drying out or absorbing any rogue refrigerator odors (because nobody wants garlic-flavored Oreo Balls, trust me). If you’re planning on making them in advance, they also freeze well. Just thaw them in the fridge before serving.
What can I use instead of melted chocolate for coating the Oreo Balls?
Okay, so maybe melted chocolate isn’t your jam. No problem! You can use melted candy melts in various colors for a festive look. Or, for a healthier option, try rolling the balls in cocoa powder, powdered sugar, or finely chopped nuts. If you are feeling adventurous, you can also drizzle a simple glaze made from powdered sugar and milk. Get creative and make them your own! These are basically blank canvases for your dessert masterpieces.

Leave a Comment