

Imagine sinking your spoon into a cool, creamy cheesecake, so smooth it practically melts on your tongue. A symphony of sweet and tangy flavors explodes in your mouth, a perfect ending to any day. This isn’t some complicated, hours-long project; this is No-Bake Cheesecake Perfects: A Sweet Symphony of Simplicity.
My aunt Millie, bless her cotton socks, always made the most incredible cheesecakes. The secret? She swore it was love, but I suspect it was also her masterful ability to craft desserts without breaking a sweat. This recipe is my tribute to her, a simplified version of her legendary no-bake creation, perfect for even the most kitchen-challenged among us.
This recipe is unbelievably easy to prepare, boasting a rich, creamy texture that will blow you away. Its visually stunning presentation makes it perfect for any occasion, and it’s surprisingly versatile, adaptable to various flavor combinations. You’ll absolutely impress your friends and family.
Ingredients for No-Bake Cheesecake Perfects: A Sweet Symphony of Simplicity
Here’s what you’ll need to make this delicious dish:
The full ingredients list, including measurements, is provided in the recipe card directly below.
How to Make No-Bake Cheesecake Perfects: A Sweet Symphony of Simplicity
Follow these simple steps to prepare this delicious dish:
Step 1: Prepare the Crust
Combine the crushed graham crackers and vegan butter in a bowl. Press this mixture firmly into the bottom of a springform pan. Refrigerate while you prepare the filling. This step is crucial for a sturdy and delicious crust.
Step 2: Make the Cheesecake Filling
In a separate bowl, beat together the vegan cream cheese and sugar until smooth and creamy. Beat in the lemon juice and vanilla extract until well combined. Slowly incorporate the agar-agar powder, ensuring no lumps remain. A whisk and elbow grease will be your best friends here.
Step 3: Incorporate the Cream
Gradually add the vegan heavy cream to the mixture, beating until smooth and fluffy. You’re aiming for that perfect light-as-air texture. If you over-beat it, it might become too airy, but that also adds to the experience.
Step 4: Set the Cheesecake
Pour the cheesecake filling over the prepared crust and smooth the top with a spatula. Cover the pan tightly with plastic wrap and refrigerate for at least 4 hours, or preferably overnight, to allow the cheesecake to set properly. Patience is a virtue, especially when it comes to cheesecakes.
Step 5: Add the finishing touches
Once the cheesecake is set, carefully release it from the springform pan. Decorate as desired with your chosen toppings, adding some artistic flair to your culinary masterpiece. Don’t underestimate the power of presentation!
Step 6: Serve and Enjoy
Slice and serve this delightful treat. The perfect ending to any meal, or a delightful standalone snack. Enjoy every creamy, tangy bite!
Recipe Card for No-Bake Cheesecake Perfects: A Sweet Symphony of Simplicity
(Insert recipe card here with precise measurements and any additional notes)
Tips and Tricks for No-Bake Cheesecake Success
Using a food processor to crush the graham crackers ensures a uniform consistency for the crust. Don’t skimp on the refrigeration time – a properly set cheesecake is a happy cheesecake. Get creative with your toppings! Fresh berries, chocolate shavings, or a simple dusting of powdered sugar all work beautifully. And most importantly, have fun! Baking (or in this case, no-baking) should always be an enjoyable experience.
Perfecting the Cooking Process
Prepare the crust first, ensuring it’s completely chilled before adding the filling. Then, whip the filling until smooth and creamy. Finally, gently pour the filling over the chilled crust and refrigerate for at least four hours to set.
Add Your Touch
Experiment with different berries for a vibrant color and flavor twist. Add a sprinkle of cinnamon or nutmeg for warmth. Consider using different types of crust for varied textures.
Storing & Reheating
Store leftover cheesecake in an airtight container in the refrigerator for up to three days. To serve, let it sit at room temperature for about 15-20 minutes to soften slightly. Reheating is generally not recommended, as it can alter the texture.
Use a food processor to create the perfect smooth and crumbly crust base. This eliminates large crumbs and ensures even baking.
Chill the crust thoroughly before adding the filling. This prevents the crust from becoming soggy and ensures a clean separation between the layers.
Don’t over-whip the filling, or you’ll end up with an airy cheesecake that doesn’t set properly. Aim for smooth and creamy consistency.
My first attempt at this No-Bake Cheesecake was a disaster! The crust crumbled; the filling curdled. But I learned, practiced, and finally created this perfect version!
No-Bake Cheesecake Perfects
: A Sweet Symphony of Simplicity
This recipe is my ode to simplicity, a testament to the fact that sometimes, less is truly more. Forget the fussy techniques and complicated processes. This No-Bake Cheesecake Perfects recipe is your gateway to creamy, dreamy dessert heaven, and it couldn’t be easier. I dare you to try it; you’ll be amazed.
The Dreamy Crust
This recipe starts with a deliciously buttery crust. Forget the pre-made stuff; we’re making it from scratch. The perfect base requires only simple ingredients: graham crackers, a touch of sugar, and a little melted vegan butter. Instead of butter, I use a high quality coconut oil, giving a subtle hint of sweetness. I then pulse this mixture in a food processor until it forms coarse crumbs, a crucial step for a nice, even texture. This is not just a crust; it’s the foundation of our dessert masterpiece. Press this into the bottom of a springform pan, ensuring an even layer to prevent any uneven settling of the cream cheese filling.
The Heavenly Filling
Now, the star of the show: the filling. We’re talking creamy, dreamy perfection. No baking required, just cold creamy bliss! This luscious filling is made with vegan cream cheese, sweetened condensed coconut milk, and a touch of vanilla extract. This simple combination delivers a decadently rich flavor, making it the perfect contrast for the subtle graham cracker crust. The sweetened condensed coconut milk is key; it adds sweetness and a wonderful thickness, creating that signature smooth cheesecake texture that everyone craves. You whisk together these ingredients, carefully folding the mixture until it’s smooth and well incorporated. Resist the urge to over-whip; just smooth and consistent is perfect.
The Sweetest Finishing Touches
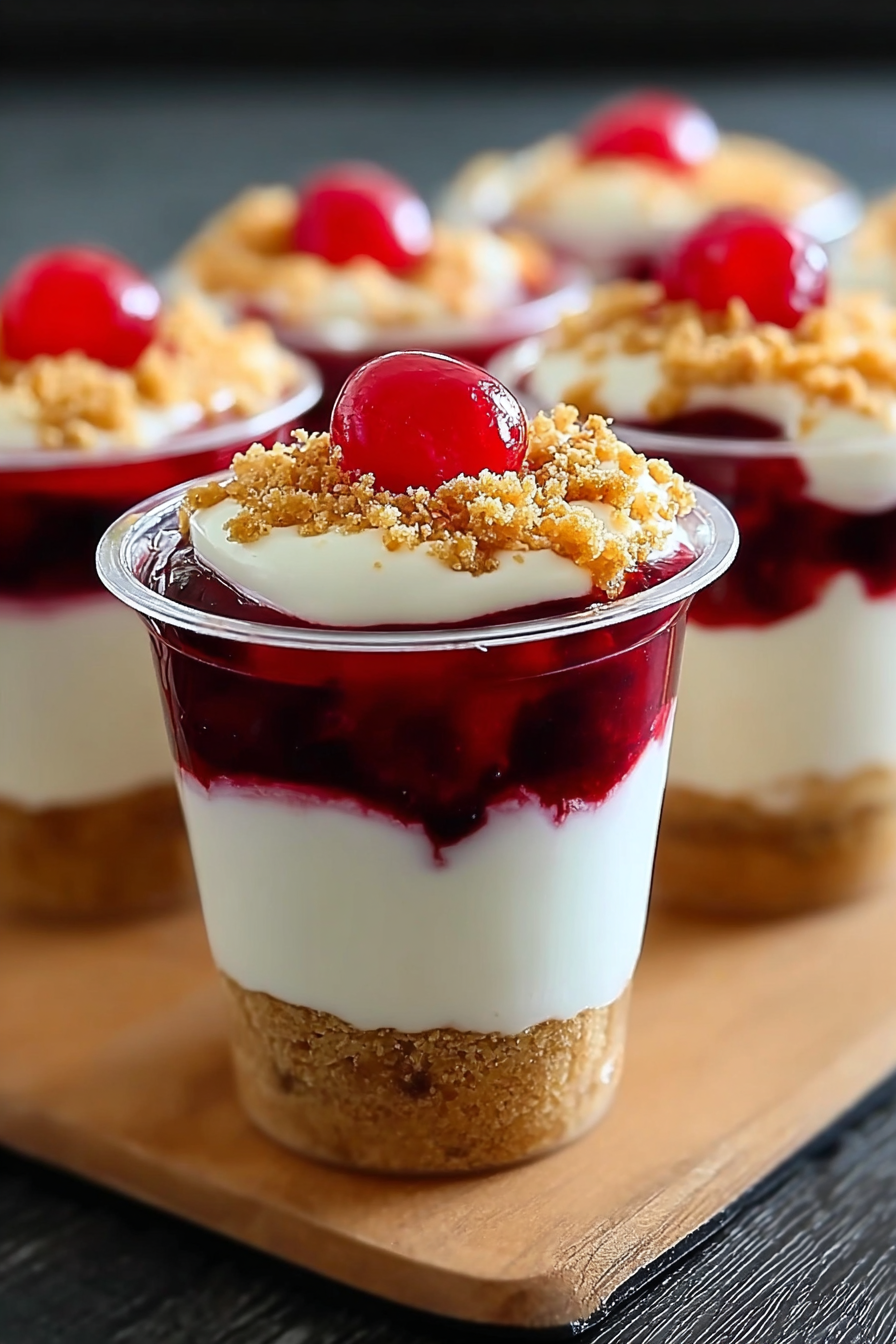
Now for the fun part. Before we tuck this No-Bake Cheesecake into the fridge to set, let’s add a little flair. A generous topping of your favorite berries creates a visually stunning finish, while simultaneously providing a burst of fresh flavor that cuts through the richness of the cream cheese. Fresh raspberries, blueberries, and strawberries are my personal picks, but feel free to experiment with whatever strikes your fancy. The contrasting colors and textures elevate this dessert to a whole new level, adding a sweet symphony of simplicity.
The Grand Finale
: Refrigeration
Once the filling is gently poured over the chilled crust and topped with the berries, it’s time for a little patience. Refrigerate the cheesecake for at least four hours, preferably overnight. This chilling process allows the filling to set properly, resulting in a firm and stable cheesecake. Trust me; the wait is worth it! This ensures you achieve the perfect, creamy consistency. Think of it as the final crescendo in our sweet symphony.
No-Bake Cheesecake Perfects
: A Recipe for Success
This recipe is more than just a set of instructions; it’s an invitation to create a dessert masterpiece without the fuss. The key is to take your time, follow the steps carefully, and most importantly, enjoy the process. It’s about creating something delicious while also having fun. This No-Bake Cheesecake Perfects recipe is your passport to dessert success, a journey filled with creamy textures, sweet flavors, and unforgettable moments. So, gather your ingredients, put on some music, and get ready to create a dessert that will leave everyone wanting more!
No-Bake Cheesecake Perfects
: Frequently Asked Questions
Q: Can I use a different type of crust?
A: Absolutely! Feel free to experiment with different crust options, such as chocolate graham crackers or even a digestive biscuit crust.
Q: How long does this cheesecake last in the refrigerator?
A: Store your No-Bake Cheesecake Perfects in an airtight container in the refrigerator for up to 3 days for optimal flavor and texture.
Q: Can I freeze this cheesecake?
A: Freezing this No-Bake Cheesecake isn’t recommended, as it can affect the texture of the filling and potentially result in an icy consistency. It’s best enjoyed fresh from the refrigerator.
Conclusion for No-Bake Cheesecake Perfects: A Sweet Symphony of Simplicity
This No-Bake Cheesecake Perfects recipe is a delightful blend of simplicity and deliciousness. Its easy-to-follow instructions and readily available ingredients make it perfect for both novice and experienced bakers. The creamy filling and satisfying crust create a delightful treat, proving that amazing desserts don’t require hours of baking. So ditch the oven, gather your ingredients, and get ready to experience the joy of creating a truly perfect, no-bake cheesecake. Enjoy!
Print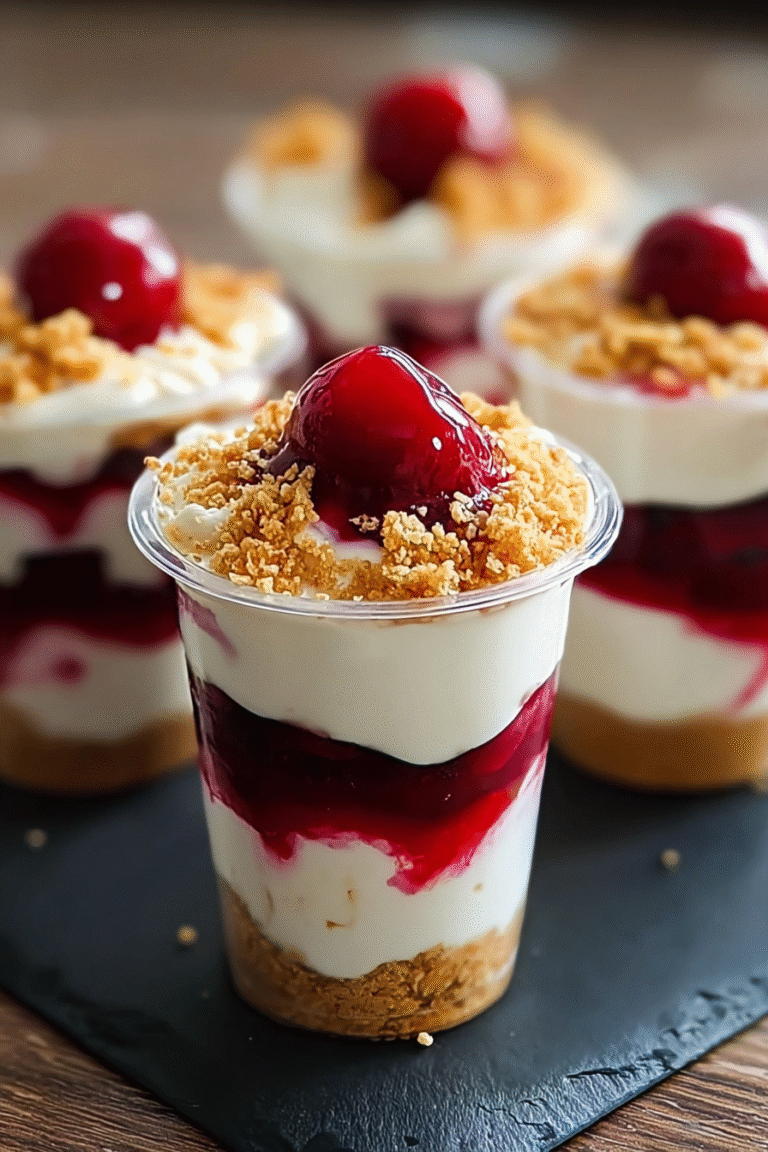
No-Bake Cheesecake Perfects: A Sweet Symphony of Simplicity
Delicious no-bake cheesecake perfects: a sweet symphony of simplicity recipe with detailed instructions and nutritional information.
- Total Time: 35 minutes
- Yield: 4 servings 1x
Ingredients
- 1 ½ cups graham cracker crumbs
- ¼ cup granulated sugar
- 6 tablespoons (3 ounces) unsalted butter, melted
- 16 ounces cream cheese, softened
- 1 cup powdered sugar
- 1 teaspoon vanilla extract
- 1 cup heavy cream, cold
- ½ cup strawberry preserves (or your preferred fruit topping)
Instructions
- Step 1: Prepare the crust: In a medium bowl, combine graham cracker crumbs, granulated sugar, and melted butter. Mix well until evenly moistened. Press the mixture firmly into the bottom of a 9-inch springform pan. Refrigerate for at least 30 minutes to firm up.
- Step 2: Make the cheesecake filling: In a large bowl, beat the softened cream cheese with an electric mixer until smooth and creamy. Gradually add the powdered sugar, beating until well combined. Stir in the vanilla extract.
- Step 3: Whip the cream: In a separate bowl, beat the cold heavy cream with an electric mixer until stiff peaks form. Gently fold the whipped cream into the cream cheese mixture until just combined. Be careful not to overmix.
- Step 4: Assemble the cheesecake: Pour the cream cheese mixture over the chilled graham cracker crust. Spread evenly and smooth the top.
- Step 5: Refrigerate and top: Refrigerate the cheesecake for at least 4 hours, or preferably overnight, to allow it to set completely. Before serving, top with your desired fruit topping (e.g., strawberry preserves, blueberry sauce, etc.)
Notes
- Store leftover cheesecake in the refrigerator for up to 3 days, covered tightly with plastic wrap to prevent it from drying out.
- For a slightly softer texture, let the cheesecake sit at room temperature for 15-20 minutes before serving. Avoid reheating it, as this can affect the creamy consistency.
- Serve chilled slices garnished with fresh mint leaves and a drizzle of additional fruit preserves for an elegant touch.
- To ensure a perfectly smooth cheesecake, make sure your cream cheese is thoroughly softened to room temperature before beating; this prevents lumps.
- Prep Time: 15 minutes
- Cook Time: 20 minutes
- Method: Stovetop
- Cuisine: American
FAQs
Can I make this No-Bake Cheesecake Perfects ahead of time?
Absolutely! In fact, the flavors of this No-Bake Cheesecake Perfects actually meld beautifully overnight. Make it a day or two in advance, and let it chill in the fridge. This allows the crust to soften slightly and the filling to set completely, resulting in a richer, more satisfying dessert. Just be sure to cover it tightly with plastic wrap to prevent it from absorbing any odors from the refrigerator. You can even prepare the crust and filling separately a day ahead and assemble just before serving.
What kind of plant-based gelling agent is best for this recipe?
For the creamiest texture in your No-Bake Cheesecake Perfects, we recommend agar-agar. It provides a smooth, silky consistency that’s very similar to gelatin. However, if you prefer to use pectin or carrageenan, you can certainly substitute them. Just be aware that the setting time and final texture might vary slightly depending on the type of agent and the amount used. Always follow the package instructions carefully for the best results with your chosen gelling agent. Remember, experimentation is key to finding your perfect plant-based gelling agent!
Are there any substitutions for the cream cheese?
While cream cheese provides the classic cheesecake flavor and texture, you can experiment with other options! A good vegan cream cheese alternative will work well. Just ensure it’s a good quality, thick, and creamy option to get the best results in your No-Bake Cheesecake Perfects. The texture might be slightly different but the taste should remain delicious. You could even try a cashew-based cream for a richer, nuttier flavor profile, but make sure it’s very smooth to avoid a grainy texture.
How can I make this No-Bake Cheesecake Perfects even more decadent?
There are a few ways to elevate your No-Bake Cheesecake Perfects to the next level of deliciousness! A swirl of melted dark chocolate through the filling adds a delightful contrast in both flavor and texture. You could also top it with fresh berries, a sprinkle of toasted nuts, or even a homemade caramel sauce. To make it extra fancy, try using different types of cookies in your crust for added complexity. The possibilities are endless! Get creative and have fun with it; every adaptation will still result in a delicious No-Bake Cheesecake Perfects.


Leave a Comment