
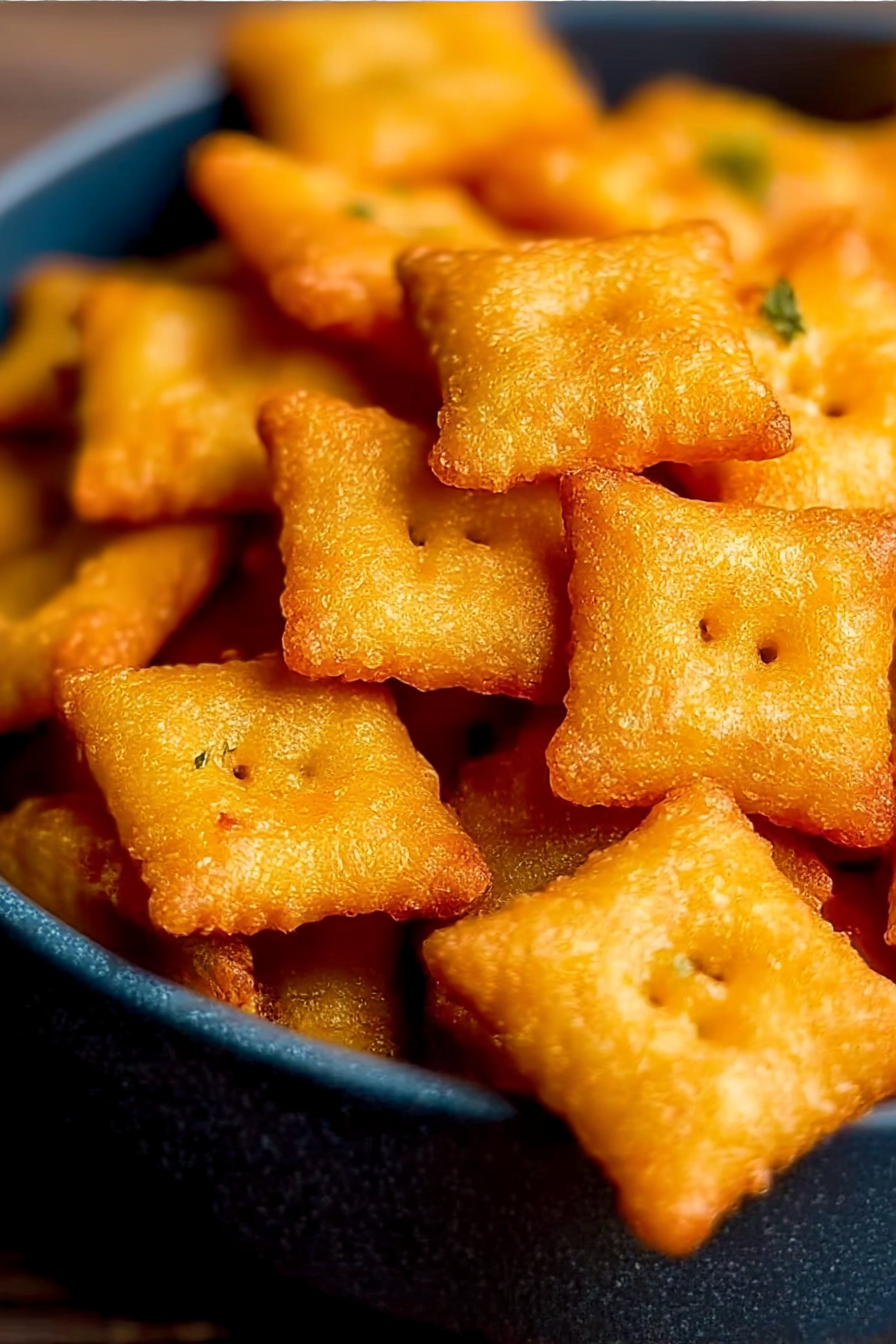
Imagine a tiny, cheesy, square-shaped explosion of flavor that dances on your tongue. Now, imagine crafting that very experience in your own kitchen, filling your home with an irresistible aroma and the pure joy of homemade goodness.
Forget those pale imitations from the store. With this recipe, you can create the most delicious batch of Homemade Cheez-Its, customizing the flavor to your precise preference. The crispy, cheesy treats are perfect for game nights, movie marathons, or just a sneaky afternoon snack.
- Effortlessly create a family-friendly snack with ingredients you likely already have in your pantry, perfect for those spontaneous cravings.
- Experience an intense, customizable cheesy flavor that surpasses store-bought versions, allowing you to tailor the recipe to your tastes.
- Enjoy the satisfying crunch and adorable square shape, guaranteed to be a visual treat as pleasing as their taste.
- These crackers are surprisingly versatile, pairing perfectly with soups, dips, or enjoying them as a standalone snack anytime.
Ingredients for Homemade Cheez-Its
Here’s what you’ll need to make this delicious dish:
- All-Purpose Flour Forms the base of the cracker dough, providing structure and stability.
- Sharp Cheddar Cheese The star of the show! Use a good quality sharp cheddar for the most intense cheesy flavor. Pre-shredded cheese often contains cellulose, so grating your own is best for flavor and texture.
- Unsalted Butter Adds richness and helps create a flaky texture. Make sure it’s cold for the best results.
- Cold Water Binds the dough together. Keep it ice cold to prevent the butter from melting too quickly.
- Salt Enhances the flavor of the cheese and balances the richness of the butter.
- Paprika Adds a touch of color and a subtle smoky flavor. You can use regular or smoked paprika, depending on your preference.
The full ingredients list, including measurements, is provided in the recipe card directly below.
How to Make Homemade Cheez-Its
Follow these simple steps to prepare this delicious dish:
Step 1: Combine Dry Ingredients and Cheese
In a large bowl, whisk together the flour, salt, and paprika. Grate the cheddar cheese and add it to the bowl. Toss to coat the cheese with the flour mixture. This helps prevent the cheese from clumping together.
Step 2: Cut in the Butter
Cut the cold butter into small cubes and add it to the bowl. Use a pastry blender or your fingertips to cut the butter into the flour and cheese mixture until it resembles coarse crumbs. The butter should be evenly distributed throughout the mixture.
Step 3: Add Water and Form Dough
Gradually add the cold water, one tablespoon at a time, mixing until the dough just comes together. Be careful not to overmix. The dough should be slightly shaggy but not sticky.
Step 4: Chill the Dough
Form the dough into a disc, wrap it tightly in plastic wrap, and chill it in the refrigerator for at least 30 minutes. This allows the gluten to relax and the butter to firm up, which will result in a flakier cracker.
Step 5: Roll and Cut
Preheat your oven to 375°F (190°C). Line a baking sheet with parchment paper. On a lightly floured surface, roll out the dough to about 1/8 inch thickness. Use a pizza cutter or knife to cut the dough into small squares.
Step 6: Bake
Transfer the squares to the prepared baking sheet, leaving a little space between each cracker. Use a toothpick or skewer to poke a hole in the center of each square (this prevents them from puffing up too much). Bake for 12-15 minutes, or until the crackers are golden brown and crispy. Let them cool on the baking sheet for a few minutes before transferring them to a wire rack to cool completely.
Enjoy your Homemade Cheez-Its with your favorite dip, alongside a bowl of soup, or simply as a satisfying snack! They’re also fantastic crumbled over salads for a cheesy crunch.
Perfecting the Cooking Process
To ensure the most amazing homemade Cheez-Its, start by prepping all your ingredients. Mix the dough thoroughly and chill for optimal results. Bake until golden brown for that perfect crispy, cheesy bite. This process ensures each cracker is uniformly delicious.
Add Your Touch
Unleash your creativity with these homemade Cheez-Its! Try adding a pinch of smoked paprika for a smoky kick. Or, experiment with different cheeses like sharp cheddar or Gruyere. A dash of garlic powder can also add a savory depth.
Storing & Reheating
Store your homemade Cheez-Its in an airtight container at room temperature to keep them crisp. If they lose their crunch, a quick bake in a low oven will revive them. They’re usually so delicious they don’t last long enough to need reheating!
- Use cold butter and ice water for a flaky, tender cracker. This prevents the butter from melting too quickly.
- Don’t overmix the dough; it will result in tough crackers. Mix until just combined for best results.
- Monitor the baking closely. Since ovens vary, start checking for doneness a few minutes early to avoid burning.
(Personal anecdote formated as paragraph subheading)
I remember the first time I made these, my kids devoured them in minutes. Now, they request them for every movie night, claiming they’re even better than the store-bought kind!
Conclusion for Homemade Cheez-Its
So there you have it: the path to Homemade Cheez-It nirvana. Ditch the processed stuff and embark on a cheesy adventure. With a few simple steps, you can create a snack that is both satisfying and impressive. They’re far superior to the originals, offering a delightful crunch and a flavour explosion in every bite. Prepare to be amazed by how simple ingredients transform into such an irresistible treat. Get ready to impress your friends and family with these homemade delights.
Print
Homemade Cheez-Its
Delicious homemade cheez-its recipe with detailed instructions and nutritional information.
- Total Time: 35 minutes
- Yield: 4 servings
Ingredients
- All-purpose flour: 1 cup
- Sharp cheddar cheese, finely shredded: 4 ounces
- Cold unsalted butter, cut into cubes: 4 tablespoons
- Cold water: 2-4 tablespoons
- Salt: 1/2 teaspoon
- Paprika: 1/4 teaspoon
- Garlic powder: 1/4 teaspoon
- Optional: Everything bagel seasoning
Instructions
- Step 1: In a food processor, combine the flour, shredded cheddar cheese, salt, paprika, and garlic powder. Pulse until the mixture resembles coarse crumbs.
- Step 2: Add the cold, cubed butter to the food processor. Pulse until the mixture resembles coarse crumbs with small pea-sized pieces of butter remaining.
- Step 3: With the food processor running, gradually add the cold water, 1 tablespoon at a time, until the dough just comes together. Do not overmix.
- Step 4: Turn the dough out onto a lightly floured surface and gently form it into a disc. Wrap the disc in plastic wrap and refrigerate for at least 30 minutes.
- Step 5: Preheat oven to 350°F (175°C). Line a baking sheet with parchment paper. On a lightly floured surface, roll the dough out to about 1/8-inch thickness.
- Step 6: Use a pizza cutter or knife to cut the dough into small squares (about 1 inch). Transfer the squares to the prepared baking sheet. If desired, sprinkle with everything bagel seasoning. Bake for 12-15 minutes, or until the edges are golden brown. Let cool completely on the baking sheet before serving.
Notes
- Store completely cooled Cheez-Its in an airtight container at room temperature for up to 3 days to maintain their crispness.
- For a warm, cheesy treat, reheat the Cheez-Its in a 300°F oven for a few minutes until heated through.
- Serve these homemade Cheez-Its with your favorite dips, alongside soup, or as a fun addition to a cheese board.
- Chef's tip: Ensure the butter and water are very cold for the flakiest, most tender cracker texture.
- Prep Time: 15 minutes
- Cook Time: 20 minutes
- Method: Stovetop
- Cuisine: American
FAQs
Are These Homemade Cheez-Its Really Better Than Store-Bought?
Oh, my friend, are they ever! Imagine tiny squares of cheesy, crunchy goodness, bursting with flavor that the store-bought kind can only dream of. These Homemade Cheez-Its aren’t just a snack; they’re an experience. You control the ingredients, ensuring a fresh and vibrant taste. Plus, you get the satisfaction of knowing you created this deliciousness from scratch. Trust me; once you try these, you might never go back to the orange boxes again. Get ready for a cheesy revelation!
Can I Make These Homemade Cheez-Its Ahead of Time?
Absolutely! In fact, these Homemade Cheez-Its are perfect for meal prepping. You can prepare the dough, wrap it tightly in plastic wrap, and store it in the refrigerator for up to two days. This is a game-changer for busy bees who still want to enjoy homemade goodness. When you’re ready to bake, just roll out the dough, cut into squares, and bake until golden brown. They’re also great for road trips, school lunch or a quick family snack.
What Kind of Cheese Works Best for This Homemade Cheez-Its Recipe?
Sharp cheddar is the champion of cheese for this recipe, hands down. Its robust and tangy flavor shines through beautifully, giving your crackers that classic Cheez-It zing. However, feel free to experiment with other hard cheeses like Gruyere or Parmesan for a different twist. The key is to use a cheese that melts well and has a distinctive flavor. Just remember to adjust the amount of salt accordingly, as some cheeses are saltier than others.
How Do I Prevent My Homemade Cheez-Its from Burning?
Ah, the age-old question! The secret lies in keeping a close eye on them during baking. Every oven is a little different, so start checking your crackers a few minutes before the suggested baking time. You’re looking for a beautiful golden-brown color, not a charred disaster. If you notice the edges browning too quickly, try lowering the oven temperature slightly or moving the baking sheet to a lower rack. These Homemade Cheez-Its require a little attention to avoid disaster, but the results are oh-so-worth it!


Leave a Comment