
Oh, the simple comfort of **Apple Cobbler**! Imagine warm, spiced apples bubbling under a golden, crumbly topping, a symphony of sweet and tart that makes your taste buds sing.
Picture this: a crisp autumn evening, the scent of cinnamon filling the air, and a warm **Apple Cobbler** fresh from the oven. It’s the perfect dessert to share with loved ones, creating memories as sweet as the dish itself.
Here are a few reasons why this **Apple Cobbler** recipe is about to become your new favorite:
- It is so easy to make, that even a kitchen newbie can whip it up in under an hour, perfect for those last-minute dessert cravings.
- The flavor combination is a delightful balance of tart apples, warm spices, and a sweet, buttery crumble, creating pure dessert perfection.
- With its golden brown crust and juicy apple filling, this cobbler is visually stunning, making it a showstopper at any gathering.
- Enjoy it warm with a scoop of vanilla ice cream or a dollop of whipped cream for a classic treat, or get creative with caramel sauce.
Ingredients for Apple Cobbler
Here’s what you’ll need to make this delicious dish:
The full ingredients list, including measurements, is provided in the recipe card directly below.
How to Make Apple Cobbler
Follow these simple steps to prepare this delicious dish:
Step 1: Prepare the Apples
Preheat your oven to 375°F (190°C). In a large bowl, combine the sliced apples, granulated sugar, cinnamon, nutmeg, and lemon juice. Stir well to coat the apples evenly with the spices and sugar.
Step 2: Make the Crumble Topping
In a separate bowl, whisk together the flour, brown sugar, baking powder, and salt. Cut in the cold butter using a pastry blender or your fingers until the mixture resembles coarse crumbs. The butter should be evenly distributed throughout the flour mixture.
Step 3: Assemble the Cobbler
Pour the apple mixture into a greased 9×13 inch baking dish. Sprinkle the crumble topping evenly over the apples, covering the entire surface. Gently press the topping to ensure it adheres to the apples.
Step 4: Bake the Cobbler
Bake in the preheated oven for 30-35 minutes, or until the topping is golden brown and the apples are tender. If the topping starts to brown too quickly, you can tent the dish with foil during the last 10 minutes of baking.
Step 5: Cool and Serve
Remove the cobbler from the oven and let it cool slightly before serving. This allows the filling to thicken and the flavors to meld together.
Transfer to plates and top with a scoop of vanilla ice cream or a dollop of whipped cream for the perfect finishing touch. This **Apple Cobbler** will definitely be a showstopper!
Tips for the Best Apple Cobbler
Want to take your **Apple Cobbler** to the next level? Here are a few tips to help you create the perfect dessert every time:
- Use a variety of apples. Combining different types of apples, such as tart Granny Smiths and sweet Honeycrisp, adds depth and complexity to the flavor of the filling. This mix of textures and tastes keeps things interesting with every bite.
- Don’t overmix the crumble topping. When making the crumble topping, be careful not to overmix the ingredients. Overmixing can result in a tough, dense topping instead of a light, crumbly one. Mix until just combined.
- Adjust the sweetness to your liking. If you prefer a sweeter cobbler, you can add more sugar to the apple filling or the crumble topping. Taste the apple mixture before assembling the cobbler and adjust the sweetness as needed.
- Add a touch of warmth with spices. In addition to cinnamon and nutmeg, you can add other warm spices like ginger or cloves to the apple filling. These spices add a cozy, comforting flavor that is perfect for fall and winter.
- Serve it warm with a scoop of vanilla ice cream. There’s nothing quite like a warm **Apple Cobbler** topped with a scoop of cold vanilla ice cream. The combination of warm and cold, sweet and tart, is simply irresistible.
Variations on Apple Cobbler
One of the best things about **Apple Cobbler** is its versatility. There are endless ways to customize the recipe to suit your taste preferences. Here are a few variations to try:
- Add other fruits. While **Apple Cobbler** is delicious on its own, you can also add other fruits to the filling. Berries, peaches, or pears would all be delicious additions. Just be sure to adjust the baking time as needed.
- Use different toppings. Instead of a traditional crumble topping, you can use other types of toppings for your **Apple Cobbler**. A biscuit topping, a streusel topping, or even a simple oat topping would all be delicious.
- Make it gluten-free. If you’re gluten-free, you can easily make a gluten-free **Apple Cobbler** by using gluten-free flour in the crumble topping. There are many gluten-free flour blends available at most grocery stores.
- Add nuts to the topping. For added texture and flavor, try adding chopped nuts to the crumble topping. Pecans, walnuts, or almonds would all be delicious choices.
- Caramel Apple Cobbler: Drizzle caramel sauce over the apples before adding the topping for a richer, sweeter flavor. A final drizzle after baking is also encouraged.
The History of Cobblers
Cobblers, like this wonderful **Apple Cobbler**, are a type of baked fruit dessert that likely originated in the early American colonies. The name “cobbler” is believed to come from the way the biscuit or dough topping resembles cobblestones. Early settlers, lacking the ingredients and equipment for more elaborate pies, created simple desserts using available fruits and a basic batter or biscuit topping. These early cobblers were often made in Dutch ovens over an open fire.
Over time, cobblers evolved with regional variations and ingredient availability. Different types of fruits were used depending on the season and location, and various toppings emerged, from simple biscuit dough to more elaborate streusels and crumbles. The ease and adaptability of cobblers made them a popular dessert choice for generations.
Today, cobblers remain a beloved comfort food, enjoyed in homes and restaurants alike. The simple, rustic nature of cobblers harkens back to their colonial roots, while the endless variations ensure that there is a cobbler recipe for everyone. So, whether you prefer a classic **Apple Cobbler** or a more adventurous fruit combination, you’re sure to find a cobbler that satisfies your sweet tooth.
Serving Suggestions for Apple Cobbler
**Apple Cobbler** is a versatile dessert that can be enjoyed in many ways. Here are some serving suggestions to elevate your cobbler experience:
- Warm with Ice Cream: A classic pairing! The warm cobbler and cold ice cream create a delightful contrast of temperatures and textures. Vanilla, cinnamon, or caramel ice cream are all excellent choices.
- With Whipped Cream: For a lighter option, serve your **Apple Cobbler** with a dollop of freshly whipped cream. You can add a touch of vanilla extract or cinnamon to the whipped cream for extra flavor.
- With Custard Sauce: Drizzle a warm custard sauce over your **Apple Cobbler** for a decadent treat. The creamy custard complements the sweet and tart apples beautifully.
- As a Brunch Item: **Apple Cobbler** can also be served as a brunch item. Pair it with a side of yogurt or granola for a satisfying and flavorful start to your day.
- With a Sprinkle of Nuts: Add some crunch to your **Apple Cobbler** by sprinkling it with chopped nuts, such as pecans or walnuts. This adds texture and enhances the nutty flavors of the crumble topping.
- With a Caramel Drizzle: Drizzle caramel sauce over your **Apple Cobbler** for an extra touch of sweetness and indulgence. The caramel complements the apples and spices perfectly.
Storing and Reheating Apple Cobbler
If you have leftover **Apple Cobbler**, you can store it in the refrigerator for up to 3-4 days. To prevent the topping from becoming soggy, cover the cobbler loosely with plastic wrap or foil.
To reheat **Apple Cobbler**, you can use the oven or the microwave.
- Oven: Preheat your oven to 350°F (175°C). Place the cobbler in an oven-safe dish and cover with foil. Bake for 10-15 minutes, or until heated through.
- Microwave: Place a serving of cobbler on a microwave-safe plate. Microwave for 30-60 seconds, or until heated through. Be careful not to overheat, as this can make the topping soggy.
Enjoy your warm and delicious reheated **Apple Cobbler**!
Perfecting the Cooking Process

To maximize your time and the deliciousness of this apple cobbler, start by prepping your apples. Get those beauties peeled, cored, and sliced. While they’re simmering, focus on mixing your biscuit topping. A little planning makes this dessert a breeze!
Add Your Touch
Want to jazz up your apple cobbler? Consider adding a handful of cranberries or blueberries to the apple mixture for a burst of tartness. A sprinkle of cinnamon or nutmeg in the biscuit topping will also add a lovely, warm flavor.
Storing & Reheating
If you happen to have leftovers (though I doubt it!), store your apple cobbler in an airtight container in the refrigerator. Reheat individual portions in the microwave or the whole thing in the oven until warmed through. It’s almost as good as the first time!
- For a perfectly golden-brown topping, brush the biscuit dough with milk and sprinkle with sugar before baking.
- Don’t overmix the biscuit dough; gently combine the ingredients to avoid a tough cobbler.
- Use a variety of apple types for a more complex and flavorful cobbler, like Honeycrisp and Granny Smith.
(Personal anecdote formated as paragraph subheading)
I once made this apple cobbler for a potluck, and it was gone in minutes! Even my picky nephew devoured it, declaring it the best dessert ever. That’s when I knew it was a true winner.
The Apple Cobbler Story: A Slice of Home
Let’s talk apple cobbler. Not just any apple cobbler, but *the* apple cobbler. The kind that whispers sweet nothings of autumn evenings, crackling fireplaces, and grandmothers who know the secret to happiness (spoiler alert: it involves butter). This isn’t just a recipe; it’s a culinary hug. Forget fancy French pastries; we’re going back to basics, to a dessert that’s as comforting as your favorite worn-out sweater.
This recipe isn’t about precise measurements and complicated techniques. It’s about intuition, about feeling the dough between your fingers, about knowing when the apples are *just* right. It’s about creating a moment, a memory, a reason to gather around the table and share something warm and delicious. So, ditch the diet, loosen your belt, and let’s make some magic, or at least a darn good apple cobbler.
Apple Cobbler: An Ode to Imperfection
Here’s the thing about apple cobbler: it’s gloriously imperfect. It’s rustic. It’s charmingly lopsided. It’s the culinary equivalent of a messy bun and comfy pajamas. And that’s exactly what makes it so perfect.
Forget striving for that picture-perfect Pinterest-worthy dessert. This is about embracing the imperfections, the slightly burnt edges, the uneven topping. Those little quirks are what give it character, what make it unique, what make it *yours*.
Think of it this way: every apple slice, every dollop of biscuit dough, is a tiny act of rebellion against the tyranny of perfection. We’re saying “Yes!” to real food, to real flavors, to real moments. So, don’t sweat the small stuff. Embrace the mess, and let’s get baking!
Why Apple Cobbler? Because Life’s Too Short for Boring Desserts
Seriously, why settle for a boring, bland dessert when you can have *apple cobbler*? It’s the ultimate comfort food, a warm hug in a bowl, a symphony of sweet and tart flavors that will make your taste buds sing.
And let’s be honest, it’s ridiculously easy to make. No fancy equipment required, no complicated techniques to master. Just a few simple ingredients, a little bit of love, and you’re on your way to dessert nirvana. So, ditch the boxed cake mix, step away from the frozen pie, and let’s whip up an apple cobbler that will knock your socks off.
Ingredients: The Apple Cobbler Dream Team
Alright, let’s gather our troops. This *apple cobbler* is only as good as its ingredients, so let’s make sure we’re using the best. No skimping here, folks! We’re talking real butter, fresh apples, and a whole lotta love.
Here’s what you’ll need:
**For the Apple Filling: **
- 6-8 medium apples (Honeycrisp, Granny Smith, or a mix – variety is the spice of life!), peeled, cored, and sliced
- 1/2 cup granulated sugar (because we all deserve a little sweetness)
- 2 tablespoons all-purpose flour (to thicken things up)
- 1 teaspoon ground cinnamon (because cinnamon makes everything better)
- 1/4 teaspoon ground nutmeg (a little spice never hurt anyone)
- 2 tablespoons lemon juice (to keep those apples from browning and add a zing)
- 2 tablespoons butter, cut into small pieces (because butter is always the answer)
- 1/4 cup apple juice (to add moisture and apple-y goodness)
**For the Biscuit Topping: **
- 1 1/2 cups all-purpose flour (the foundation of our delicious topping)
- 1/4 cup granulated sugar (more sweetness, please!)
- 2 teaspoons baking powder (for that light and fluffy texture)
- 1/2 teaspoon salt (to balance the sweetness)
- 1/2 cup (1 stick) cold butter, cut into small pieces (cold butter is key!)
- 1/2 cup milk (or buttermilk, if you’re feeling fancy)
Ingredient Spotlight: The Apples
Let’s talk apples. These aren’t just any apples, folks. These are the stars of our show, the heart and soul of our *apple cobbler*. So, choose wisely!
I personally love a mix of Honeycrisp and Granny Smith. The Honeycrisp apples bring a lovely sweetness and crispness, while the Granny Smith apples add a tartness that cuts through the sweetness perfectly. But feel free to experiment! Use whatever apples you have on hand, or try a combination of different varieties. Braeburn, Gala, or Fuji apples would also work beautifully.
Just make sure your apples are fresh, firm, and free from bruises. Nobody wants a mushy, mealy apple cobbler!
Making the Magic: Step-by-Step Apple Cobbler Instructions
Alright, buckle up, buttercups! It’s time to get our hands dirty and make some *apple cobbler* magic. Don’t worry, I’ll guide you through every step of the way.
1. **Preheat your oven to 375°F (190°C).** This is crucial. A preheated oven ensures that your cobbler cooks evenly and the topping gets nice and golden brown.
2. **Prepare the apple filling: ** In a large bowl, combine the sliced apples, sugar, flour, cinnamon, nutmeg, lemon juice, and apple juice. Toss everything together until the apples are evenly coated.
3. **Pour the apple filling into a 9×13 inch baking dish.** Dot the top of the apple filling with the butter pieces.
4. **Make the biscuit topping: ** In a separate bowl, whisk together the flour, sugar, baking powder, and salt.
5. **Cut in the cold butter using a pastry blender or your fingers** until the mixture resembles coarse crumbs. This is where the cold butter is crucial! It creates pockets of air that will make the topping light and flaky.
6. **Stir in the milk until just combined.** Don’t overmix! Overmixing will result in a tough topping.
7. **Drop spoonfuls of the biscuit topping over the apple filling.** Don’t worry about making it perfect; rustic is the name of the game.
8. **Bake for 30-35 minutes, or until the topping is golden brown and the apple filling is bubbly.** Keep an eye on it! Ovens can vary, so you may need to adjust the baking time.
9. **Let the cobbler cool slightly before serving.** This is important! The filling will be extremely hot, so give it a few minutes to cool down before you dig in.
Troubleshooting Your Apple Cobbler: Tips and Tricks
Okay, let’s face it: even the best cooks have their off days. So, let’s troubleshoot some common *apple cobbler* woes and how to fix them:
- **Topping is too dry:** You probably added too much flour or not enough liquid. Next time, measure carefully and add a little more milk if needed.
- **Topping is too tough:** You probably overmixed the dough. Remember, gently combine the ingredients until just combined.
- **Filling is too watery:** You may have used apples that were too juicy or didn’t use enough flour to thicken the filling. Next time, try using a different variety of apples or adding a little more flour.
- **Topping is burning before the apples are cooked:** Cover the cobbler with foil for the last 10-15 minutes of baking.
Serving Suggestions: Apple Cobbler and…
Alright, you’ve got a beautiful *apple cobbler* fresh out of the oven. Now what? Well, the possibilities are endless!
- **Vanilla ice cream:** This is the classic pairing for a reason. The cold, creamy ice cream complements the warm, sweet cobbler perfectly.
- **Whipped cream:** A dollop of whipped cream adds a light and airy touch.
- **Caramel sauce:** Drizzle a little caramel sauce over the top for an extra dose of sweetness.
- **Cheddar cheese:** Don’t knock it ’til you try it! A slice of sharp cheddar cheese on top of the warm cobbler is a surprisingly delicious combination.
Beyond the Basics: Apple Cobbler Variations
Feeling adventurous? Let’s take our *apple cobbler* to the next level with some fun and creative variations:
- **Cranberry Apple Cobbler:** Add a cup of fresh or frozen cranberries to the apple filling for a tart and festive twist.
- **Apple Pear Cobbler:** Substitute half of the apples with pears for a unique flavor combination.
- **Caramel Apple Cobbler:** Drizzle caramel sauce over the apples before topping with the biscuit dough.
- **Gingerbread Apple Cobbler:** Add a teaspoon of ground ginger to the biscuit dough for a warm and spicy flavor.
Conclusion for Apple Cobbler
This Apple Cobbler is a comforting dessert that’s easy to whip up and sure to impress. With its sweet, spiced apple filling and golden, crumbly topping, it’s a crowd-pleaser. Remember to use a mix of apple types for the best flavor and to avoid over-mixing the topping to keep it tender. Whether you make it ahead of time or bake it fresh, this dessert brings warmth and joy to any occasion. Enjoy every bite!
Print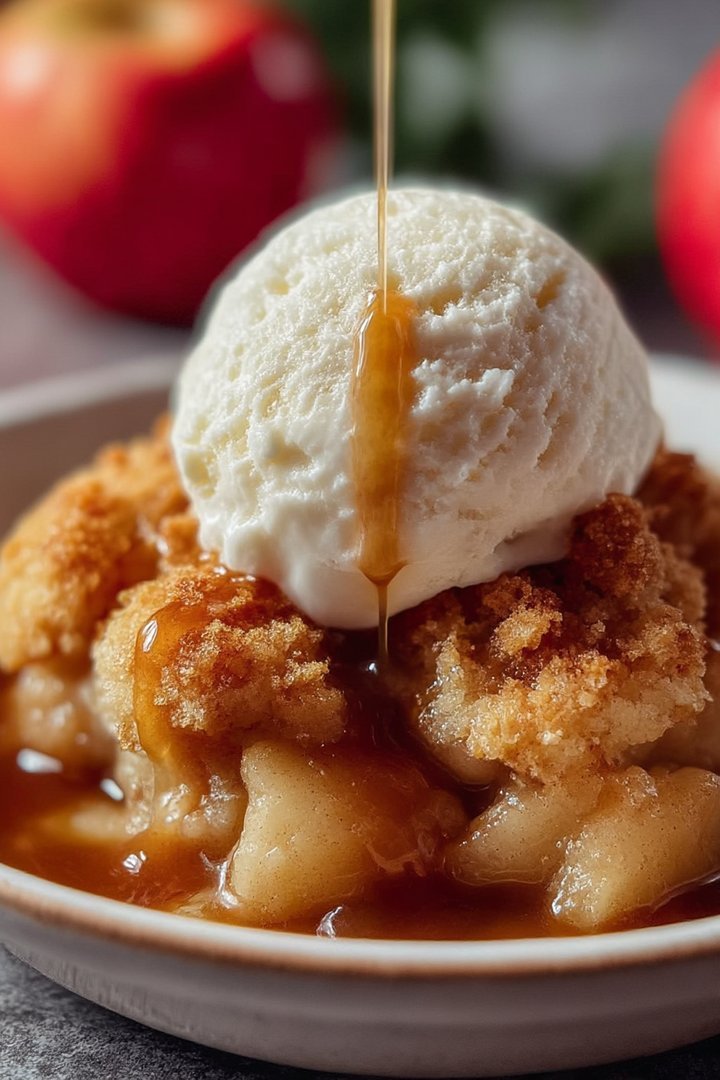
Apple Cobbler
Delicious apple cobbler recipe with detailed instructions and nutritional information.
- Total Time: 35 minutes
- Yield: 4 servings 1x
Ingredients
- 6 medium apples, peeled, cored, and sliced
- 1 cup all-purpose flour
- 1 cup granulated sugar
- 1 teaspoon baking powder
- 1/2 teaspoon salt
- 1 cup milk
- 1/2 cup unsalted butter, melted
- 1 teaspoon ground cinnamon
Instructions
- Step 1: Preheat oven to 375°F (190°C). In a large bowl, combine the sliced apples with cinnamon.
- Step 2: In a separate bowl, whisk together the flour, sugar, baking powder, and salt.
- Step 3: Add the milk to the dry ingredients and stir until just combined. Do not overmix.
- Step 4: Pour the melted butter into a 9×13 inch baking dish. Then, pour the batter over the melted butter.
- Step 5: Spoon the apple mixture evenly over the batter.
- Step 6: Bake for 30-40 minutes, or until the topping is golden brown and the apples are tender. Let cool slightly before serving.
Notes
- Store leftover apple cobbler in the refrigerator, covered, for up to 3 days.
- For a warm, gooey treat, reheat individual portions in the microwave for 30-60 seconds or in a 350°F oven until heated through.
- Serve warm apple cobbler with a scoop of vanilla ice cream or a dollop of whipped cream for a truly decadent dessert.
- To prevent a soggy bottom, make sure the melted butter completely coats the bottom of the baking dish before adding the batter.
- Prep Time: 15 minutes
- Cook Time: 20 minutes
- Method: Stovetop
- Cuisine: American
FAQs
Can I use different types of apples for my Apple Cobbler?
Absolutely! Experimenting with apple varieties is part of the fun. A mix of sweet and tart apples, like Honeycrisp and Granny Smith, creates a delightful flavor profile. Some folks like to use all Granny Smith for a more intense tartness, while others prefer the sweetness of Fuji or Gala. The key is to ensure the apples are firm enough to hold their shape during baking. Soft apples might turn to mush, and nobody wants a mushy cobbler. So, go ahead, get creative and find your favorite apple blend!
How do I prevent my Apple Cobbler topping from getting soggy?
A soggy topping is a cobbler’s worst nightmare! To avoid this, ensure your apple filling isn’t too watery. You can thicken it slightly by adding a tablespoon of cornstarch or tapioca starch to the apple mixture before baking. Also, avoid over-mixing the topping; a light hand ensures a tender, crumbly texture. Another trick is to bake the cobbler on the middle rack of your oven, allowing for even heat distribution. Trust me, a crispy, golden topping is the ultimate reward!
Can I make Apple Cobbler ahead of time?
Yes, you certainly can! You can prepare the apple filling and the topping separately a day in advance. Store them in the refrigerator until you’re ready to assemble and bake. When ready, simply combine the filling and topping, then bake as directed. This is a fantastic option for busy bees who want to enjoy a homemade dessert without spending hours in the kitchen on the day of. Plus, the flavors often meld together even more beautifully overnight!
How do I store leftover Apple Cobbler?
Storing leftover cobbler is a breeze. Allow the cobbler to cool completely, then cover it tightly with plastic wrap or transfer it to an airtight container. Store it in the refrigerator for up to three days. To reheat, you can warm it in the oven at 350°F (175°C) for about 10-15 minutes, or microwave individual portions for a quicker treat. A scoop of vanilla ice cream on top of warm leftover apple goodness? Yes, please!


Leave a Comment