

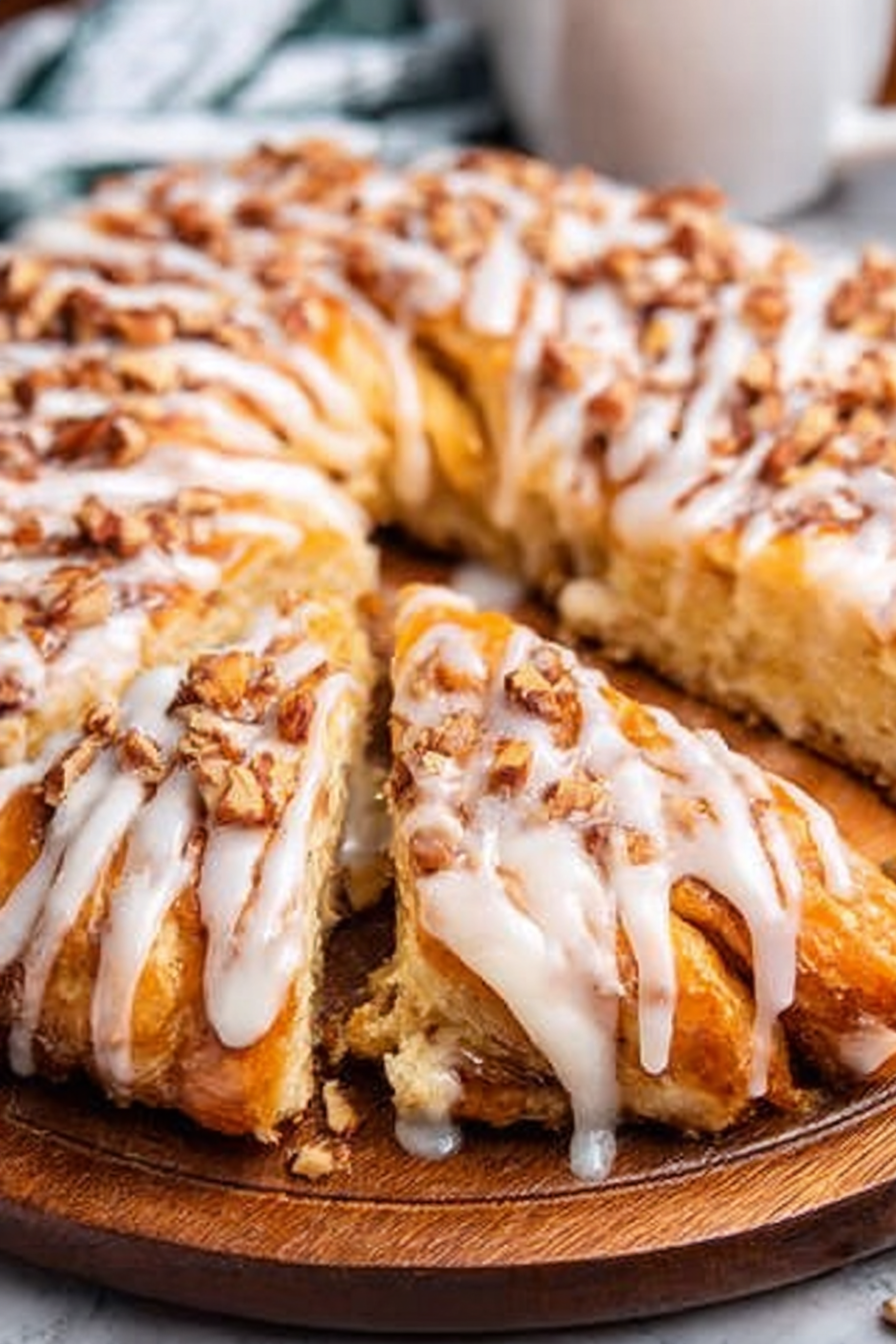
The aroma of warm apples, cinnamon, and sweet vanilla fills the air, a symphony of scents promising pure comfort. Imagine sinking your teeth into the flaky layers of an Apple Kringle with Vanilla Glaze, a taste that feels like a warm hug on a chilly day.
My grandmother used to bake a similar treat every autumn, and the memory of those cozy afternoons spent in her kitchen always brings a smile. This Apple Kringle with Vanilla Glaze is more than just a dessert; it’s a celebration of fall flavors, perfect for sharing with loved ones or indulging in a quiet moment of bliss. Get ready for a baking adventure that will tantalize your taste buds and leave you craving more!
Here are a few reasons why you’ll absolutely adore this recipe:
- It’s surprisingly easy to make, even if you’re not a seasoned baker, resulting in a show-stopping dessert.
- The combination of tart apples, warm spices, and sweet vanilla glaze creates an irresistible symphony of flavors.
- The beautiful, golden-brown Kringle is a feast for the eyes, making it perfect for holiday gatherings or special occasions.
- This versatile dessert can be enjoyed warm from the oven, at room temperature, or even slightly chilled, ensuring enjoyment in any season.
Ingredients for Apple Kringle with Vanilla Glaze
Here’s what you’ll need to make this delicious dish:
The full ingredients list, including measurements, is provided in the recipe card directly below.
How to Make Apple Kringle with Vanilla Glaze
Follow these simple steps to prepare this delicious dish:
Step 1: Prepare the Dough
In a large bowl, whisk together the flour, sugar, and salt. Cut in the cold butter using a pastry blender or your fingertips until the mixture resembles coarse crumbs. Gradually add the ice water, mixing until the dough just comes together. Divide the dough in half, flatten into discs, wrap in plastic wrap, and refrigerate for at least 2 hours. This chilling time is crucial for developing a flaky crust.
Step 2: Make the Apple Filling
In a large saucepan, combine the diced apples, granulated sugar, brown sugar, cinnamon, and cornstarch. Cook over medium heat, stirring occasionally, until the apples are tender and the filling has thickened, about 10-15 minutes. Remove from heat and let cool slightly. The aroma alone will make your kitchen smell divine!
Step 3: Assemble the Kringle
Preheat oven to 375°F (190°C). On a lightly floured surface, roll out one disc of dough into a large oval, about 12 inches long and 8 inches wide. Transfer the dough to a baking sheet lined with parchment paper. Spread half of the apple filling evenly over the dough, leaving a 1-inch border. Repeat with the remaining dough and filling, placing it on a separate baking sheet.
Step 4: Shape and Bake
With a sharp knife or pizza cutter, make cuts along both sides of the oval, about 1 inch apart, angling slightly inward. Fold the strips of dough over the filling, alternating sides, to create a braided effect. Pinch the ends to seal. Bake for 25-30 minutes, or until golden brown. Keep a close eye on them – nobody likes a burnt Kringle!
Step 5: Prepare the Vanilla Glaze
While the Kringle is baking, prepare the vanilla glaze. In a medium bowl, whisk together the powdered sugar, Alcohol-free vanilla extract, and milk until smooth. Adjust the amount of milk to achieve your desired consistency. If you want a thicker glaze, use less milk; for a thinner glaze, add a bit more.
Step 6: Glaze and Enjoy
Let the baked Kringle cool slightly on the baking sheet before transferring it to a wire rack to cool completely. Once cooled, drizzle the vanilla glaze evenly over the top. Slice and serve. Enjoy your homemade Apple Kringle with Vanilla Glaze with a cup of coffee or tea for the perfect treat!
Perfecting the Cooking Process
To achieve the ultimate Apple Kringle with Vanilla Glaze, start by preparing the dough first. Then, focus on the apple filling while the dough is proofing. Finally, bake the Kringle, let it cool, and drizzle with the vanilla glaze for a delightful finish.
Add Your Touch
Want to make it your own? Consider swapping the apples for pears or peaches. Add a dash of cinnamon or nutmeg to the filling for extra warmth. For the glaze, a hint of lemon juice will brighten the flavor and add a zesty twist.
Storing & Reheating
Store your Apple Kringle in an airtight container at room temperature for up to three days. To reheat, a quick zap in the microwave or a few minutes in a warm oven will restore its warm, comforting flavor. Enjoy!
Here are some tips to help you achieve the perfect Apple Kringle with Vanilla Glaze:
- Make sure your butter is cold when making the dough. This will help create a flaky, tender crust.
- Don’t overfill the Kringle, or the filling might ooze out during baking. A little restraint goes a long way!
- Let the Kringle cool completely before glazing. This will prevent the glaze from melting and creating a sticky mess.
(Personal anecdote formated as paragraph subheading)
My family devours this Apple Kringle every Harvest celebration. It’s become our signature dessert, and I always get requests for the recipe. It’s truly a crowd-pleaser.
Let’s talk about the star of the show: the **Apple Kringle with Vanilla Glaze**. I know, I know, the name itself sounds like something Marie Antoinette would whisper about while nibbling a petit four. But trust me, this isn’t just for royalty. It’s for anyone who appreciates a seriously delicious pastry that’s surprisingly easy to make. Forget those complicated croissants that require a PhD in pastry arts. This Kringle is all about approachable elegance.
Why This Apple Kringle Recipe is a Winner
First of all, it’s delicious. Like, stop-what-you’re-doing-and-make-this-now delicious. The flaky, buttery crust, the warm, spiced apple filling, and the sweet vanilla glaze… it’s a symphony of flavors and textures that will make your taste buds sing. But beyond the taste, this recipe is a winner because it’s adaptable. Don’t have Granny Smith apples? Use Honeycrisp. Feeling adventurous? Throw in some chopped pecans or walnuts. This recipe is a starting point for your own Kringle masterpiece.
Second, it’s a crowd-pleaser. Whether you’re bringing it to a potluck, serving it at a holiday gathering, or just want to treat your family on a Sunday morning, this Apple Kringle with Vanilla Glaze is guaranteed to be a hit. I’ve seen even the pickiest eaters devour it. It’s like magic!
Finally, it’s easier than you think. Sure, making a pastry from scratch might seem intimidating, but I promise, this recipe is totally doable. I’ve broken it down into simple, easy-to-follow steps, so even if you’re a baking newbie, you can still create a gorgeous, delicious Kringle that will impress everyone.
Gathering Your Ingredients for the Best Apple Kringle
Let’s talk ingredients. You’ll need the basics: flour, butter (the good stuff, please!), sugar, eggs, and yeast. For the filling, we’re using apples, of course, along with some cinnamon, nutmeg, and a touch of lemon juice to brighten things up. And for the glaze, we’re keeping it simple with powdered sugar, Alcohol-free vanilla extract, and a little milk. No fancy ingredients here, just simple, wholesome goodness.
Now, a word about apples. While Granny Smith are my go-to for their tartness, feel free to experiment. Honeycrisp, Fuji, or even a mix of different varieties will work beautifully. Just make sure they’re firm and hold their shape during baking. Nobody wants a mushy Kringle!
And speaking of ingredients, let’s address the substitutions. I know some of you are already thinking, “Can I use this?” or “Can I swap that?”. The answer is usually yes! This recipe is forgiving, so don’t be afraid to get creative. Just remember the key phrase.
Making the Dough: The Foundation of Your Apple Kringle
Alright, let’s get to the fun part: making the dough! This is where the magic happens. First, you’ll need to activate the yeast. This is super easy: just mix it with some warm water and a pinch of sugar and let it sit for a few minutes until it gets foamy. This means the yeast is alive and ready to work its magic.
Next, you’ll mix the yeast mixture with the flour, sugar, salt, and eggs. I like to use a stand mixer for this, but you can also do it by hand. Just be prepared for a little arm workout! Knead the dough until it’s smooth and elastic, about 5-7 minutes.
Now comes the important part: chilling the dough. This is crucial for developing that flaky, buttery texture. Wrap the dough tightly in plastic wrap and refrigerate it for at least 2 hours, or even overnight. The longer it chills, the better.
Crafting the Apple Filling: The Heart of the Kringle
While the dough is chilling, let’s make the apple filling. Peel, core, and chop your apples into small pieces. Then, toss them with cinnamon, nutmeg, sugar, and lemon juice. This is where you can really customize the flavor. Add a pinch of cardamom for a warm, spicy note, or a splash of apple juice for extra moisture.
Some people like to cook the apples before filling the Kringle, but I prefer to use them raw. This way, they retain their texture and don’t get mushy during baking. Plus, it saves you an extra step!
Remember not to overfill the Kringle. Too much filling can make it difficult to seal and can cause the Kringle to burst during baking. Trust me, you don’t want that to happen.
Assembling and Baking Your Apple Kringle with Vanilla Glaze
Now comes the fun part: assembling the Kringle! Roll out the chilled dough into a large rectangle, about 1/4 inch thick. Spread the apple filling evenly over the dough, leaving a small border around the edges.
Carefully roll up the dough into a log, like you’re making a jelly roll. Pinch the seam to seal it tightly. Then, shape the log into a circle and pinch the ends together to form a Kringle.
Use a sharp knife or pizza cutter to make slits along the top of the Kringle. This will allow the steam to escape during baking and prevent it from bursting.
Bake the Kringle in a preheated oven at 375°F (190°C) for 25-30 minutes, or until it’s golden brown and the filling is bubbly. Let it cool completely on a wire rack before glazing.
The Finishing Touch: Vanilla Glaze Perfection
While the Kringle is cooling, let’s make the vanilla glaze. This is the easiest part! Just whisk together powdered sugar, Alcohol-free vanilla extract, and a little milk until it’s smooth and creamy. If it’s too thick, add a little more milk. If it’s too thin, add a little more powdered sugar.
Once the Kringle is completely cool, drizzle the glaze over the top. You can use a spoon, a fork, or even a piping bag for a more decorative look.
And that’s it! Your Apple Kringle with Vanilla Glaze is ready to be enjoyed. Serve it warm or at room temperature with a cup of coffee or tea. Trust me, it won’t last long!
Troubleshooting Your Apple Kringle
Okay, so things didn’t go exactly as planned? Don’t panic! Here are some common problems and how to fix them:
- Dough is too sticky: Add a little more flour, one tablespoon at a time, until it’s easier to handle.
- Filling is too runny: Add a tablespoon of cornstarch to the filling to thicken it up.
- Kringle is browning too quickly: Tent it with foil during baking.
- Glaze is too thick: Add a little more milk.
- Glaze is too thin: Add a little more powdered sugar.
Beyond the Recipe: Variations and Serving Suggestions
Want to take your Apple Kringle with Vanilla Glaze to the next level? Here are some ideas:
- Add chopped nuts to the filling or sprinkle them on top of the glaze.
- Drizzle with caramel sauce or chocolate sauce.
- Serve with a scoop of vanilla ice cream or whipped cream.
- Use different fruits, such as pears, peaches, or berries.
- Add spices like cardamom, ginger, or cloves.
- Use a different glaze, such as maple glaze or cream cheese glaze.
The possibilities are endless! Let your creativity run wild and create your own unique Kringle masterpiece.
Conclusion for Apple Kringle with Vanilla Glaze
This Apple Kringle with Vanilla Glaze is more than just a dessert; it’s a comforting hug on a plate. Remember, the secret to a perfect kringle lies in the balance of flavors: tart apples, sweet glaze, and flaky pastry. Don’t be afraid to experiment with different apple varieties or add a pinch of cinnamon for extra warmth. So go ahead, bake up a batch of this delightful treat. After all, every day is a good day for a little bit of homemade goodness. Enjoy!
Print
Apple Kringle with Vanilla Glaze
Delicious apple kringle with vanilla glaze recipe with detailed instructions and nutritional information.
- Total Time: 35 minutes
- Yield: 4 servings 1x
Ingredients
- All-purpose flour 3 cups
- Unsalted butter 1 cup (cold, cubed)
- Cream cheese 8 ounces (softened)
- Granulated sugar 1/2 cup
- Baking powder 1 teaspoon
- Salt 1/2 teaspoon
- Apple pie filling 21 ounces
- Vanilla extract 1 teaspoon
Instructions
- Step 1: In a large bowl, combine flour, baking powder, and salt. Cut in the cold butter and cream cheese using a pastry blender or your fingers until the mixture resembles coarse crumbs.
- Step 2: Gradually add sugar and mix until a dough forms. Divide the dough in half, wrap each half in plastic wrap, and refrigerate for at least 30 minutes.
- Step 3: Preheat oven to 375°F (190°C). On a lightly floured surface, roll out one portion of dough into an oval shape. Spread half of the apple pie filling over the dough, leaving a 1-inch border.
- Step 4: Fold one side of the dough over the filling, then fold the other side over, creating a layered effect. Pinch the edges to seal. Repeat with the remaining dough and filling.
- Step 5: Place the kringles on a baking sheet lined with parchment paper. Bake for 25-30 minutes, or until golden brown. Let cool completely before glazing with vanilla glaze.
Notes
- For best flavor, store your cooled Kringle in an airtight container at room temperature for up to 2 days.
- A quick zap in the microwave (15-20 seconds) will gently warm a slice and soften the glaze.
- Serve slices of Apple Kringle with a dollop of whipped cream or a scoop of vanilla ice cream for an extra indulgent treat.
- To prevent a soggy Kringle, be sure to drain excess liquid from the apple pie filling before spreading it on the dough.
- Prep Time: 15 minutes
- Cook Time: 20 minutes
- Method: Stovetop
- Cuisine: American
FAQs
Can I use a different type of apple in my Apple Kringle with Vanilla Glaze?
Absolutely! While I personally adore the crisp tartness of Granny Smith apples in this Apple Kringle with Vanilla Glaze, feel free to experiment. Honeycrisp apples bring a lovely sweetness, while Braeburn apples offer a complex flavor. Just make sure whatever apple you choose holds its shape well during baking, or you might end up with a slightly mushy filling. Nobody wants a mushy filling, unless we’re talking about apple sauce (which, admittedly, is also delicious, but that’s a different recipe for a different day!). Adjust the sugar in the recipe depending on how sweet your chosen apples are to maintain the perfect balance.
How do I prevent my Apple Kringle with Vanilla Glaze from getting soggy?
Soggy bottoms are the bane of every baker’s existence, aren’t they? To avoid a soggy Apple Kringle with Vanilla Glaze, make sure to fully cool the filling before assembling the pastry. A hot filling will release steam, which will condense and make your dough, well, soggy. Also, don’t overfill the kringle. Too much filling equals too much moisture. Finally, bake the kringle on the bottom rack of your oven for the last few minutes of baking time. This will help crisp up that bottom crust. Nobody wants a soggy bottom!
What’s the best way to store leftover Apple Kringle?
If, and that’s a big IF, you have any leftover Apple Kringle, storing it properly is key. Wrap it tightly in plastic wrap or aluminum foil and store it at room temperature for up to two days. If you want to keep it longer, pop it in the fridge. Just be aware that refrigeration can dry it out slightly, so consider reheating individual slices in the microwave for a few seconds before enjoying. You can also freeze the Kringle for up to two months. When ready to eat, thaw it overnight in the refrigerator and then warm it slightly before glazing and serving.
Can I make the Apple Kringle dough ahead of time?
Oh, you’re speaking my language now! Making the dough ahead of time is a fantastic idea, especially if you’re short on time. Prepare the dough according to the recipe instructions, then wrap it tightly in plastic wrap and refrigerate it for up to 24 hours. When you’re ready to bake, let the dough sit at room temperature for about 30 minutes to soften slightly before rolling it out. This will make it much easier to work with. This simple trick can save you some serious time and stress on baking day.

Leave a Comment