
Remember that time you bought that expensive sweet chili sauce only to realize it tasted suspiciously like sugar and regret? We fix that tragic disappointment today! Prepare for a flavor explosion that beats anything bottled when you master this simple Asian Sweet Chili Homemade Sauce.
If you thought creating that irresistible balance of fiery spice and sugary tang was strictly for restaurant chefs, think again. This recipe is your backstage pass to culinary stardom, promising maximum flavor with minimal kitchen drama.
- This incredibly simple recipe minimizes prep time, allowing you to whip up a batch faster than ordering takeout, perfect for busy weeknights.
- Experience a perfectly balanced symphony of heat, tang, and sweetness, ensuring a complex and addictive flavor profile for dipping or glazing.
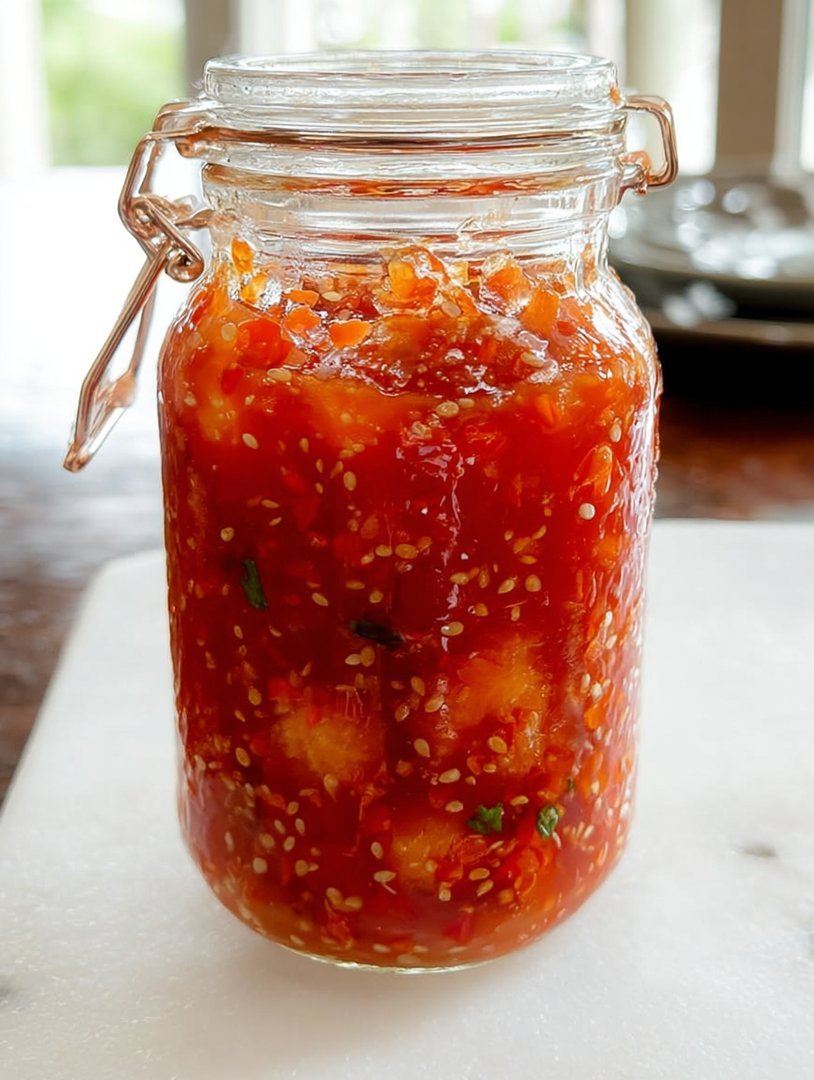
- The finished sauce boasts a gorgeous, translucent ruby color and luscious, pourable texture that makes every dish look professionally catered.
- Its remarkable versatility means this sauce elevates everything from crispy chicken strips and spring rolls to grilled vegetables and rice bowls seamlessly.
Why Ditch the Bottle? The Magic of Homemade Sweet Chili
For years, I treated bottled sweet chili sauce like liquid gold—expensive, necessary, and often disappointing. It seemed like every store-bought version was either too thin, too gloopy, or so heavily dominated by vinegar that it made my nose wrinkle. My quest for the perfect dipping experience eventually led me to the kitchen, armed with a cutting board and a stubborn determination to create the ultimate version myself. What I discovered was shockingly easy: the secret to truly great sweet chili sauce lies in fresh ingredients and controlling the heat yourself.
Making your own version ensures you skip the questionable additives and achieve that perfect viscosity—thick enough to cling to a spring roll but smooth enough to drizzle elegantly over grilled chicken skewers. Plus, let’s be honest, standing over a bubbling pot of homemade sauce just makes you feel like a culinary genius, even if the entire process takes less than twenty minutes. The aroma alone is worth the effort; a powerful, sweet cloud of garlic and fresh chili steam that instantly makes your kitchen the most exciting place in the house. This sauce isn’t just a condiment; it’s a personality upgrade for your refrigerator, ready to transform boring leftovers into celebrated main courses.
Balancing the Flavor: Sweet, Sour, and Spicy Harmony
The beauty of the Asian Sweet Chili Homemade Sauce is its ability to dance across your palate. It starts sweet, offers a satisfying punch of spice in the middle, and finishes with a bright, clean tanginess that keeps you coming back for more. Achieving this balance requires precision and high-quality core ingredients. Many people rely only on granulated sugar, but incorporating a touch of honey or brown sugar adds depth that standard refined sugar misses. Similarly, skipping dried flakes for fresh chili peppers—whether it’s mild jalapeños or fiery serranos—provides a vibrant flavor profile that’s impossible to replicate.
When cooking, remember that heat level is subjective. I recommend starting with the specified amount of chili and tasting as you go. If you are serving this to a crowd with varied spice tolerances, you can halve the amount of fresh chili and include red pepper flakes at the end, allowing people to amp up the heat if they dare. Don’t be afraid to adjust the vinegar; a splash of apple cider vinegar can often provide a smoother tang than standard white distilled vinegar. Remember, you are the chef, and this sauce should reflect your personal heat tolerance and flavor preferences. This foundation is so simple that you can customize it infinitely without destroying its integrity.
Essential Tips for the Perfect Consistency
Consistency is often the biggest hurdle when making sauces at home. Nobody wants watery chili water, but conversely, a sauce that refuses to pour is equally frustrating. The goal for this Asian Sweet Chili Homemade Sauce is a syrupy, glossy texture that coats the back of a spoon beautifully. We achieve this primarily through two methods: reduction and careful use of a thickening agent, usually cornstarch or potato starch.
When you boil the sauce mixture (sugar, water, vinegar), the liquid reduces, concentrating the flavors and slightly thickening the base. This step is crucial. However, relying solely on reduction can take a long time and result in an overly caramelized flavor. The quick fix is creating a slurry: mixing a starch (like cornstarch) with cold water before adding it to the simmering sauce. The cold liquid prevents the starch from clumping immediately. Once the slurry hits the heat, whisk vigorously, and you will see the magical transformation from liquid to luscious sauce in less than a minute. Always let the sauce simmer for 60 seconds after adding the slurry to ensure the starchy flavor is fully cooked out.
Troubleshooting Common Sweet Chili Sauce Problems
Even the simplest recipes can present minor challenges. If your sauce looks cloudy, it usually means you added the cornstarch slurry when the sauce was not hot enough, or you didn’t cook it long enough afterward. Ensure the sauce is at a full boil before adding the slurry, and then maintain a gentle simmer for at least one minute. If your sauce is too thick after cooling, don’t panic! Simply whisk in a teaspoon or two of warm water or broth until you achieve the desired consistency. If it’s too thin, you can create a second, smaller slurry (1 teaspoon cornstarch mixed with 1 tablespoon cold water) and whisk it in, boiling for another minute until it tightens up. Patience is your greatest tool; the sauce will thicken noticeably as it cools.
Ingredients for Asian Sweet Chili Homemade Sauce
Here’s what you’ll need to make this delicious dish:
- Fresh Red ChiliesUse mild options like Fresno or hotter alternatives like bird’s eye chilies, finely minced to control the heat level precisely.
- Garlic ClovesFreshly minced garlic provides an essential pungent base; avoid using dried garlic powder for this recipe’s core flavor.
- Granulated SugarThis provides the necessary sweetness and structure for the sauce, contributing to the desirable glossy texture.
- WaterNeeded to dissolve the sugar and create the base syrup before reduction and thickening.
- Rice VinegarProvides the sharp, bright tang essential to balancing the sweetness; ensure you use plain rice vinegar, not seasoned.
- Soy Sauce AlternativeA splash of liquid aminos or a certified wheat-free soy sauce provides necessary umami depth and color enhancement.
- Ginger PasteA small amount of freshly grated ginger adds a layer of warm complexity that elevates the final flavor profile.
- CornstarchUsed as the thickening agent; mix it with cold water to create a slurry before introducing it to the hot liquid.
The full ingredients list, including measurements, is provided in the recipe card directly below.
How to Make Asian Sweet Chili Homemade Sauce
Follow these simple steps to prepare this delicious dish:
Step 1: Prep the Aromatics and Base Liquid
In a medium saucepan, combine the water, granulated sugar, rice vinegar, liquid aminos, and ginger paste. Place the saucepan over medium-high heat. While the mixture warms, finely mince your fresh red chilies and garlic cloves. Add the minced chilies and garlic to the saucepan, stirring until the sugar completely dissolves, which should take about 3 to 5 minutes.
Step 2: Boil and Simmer the Sauce
Bring the mixture to a rolling boil, then immediately reduce the heat to a gentle simmer. Allow the sauce to simmer uncovered for 8 to 10 minutes. This allows the fresh flavors of the chili and garlic to infuse the liquid, and the liquid will begin a slight reduction, concentrating the taste. Taste cautiously and adjust the sugar or vinegar if necessary.
Step 3: Prepare the Cornstarch Slurry
While the sauce is simmering, prepare the thickening slurry. In a very small bowl, combine the cornstarch and 2 tablespoons of cold water, stirring rapidly with a fork until no lumps remain. The cold water is essential here to prevent the starch from clumping when it hits the heat.
Step 4: Thicken the Sauce
Ensure the sauce is at a low simmer. Slowly pour the cornstarch slurry into the simmering sauce while whisking continuously and vigorously. Continue to whisk for about 60 seconds. The sauce should immediately begin to thicken and turn translucent and glossy. If it doesn’t thicken quickly, increase the heat slightly, but keep whisking.
Step 5: Cool and Store
Remove the saucepan from the heat. Allow the sauce to cool completely at room temperature before transferring it to an airtight jar or container. As the sauce cools, it will thicken further, achieving that perfect, syrupy consistency.
Transfer to plates and drizzle with sauce for the perfect finishing touch on egg rolls, grilled shrimp, or crispy chicken tenders.
Storing and Serving Your Homemade Chili Sauce
Once you make a batch of this fantastic Asian Sweet Chili Homemade Sauce, you will realize quickly that you need to make more. This sauce stores remarkably well, making it an excellent candidate for meal prep or homemade gifts for friends who appreciate complex flavors.
How Long Does Sweet Chili Sauce Last?
Because this recipe contains vinegar and sugar, both natural preservatives, this sauce boasts a good shelf life. When properly stored in a sterilized, airtight container, it will remain fresh and delicious in the refrigerator for up to three weeks. Always ensure the lid is tightly sealed and avoid dipping directly into the jar, which can introduce bacteria and shorten the storage time. If you notice any separation, simply stir it vigorously before serving; this is normal.
Creative Ways to Use Your Sweet Chili Sauce
While this sauce is undeniably the star of any spring roll party, its applications extend far beyond dipping. Use it as a glaze for oven-baked turkey meatballs or brushed onto flank steak during the last few minutes of grilling for a beautiful caramelized crust. It also works brilliantly as a base for a vibrant salad dressing when combined with a little sesame oil and lime juice. For a quick appetizer, toss shredded rotisserie chicken with a few tablespoons of the sauce and serve it in lettuce cups. It adds instant pizzazz to rice bowls, noodle stir-fries, and even acts as a sweet and spicy sandwich spread.
Frequently Asked Questions About Homemade Sauces
Can I substitute dried chilies for fresh ones in the Asian Sweet Chili Homemade Sauce?
While you can substitute dried chili flakes, the flavor profile will differ significantly. Fresh chilies provide a brighter, fruitier heat. If using dried flakes, start with 1 teaspoon and adjust up, noting that dried flakes absorb more liquid and deliver heat more slowly.
How do I make the sauce less spicy after I’ve already cooked it?
If your finished sauce is too spicy, the best way to temper the heat is by increasing the sweetness or acidity. Try mixing in an extra teaspoon of sugar or a splash of fresh lime juice. You can also dilute the mixture slightly by adding a tablespoon of water or plain broth, then re-thickening if necessary with a tiny bit more cornstarch slurry.
Is there a gluten-free option for thickening this sweet chili sauce?
Absolutely. While cornstarch is naturally gluten-free, if you prefer an alternative, you can substitute potato starch or tapioca starch in equal measure for the cornstarch slurry. Both options provide a glossy, clear finish and excellent thickening power without changing the flavor of the Asian Sweet Chili Homemade Sauce.
Life is too short for bland condiments. You know the scenario: you order takeout, excited for that perfect crispy chicken or those tender spring rolls, but the accompanying sauce packet tastes vaguely like sugar and disappointment. It lacks that essential zing, that perfect balance of heat and sweet that makes an authentic dipping experience truly memorable.
For years, I believed that magical bottle of crimson delight, the one that somehow elevates cheap noodles and boring steamed vegetables into weeknight heroes, was impossible to replicate at home. I tried various store-bought brands, chasing that elusive flavor profile—a blend of pungent garlic, fiery chili, and tangy vinegar—but nothing measured up. They were either too watery, too vinegary, or suspiciously sticky.
This quest led me into my kitchen, where after much chopping, simmering, and inevitable eye-watering due to excessive chili vapors, I cracked the code. Forget complex chemistry; the secret to crafting the perfect glaze lies in high-quality, fresh ingredients and a simple, patient simmer. This is more than just a recipe; it’s an invitation to elevate your entire pantry with a homemade sweet chili dipping sauce that is vibrant, fresh, and customizable.
The Magic of Homemade Flavor
Making your own version of this popular condiment allows you to dictate the narrative of flavor. Do you like a gentle, warming heat, or do you prefer a blast of capsaicin that makes your ears ring? When you control the ingredients, you control the outcome. Store-bought sauces often rely on heavy doses of high-fructose corn syrup and artificial thickeners, but we are using natural sweeteners and simple cornstarch (or arrowroot, if you prefer) to achieve that signature glossy sheen and satisfying texture.
This process transforms raw ingredients—fresh red jalapeños, garlic, and ginger—into a complex, multidimensional glaze. The initial aroma alone, as the ingredients bubble gently on the stovetop, is intoxicating. You’ll find that once you taste this vibrant, fresh version, you will never look at a pre-packaged bottle the same way again. It truly showcases why fresh preparation always wins when it comes to intense flavor.
Why Make Your Own Asian Sweet Chili Homemade Sauce?
The primary benefit of preparing your ownAsian Sweet Chili Homemade Sauceis the freshness factor. You avoid preservatives and choose the exact level of heat you desire by adjusting the quantity of chili seeds. Furthermore, mastering this simple recipe provides you with an endless supply of a versatile staple perfect for drizzling over fried appetizers, mixing into salad dressings, or glazing grilled chicken. It’s an easy, economical way to boost your weeknight meals.
Ingredients: What You Need
You probably have most of these items hiding in your pantry already. We emphasize fresh ingredients here—don’t skimp on the quality of your garlic and ginger, as they form the foundational aromatic layer of this delicious sauce. While some recipes use exotic chilies, we stick to easy-to-find red jalapeños or Fresno chilies to maintain accessibility without sacrificing that necessary heat.
Sauce Components
- 1 cup water
- 1 cup granulated sugar
- 1/2 cup rice vinegar (or apple cider vinegar for a stronger tang)
- 6 medium fresh red jalapeños (or 4 red Fresno chilies), finely minced (seeds in for maximum heat)
- 4 cloves garlic, minced
- 2 teaspoons fresh ginger, grated
- 1 tablespoon cornstarch or arrowroot powder
- 2 tablespoons cold water (for slurry)
- 1/2 teaspoon salt
- 1/4 teaspoon red pepper flakes (optional, for visual appeal and extra spice)
Step-by-Step Instructions for the Perfect Glaze
Patience is key during the simmering phase. This ensures the sugar dissolves completely and the flavors meld harmoniously, giving you that beautiful, glossy finish characteristic of high-quality sweet chili preparations. Remember to stir frequently, especially after adding the thickening slurry, to prevent clumping and sticking.
Preparation Phase
- Mise en Place:Thoroughly wash your chilies, garlic, and ginger. Finely mince the chilies and garlic. Grate the ginger. Ensure all seeds are retained if you prefer a spicier sauce.
- Initial Simmer:In a medium saucepan, combine the 1 cup of water, sugar, rice vinegar, salt, minced chilies, minced garlic, grated ginger, and red pepper flakes. Bring this mixture to a rolling boil over medium-high heat, stirring until the sugar is fully dissolved.
- Reduce Heat and Steep:Once boiling, immediately reduce the heat to low and let the mixture simmer gently, uncovered, for about 10 to 15 minutes. The mixture should thicken slightly, and the aromatics will have softened significantly. This simmering period extracts the deep flavors from the chilies and spices.
Thickening and Finishing
- Prepare the Slurry:While the sauce simmers, whisk together the cornstarch (or arrowroot) and 2 tablespoons of cold water in a small bowl until completely smooth. This is your thickening agent.
- Thicken the Sauce:Pour the slurry slowly into the simmering sauce mixture while constantly stirring with a whisk or wooden spoon. Continue stirring continuously for one to two minutes. The sauce will rapidly become thick and translucent, developing that famous glossy appearance.
- Cool and Store:Remove the saucepan from the heat immediately. Allow the sauce to cool completely before transferring it to an airtight jar or container. As it cools, the consistency will firm up further, reaching that ideal dipping texture.
Perfecting the Cooking Process
To achieve the best texture for thisAsian Sweet Chili Homemade Sauce, bring the initial ingredients to a quick boil to dissolve the sugar entirely, then immediately reduce the heat to a low, gentle simmer. Ensure you stir in the cornstarch slurry only after the flavors have fully developed during the low-heat steep, guaranteeing a perfect glaze.
Chef’s Insider Tips for Success
I once served a batch of this sweet chili sauce with homemade beef spring rolls at a neighborhood gathering, and everyone kept asking if I had finally opened a takeout restaurant. It was the perfect proof that making it from scratch makes all the difference in flavor intensity.
- Ensure you use cold water when mixing the cornstarch slurry; this prevents clumping and guarantees a smooth, uniform thickening process when added to the hot liquid.
- If you prefer a perfectly smooth, restaurant-style sauce, carefully strain the mixture through a fine-mesh sieve before adding the slurry, removing all solids.
- Taste and adjust the balance before cooling; if too sweet, add a splash more vinegar, and if too hot, stir in a tiny pinch more sugar to balance the heat.
Add Your Touch
For a unique twist on this great dipping sauce, incorporate finely chopped fresh lemongrass during the simmering phase for a citrusy aroma, or swap the sugar for coconut sugar for a subtle caramel note. Consider adding a dash of tamari or soy sauce for an umami depth.
Serving Suggestions: Beyond the Dip
While thisAsian Sweet Chili Homemade Sauceexcels as a dipping partner for anything fried—think crispy shrimp, vegetable tempura, or chicken tenders—its versatility extends far beyond appetizer platters. Use it as a vibrant glaze for oven-baked salmon or chicken breasts during the last five minutes of cooking, creating a beautiful caramelized crust.
Mix a tablespoon of the sweet chili sauce into plain yogurt or sour cream to create a creamy, spicy dressing perfect for coleslaw or potato salads. It also works brilliantly as a secret ingredient in marinades for flank steak or turkey skewers, infusing the meat with sweetness and a subtle kick. Don’t be afraid to drizzle it over rice bowls or stir-fries right before serving for a burst of fresh, homemade flavor.
Storing & Reheating
Store your finishedAsian Sweet Chili Homemade Saucein a sealed, sterilized jar in the refrigerator, where it will maintain excellent quality for up to two weeks. If the sauce thickens too much upon chilling, simply whisk in a teaspoon of hot water before serving to restore its desired drizzly consistency.
Frequently Asked Questions
How long does homemade sweet chili sauce last?
Due to the high sugar and vinegar content, this sauce keeps remarkably well. When stored properly in the refrigerator in an airtight container, it will last approximately two weeks, but its flavor is best within the first seven days.
Can I use dried chili flakes instead of fresh chilies?
You can substitute fresh chilies with dried flakes, but you will lose the fresh, vibrant quality. If you do use dried flakes, hydrate them slightly in warm water before adding to the saucepan, and use about 1 to 2 tablespoons, depending on desired heat level.
What if my sauce is too thin after cooling?
If your sauce is too runny, return it to the saucepan over medium heat. Prepare another small slurry using 1 teaspoon of cornstarch mixed with 1 tablespoon of cold water, whisk it into the warm sauce, and simmer for another minute until the desired thickness is achieved.
Can I freeze this sweet chili sauce?
While technically possible, freezing is not recommended. The freezing and thawing process can cause the cornstarch to break down, resulting in a slightly grainy or watery texture upon defrosting. It is best enjoyed fresh or refrigerated.
Embrace the joy of making your own condiments. This simple recipe forAsian Sweet Chili Homemade Sauceis a game-changer, transforming basic meals into extraordinary culinary experiences. Say goodbye to the lackluster packets and hello to the bold, bright flavors of true homemade goodness. Happy simmering!
Let’s be honest. We’ve all been there: reaching for that gorgeous, glossy bottle of sweet chili sauce at the grocery store, picturing crisp spring rolls and tender chicken wings. Then you taste it. It’s either so vinegary it makes your teeth hurt, or it’s basically just sugar syrup with a rogue chili flake floating forlornly inside. It’s a tragedy, really, and one that has haunted my kitchen for years until I finally realized the only way forward was rebellion. We are ditching the mediocre store-bought versions and creating a legendary batch of truly magnificent Asian Sweet Chili Homemade Sauce.
Trust me when I say this recipe transforms standard weeknight dinners into culinary celebrations. Forget the watered-down, artificial flavor profile; we are talking about a perfectly balanced symphony of heat, sweetness, and tang, thick enough to cling lovingly to whatever you dip it into. Gather your ingredients, prepare for a little simmering magic, and get ready to be absolutely spoiled by the best homemade sweet chili sauce you’ve ever tasted.
The Anatomy of Perfect Sweet Chili Sauce
Making a sauce from scratch can sound intimidating—like something only Michelin-starred chefs attempt—but this sweet chili sauce recipe is deceptively simple. It requires patience for simmering, but the active prep time is minimal. The real difference maker here is using fresh ingredients, particularly the garlic and ginger, which elevate this condiment from basic sweetness to complex, layered flavor territory.
Selecting Your Heat Level
The beauty of making this sauce at home is complete control over the spice. Are you a mild-mannered diner who prefers a gentle warmth, or do you require a fiery kick that borders on exhilarating? For a milder flavor, use Fresno peppers or larger red bell peppers mixed with a small amount of cayenne. If you want to taste the spice gods laugh, opt for small Thai bird’s eye chilies. Remember that the seeds carry most of the heat, so removing them is the easiest way to dial down the intensity without sacrificing that beautiful red color.
Essential Ingredients for Homemade Sweet Chili
This list is surprisingly short, proving that big flavor doesn’t require a complicated shopping trip. Ensure you select fresh, firm chilies and pungent ginger for the best results. We are using cornstarch to create that perfect, desirable glaze texture.
Gathering Your Supplies
- 1 cup granulated sugar
- 1 cup water
- 1/2 cup rice vinegar (unseasoned is preferred)
- 4–6 medium red chilies (Fresno or similar mild-to-medium heat), roughly chopped
- 4 cloves fresh garlic, minced
- 1 tablespoon fresh ginger, grated
- 1/2 teaspoon salt
- 2 tablespoons cornstarch (or tapioca starch)
- 3 tablespoons cold water (for the slurry)
Step-by-Step Instructions for the Perfect Glaze
This process is about combining and reducing the liquid before thickening it to achieve that iconic, sticky, homemade sweet chili consistency.
Creating the Flavor Base
First, you need to prepare the aromatic components. In a small food processor or high-speed blender, pulse the chopped chilies, garlic, and ginger until they form a chunky, coarse paste. You want texture here, not baby food, so don’t over-process them. Next, in a medium saucepan, combine the 1 cup of water, sugar, rice vinegar, and salt. Bring this mixture to a rolling boil over medium-high heat, stirring until the sugar completely dissolves. This creates the foundational syrup for our Asian chili glaze.
Simmering and Thickening
Once the syrup is boiling, reduce the heat to low and add the chili, garlic, and ginger paste. Allow the mixture to gently simmer, uncovered, for about 10 to 15 minutes. This step is crucial for melding the flavors and slightly reducing the liquid. While it simmers, prepare your slurry: whisk the cornstarch (or tapioca starch) with the 3 tablespoons of cold water until smooth. Pour this slurry into the simmering sauce, stirring constantly for about 60 to 90 seconds. The sauce will rapidly thicken and turn beautifully glossy. Remove the pan from the heat immediately.
Storage and Serving Suggestions
Once the sauce is finished, let it cool slightly before transferring it to an airtight jar or container. As the sauce cools completely, it will thicken even further. Don’p worry if it looks slightly runny when hot—patience is a virtue here! This sauce is incredibly versatile, extending far beyond the standard dipping use.
Maximum Shelf Life for Sweet Chili Sauce
Store your freshly made sweet chili sauce in a sealed container in the refrigerator. Due to the high vinegar and sugar content, it preserves remarkably well. You can expect this homemade delight to last for up to three weeks, sometimes even a month, if stored correctly. Always use a clean spoon when serving to avoid introducing contaminants, ensuring the maximum shelf life for your batch.
Creative Ways to Use Your Glaze
While fantastic with simple spring rolls or dumplings, this sweet chili homemade sauce truly shines when incorporated into full meals. Use it as a glaze for oven-baked turkey meatballs or brushed onto chicken thighs before grilling. Drizzle it over cream cheese for a quick party appetizer, or whisk a tablespoon into your stir-fry for an instant hit of balanced flavor. It also makes an exceptional topping for fish tacos!
Conclusion for Asian Sweet Chili Homemade Sauce
Say goodbye forever to the disappointment of watery, one-note bottled sauces and embrace the vibrant, perfectly spiced world of the homemade sweet chili. This simple recipe proves that premium flavor doesn’t require complex techniques or dozens of ingredients. By combining fresh ginger and garlic with the ideal balance of sugar and vinegar, you create an indispensable condiment that will elevate everything it touches. Investing 20 minutes in making this glorious homemade sweet chili pays off exponentially, delivering a fresh, restaurant-quality glaze that will quickly become a permanent fixture in your refrigerator.
Print
Asian Sweet Chili Homemade Sauce
Skip store-bought! Craft this vibrant, balanced sweet chili sauce in minutes. Sugar, sharp vinegar, and minced garlic simmer quickly for a perfectly glossy, fiery glaze.
- Total Time: 35 minutes
- Yield: 4 servings 1x
Ingredients
- 1/2 cup Granulated Sugar
- 1/2 cup Water
- 1/4 cup Rice Vinegar
- 3 cloves Garlic, minced
- 2 tablespoons Chili Garlic Sauce (or Sriracha)
- 1 tablespoon Cornstarch
- 2 tablespoons Cold Water (for slurry)
- 1/2 teaspoon Kosher Salt
Instructions
- Step 1: In a small saucepan, combine the granulated sugar, 1/2 cup water, rice vinegar, minced garlic, chili garlic sauce, and kosher salt.
- Step 2: Place the saucepan over medium heat and bring the mixture to a gentle boil, stirring constantly until all the sugar is completely dissolved. Reduce the heat to low and let the mixture simmer for 3 minutes.
- Step 3: While the sauce simmers, whisk together the cornstarch and 2 tablespoons of cold water in a separate small bowl until a smooth slurry is formed. Ensure there are no lumps.
- Step 4: Slowly pour the cornstarch slurry into the simmering sauce while constantly whisking. Continue to stir gently for 1 to 2 minutes until the sauce thickens noticeably and becomes translucent.
- Step 5: Remove the saucepan from the heat. Taste the sauce and adjust seasonings if necessary. Allow the sauce to cool completely at room temperature, as it will thicken significantly as it cools.
- Step 6: Transfer the finished Asian Sweet Chili Sauce to an airtight container or jar and refrigerate. It can be stored for up to 2-3 weeks.
Notes
- For the best flavor and texture, store the sauce in a sterilized, airtight jar in the refrigerator for up to three weeks, checking for signs of cloudiness or separation before using.
- If the chilled sauce is too thick for dipping or pouring, reheat it gently in a small pan over low heat, whisking in a teaspoon of water at a time until the desired consistency is reached.
- This versatile sauce shines as a glaze for baked salmon, a dipping condiment for crispy spring rolls, or drizzled generously over cream cheese served with crackers for a quick party appetizer.
- To guarantee a smooth, lump-free final product, make sure the cold water and cornstarch slurry is perfectly dissolved before you slowly pour it into the hot simmering liquid, whisking constantly.
- Prep Time: 15 minutes
- Cook Time: 20 minutes
- Method: Stovetop
- Cuisine: American
FAQs
How do I prevent my Asian Sweet Chili Homemade Sauce from being too thin or too thick?
Achieving the perfect consistency often comes down to the cornstarch slurry and proper simmering time. If your sauce is too thin after cooling completely, reheat it gently and add a small, additional slurry (1 teaspoon cornstarch mixed with 2 teaspoons cold water). Whisk rapidly and cook for one minute. Conversely, if your Asian Sweet Chili Homemade Sauce becomes too thick, simply whisk in a tablespoon of hot water or rice vinegar until it reaches your desired pourable consistency. Remember that starch thickens significantly as it cools, so assess the final texture only after it has reached room temperature.
What is the best way to adjust the flavor profile if I find the sauce too spicy or too sour?
If the batch is too spicy, adding an extra spoonful of granulated sugar can help balance the heat, as sugar counteracts capsaicin. If the homemade sweet chili sauce tastes too sour or vinegary, add water, perhaps a quarter cup at a time, and simmer for five minutes to allow the excess acidity to evaporate slightly. If you prefer a more complex flavor profile, you can also swap a tablespoon of the granulated sugar for brown sugar, which adds a subtle molasses note.
Can I freeze this homemade sweet chili sauce, and does freezing affect the texture?
Yes, you can absolutely freeze this sauce, which is ideal if you’ve made a massive double batch. Store the sweet chili sauce in freezer-safe containers, leaving a little headspace as liquids expand upon freezing. It can be frozen for up to three months without flavor degradation. When you thaw the sauce, you might notice that the texture seems slightly grainy or separated due to the starch. Don’t panic; simply give it a vigorous whisk, or gently reheat it on the stovetop while stirring, and it will return to its beautiful, glossy state.
I don’t have fresh chilies available; can I use dried chili flakes instead in this Asian Sweet Chili Homemade Sauce recipe?
While fresh chilies provide the best color, texture, and bright flavor, you can substitute with dried flakes in a pinch, but you must adjust the quantity. For this recipe, you would use about 2 to 3 teaspoons of dried chili flakes soaked in a little hot water for 10 minutes before adding them to the pot. However, be aware that dried flakes deliver a sharper, less nuanced heat and will not provide the vibrant red color or the body that fresh peppers contribute to the final Asian Sweet Chili Homemade Sauce product.


Leave a Comment