

The smell of cinnamon and brown sugar signals the start of the season, usually accompanied by chaos. If you need a dessert that tastes like a cozy fireplace hug without the hours of delicate decoration, you need this recipe. Get ready for theBest winter holiday Cookie Bars Recipeyou have ever made.
- These bars deliver maximum festive flavor effortlessly, combining chewy textures with bright, warming spices perfect for seasonal celebrations.
- The easy, press-in crust and simple topping eliminate tedious rolling and cutting, making preparation a breeze even on busy December evenings.
- Achieve stunning visual layers featuring bright cranberry swirls and crunchy pecan pieces that look gorgeous displayed on any dessert platter.
- This forgiving dessert travels exceptionally well, offering a wonderful, sturdy alternative to delicate cookies for gifting or potluck contributions.
The Disaster That Led to Cookie Bar Perfection
I am usually a perfectionist when it comes to holiday baking. We are talking intricate royal icing, meticulously shaped gingerbread men, and the kind of aggressive organizational system that would make a librarian weep with joy. However, three years ago, disaster struck. I had meticulously prepared 12 dozen cookies for the annual neighborhood gathering, only to have my overly enthusiastic golden retriever, Barnaby, perform an unplanned ‘taste test’ on the cooling rack.
There I was, standing in a kitchen smelling faintly of burnt sugar and canine remorse, with only two hours until guests arrived. I needed speed, I needed flavor, and most importantly, I needed zero dexterity requirements. That frantic moment of panic led to the improvisation of this magnificent, streamlined bar recipe. Forget rolling, chilling, or decorating; this recipe is about pure, unadulterated, glorious flavor delivered straight to your face in a convenient square. It truly became theBest winter holiday Cookie Bars Recipebecause it survived Barnaby’s rampage and still tasted like pure joy.
Building the Ultimate Foundation for Festive Bars
Building the Ultimate Foundation: The Chewy Crust
The secret to a truly great cookie bar is the crust. It can’t be too cakey or too crumbly; it needs to be dense, buttery, and strong enough to hold up to the glorious, decadent filling we are about to introduce. Think of it as the foundation of a very delicious, temporary dessert structure. We start with browned butter, because if you aren’t browning your butter for holiday desserts, honestly, what are you even doing? Browning the butter adds a nutty, deep flavor complexity that plain melted butter simply cannot match. It takes an extra five minutes but elevates the flavor profile by about a thousand percent.
Make sure your brown sugar is packed tightly; this moisture is crucial for achieving that quintessential holiday chewiness. Mix in your flour, a touch of baking powder, and a generous pinch of sea salt. The dough will be thick and sticky—this is exactly what we want. Pressing it into the pan is the only labor-intensive part of this entire process, but trust me, it’s worth the effort. Use the bottom of a measuring cup or the back of a spoon to ensure you have a completely flat, uniform base. Consistency is key here; uneven crusts lead to uneven baking, and nobody wants a half-burnt, half-raw cookie bar experience.
Layering in Festive Flavor: Cranberry and Spice
What makes these the quintessential winter holiday bars? The filling, naturally. We ditch the overwhelming sweetness of traditional fillings and lean heavily into robust seasonal spices and bright fruit. We combine warming spices like cinnamon, nutmeg, and ginger—but the real star is the dried cranberry and orange zest pairing. Cranberries cut through the richness of the butter and sugar, providing a necessary tang that keeps you coming back for another bite. If you use fresh cranberries, ensure you chop them coarsely first so they distribute evenly and don’t introduce too much moisture.
Don’t skip the orange zest! That little bit of citrus oil brings an incredible aromatic quality that complements the spices perfectly. This is where the magic happens. We drizzle a simple sugar mixture over the base, scattering the cranberries and chopped pecans generously. If you prefer walnuts, those work wonderfully too, offering a slightly different bitter crunch. The resulting bake is a mosaic of texture and flavor: chewy bottom, gooey center, and crunchy top. This approach ensures every square is perfectly balanced, making it arguably theBest winter holiday Cookie Bars Recipefor gifting.
For those who adore chocolate, feel free to toss in a handful of mini chocolate chips before baking. They melt beautifully into the gaps, adding another layer of richness. Remember, this recipe is incredibly adaptable, which is part of its charm. The baking process is mostly hands-off once the layers are assembled. You are aiming for a golden brown edge and a center that looks just set—not overly wobbly, but definitely not rock hard. Overbaking is the enemy of the chewy bar, so watch your timing carefully and err on the side of slightly underdone, as they continue to set while cooling.
Ingredients for Best winter holiday Cookie Bars Recipe
Here’s what you’ll need to make this delicious dish:
- Unsalted ButterUse high-quality butter for the best flavor, especially since we will be browning it to enhance the nuttiness.
- Brown SugarDark brown sugar is preferred here for its deep molasses flavor and high moisture content, ensuring a wonderfully chewy texture.
- Granulated SugarUsed in combination with brown sugar for structure and to create a crisp layer on the top of the bars.
- All-Purpose FlourMeasure this using the spoon-and-level method to avoid adding too much, which would result in dry, dense bars.
- Large EggsEnsure the eggs are at room temperature, which helps them emulsify properly into the butter mixture for a smoother dough.
- Baking Powder and SaltBaking powder provides lift, while a generous pinch of fine sea salt balances the sweetness beautifully.
- Vanilla PowderUse pure vanilla powder, as this provides depth of flavor essential for any classic baked good.
- Dried CranberriesThese provide the necessary tartness; ensure they are fresh and not overly dried out for better plumpness in the bars.
- PecansUse raw pecans, roughly chopped, as they toast lightly during baking, intensifying their earthy flavor.
- SpicesA blend of ground cinnamon, nutmeg, and a whisper of ginger provides the signature warm holiday aroma.
- Orange ZestCritical for providing a bright, aromatic lift that cuts through the richness of the butter and sugar.
The full ingredients list, including measurements, is provided in the recipe card directly below.
How to Make the Ultimate Winter Holiday Cookie Bars
Follow these simple steps to prepare this delicious dish:
Step 1: Preparing the Base and Browning the Butter
Preheat your oven to 350°F (175°C). Line a 9×13 inch baking pan with parchment paper, leaving an overhang on two sides for easy removal later. Melt the butter in a saucepan over medium heat, stirring frequently until golden brown speckles form at the bottom and the butter smells nutty—this usually takes about five to seven minutes. Immediately pour the browned butter into a large mixing bowl to stop the cooking process.
Step 2: Mixing the Dough
Add both the brown and granulated sugars to the warm browned butter and whisk until combined. Beat in the room temperature eggs one at a time, followed by the vanilla powder. In a separate bowl, combine the flour, baking powder, salt, and spices. Gradually add the dry ingredients to the wet ingredients, mixing only until just combined—do not overmix, which develops gluten and leads to tough bars.
Step 3: Assembling the Layers
Press two-thirds of the dough mixture evenly into the prepared baking pan to form the base crust. Sprinkle the dried cranberries, chopped pecans, and fresh orange zest evenly over the crust. Crumble the remaining one-third of the cookie dough mixture over the top of the fruit and nut layer to create a textured, craggy top layer.
Step 4: Baking the Cookie Bars
Place the pan in the preheated oven and bake for 30 to 35 minutes. The edges should be deeply golden brown, and the center should look set but still slightly soft. If the edges are browning too quickly, you can loosely tent the pan with aluminum foil for the last ten minutes of baking. Remember, slight underbaking ensures maximum chewiness.
Step 5: Cooling and Cutting
This is arguably the hardest step: patience is required. Remove the bars from the oven and allow them to cool completely in the pan on a wire rack—about two hours. Cooling them completely prevents them from falling apart when slicing. Once cool, use the parchment paper overhang to lift the entire sheet of bars out of the pan and slice them into 24 even squares.
Transfer to plates and drizzle with a simple powdered sugar glaze or a dusting of confectioners’ sugar for the perfect finishing touch, proving why this is theBest winter holiday Cookie Bars Recipeon your dessert table.
Why Cookie Bars Reign Supreme Over Individual Cookies
Let’s have an honest discussion about holiday baking efficiency. While traditional cookies are charming and certainly have their place, they are extraordinarily demanding. You must chill the dough, roll it out precisely, cut delicate shapes, transfer them carefully to baking sheets, and then bake them in multiple small batches. If you are baking for a crowd, this process quickly turns into an all-weekend affair that leaves your counter dusted in flour and your energy levels dangerously low. Cookie bars, however, are the pragmatic hero of the season. They are the dessert equivalent of ordering takeout when you promised yourself you would cook—efficient, delicious, and deeply satisfying with minimal effort.
A major advantage is consistency. When you bake bars, the entire batch cooks in one large, contained vessel. This ensures that every piece receives similar heat exposure, leading to a much more consistent result than trying to monitor four separate trays of cutouts. Furthermore, bars are incredibly robust for travel and gifting. Try transporting a tray of delicate, frosted sugar cookies across town without a casualty; it’s a high-stakes mission. These sturdy bars, packed tightly with flavor and texture, handle transportation like seasoned professionals. Just wrap them tightly, and they are ready for the sleigh ride—or, you know, the minivan ride—to your destination.
Tips for Perfecting Your Holiday Bar Technique
Achieving bakery-quality results at home often comes down to mastering a few seemingly small techniques. First, temperature control is paramount, especially when working with butter. If you incorporate your eggs when the browned butter is too hot, you risk scrambling them, leading to an unpleasant texture in the dough. Allow the butter mixture to cool slightly until it is warm to the touch before adding the eggs. This small pause ensures a smooth, homogeneous base.
Second, remember the power of pre-chilling your ingredients. While we aren’t chilling the dough itself, ensuring your eggs are at room temperature is essential for incorporation. Conversely, if you are using a very oily filling (like some nut pastes), freezing or chilling the filling ingredients slightly before sprinkling them on helps prevent them from sinking completely into the crust during baking. For these particular spiced bars, making sure the dried fruit and nuts are lightly coated in flour prevents them from clumping together, ensuring an even distribution of flavor throughout the bar.
Finally, always trust the toothpick test, but interpret it correctly. For a cookie bar, a clean toothpick means you’ve gone too far. You are looking for moist crumbs attached to the toothpick when inserted into the center. This indicates that the bar is cooked enough to be safe but still retains enough moisture to be perfectly chewy once cooled. Pulling them out at this slightly underdone stage is the secret weapon for avoiding dry, crumbly bars. This guarantees that thisBest winter holiday Cookie Bars Recipealways meets expectations for optimal texture.
The combination of rich, buttery dough, tart cranberries, crunchy pecans, and aromatic spices creates a profoundly comforting dessert. It captures the essence of the holiday season without demanding complicated techniques or hours of slave labor. This recipe is designed for maximum joy and minimal stress—allowing you more time to enjoy the chaos of the season, perhaps keeping a closer eye on any overly curious golden retrievers while you’re at it.
Whether you are making a batch for a huge party or simply crafting a cozy treat for a snow day, these bars deliver on every promise. They store well in an airtight container at room temperature for up to five days, or you can freeze pre-cut bars for up to two months, making them excellent for preparing well in advance of the holiday rush. Just thaw them overnight, and they are ready to impress.
Remember that the beauty of a bar recipe lies in its imperfections; those slightly uneven crumbles on top and the gooey edges are part of the charm. Embrace the ease, savor the flavor, and celebrate the fact that you accomplished a magnificent baking feat without resorting to complicated piping bags or cookie cutters. Enjoy the warmth and spice this season brings!
The Quest for the Ultimate Low-Effort Holiday Cheer
The winter holidays are a magical time, filled with sparkling lights, cozy blankets, and the crushing expectation that you will produce fifty dozen perfectly shaped, individually decorated sugar cookies. I love baking, truly I do, but sometimes the sheer volume of holiday demands leaves me feeling less like a cheerful elf and more like a perpetually sticky, sleep-deprived mess. That’s why, a few years ago, I declared a personal war on unnecessary complexity and set out on a mission to create a dessert that screamed “festive joy” while whispering “effortless.”
I needed something that delivered maximum flavor and visual impact with minimal fuss—no rolling, no chilling, and absolutely no precision piping required. The solution, I quickly realized, lay in the glorious, often underestimated world of the humble bar cookie. These aren’t just any old squares; this is theBest winter holiday Cookie Bars Recipeyou will ever encounter. They combine a buttery shortbread base, a rich, nutty center, and a beautiful crackle topping that looks complicated but is laughably simple to achieve. Forget the complicated cookie cutters; we are embracing the 9×13 pan and a lot of holiday cheer.
The Accidental Discovery of Sunshine on a Plate

This recipe began as a frantic mash-up of leftover pantry items right before a major snowstorm. I was desperately seeking a comforting treat, combining shortbread, crushed walnuts, and a splash of maple syrup. The resulting rich, dense squares vanished almost instantly at our annual neighborhood gathering, surprising everyone, especially me, with their delightful ease and intense flavor.
Ingredients for the Best winter holiday Cookie Bars Recipe
For the Shortbread Crust:
- 1 cup (2 sticks) unsalted butter, softened
- 1/2 cup granulated sugar
- 1 teaspoon vanilla powder
- 2 cups all-purpose flour
- 1/4 teaspoon salt
For the Filling and Topping:
- 4 large eggs
- 1 1/2 cups packed light brown sugar
- 1/2 cup all-purpose flour
- 1 teaspoon baking powder
- 1/2 teaspoon salt
- 1 teaspoon vanilla powder
- 1/4 cup maple syrup (pure, Grade A)
- 2 cups chopped pecans or walnuts
- 1/2 cup dried cranberries or cherries (optional, for festive color)
- Powdered sugar, for dusting (optional)
Preparation: Getting Ready to Bake
Before you even think about turning on that mixer, gather your ingredients and ensure your butter is properly softened—not melted, just cooperative. Preheat your oven to 350°F (175°C). Line a 9×13 inch baking pan with parchment paper, leaving enough overhang on the sides to easily lift the finished bars out later. This small step is your shield against holiday baking frustration, trust me. Nobody wants to scrape a beautifully caramelized bar from the bottom of the pan.
Perfecting the Cooking Process
Start by creaming the butter and sugar for the crust until fluffy, pressing the dough firmly into the prepared pan and baking it briefly until light gold. While the crust cools slightly, whisk the filling ingredients vigorously, then pour this rich, sticky mixture evenly over the pre-baked base before returning the pan to the oven for the final, slow bake.
Step-by-Step Instructions
Following this sequence ensures a crisp, sturdy crust and a perfectly set, gooey center. Trying to bake the crust and the filling simultaneously often results in an undercooked base or an overbaked topping. Precision here is key to achieving that perfect textural contrast that defines theBest winter holiday Cookie Bars Recipe.
1. Create the Crust Foundation
In a large mixing bowl, beat the softened butter, granulated sugar, and vanilla powder until creamy and light. Gradually add the flour and salt, mixing until the dough just comes together. Be careful not to overmix; we want tender, not tough, shortbread. Press the dough evenly across the bottom of the prepared 9×13 inch pan. Bake for 15 minutes, or until the edges are lightly golden. Remove from the oven and set aside to cool slightly while you prepare the topping.
2. Whisk Together the Decadent Filling
While the crust is cooling, turn your attention to the filling. In a separate bowl, whisk together the eggs, brown sugar, flour, baking powder, and salt until smooth. Stir in the vanilla powder and maple syrup. The maple syrup gives this filling a deep, warming flavor that shouts “winter comfort.” Finally, fold in the chopped nuts and dried fruit, ensuring they are evenly distributed throughout the gooey batter. This mixture is rich, thick, and wonderfully fragrant.
3. The Grand Finale Bake
Pour the filling mixture over the warm, pre-baked shortbread crust. Spread it gently with a spatula to ensure it reaches all four corners. Return the pan to the oven and bake for 30 to 35 minutes. You are looking for the center to be set and the top to be a beautiful deep golden brown with delightful crackles. A toothpick inserted into the center should come out mostly clean, maybe with a few moist crumbs clinging to it—not wet batter.
4. Cooling and Cutting
This is arguably the most difficult part of the process: patience. Let the bars cool completely in the pan on a wire rack. Cooling is absolutely essential for clean cuts and for allowing the filling to fully set. Once cooled, use the parchment overhang to lift the entire slab onto a cutting board. Trim the edges (chef’s treat!) and slice into 24 squares. Dust with powdered sugar just before serving for that final snowy, festive touch.
The beauty of this winter bar recipe is its resilience. You don’t have to worry about dough temperature or individual decorations. It is baking for the busy holiday season, delivering maximum flavor with minimal fuss.
Add Your Touch
Swap pecans for toasted almonds or hazelnuts for different flavor profiles, or replace maple syrup with molasses for a darker, spicier note. Consider adding 1/2 teaspoon of ground cinnamon and a pinch of nutmeg to the filling for extra festive warmth, transforming these squares into spiced holiday treats instantly.
For those who love a hint of brightness, finely grated orange zest stirred into the shortbread crust provides a wonderful aroma and counterpoint to the sweetness. If you want to increase the chocolate factor (and who doesn’t?), you can sprinkle about 1/2 cup of mini chocolate chips over the filling before baking. The key to successful bar baking is customization; make it truly yours without altering the essential ratios of the crust and the binding agents in the filling.
Troubleshooting and Expert Baking Advice
Even the simplest festive recipe can benefit from a few insider tips designed to guarantee perfection. Skip the guesswork and learn from my many past baking blunders. After all, the holidays are too short for disappointing desserts.
-
Avoid a greasy crust by ensuring your butter is only softened, not melted; melted butter makes the shortbread dense and oily during the crucial first bake.
-
For incredibly clean cuts, chill the fully cooled bars in the refrigerator for at least an hour before slicing with a large, sharp knife.
-
Toast your nuts briefly before adding them to the filling; this deepens their flavor considerably, ensuring a richer, more complex taste in the finished bars.
I once took these bars to a potluck where a friend, usually reserved, ate three squares immediately and declared they tasted exactly like his grandmother’s holiday baking, which truly warmed my heart.
Storing & Reheating
Store leftover bars in an airtight container at room temperature for up to four days, separating layers with parchment paper to prevent sticking. For long-term freshness, freeze the fully cooled, uncut slab tightly wrapped for up to two months; thaw overnight at room temperature before slicing and serving.
Serving Suggestions for Holiday Perfection
While theseBest winter holiday Cookie Bars Recipeare stellar on their own, they truly shine when paired with other festive elements. Serve them slightly warm with a scoop of vanilla bean ice cream or a dollop of fresh whipped cream and a sprinkle of cinnamon. They are robust enough to stand up to a strong cup of coffee or a spiced tea, making them the ideal afternoon treat when you are cozying up by the fire after a long day of gift wrapping.
They also make a fantastic, edible gift. Wrap four or six bars attractively in cellophane bags tied with a festive ribbon. Because they are so easy to transport and store, they are an excellent option for holiday parties or school functions where individual cookies might be too delicate or time-consuming to prepare in bulk.
Ultimately, these bars are the essence of holiday baking done right—comforting, generous, and requiring very little fuss. They allow you to spend less time stressing over perfect shapes and more time actually enjoying the warmth and joy of the season with the people you love.
Conclusion for Best winter holiday Cookie Bars Recipe
The journey to finding theBest winter holiday Cookie Bars Recipeends here with these stunning, low-effort squares. We started with a simple shortbread crust and topped it with a rich, nutty, caramelized filling that embodies all the comforting flavors of the season. Remember the crucial tips: pre-bake the crust, cool completely before slicing, and don’t hesitate to customize the nuts or spices. These bars prove that you do not need hours of complex labor to create an unforgettable, crowd-pleasing holiday dessert. Enjoy the ease and the applause, because these festive squares are guaranteed to disappear faster than snow on a sunny day.
Print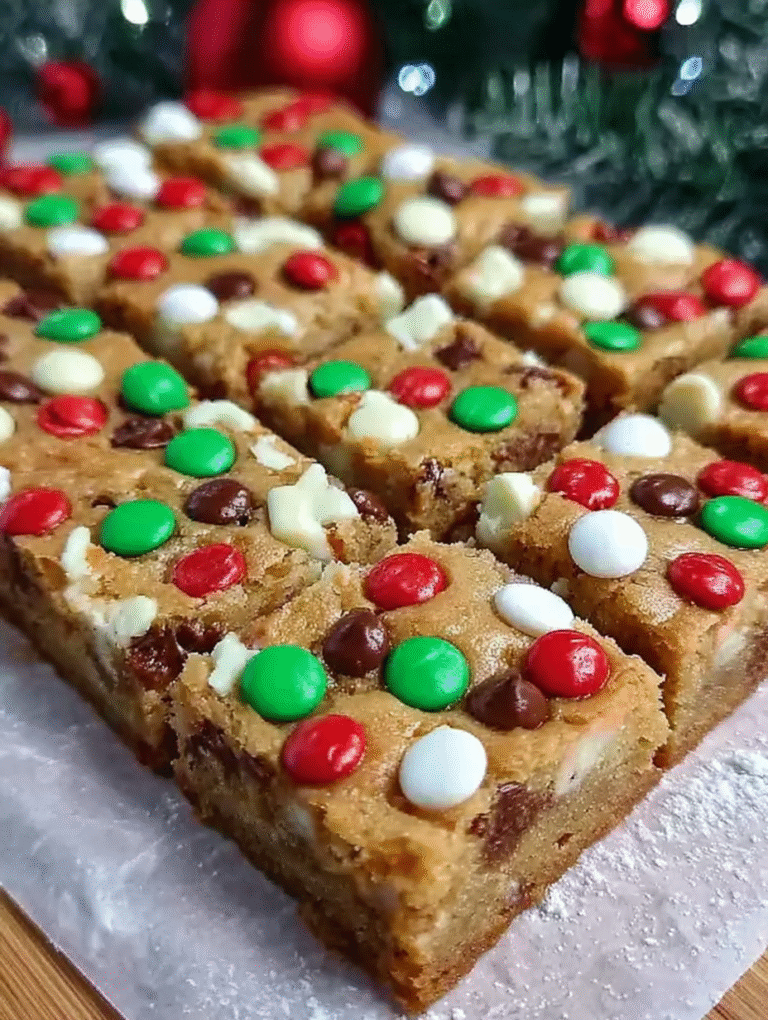
Best winter holiday Cookie Bars Recipe
The ultimate holiday bar! Achieve buttery, melt-in-your-mouth perfection by creaming the butter and sugar for 3 minutes. Easy pan prep ensures quick removal.
- Total Time: 35 minutes
- Yield: 4 servings 1x
Ingredients
- 1 cup (2 sticks) unsalted butter, softened
- 3/4 cup granulated sugar
- 2 cups all-purpose flour
- 1 large egg
- 1 teaspoon pure vanilla powder
- 1/2 teaspoon kosher salt
- 1/2 cup festive holiday sprinkles (nonpareils or jimmies)
- 1/2 cup white chocolate chips (for optional drizzle)
Instructions
- Step 1: Preheat the oven to 350°F (175°C). Line a 9×13 inch baking pan with parchment paper, leaving an overhang on the sides for easy removal, and lightly spray with non-stick cooking spray.
- Step 2: In a large bowl, use an electric mixer to cream together the softened butter and granulated sugar until the mixture is light and fluffy (about 3 minutes). Beat in the egg and alcohol-free vanilla extract until they are just combined.
- Step 3: Gradually add the all-purpose flour and kosher salt to the wet mixture, mixing on low speed until a thick, uniform dough forms. Switch to a spatula and gently fold in the holiday sprinkles until they are evenly distributed.
- Step 4: Press the entire dough mixture evenly into the prepared 9×13 inch pan. Bake for 25 to 30 minutes, or until the edges are lightly golden brown and the center is set and no longer glossy.
- Step 5: Allow the cookie bars to cool completely in the pan on a wire rack. If using the white chocolate drizzle, melt the chips and drizzle over the cooled bars. Once the chocolate is set, lift the bars out using the parchment paper and cut into 24 squares.
Notes
- Store these bars tightly sealed in an airtight container at room temperature for up to 4 days, or freeze the cut, undecorated bars for up to 3 months for future holiday cheer.
- If the bars have been refrigerated and seem too firm, warm them briefly in a 250°F oven for 5 minutes just before serving to refresh the delightful, buttery texture.
- For the perfect holiday presentation, serve these sturdy squares alongside a steaming mug of spiced cider or a small scoop of vanilla bean ice cream garnished with extra sprinkles.
- A chef's trick: Fold the holiday sprinkles in quickly with a spatula after mixing the flour, as overworking the dough, especially with jimmies, can cause the colors to bleed when baked.
- Prep Time: 15 minutes
- Cook Time: 20 minutes
- Method: Stovetop
- Cuisine: American

Leave a Comment