
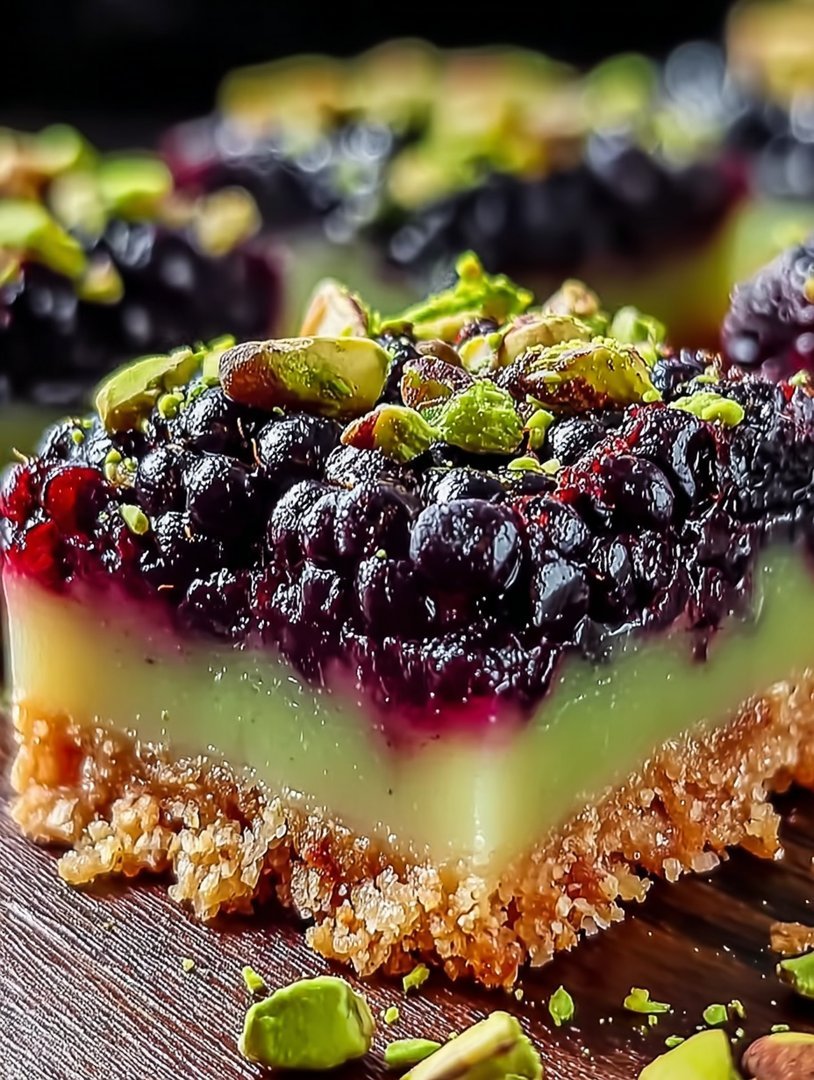
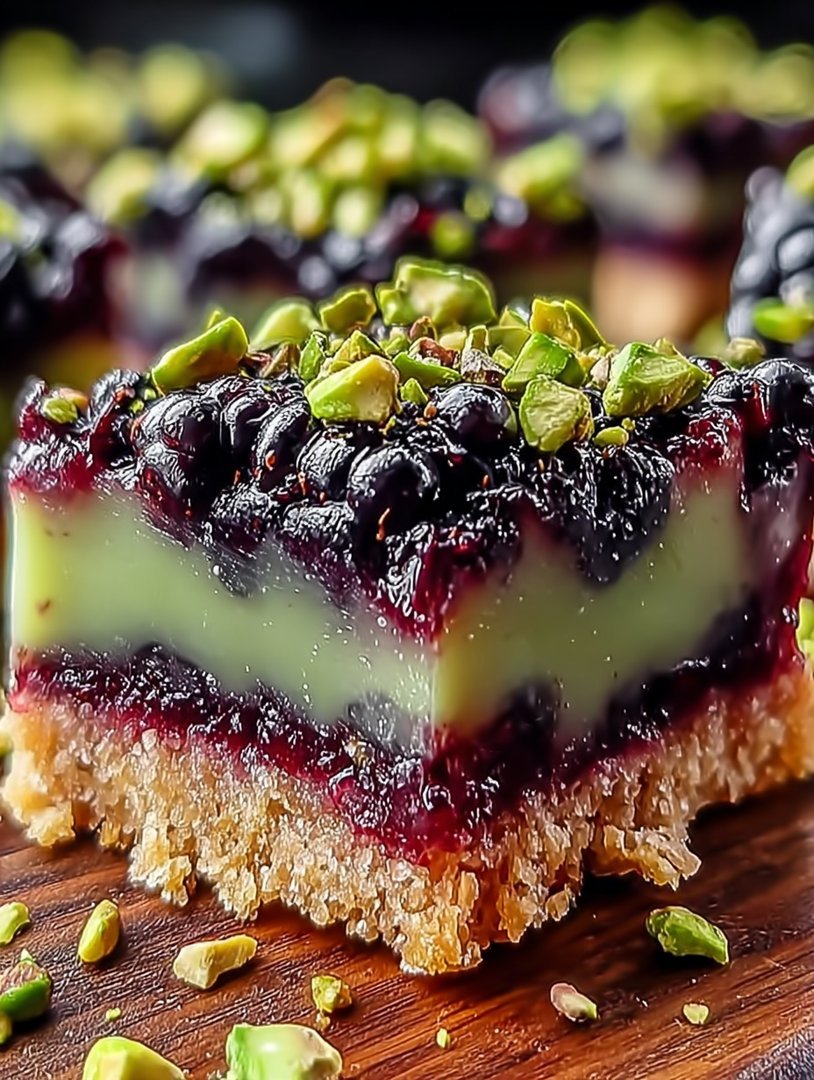
The scent of toasted nuts and bubbling fruit is enough to stop a marching band in its tracks. These gloriousBlackberry Pistachio Dream Barsare the perfect antidote to a mundane afternoon, rescuing us from the tyranny of the boring oatmeal cookie. Prepare yourself for a buttery, crunchy, and tangy masterpiece that guarantees instant happiness. This isn’t just baking; it’s a culinary hug wrapped in neon green and deep purple, ready to turn any Tuesday into a triumphant celebration.
Before diving into the glorious mess of flour and fruit, let’s quickly celebrate what makes these bars truly legendary:
- A surprisingly simple three-layer structure ensures maximum flavor payoff with minimal fuss, perfect for even novice bakers seeking sophisticated results.
- The brilliant contrast between the tart, bursting blackberries and the subtle, earthy crunch of pistachios is absolutely mesmerizing on the palate.
- Visually stunning treats, featuring vibrant purple and green hues, make these bars the undisputed star of any dessert table presentation.
- Easily adaptable to different berry seasons or nut preferences, offering endless versatility for year-round delightful baking endeavors and customizations.
Ingredients for Blackberry Pistachio Dream Bars
Here’s what you’ll need to make this delicious dish:
- All-Purpose FlourThe structural backbone of the crust and topping; ensure it is properly spooned and leveled for accurate results.
- Granulated SugarUsed primarily for sweetening the shortbread base, it provides the necessary crispness and golden hue.
- Brown SugarEssential for the crumb topping, offering moisture and a slightly deeper, molasses flavor that complements the nuts beautifully.
- Unsalted ButterNeeds to be chilled and cut into small cubes for the crust and topping, ensuring a flaky, tender texture when combined with the dry ingredients.
- PistachiosUse raw or lightly toasted, shelled pistachios; their distinct color and savory crunch are crucial for the “dream” bar texture.
- BlackberriesFresh or frozen blackberries work equally well for the filling; if using frozen, do not thaw them completely before cooking.
- Lemon JuiceA splash of fresh lemon juice cuts through the sweetness and brightens the blackberry flavor, providing that essential tangy element.
- Cornstarch or Tapioca StarchThis acts as the thickening agent for the berry filling, preventing the filling from running out when sliced.
- Vanilla Bean PasteUse a high-quality pure vanilla bean paste to enhance the overall aroma and complexity of the shortbread base.
- Baking Powder and SaltStandard leavening and seasoning ingredients that ensure the crust rises slightly and the flavors are properly balanced.
The full ingredients list, including measurements, is provided in the recipe card directly below.
The Culinary Saga of the Dream Bar
The beauty of theBlackberry Pistachio Dream Barslies not just in their taste, but in the psychological comfort they provide. There is something deeply satisfying about a dessert that knows exactly what it is—a structured, layered treat that doesn’t pretend to be a delicate mousse or a fussy tart. It’s robust, reliable, and profoundly delicious, much like your favorite oversized sweater after a long week.
I first concocted this recipe during a truly disastrous weekend. I had planned a lavish, multi-course dinner party that spectacularly imploded when my centerpiece roast decided to stage a dramatic smoke-filled protest. Faced with the immediate need for comfort and a pantry stocked only with residual baking supplies, I began throwing things together. The intense purple of the blackberries, the unusual green of the pistachios—it felt like baking therapy. The resulting bars weren’t elegant, but they were pure joy, earning the moniker “Dream Bar” because eating one truly felt like escaping into a better reality.
Why Blackberry and Pistachio Are the Ultimate Power Couple
In the culinary world, some combinations are classics: chocolate and mint, peanut butter and jelly, and now, unquestionably, blackberry and pistachio. This pairing works so well because it hits all the sensory notes without any single element becoming overwhelming. Blackberries bring a juicy, slightly aggressive tartness that demands attention. They are the spirited conversationalist at the party.
Pistachios, on the other hand, are the quiet, sophisticated observers. They contribute a subtle, buttery texture and a unique, earthy flavor that anchors the entire dish. They absorb some of the berry’s moisture while adding necessary structural integrity to the crumb topping. When baked, the nuts lightly toast, releasing oils that infuse the brown sugar and butter mixture with their delicate perfume. It is this synergy—the loud, tart fruit nestled against the quiet, savory nut—that elevates these bars beyond a standard dessert and into the realm of true comfort food royalty. Furthermore, the visual presentation of deep purple against bright emerald green is stunning, proving that nature is the best art director.
How to Make Blackberry Pistachio Dream Bars
Follow these simple steps to prepare this delicious dish:
-
Prepare the Shortbread Foundation
Preheat your oven to 350°F (175°C). Lightly grease and line an 8×8 inch baking pan with parchment paper, leaving an overhang on two sides for easy removal later. In a large bowl, whisk together the flour, granulated sugar, baking powder, and salt. Cut in the cold, cubed butter using a pastry blender or your fingers until the mixture resembles coarse, pea-sized crumbs. Press two-thirds of this mixture evenly into the prepared pan, forming the crust. Bake the crust for 15 minutes until set and lightly golden.
-
Develop the Blackberry Filling
While the crust is par-baking, prepare the filling. In a small saucepan, combine the blackberries (fresh or frozen), lemon juice, granulated sugar, and cornstarch. Cook over medium heat, stirring frequently, until the mixture thickens and begins to bubble vigorously, about 5 to 7 minutes. The cornstarch must cook completely to achieve a clear, thick consistency, similar to a soft jam. Remove from the heat and allow it to cool slightly while the crust finishes its initial bake.
-
Craft the Pistachio Crumb Topping
Return to the remaining one-third of the crumb mixture. Add the chopped pistachios, brown sugar, and a dash of vanilla bean paste to the dry mix. Use your fingers to gently combine everything until uniform, maintaining that classic crumbly texture. Ensure the nuts are roughly chopped, as large pieces provide a better texture contrast than finely ground ones.
-
Assemble and Final Bake
Remove the par-baked crust from the oven. Spread the warm blackberry filling evenly over the hot crust, ensuring you get right up to the edges. Immediately sprinkle the pistachio crumb topping evenly over the berry layer. Return the pan to the oven and bake for an additional 25 to 30 minutes, or until the crumb topping is deeply golden brown and the filling is visibly bubbling.
-
Cooling is Critical
This is the hardest part: the waiting game. Remove the pan from the oven and let it cool completely on a wire rack for at least 2 hours, or until the bars are fully set. The filling needs ample time to firm up; cutting them hot results in a messy, gooey disaster, charming as that might be. Once cool, use the parchment paper overhang to lift the entire slab out of the pan. Cut into 16 or 9 even squares.
Transfer to plates and dust lightly with a touch of powdered sugar for the perfect finishing touch and a charming snow-capped look.
Mastering the Three Layers: Tips for Perfection
Achieving the perfect balance in these bars requires respecting the integrity of each layer. The shortbread base should be sturdy enough to hold the fruit but tender enough to melt in your mouth. The secret here is using genuinely cold butter for the initial crumble. If your hands are warm, switch to a metal pastry blender to avoid melting the fat, which would result in a tough, less flaky crust. When pressing the base into the pan, be firm but not aggressive; over-compacting leads to a rock-hard crust.
For the filling, don’t skimp on the cook time. Many home bakers pull the filling off the heat too soon, leaving the cornstarch partially raw, which prevents proper setting. You need a good, rolling boil for a minute or two to ensure the thickening agent activates fully. If your filling seems too thin after cooling, remember the next time to add a tiny bit more starch, but never more than a teaspoon extra, or the texture becomes gummy. Furthermore, using a thick layer of fruit ensures that sweet-tart flavor explosion in every single bite of the final product.
Variations on the Theme: Adapting Your Dream Bars
While theBlackberry Pistachio Dream Barsare phenomenal as written, these treats are wonderfully adaptable to whatever ingredients you have on hand or whatever fruit is currently in season. If blackberries aren’t available, substitute raspberries, blueberries, or even a mixed berry blend. Just note that raspberries tend to hold more moisture, so you might need to slightly increase the amount of cornstarch in the filling by half a teaspoon.
If pistachios are out of budget or preference, walnuts or pecans are excellent substitutes. Walnuts offer a robust, earthier flavor, while pecans provide a sweeter, buttery undertone. If you use a different nut, lightly toast them beforehand to enhance their natural oils and crunch—just five minutes in the oven before adding them to the crumb topping makes a huge difference in flavor intensity. These bars store beautifully, wrapped tightly at room temperature for up to three days, though they rarely last that long. For longer storage, freeze the sliced bars individually in an airtight container for up to two months, thawing them on the counter whenever a sudden craving for a dream bar strikes.
The Accidental Discovery of Sunshine on a Plate
I needed a dessert for a neighbor’s party and only had leftover pistachios and a carton of blackberries languishing in the fridge. The result was this incredible, bright bar that tasted exactly like a surprise summer vacation, all wrapped up in a buttery shortbread hug. That day, the world received the unexpected gift of these glorious Blackberry Pistachio Dream Bars.
Why These Bars Are Superior to Your Average Brownie
Let’s be honest: brownies are fine. They are reliable, fudgy, and occasionally necessary. But sometimes, life demands a dessert that doesn’t just satisfy a craving; it changes your outlook on the entire week. That is where the Blackberry Pistachio Dream Bars swoop in, capes flowing dramatically, ready to rescue your taste buds from mediocrity. These bars offer a masterclass in textural balance. You have the snappy, salty crunch of the pistachio shortbread base, followed by the lush, creamy tang of the filling, all topped with the burst of jewel-toned blackberries.
The secret lies in treating each layer as a separate entity worthy of respect. The crust isn’t just a platform; it’s a foundation of flavor. We rely on ground pistachios not just for their striking green color but for their subtle, earthy sweetness that plays beautifully against the vibrant fruit. The filling itself must strike the perfect balance between sweetness and tartness, leveraging fresh lemon juice to cut through the richness of the cream cheese. This is a dessert that looks impressive, but secretly laughs in the face of complexity.
The Anatomy of the Perfect Shortbread Crust
A good crust must be sturdy enough to hold the glorious filling without crumbling into despair the moment you pick it up, yet tender enough to melt in your mouth. We achieve this glorious dichotomy by using truly cold butter and a gentle touch. Overworking shortbread is the quickest route to a tough, bready outcome, and nobody wants that. Think of the kneading process like giving a delicate hug, not wrestling an fish. The addition of the ground pistachios elevates the standard shortbread, adding both flavor depth and a delightful graininess that provides textural interest against the smooth filling.
Always remember to press the dough firmly and evenly into the pan. If the edges are too thick or the center is too thin, you risk uneven baking. Use a flat-bottomed measuring cup or the heel of your hand to ensure maximum compression. A well-compacted crust is a happy crust, ready to withstand the creamy onslaught that follows.
Gathering Your Ingredients for Dreamy Results
While the process is straightforward, the quality of your ingredients directly impacts the final divine flavor profile of the Blackberry Pistachio Dream Bars. Seek out the plumpest, most fragrant blackberries you can find. If they are slightly tart, even better, as this will contrast beautifully with the sweetened cream cheese layer. Ensure your pistachios are shelled and unsalted—we want control over the salt levels.
Ingredients for the Pistachio Shortbread Crust
- 1 ½ cups all-purpose flour
- ½ cup shelled, unsalted pistachios, finely ground
- ½ cup granulated sugar
- ¼ teaspoon salt
- 1 cup (2 sticks) unsalted butter, very cold and cut into cubes
Ingredients for the Blackberry Cream Cheese Filling
- 8 ounces full-fat cream cheese, softened
- 1 cup granulated sugar
- ¼ cup fresh lemon juice
- 1 teaspoon vanilla bean paste
- 2 large eggs
- 2 tablespoons cornstarch (or substitute 1 tablespoon arrowroot powder)
- 2 cups fresh blackberries, rinsed and gently dried
- 2 tablespoons coarse granulated sugar, for sprinkling (optional)
Step-by-Step Guide to Baking Blackberry Pistachio Dream Bars
Preheat your oven to 350°F (175°C). Line a 9×13 inch baking pan with parchment paper, leaving an overhang on the sides. This overhang is your best friend when it comes time to lift the completed bars out for perfect slicing.
Phase One: The Golden Foundation
In a medium bowl, whisk together the flour, ground pistachios, sugar, and salt for the crust. Add the cold, cubed butter. Using a pastry blender or your fingertips, cut the butter into the dry ingredients until the mixture resembles coarse, sandy crumbs. If you choose to use your hands, work quickly so the butter doesn’t warm up too much.
Press this crumb mixture firmly into the prepared baking pan. Bake the crust for 20 to 25 minutes, or until the edges are lightly golden brown. While the crust is baking, you can move on to preparing the sumptuous filling. Remove the crust from the oven and allow it to cool slightly while the oven temperature remains steady.
Phase Two: The Silky Berry Cloud
In a large mixing bowl, beat the softened cream cheese and sugar together until the mixture is completely smooth and fluffy, making sure there are no lumps remaining. Add the lemon juice and vanilla bean paste, mixing until just combined. Vigorously whisk in the eggs one at a time, ensuring each is fully incorporated before adding the next. This keeps the mixture emulsified and wonderfully smooth. Finally, gently mix in the cornstarch or arrowroot powder until barely combined—we want to avoid unnecessary gluten activation.
Pour the cream cheese filling evenly over the partially cooled shortbread crust. Distribute the fresh blackberries evenly over the top of the filling, lightly pressing them down so they are nestled into the cream. Sprinkle the optional coarse sugar over the berries for a slight crystalline crunch after baking.
Phase Three: The Great Chill
Return the baking pan to the oven. Bake for an additional 25 to 35 minutes. The bars are finished when the edges are set and lightly golden, and the center is mostly set but still has a slight gentle wobble—it will firm up completely as it cools. If the edges begin to brown too quickly, you can tent the pan lightly with aluminum foil.
Remove the Blackberry Pistachio Dream Bars from the oven and place the pan on a wire rack to cool completely to room temperature. This is the hardest part of the recipe because they smell magnificent, but resisting the urge to slice them early is mandatory! Once fully cooled, transfer the pan to the refrigerator and chill for a minimum of 4 hours, or ideally overnight, before lifting the bars out using the parchment paper overhang and slicing them into neat squares.
Perfecting the Cooking Process
Start by blind-baking the shortbread crust until lightly golden; this ensures it’s structurally sound enough to support the filling without getting soggy. While the crust is cooling, prepare the creamy filling, making sure the cream cheese is perfectly smooth. Finally, layer the berry mixture on top before the final bake and critical overnight chill. Patience is the key to achieving perfect bars.
Add Your Touch
If blackberries aren’t available, substitute raspberries or chopped dried cherries—they work beautifully with the pistachio base! For an extra zing in the filling, try swapping half the lemon juice for lime juice. You can also toast the pistachios lightly before grinding them for the crust to introduce a deeper, nuttier flavor profile in the final Blackberry Pistachio Dream Bars.
Storing & Reheating
Store these bars tightly covered in an airtight container in the refrigerator for up to four days; due to the cream cheese filling, they must stay chilled. Freezing them is generally not recommended as the filling texture may become grainy upon thawing. Always let the chilled bars come close to room temperature for ten minutes before serving for optimal flavor payoff.
My uncle tried these once and swore I had used some ancient, forbidden sorcery. He still asks for the recipe every time we gather, proving these Blackberry Pistachio Dream Bars are truly magical.
- Ensure your butter is truly cold when making the shortbread crust; this prevents excessive gluten development and guarantees a flaky, beautifully tender base.
- Always use fresh lemon juice—the bottled stuff won’t give you the bright, clean acidity needed to balance the sweetness of the fruit and cream cheese.
- Do not overmix the filling once the cornstarch is added, or the bars might become tough instead of maintaining that desired creamy, smooth texture.
Conclusion for Blackberry Pistachio Dream Bars
Mastering the preparation of the Blackberry Pistachio Dream Bars involves trusting the process and embracing the glorious combination of tart fruit and buttery nuts. From the sandy, flavorful pistachio shortbread crust to the vibrant, tangy filling, every single bite delivers pure, unadulterated joy. Remember to bake the crust fully and give the final bars ample chilling time—patience yields textural perfection. These bars are the ideal dessert for potlucks, celebratory gatherings, or when you simply need a little slice of sunshine on a dreary afternoon. Go ahead, bake a batch today, and prepare for a wave of happy compliments.
Print
Blackberry Pistachio Dream Bars
Nutty pistachio shortbread meets tart blackberry jam, baked until golden. These layered Dream Bars offer buttery crunch and smooth sweetness. Full recipe instructions and nutrition analysis provided.
- Total Time: 35 minutes
- Yield: 4 servings 1x
Ingredients
- 1 cup all-purpose flour
- 1/2 cup (1 stick) cold unsalted butter, cubed
- 1/4 cup granulated sugar
- 1/2 cup shelled pistachios, roughly chopped and divided
- 1/2 cup high-quality blackberry preserves or jam
- 1 cup white chocolate chips
- 2 large eggs, lightly beaten
- 1/2 teaspoon pure alcohol-free vanilla extract
Instructions
- Step 1: Preheat the oven to 350°F (175°C). Line an 8×8 inch baking pan with parchment paper, leaving an overhang on two sides. In a medium bowl, combine the flour, sugar, and half (1/4 cup) of the chopped pistachios. Cut in the cold butter using a pastry blender or your fingers until the mixture resembles coarse crumbs. Press the mixture firmly and evenly into the prepared pan.
- Step 2: Bake the crust for 15 minutes, or until the edges are light golden brown. While the crust is baking, melt the white chocolate chips either in a microwave in 30-second intervals or in a double boiler until smooth.
- Step 3: Remove the par-baked crust from the oven. Gently and evenly spread the blackberry preserves over the hot crust. In a separate bowl, whisk together the melted white chocolate, the beaten eggs, and the alcohol-free vanilla extract until fully incorporated.
- Step 4: Pour the chocolate-egg mixture over the layer of blackberry preserves. Sprinkle the top evenly with the remaining 1/4 cup of chopped pistachios.
- Step 5: Return the bars to the oven and bake for an additional 20 to 25 minutes, or until the edges are set and the center is firm to the touch. Let the bars cool completely at room temperature for at least 2 hours before lifting them out of the pan using the parchment paper overhang. Cut into 16 squares to serve.
Notes
- Keep any leftovers stored tightly wrapped in the refrigerator for up to five days, but always let them sit at room temperature for 15 minutes before enjoying for optimal texture.
- These bars are best served chilled or at room temperature, so avoid microwaving or heating them, which could cause the creamy topping to separate or melt away from the crust.
- For an elevated experience, serve the bars with a spoonful of crème fraîche or a small scoop of pistachio gelato to highlight the fruity tartness and nutty base.
- For the sharpest slices and clean layers, chill the fully cooled bars in the refrigerator for 30 minutes before using a sharp, non-serrated knife dipped in hot water to cut them.
- Prep Time: 15 minutes
- Cook Time: 20 minutes
- Method: Stovetop
- Cuisine: American


Leave a Comment