
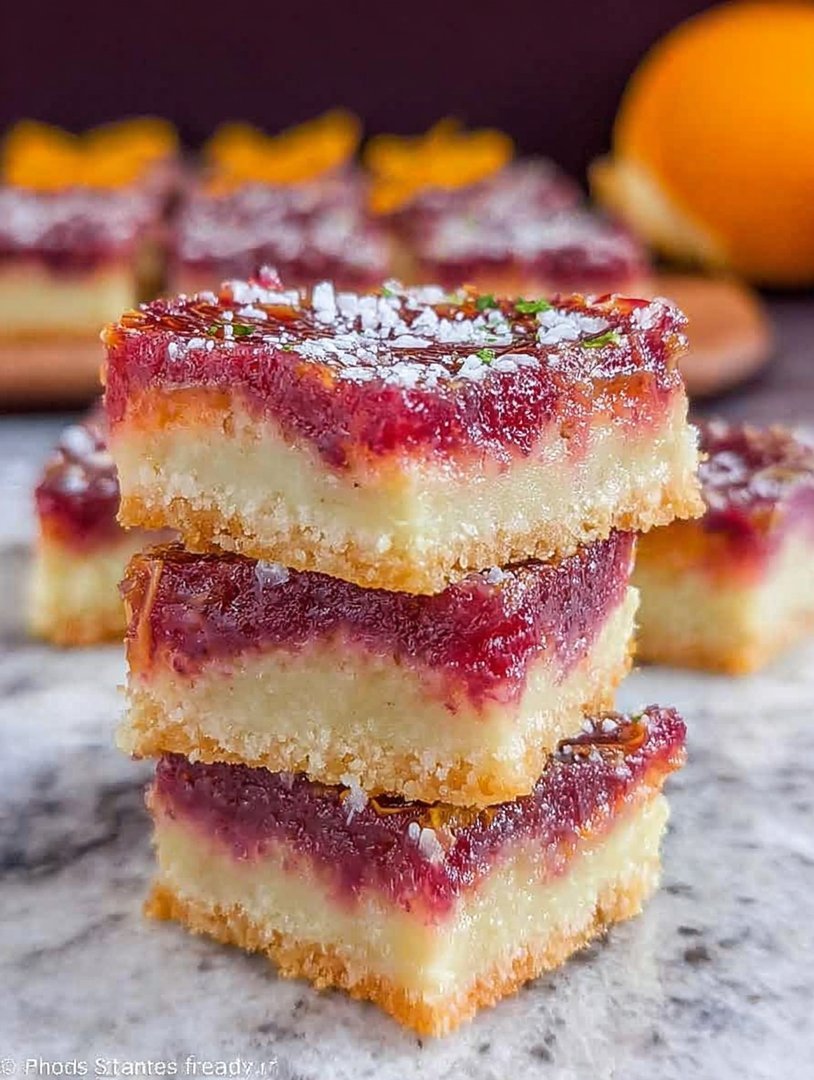
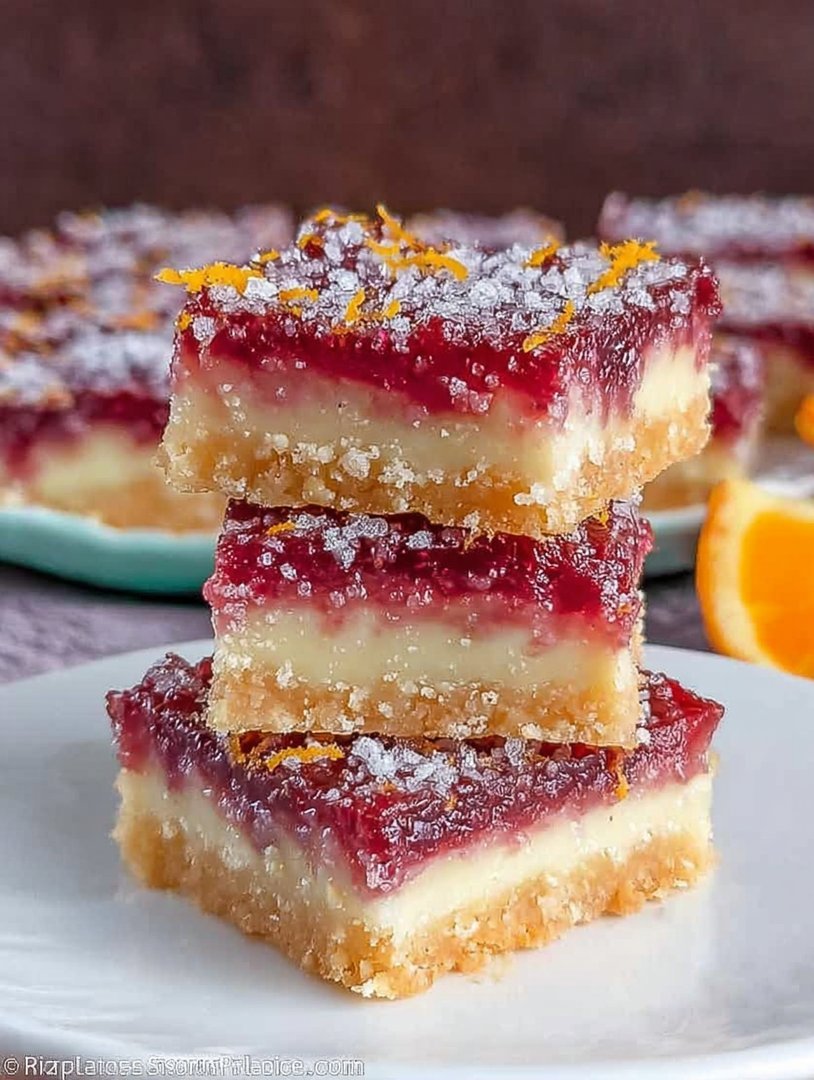
It’s time to abandon those predictable lemon desserts and embrace the dramatic flair of winter citrus. When the sun hides but your taste buds demand brilliance, the vibrant pink hue and complex sweetness of perfectBlood Orange Barsarrive to save the day, tasting like sunshine and sophistication had a delicious baby. These are the showstoppers, the stunning cousins of traditional lemon squares who actually know how to dress for a party.
Trust me, if you want a dessert that looks like abstract art but requires the effort of folding laundry, you are in the right place. These bars are ridiculously simple, packed with flavor, and feature a ruby-red intensity that screams elegance, even if you are just eating them standing over the sink at 3 AM.
- Effortlessly simple shortbread crust provides a buttery, sturdy foundation that contrasts perfectly with the sharp, sweet filling.
- The stunning crimson and ruby swirl of the filling offers unparalleled visual appeal that instantly elevates any dessert table.
- Flavor profile balances a gorgeous blend of tartness and floral notes, avoiding the overpowering punch of standard citrus bars.
- Highly versatile treat, ideal for elegant afternoon teas, chaotic family gatherings, or just hiding in your pantry for a midnight snack.
The Saga of Citrus Obsession: Why I Ditched Lemon Squares
The Great Lemon Square Incident of 2018
I used to be a loyal lemon square enthusiast, honestly believing that the pale yellow bar was the peak of pastry perfection. That was until I brought a platter to a friend’s potluck, and they sat there, forlorn and untouched, sandwiched between a dramatic chocolate torte and a tray of glittering raspberry thumbprints. My lemon squares looked tired, pedestrian, and frankly, a bit sad next to the competition. It was a dessert identity crisis. I realized I needed drama, flair, and a color palette that screamed “I am fabulous,” not “I need a nap.” That moment was pivotal; it led me straight into the waiting, glorious arms of the blood orange.
Discovering the Secret Weapon of Winter
The blood orange, a fruit that looks like it has a secret life as a moody vampire artist, immediately captivated me. It possesses a sophisticated sweetness combined with a necessary tang, and crucially, it delivers that striking color. Transitioning toBlood Orange Barswasn’t just a recipe change; it was a commitment to high-impact dessert presentation. Where lemon bars whisper, blood orange bars sing opera. They demand attention, and suddenly, my dessert platter was the star of the show.
This dessert offers a flavor profile that is beautifully complex. Unlike the straightforward acidity of a regular orange, the blood orange carries subtle undertones of raspberry and cherry, making the filling taste richer and deeper. This complex flavor profile prevents the bars from tasting overwhelmingly sour or overly sweet, hitting that perfect middle ground that keeps everyone reaching for just one more piece. People stopped asking for the recipe for the ‘yellow thing’ and started demanding the secrets behind the ‘ruby jewels.’ This simple switch changes the entire narrative of dessert preparation, taking you from reliable baker to culinary genius overnight. Embrace the drama, ditch the predictable, and let the citrus opera begin.
Mastering the Ingredients: The Magic of Color and Contrast
Selecting Your Blood Oranges
The quality of your citrus dictates the success of these bars. You are not looking for just any old orange; you need the deeply pigmented, slightly mysterious Sicilian variety. Look for fruit that feels heavy for its size, indicating plenty of juice, and ideally, choose oranges with deep reddish-orange skin, as this often hints at a more intense internal color. Sometimes you’ll encounter oranges that are merely blushed pink, and while they taste fine, they won’t give you that show-stopping ruby red filling.
A truly spectacular bar relies on that dramatic, natural coloring—it’s what separates a good citrus dessert from an unforgettable one. Don’t be afraid to buy a couple of extra to ensure you have enough vibrant juice, especially since squeezing them is half the fun, resulting in a beautiful mess of pink staining your hands. If you’re struggling to find deeply colored blood oranges, adding a few drops of natural red food coloring is acceptable, but always try to maximize the natural pigment first. The variance in color is part of the charm; sometimes they are ruby, sometimes deep magenta, but they are always delicious.
The Importance of the Perfect Crust
The foundation of any great bar is the crust. Forget fancy additions; the best crust is a simple shortbread, rich in butter and subtly sweet. It should be tender enough to melt in your mouth but structurally sound enough to support the creamy, intense filling. We rely on good quality, unsalted butter, mixed with just the right amount of flour and a dusting of powdered sugar. The cold butter is crucial here; it creates steam pockets during baking that result in that lovely crumbly texture. If your butter is too warm, you risk ending up with a dense, sad, cookie-like base instead of a light shortbread.
The powdered sugar, rather than granulated, ensures a more delicate crumb texture that bakes up light and crisp without becoming dense or heavy. Pressing the crust evenly into the pan is a non-negotiable step; uneven crusts lead to soggy spots or overly thick edges, and nobody has time for structural failures in their dessert life. Bake the crust until it is just set and slightly golden around the edges—it’s the backbone of your perfectBlood Orange Bars.
Achieving Silky Smoothness in the Filling
The filling for these bars must be smooth, slightly jiggly when warm, and intensely flavored. Achieving this texture relies on a perfect balance of eggs, sugar, and, of course, that brilliant blood orange juice. We use whole eggs to provide structure and richness, allowing the filling to set up beautifully during baking without becoming tough. Whisk the eggs thoroughly before adding the juice to ensure no streaks remain, which guarantees a uniform custard.
A common mistake is overbaking, which turns the delicate custard into a rubbery disappointment. Keep a close eye on the baking process; you want the edges to look set, but the very center should still possess a slight wobble when gently tapped. This wobble is your secret indicator that upon cooling, the bars will reach their peak, velvety texture. Once cooled, the natural pectin and proteins in the filling solidify, giving you that beautiful sliceable bar that holds its shape perfectly and presents that gorgeous pink and red mosaic.
Ingredients for Blood Orange Bars
Here’s what you’ll need to make this delicious dish:
- All-Purpose FlourThe structural backbone for both the crust and as a light thickening agent in the filling.
- Unsalted ButterNeeds to be chilled and cut into cubes for the crust to ensure optimal flakiness and texture.
- Powdered SugarUsed both in the crust for a tender crumb and as a decorative finishing touch upon serving.
- Granulated SugarEssential for balancing the tartness of the blood orange juice and sweetening the filling mixture.
- Large EggsProvides necessary binding and richness, allowing the custard-like filling to set up correctly during baking.
- Blood Orange Juice and ZestThe star of the show, providing the unique tart, floral flavor and stunning natural color. Select deeply colored fruit for the best visual result.
- Pinch of SaltA small amount is added to both the crust and the filling to enhance the overall flavor and contrast the sweetness.
The full ingredients list, including measurements, is provided in the recipe card directly below.
How to Make Blood Orange Bars
Follow these simple steps to prepare this delicious dish:
Step 1: Preparing the Shortbread Crust
Preheat your oven to 350°F (175°C). Lightly grease an 8×8 inch baking pan and line it with parchment paper, leaving an overhang on two sides for easy removal later. In a large bowl, whisk together the flour, powdered sugar, and salt for the crust. Cut in the cold, cubed unsalted butter using a pastry blender or your fingertips until the mixture resembles coarse crumbs. Press this mixture firmly and evenly into the bottom of the prepared pan, ensuring the base is compacted and uniform. Bake the crust for 20 to 25 minutes, or until the edges are lightly golden brown, then remove it from the oven but keep the oven running.
Step 2: Zesting and Juicing the Blood Oranges
While the crust is baking, prepare the citrus. Finely zest three of your blood oranges, being careful to only capture the brightly colored outer layer and avoid the bitter white pith. You should aim for about two tablespoons of zest. Then, juice enough of the blood oranges to yield exactly half a cup of vibrant juice. Strain the juice through a fine-mesh sieve to remove any pulp or seeds, guaranteeing a silky smooth filling.
Step 3: Creating the Custard Filling
In a separate large mixing bowl, whisk together the granulated sugar and the remaining flour until fully combined. This step prevents the flour from clumping when the liquids are added. Add the eggs one at a time, whisking vigorously after each addition until the mixture is light and uniform. Finally, incorporate the strained blood orange juice and the zest, stirring until the mixture is smooth and beautifully pink or crimson. Do not overmix the filling once the juice is added.
Step 4: Baking the Bars
Carefully pour the liquid filling over the warm, pre-baked crust. The heat from the crust will not harm the filling; in fact, it helps kickstart the setting process immediately. Return the pan to the oven and bake for an additional 25 to 30 minutes. You know the bars are done when the edges are completely set and slightly puffed, but the center still shows a slight, gentle wobble when the pan is nudged. This slight wobble is key to maintaining a tender interior.
Step 5: Cooling and Setting
Remove theBlood Orange Barsfrom the oven and let them cool on a wire rack to room temperature. This cooling process is crucial for the filling to finish setting. Once completely cool, transfer the pan to the refrigerator and chill for at least 3 hours, or preferably overnight. Chilling makes them significantly easier to cut cleanly and enhances the density of the filling.
Step 6: Cutting and Finishing
Use the parchment paper overhangs to carefully lift the chilled bars out of the pan. Place the large square on a cutting board and use a sharp knife to slice them into squares or rectangles. For the perfect presentation, dust the tops generously with a final, delicate layer of powdered sugar just before serving. Transfer to plates and drizzle with a thin blood orange glaze (optional, made from powdered sugar and juice) for the perfect finishing touch.
The Accidental Discovery of Sunshine on a Plate
My kitchen counter looked like a crime scene committed by a tiny, very angry citrus fruit when I first tried making these. I ran out of lemons, panicked, and grabbed the dramatic, ruby-red blood oranges instead. What emerged from the oven wasn’t a standard lemon square; it was a transcendent, vividly colored dessert that tasted like winter ending.
Let’s be honest, classic lemon bars are great, but they are the reliable, slightly predictable accountant of the dessert world. Blood Orange Bars, however? They are the mysterious, well-traveled artist who just showed up to the party wearing velvet. They possess that perfect, sharp tang blended seamlessly with an unexpected honeyed sweetness, turning a rainy Tuesday into a tropical vacation.
The Shortbread Crust: The Foundation of Flavor
A good bar recipe lives or dies by its foundation. If the crust is soggy, crumbly, or too thick, the whole operation collapses—both literally and emotionally. We are aiming for a buttery, crisp, slightly sweet base that provides the perfect counterpoint to the intensely bright curd. Think of the crust as the sturdy, sensible backdrop that allows the dramatic blood orange filling to truly shine.
The secret here lies in not overworking the dough and ensuring a proper “blind bake.” You need cold butter, people! If your butter is room temperature, you are making a sad, greasy biscuit, not a sublime shortbread. Cut those cold cubes into the dry ingredients—flour, sugar, and a pinch of salt—until the mixture resembles coarse sand. I personally use a pastry blender, but two knives or a food processor pulsed rapidly will also do the trick, provided you stop before it forms a cohesive dough ball. Press this mixture firmly and evenly into your pan, paying special attention to the corners. Don’t skip the chilling step; that time in the refrigerator locks the fat structure, preventing excessive spreading during baking.
The Ingredients List for Blood Orange Bar Perfection
Before diving into the ruby-red chaos, ensure your ingredients are prepped and measured accurately. Baking is a science, and unlike cooking where you can “eyeball” the garlic (which I wholeheartedly endorse for savory dishes), precision matters here. The quality of your blood oranges is paramount. Look for fruits that feel heavy for their size, indicating they are full of glorious juice.
- For the Shortbread Crust:
- 1 ½ cups all-purpose flour
- ½ cup granulated sugar
- ¼ teaspoon salt
- 1 stick (½ cup) unsalted butter, very cold and cubed
- For the Blood Orange Curd Filling:
- 1 ½ cups granulated sugar
- 3 tablespoons all-purpose flour (or cornstarch for extra smoothness)
- 4 large eggs, plus 2 extra yolks (for richness)
- ¾ cup freshly squeezed blood orange juice (about 4–6 oranges)
- Zest of 2 blood oranges
- Pinch of salt
- For Garnishing (Optional):
- Powdered sugar for dusting
Perfecting the Cooking Process
To achieve peak efficiency, first mix and press the shortbread dough, then chill it while the oven preheats. While the crust is blind-baking, whisk together the filling ingredients. This minimizes idle time and ensures the filling is ready to pour onto the warm crust the moment it emerges from its first bake.
Step-by-Step Guide to the Best Blood Orange Bars
Making the Crust
Preheat your oven to 350°F (175°C). Line an 8×8 or 9×9 inch baking pan with parchment paper, leaving an overhang on two sides for easy removal later. In a large bowl, whisk together the flour, sugar, and salt. Cut in the cold butter until the mixture resembles coarse meal. Press this mixture firmly into the prepared pan. Bake the crust for 20 to 25 minutes, or until the edges begin to turn a light golden color. While it bakes, move on to the curd.
Creating the Vibrant Curd
This is where the magic happens and where you transform simple ingredients into that stunning ruby-red layer. In a separate, medium bowl, whisk together the sugar, flour, and salt until there are no lumps. The flour is crucial; it helps stabilize the filling, preventing it from weeping or splitting when sliced. Now, whisk in the eggs and the additional yolks until the mixture is uniform and pale yellow. Finally, stir in the blood orange juice and the zest. Do not over-mix once the liquid is added, but ensure everything is fully combined.
Baking and Setting the Bars
Once the shortbread is lightly baked, carefully pour the liquid filling over the warm crust. The warmth of the crust actually helps initiate the cooking process for the bottom layer of the curd, which is a neat little trick. Return the pan to the oven and bake for an additional 25 to 30 minutes. The bars are done when the center is just barely set—it should wobble slightly, like a very firm jelly, but the edges should be fully stable and slightly darker.
The hardest part of this recipe is waiting. You absolutely must allow these citrus squares to cool completely before cutting them. If you rush it, the filling will run everywhere, turning your elegant dessert into a messy puddle of citrus regret. Once cool, chill them in the refrigerator for at least two hours (four is better) to achieve that signature firm, sharp slice. When ready, use the parchment paper overhang to lift the entire creation out of the pan, dust generously with powdered sugar, and cut into squares.
Add Your Touch
Craving a twist? Swap out half the blood orange juice for lime for a hybrid citrus punch. For added texture, incorporate finely chopped pistachios into the shortbread base. If you prefer a milder color, a mix of navel orange and blood orange juice works beautifully while still retaining the flavor profile.
Expert Tips for Flawless Blood Orange Bars
- Keep the butter and eggs cold until use for the crust; this prevents the butter from melting too quickly and yields a flakey, tender base, not a dense one.
- Ensure you grate only the colored zest of the blood orange, avoiding the bitter white pith beneath, which would instantly sabotage the delicate sweetness of the curd.
- To achieve the cleanest slices, use a very sharp knife wiped clean with a damp cloth between each cut after the bars have fully chilled.
I once served these Blood Orange Bars at a holiday party where everyone assumed I had spent hours performing complex pastry magic. The reality? They are astoundingly simple, earning you maximum dessert credibility with minimal effort.
Storing & Reheating
Store these citrusy squares in an airtight container in the refrigerator for up to five days; they are best chilled. Since they are a cold dessert, reheating is unnecessary, but always let them sit out for 10 minutes before serving to slightly soften the curd for optimal texture.
Conclusion for Blood Orange Bars
These Blood Orange Bars are truly a celebration of winter citrus, delivering a captivating balance of buttery shortbread and intensely bright, velvety curd. Remember the core principles: use cold ingredients for your crust and allow ample time for chilling the finished product. Whether you are hosting a grand gathering or simply seeking a dazzling afternoon treat, this recipe offers a burst of color and flavor that is guaranteed to impress. Don’t be afraid to embrace the ruby-red delight of the blood orange; it elevates the humble citrus square from ordinary to truly exceptional, proving that sometimes, the best recipes are the happy accidents we stumble upon.
Print
Blood Orange Bars
Experience the vibrant zing of winter citrus! Our Blood Orange Bars feature a rich, buttery shortbread crust topped with a silky, tart filling. A perfect balance of sweet and sharp.
- Total Time: 35 minutes
- Yield: 4 servings
Ingredients
- All-purpose flour: 1 1/2 cups (divided)
- Unsalted butter: 1/2 cup (1 stick, cold and cubed)
- Granulated sugar: 1 1/4 cups (divided)
- Salt: 1/4 teaspoon
- Large eggs: 3
- Fresh blood orange juice: 1/2 cup (strained)
- Blood orange zest: 1 tablespoon
- Confectioners' sugar: For dusting
Instructions
- Step 1: Preheat your oven to 350°F (175°C). Line an 8×8 inch baking pan with parchment paper, leaving an overhang on two sides. For the crust, combine 1 1/2 cups flour, 1/4 cup granulated sugar, and salt in a bowl; cut in the cold butter until the mixture resembles coarse crumbs. Press the mixture firmly and evenly into the prepared pan and bake for 20 minutes, or until lightly golden.
- Step 2: While the crust bakes, prepare the blood orange filling. In a separate bowl, whisk the 3 eggs until smooth. Gradually whisk in the remaining 1 cup of granulated sugar, the blood orange zest, and the strained blood orange juice until the mixture is fully combined and slightly frothy.
- Step 3: Remove the hot crust from the oven. Carefully and immediately pour the blood orange filling evenly over the baked crust. Return the pan to the oven and bake for an additional 25–30 minutes, or until the filling is fully set and the center no longer jiggles when gently shaken.
- Step 4: Allow the bars to cool completely at room temperature for at least 1 hour. Once cooled, transfer the pan to the refrigerator and chill for a minimum of 3 hours, or preferably overnight, to allow the custard to fully firm up before slicing.
- Step 5: Use the parchment paper overhang to lift the chilled bars out of the pan. Slice into 16 squares using a sharp knife, wiping the knife clean between cuts for a cleaner edge. Dust the tops generously with confectioners' sugar immediately before serving.
Notes
- Keep these delicate bars refrigerated in an airtight container for up to 4 days; they must be served chilled, as the citrus filling softens quickly at room temperature.
- These bars are best enjoyed cold straight from the refrigerator, but if they have been deeply chilled overnight, allow them to sit at room temperature for about 10 minutes just before serving to slightly soften the filling texture.
- Elevate the experience by serving these intensely tart bars alongside a dollop of fresh whipped cream lightly scented with vanilla bean or a few slivers of candied ginger.
- For perfectly clean, professional slices, dip your sharp knife into hot water and wipe it completely dry between each cut; this prevents the sticky filling from dragging and smearing the edges.
- Prep Time: 15 minutes
- Cook Time: 20 minutes
- Method: Stovetop
- Cuisine: American
Leave a Comment