
Imagine sinking your fork into a cool, decadent dream. The richness of fudgy brownies mingles with layers of creamy goodness, creating a symphony of textures and tastes that will leave you speechless.
This Brownie Refrigerator Cake isn’t just a dessert; it’s an experience, a no-bake masterpiece perfect for satisfying your sweet cravings without breaking a sweat. Prepare to be amazed!
- Effortlessly assembled with minimal baking, ideal for hot summer days or spontaneous dessert cravings.
- The combination of rich brownies and creamy layers delivers an unforgettable flavor explosion in every bite.
- Visually stunning with its alternating layers of dark chocolate and light cream, making it a show-stopping centerpiece.
- Highly customizable, allowing you to experiment with different brownie types, creams, and toppings for endless variations.
Ingredients for Brownie Refrigerator Cake
Here’s what you’ll need to make this delicious dish:
The full ingredients list, including measurements, is provided in the recipe card directly below.
How to Make Brownie Refrigerator Cake
Follow these simple steps to prepare this delicious dish:
Step 1: Prepare the Brownies
Cut the brownies into bite-sized cubes or squares. This will make them easier to layer and ensure that each bite of the cake has a perfect brownie-to-cream ratio. If you baked your brownies, allow them to cool completely before cutting.
Step 2: Whip the Cream
In a large bowl, combine the heavy cream, powdered sugar, and Alcohol-free vanilla extract. Use an electric mixer to whip the ingredients until stiff peaks form. Be careful not to overwhip the cream, or it may turn grainy.
Step 3: Prepare the Pudding
In a separate bowl, whisk together the instant chocolate pudding mix and milk according to the package directions. Let it sit for a few minutes until it thickens slightly.
Step 4: Combine Pudding and Cream
Gently fold the chocolate pudding into the whipped cream until well combined. This creates a light and airy chocolate cream that will perfectly complement the fudgy brownies.
Step 5: Layer the Cake
In a trifle bowl or serving dish, begin layering the brownie cubes and chocolate cream. Start with a layer of brownies, followed by a layer of cream. Repeat the layers until all the ingredients are used, ending with a layer of cream on top.
Step 6: Chill and Serve
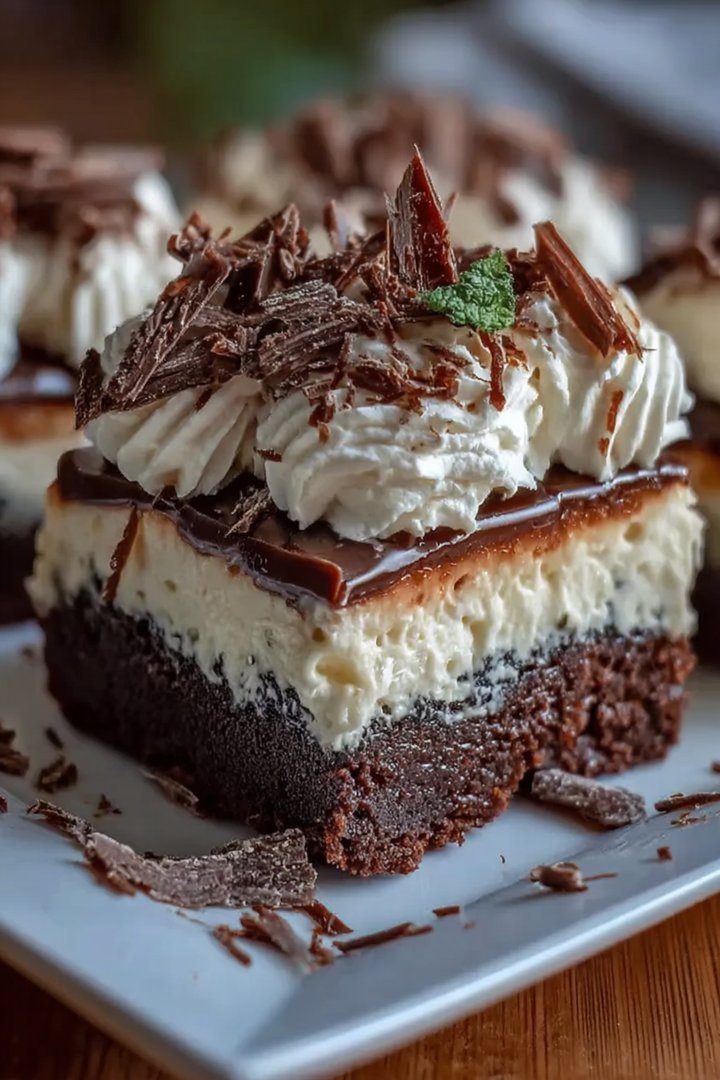
Cover the dish with plastic wrap and refrigerate for at least 4 hours, or preferably overnight. This allows the flavors to meld together and the cream to set properly. Before serving, garnish with chocolate shavings, if desired. Slice and serve this Brownie Refrigerator Cake for a simple, yet decadent dessert.
Perfecting the Cooking Process
To orchestrate the perfect symphony of flavors for our **brownie refrigerator cake**, start by preparing the brownies, allowing them to cool completely. Then, whip up the creamy filling while the brownies settle. Assemble the layers with precision for a guaranteed delightful dessert.
Add Your Touch
Want to personalize your **brownie refrigerator cake**? Swap out the standard chocolate brownies for a blondie base, or introduce a layer of fresh berries for a burst of fruity freshness. A sprinkle of chopped nuts adds a delightful crunch, making it truly your own.
Storing & Reheating
To keep your **brownie refrigerator cake** at its best, store it in an airtight container in the refrigerator. It’s best enjoyed cold, straight from the fridge. Avoid freezing, as this can alter the texture of the creamy filling.
Here are a few tips to elevate your baking game:
- Ensure your brownies are completely cooled before layering to prevent the filling from melting and creating a soggy mess.
- Use high-quality cocoa powder for richer, more intense brownie flavor that will make your cake irresistible.
- Don’t overmix the filling; gentle folding ensures a light and airy texture that complements the dense brownies perfectly.
(Personal anecdote formated as paragraph subheading)
I once served this at a summer barbecue, and it vanished in minutes. My cousin declared it the “best dessert ever,” proving this cake’s universal appeal.
The Wonderful World of Brownies
Okay, let’s talk brownies. These aren’t your average, run-of-the-mill, “meh” brownies. We’re talking about rich, decadent, fudgy squares of pure joy. The kind that make you close your eyes and savor every single bite. And when you combine them with a luscious, creamy filling? Forget about it. It’s game over for every other dessert on the table. This **brownie refrigerator cake** is more than just a dessert; it’s an experience.
I remember the first time I attempted to bake brownies. It was a disaster. They were either rock hard or completely raw in the middle. My poor family bravely choked them down, bless their hearts. But I was determined to master the art of the perfect brownie. After countless experiments (and a few more baking fails), I finally cracked the code. And now, I’m sharing my secrets with you!
Why This Brownie Refrigerator Cake Is a Must-Try
So, what makes this **brownie refrigerator cake** so special? Well, first of all, it’s incredibly easy to make. No fancy equipment required, just a couple of bowls, a baking pan, and your trusty oven. Secondly, it’s a crowd-pleaser. Seriously, I’ve never met anyone who doesn’t love a good brownie, especially when it’s layered with a creamy, dreamy filling. And finally, it’s the perfect make-ahead dessert. You can whip it up the day before, stash it in the fridge, and forget about it until you’re ready to impress your guests. It gets better as it sits.
But the best thing about this **brownie refrigerator cake** is that it’s customizable. Are you a chocolate fanatic? Add extra cocoa powder to the brownie batter or sprinkle chocolate shavings on top. Do you prefer a hint of coffee? Mix a teaspoon of instant coffee into the filling. Are you feeling adventurous? Throw in some chopped nuts, dried fruit, or even a swirl of peanut butter. The possibilities are endless! This cake is your blank canvas.
Gathering Your Brownie Brigade (Ingredients)
Before we dive into the baking frenzy, let’s gather our troops, I mean, ingredients. Don’t worry, you probably already have most of these lurking in your pantry. If not, a quick trip to the grocery store is all it takes.
For the Brownies:
- 1 cup (2 sticks) unsalted butter, melted
- 2 cups granulated sugar
- 1 cup unsweetened cocoa powder
- 1 teaspoon Alcohol-free vanilla extract
- 4 large eggs
- 1 1/2 cups all-purpose flour
- 1/2 teaspoon salt
- 1/2 cup chocolate chips (optional, but highly recommended)
For the Creamy Filling:
- 8 ounces cream cheese, softened
- 1 cup powdered sugar
- 1 teaspoon Alcohol-free vanilla extract
- 2 cups heavy cream, whipped to stiff peaks
Step-by-Step Brownie Refrigerator Cake Construction (Recipe)
Alright, soldiers, let’s get to work! Preheat your oven to 350°F (175°C). Grease and flour a 9×13 inch baking pan. (Trust me, you don’t want those brownies sticking to the pan!)
Brownie Time:
1. In a large bowl, whisk together the melted butter, sugar, and cocoa powder until smooth.
2. Stir in the Alcohol-free vanilla extract.
3. Add the eggs one at a time, mixing well after each addition.
4. In a separate bowl, whisk together the flour and salt.
5. Gradually add the dry ingredients to the wet ingredients, mixing until just combined. Be careful not to overmix!
6. Stir in the chocolate chips (if using).
7. Pour the batter into the prepared pan and bake for 25-30 minutes, or until a toothpick inserted into the center comes out with moist crumbs attached.
8. Let the brownies cool completely in the pan. This is crucial! Warm brownies will melt the filling.
Creamy Filling Extravaganza:
1. In a large bowl, beat the softened cream cheese and powdered sugar together until smooth and creamy.
2. Stir in the Alcohol-free vanilla extract.
3. Gently fold in the whipped cream until just combined. Don’t overmix!
Assembly Time:
1. Once the brownies are completely cooled, spread the creamy filling evenly over the top.
2. Cover the pan with plastic wrap and refrigerate for at least 2 hours, or preferably overnight. This allows the flavors to meld together and the filling to set.
Serving Suggestion:
Cut into squares and serve cold. You can sprinkle with cocoa powder, chocolate shavings, or fresh berries for an extra touch of elegance. Or, you know, just devour it straight from the pan with a spoon. I won’t judge.
Brownie Refrigerator Cake Variations: Unleash Your Inner Baker
The basic recipe is fantastic, but why stop there? Let’s explore some fun and delicious variations!
- Peanut Butter Paradise: Swirl peanut butter into the brownie batter or mix peanut butter chips into the filling.
- Mint Chocolate Chip Mania: Add a teaspoon of mint extract to the filling and sprinkle with mini chocolate chips.
- Caramel Craze: Drizzle caramel sauce over the top of the filling before refrigerating.
- Mocha Madness: Mix instant coffee into both the brownie batter and the filling.
- Rocky Road Revelation: Add chopped nuts, marshmallows, and chocolate chips to the filling.
Get creative and experiment with your own favorite flavor combinations! There are truly no limits when it comes to baking.
Troubleshooting Tips for Brownie Bliss
Even the most experienced bakers encounter hiccups from time to time. Here are a few common brownie problems and how to solve them:
- Dry Brownies: Overbaking is the usual culprit. Reduce the baking time by a few minutes or lower the oven temperature slightly.
- Gummy Brownies: This can be caused by overmixing the batter. Mix until just combined, and no more!
- Brownies Too Cakey: Add an extra egg yolk to the batter for a fudgier texture.
- Filling Too Runny: Make sure your cream cheese is softened and your whipped cream is stiff. You can also add a tablespoon of cornstarch to the filling to help it thicken.
The Brownie Refrigerator Cake: A Sweet Ending
So there you have it! My ultimate **brownie refrigerator cake** recipe, complete with tips, tricks, and variations. I hope you enjoy making (and eating!) this decadent dessert as much as I do. It’s the perfect treat for any occasion, from birthdays to potlucks to a simple weeknight indulgence. And remember, baking is all about having fun, so don’t be afraid to experiment and make it your own! Happy baking!
I hope this recipe brings you as much joy as it has brought me, now let’s get baking!
Essential Equipment for Brownie Baking Success
To ensure the most successful **brownie refrigerator cake** experience, consider these essential tools:
- 9×13 inch Baking Pan: The ideal size for achieving perfectly thick brownies.
- Mixing Bowls: A variety of sizes for different stages of mixing.
- Electric Mixer: Makes whipping cream and blending fillings a breeze.
- Rubber Spatula: Perfect for folding ingredients gently.
- Measuring Cups and Spoons: Accuracy is key in baking!
Having these tools will streamline the baking process and contribute to a professional-looking and delicious final product.
Brownie Refrigerator Cake Serving Suggestions: Beyond the Slice
Elevate your **brownie refrigerator cake** presentation with these creative serving ideas:
- Individual Parfaits: Layer brownie chunks and filling in glasses for an elegant dessert.
- Brownie Sundaes: Top slices with ice cream, whipped cream, and your favorite sundae toppings.
- Gourmet Plating: Arrange slices artfully on a platter with fresh berries and a dusting of powdered sugar.
These serving suggestions add a touch of flair to your delicious creation!
Conclusion for Brownie Refrigerator Cake :
This brownie refrigerator cake is the ultimate dessert for those hot days when you don’t want to turn on the oven. It’s quick, easy, and requires no baking at all! It also allows for personal creativity in the kitchen. Simply layer brownies with whipped cream or other delicious fillings. It’s also a crowd-pleaser that’s perfect for parties, potlucks, or a simple weeknight treat. Plus, you can customize it with your favorite flavors and toppings. Get ready to impress your friends and family with this super simple dessert.
Print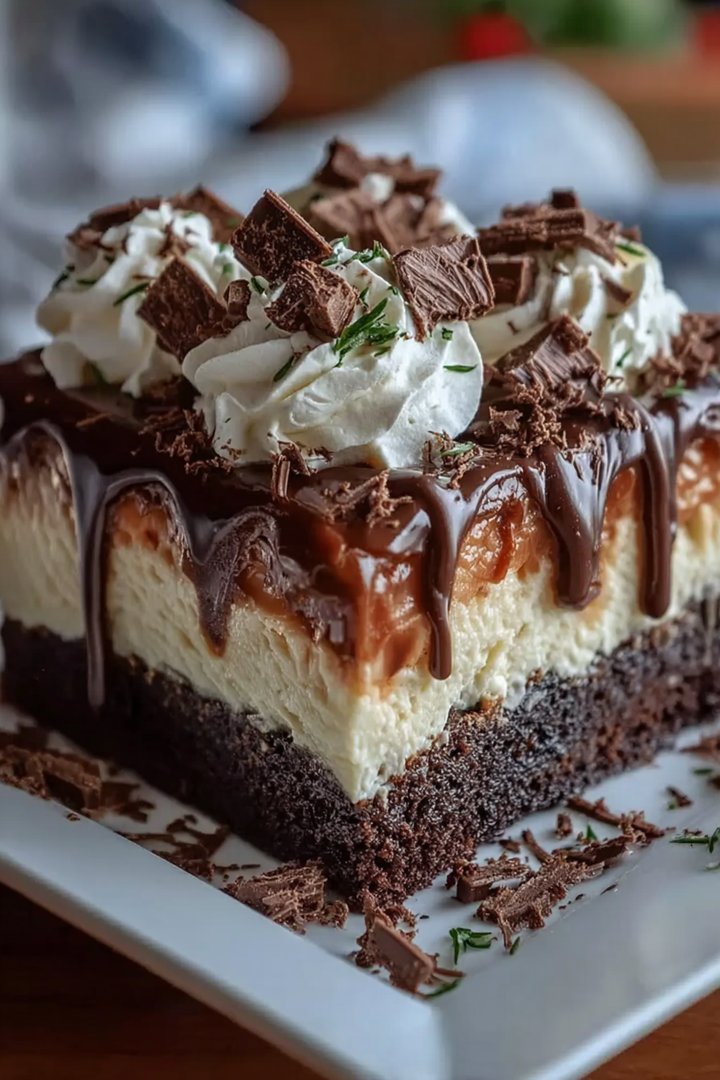
Brownie Refrigerator Cake
Delicious brownie refrigerator cake recipe with detailed instructions and nutritional information.
- Total Time: 35 minutes
- Yield: 4 servings
Ingredients
- Box brownie mix: 1 package (family size)
- Eggs: As called for on brownie mix package
- Vegetable oil: As called for on brownie mix package
- Water: As called for on brownie mix package
- Heavy whipping cream: 2 cups
- Powdered sugar: 1/2 cup
- Vanilla extract: 1 teaspoon
- Chocolate shavings or sprinkles: For garnish
Instructions
- Step 1: Prepare brownies according to package directions using eggs, oil, and water as directed. Let cool completely.
- Step 2: While the brownies are cooling, prepare the whipped cream. In a large bowl, beat heavy whipping cream with an electric mixer until soft peaks form.
- Step 3: Add powdered sugar and vanilla extract to the whipped cream. Continue beating until stiff peaks form. Be careful not to overbeat.
- Step 4: Crumble the cooled brownies into bite-sized pieces.
- Step 5: In a trifle bowl or other serving dish, layer half of the crumbled brownies, followed by half of the whipped cream. Repeat layers.
- Step 6: Garnish with chocolate shavings or sprinkles. Refrigerate for at least 2 hours before serving.
Notes
- For easier slicing, chill the cake for at least 4 hours, or even overnight!
- If you want a softer texture after refrigeration, let individual slices sit at room temperature for 10-15 minutes before serving.
- Serve this decadent cake with a scoop of vanilla ice cream or a drizzle of chocolate sauce for an extra special treat.
- Don't overmix the whipped cream; stop beating as soon as stiff peaks form to keep it light and airy.
- Prep Time: 15 minutes
- Cook Time: 20 minutes
- Method: Stovetop
- Cuisine: American
FAQs :
Can I substitute the type of brownie I use for this Brownie Refrigerator Cake?
Absolutely! This recipe is incredibly forgiving. Use your favorite homemade brownies, a box mix, or even store-bought ones. If you prefer a fudgier texture, go for it. Like a cake that’s more cakey? That works too! The beauty of this refrigerator cake is its adaptability. The key is to let the brownies cool completely before assembling, so they don’t make the cream layer melt. Don’t worry if they’re slightly crumbly, it will all come together in the end. It’s like a delicious, happy accident waiting to happen!
How long does the Brownie Refrigerator Cake last in the fridge?
Patience is a virtue, but sometimes waiting is hard! Once assembled, this brownie refrigerator cake needs at least 4 hours in the fridge to allow the flavors to meld and the cream to set. Ideally, overnight is best. It tastes even better the next day! Once ready, it will happily sit in the fridge for up to 3 days. After that, the brownies may start to get a bit soggy. But let’s be real, it’s unlikely to last that long anyway.
Can I add other flavors or toppings to this Brownie Refrigerator Cake?
Oh, the possibilities are endless! Feel free to get creative and customize this no-bake dessert. Some popular additions include layers of fresh berries (strawberries, raspberries, or blueberries), sliced bananas, chopped nuts (walnuts, pecans, or almonds), a drizzle of chocolate syrup or caramel sauce, or even a sprinkle of chocolate shavings. You could also try adding a layer of peanut butter or Nutella for an extra decadent treat. This recipe is your canvas, so have fun with it!
What’s the best way to cut this Brownie Refrigerator Cake?
Cutting a layered dessert can sometimes be a challenge, but don’t fret! The best way to get clean slices of this brownie refrigerator cake is to use a large, sharp knife. Before each cut, run the knife under hot water and wipe it clean. This helps to prevent the cream from sticking to the blade and creating messy slices. Alternatively, you can use a cake server or spatula to gently lift the slices out. If you are patient enough to do so, you can chill it for about 30 minutes before cutting it.


Leave a Comment