
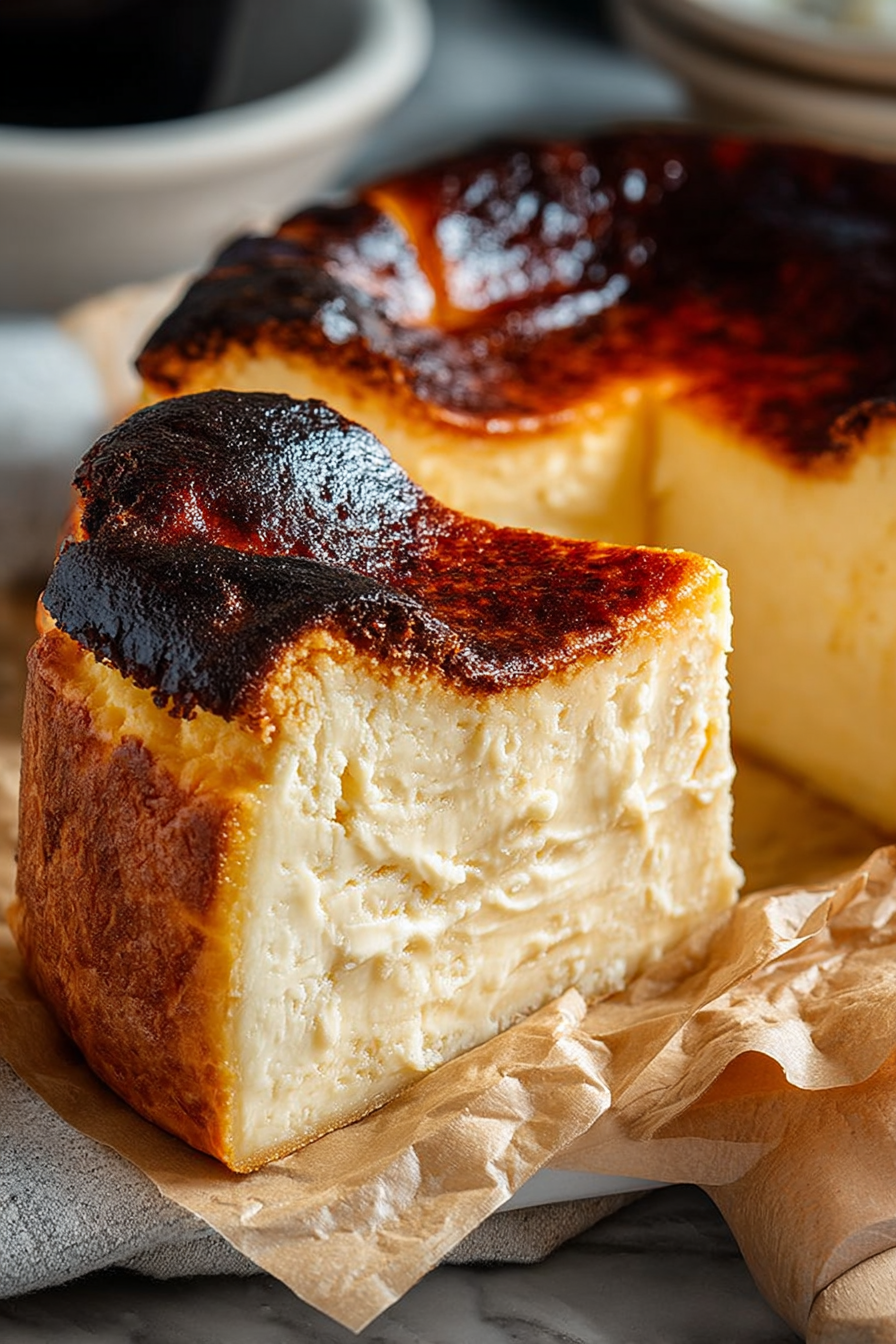
A symphony of caramelized edges giving way to a heart of creamy, dreamy perfection; this isn’t just dessert, it’s an experience. Imagine the delighted gasps as you unveil this **Burnt Basque Cheesecake in a Loaf Pan That’s Rustic, Silky, and Unexpectedly Chic**.
Remember that time you tried to bake a cake and it *almost* caught fire? Well, this recipe embraces that “almost” and turns it into pure magic. This cheesecake is intentionally burnt, creating a deep, complex flavor that’s strangely addictive and sophisticated, but it is easier than that cake you tried.
This **Burnt Basque Cheesecake in a Loaf Pan That’s Rustic, Silky, and Unexpectedly Chic** is a delightful surprise because:
- It’s incredibly easy to make, requiring minimal effort for maximum flavor impact, ensuring a stress-free baking experience.
- The rich, caramelized top contrasts beautifully with the smooth, creamy interior, offering a delightful textural adventure.
- Its rustic appearance adds a touch of elegance to any table, making it a perfect centerpiece for gatherings or quiet nights.
- Served chilled, it provides a refreshing and satisfying dessert option any time of year, adapting to any occasion.
Ingredients for Burnt Basque Cheesecake in a Loaf Pan That’s Rustic, Silky, and Unexpectedly Chic
Here’s what you’ll need to make this delicious dish:
The full ingredients list, including measurements, is provided in the recipe card directly below.
How to Make Burnt Basque Cheesecake in a Loaf Pan That’s Rustic, Silky, and Unexpectedly Chic
Follow these simple steps to prepare this delicious dish:
Step 1: Prepare the Loaf Pan
Preheat your oven to 400°F (200°C). Line a 9×5 inch loaf pan with parchment paper, ensuring the paper extends over the edges. This will make it easier to remove the cheesecake later.
Step 2: Cream the Cheese and Sugar
In a large mixing bowl, beat the softened cream cheese and granulated sugar together until smooth and creamy. Make sure there are no lumps.
Step 3: Incorporate Eggs
Add the eggs one at a time, beating well after each addition. Ensure each egg is fully incorporated before adding the next to maintain a smooth batter.
Step 4: Add Cream and Vanilla
Pour in the heavy cream, Alcohol-free vanilla extract, and lemon juice. Mix until just combined. Be careful not to overmix at this stage.
Step 5: Add Flour
Sprinkle the all-purpose flour over the wet ingredients and gently fold it in until just combined. Ensure there are no streaks of flour remaining.
Step 6: Bake the Cheesecake
Pour the batter into the prepared loaf pan. Bake for 50-60 minutes, or until the top is deeply browned and the center is slightly jiggly. The top should look almost burnt; that’s the key to the flavor.
Step 7: Cool and Chill
Let the cheesecake cool completely in the pan at room temperature. Once cooled, cover and refrigerate for at least 4 hours, or preferably overnight, to allow it to set properly.
Step 8: Serve
Remove the cheesecake from the loaf pan using the parchment paper overhang. Slice and serve chilled. Enjoy the rustic charm and delicious flavor of your **Burnt Basque Cheesecake in a Loaf Pan That’s Rustic, Silky, and Unexpectedly Chic**.
Why This Burnt Basque Cheesecake in a Loaf Pan is a Game-Changer
This isn’t your grandma’s meticulously decorated, perfectly frosted cheesecake. This is its cooler, edgier cousin who listens to jazz and wears vintage clothing. The beauty of this **Burnt Basque Cheesecake in a Loaf Pan That’s Rustic, Silky, and Unexpectedly Chic** lies in its imperfections – the cracked top, the uneven edges, the gloriously dark exterior. It’s a testament to the fact that sometimes, the most delicious things in life are a little bit rough around the edges.
The Secret to the Perfect Burnt Top
Don’t be shy with the heat! The high baking temperature is crucial for achieving that signature burnt top. It’s what gives this cheesecake its unique flavor profile – a complex blend of caramelized sugar, slightly bitter notes, and a hint of smokiness. If your cheesecake isn’t getting dark enough, you can broil it for a minute or two at the end, but watch it carefully to prevent it from actually burning.
Loaf Pan Love: Why This Shape Works
Why a loaf pan, you ask? Well, besides being delightfully unexpected, a loaf pan creates a taller, denser cheesecake with a higher ratio of caramelized crust to creamy interior. It’s also incredibly easy to slice and serve, making it perfect for potlucks, dinner parties, or even a simple weeknight dessert. Plus, the loaf shape lends itself to that rustic, chic aesthetic we’re going for.
Variations and Adaptations for Your Burnt Basque Cheesecake in a Loaf Pan
- Spice it up: Add a pinch of cinnamon, nutmeg, or cardamom to the batter for a warm and cozy twist.
- Citrus zing: Grate some orange or lime zest into the batter for a bright and refreshing flavor.
- Coffee kick: Dissolve a teaspoon of instant coffee in a tablespoon of hot water and add it to the batter for a mocha-flavored cheesecake.
- Berry bliss: Swirl in some fresh or frozen berries for a fruity and colorful addition.
- Chocolate indulgence: Drizzle melted chocolate over the top of the baked cheesecake for an extra decadent treat.
##### Serving Suggestions for Maximum Enjoyment
This **Burnt Basque Cheesecake in a Loaf Pan That’s Rustic, Silky, and Unexpectedly Chic** is delicious on its own, but here are a few ideas to elevate your serving experience:
- A dollop of whipped cream: A classic pairing that never fails.
- Fresh berries: The acidity of the berries complements the richness of the cheesecake.
- A drizzle of honey or maple syrup: Adds a touch of sweetness and warmth.
- A sprinkle of sea salt: Enhances the caramelized flavors and adds a delightful contrast.
- A scoop of vanilla ice cream: For the ultimate indulgence.
###### Tips and Tricks for Baking Success
- Use room temperature ingredients: This will ensure a smooth and lump-free batter.
- Don’t overmix the batter: Overmixing can lead to a tough cheesecake.
- Bake in the center rack of the oven: This will ensure even baking.
- Let the cheesecake cool completely before refrigerating: This will prevent it from cracking.
- Chill the cheesecake for at least 4 hours before serving: This will allow it to set properly and develop its flavors.
Enjoy the journey of creating this **Burnt Basque Cheesecake in a Loaf Pan That’s Rustic, Silky, and Unexpectedly Chic** – a dessert that’s as forgiving as it is delicious. Embrace the imperfections, savor the flavors, and prepare to wow your friends and family with this unexpectedly chic treat. Happy baking!
Perfecting the Cooking Process

First, crank up that oven heat! Mix all your ingredients until smooth and combined well. No one wants lumpy cheesecake. Lastly, pour the batter into your prepared loaf pan and bake until it’s deeply golden brown and jiggly.
Add Your Touch
Why not try some lemon zest for a bright, tangy kick? Or perhaps a swirl of raspberry puree before baking? You could even use brown sugar instead of regular for a deeper, more caramel-like flavor. Get creative!
Storing & Reheating
This Basque cheesecake is best enjoyed fresh, but you can store it in the fridge for up to three days. Cover it well to prevent it from drying out. It’s delicious cold, but you can let it sit at room temperature for a bit before serving.
Here are some tips for cheesecake perfection:
- Don’t overmix the batter! Overmixing incorporates too much air, which can cause the cheesecake to crack. Keep it gentle.
- Make sure all your ingredients are at room temperature for even mixing and a smooth, creamy texture.
- Trust the burnt top! That’s where all the flavor lives. Don’t be afraid to let it get dark.
(Personal anecdote formated as paragraph subheading)
My friend Sarah tried this recipe and said her loaf pan cheesecake was the star of her dinner party. “Everyone thought I was a professional baker!” she exclaimed.
Burnt Basque Cheesecake in a Loaf Pan: A Journey of Culinary Chaos (and Deliciousness)
Alright, buckle up buttercups, because we’re about to embark on a journey into the wild and wonderful world of the **Burnt Basque Cheesecake in a Loaf Pan That’s Rustic, Silky, and Unexpectedly Chic**. Yes, that’s a mouthful, but trust me, this cheesecake is worth every single syllable. Forget those pristine, picture-perfect cheesecakes that look like they belong in a museum. We’re going for something a little…rough around the edges. Think “effortlessly elegant” meets “I totally meant to burn it.”
This isn’t your grandma’s cheesecake (unless your grandma is a total rebel chef, in which case, high five to your grandma!). This is a cheesecake that celebrates imperfection, that embraces the beauty of a slightly charred surface, and that delivers a creamy, dreamy interior that will make your taste buds sing. Prepare for a culinary adventure that’s as forgiving as it is flavorful. We’re ditching the water bath, ignoring the fussy instructions, and diving headfirst into a baking experience that’s all about good vibes and great taste.
Why a Loaf Pan? Let’s Talk Practicality (and Aesthetics)
Now, you might be wondering, “Why a loaf pan? Isn’t cheesecake supposed to be round?” Excellent question! And the answer is: because we can. Seriously, that’s pretty much it. But also, there are some very practical reasons why a loaf pan is a fantastic choice for this particular cheesecake.
First off, it’s easier. No springform pan drama, no worrying about leaks, no complicated wrapping in foil. Just grease, pour, and bake. Simple as pie (or, you know, cheesecake). Secondly, it’s rustic chic. The rectangular shape gives this cheesecake a unique, almost architectural look. It’s unexpected, it’s stylish, and it screams, “I’m a sophisticated dessert, but I don’t take myself too seriously.” Plus, slicing it into neat little squares or rectangles makes it perfect for sharing (or, you know, not sharing…we don’t judge). The **Burnt Basque Cheesecake in a Loaf Pan That’s Rustic, Silky, and Unexpectedly Chic** is all about simple beauty.
The “Burnt” Part: Embrace the Darkness (It’s Delicious!)
Okay, let’s address the elephant in the room: the burnt top. Yes, this cheesecake is supposed to be burnt. Not cremated, not charcoal, but a lovely, deep, caramelized brown. Think of it as a really intense crème brûlée. That dark crust is where all the magic happens. It adds a smoky, slightly bitter flavor that perfectly complements the creamy sweetness of the cheesecake filling.
Don’t be scared! Embrace the darkness! Trust the process! Your **Burnt Basque Cheesecake in a Loaf Pan That’s Rustic, Silky, and Unexpectedly Chic** is supposed to have a gorgeous, deep color.
If you’re a little hesitant, you can always start with a slightly lower oven temperature and keep a close eye on it. But honestly, the higher heat is what gives this cheesecake its signature texture and flavor. It’s all about high heat and short baking time for that characteristic result.
Ingredients: Keeping It Simple (and Delicious)
The beauty of this recipe lies in its simplicity. You don’t need a ton of fancy ingredients to create a truly exceptional cheesecake. Here’s what you’ll need:
- Cream Cheese: The star of the show! Use full-fat cream cheese for the best flavor and texture. Make sure it’s softened to room temperature for a smooth, lump-free batter.
- Sugar: Granulated sugar is the classic choice, but you could also experiment with brown sugar for a richer, more caramel-like flavor.
- Eggs: These bind everything together and add richness. Use large eggs and make sure they’re at room temperature.
- Heavy Cream: This is what makes the cheesecake so incredibly creamy and decadent. Don’t skimp on the fat!
- Alcohol-free vanilla extract: A touch of vanilla enhances all the other flavors and adds a lovely aroma.
- All-Purpose Flour: Just a tiny bit to help stabilize the cheesecake.
- Salt: A pinch of salt balances the sweetness and brings out all the other flavors.
That’s it! No weird ingredients, no complicated techniques. Just a handful of simple ingredients that combine to create something truly extraordinary. The secret of the **Burnt Basque Cheesecake in a Loaf Pan That’s Rustic, Silky, and Unexpectedly Chic** is in the quality of the ingredients, not the quantity.
Let’s Get Baking: The Recipe (Finally!)
Alright, enough chit-chat! Let’s get down to business and bake this beauty. Here’s the recipe:
**Yields: ** 8 servings
**Prep time: ** 15 minutes
**Cook time: ** 50-60 minutes
**Ingredients: **
- 24 ounces cream cheese, softened
- 1 1/2 cups granulated sugar
- 4 large eggs, room temperature
- 1 cup heavy cream
- 1 teaspoon Alcohol-free vanilla extract
- 2 tablespoons all-purpose flour
- 1/4 teaspoon salt
**Equipment: **
- Loaf pan (9×5 inch)
- Parchment paper
- Mixer (stand or hand-held)
- Mixing bowls
**Instructions**
**Get Started: **
1. Preheat your oven to 400°F (200°C).
2. Line a 9×5 inch loaf pan with parchment paper, making sure the paper overhangs the sides. This will make it easy to remove the cheesecake later.
**Make the Batter: **
1. In a large bowl, beat the softened cream cheese and sugar together until smooth and creamy.
2. Add the eggs one at a time, beating well after each addition.
3. Pour in the heavy cream and Alcohol-free vanilla extract and mix until just combined.
4. Gently whisk in the flour and salt until there are no lumps. Be careful not to overmix.
**Bake the Cheesecake: **
1. Pour the batter into the prepared loaf pan.
2. Bake for 50-60 minutes, or until the top is deeply golden brown and the center is still slightly jiggly. Don’t worry if it looks burnt! That’s what we want.
3. Remove the cheesecake from the oven and let it cool completely in the pan.
4. Once cooled, chill in the refrigerator for at least 4 hours, or preferably overnight.
**Serve and Enjoy: **
1. Use the parchment paper overhang to lift the cheesecake out of the loaf pan.
2. Slice and serve. Enjoy the **Burnt Basque Cheesecake in a Loaf Pan That’s Rustic, Silky, and Unexpectedly Chic**!
Troubleshooting: What to Do When Things Go Wrong (and They Will)
Even the best bakers have their off days. If your cheesecake doesn’t turn out exactly as planned, don’t panic! Here are a few common problems and how to fix them:
- Cracked Top: A cracked top is usually caused by overbaking or sudden temperature changes. To prevent this, don’t overbake the cheesecake, and let it cool slowly in the oven with the door slightly ajar.
- Lumpy Batter: A lumpy batter is usually caused by using cold cream cheese. Make sure your cream cheese is softened to room temperature before mixing.
- Cheesecake is Too Soft: If your cheesecake is too soft, it probably wasn’t baked long enough. Next time, bake it for a few more minutes, or chill it for a longer period of time.
Remember, baking is a learning process! Don’t be afraid to experiment and try new things. Even if your cheesecake isn’t perfect, it will still be delicious. And that’s all that really matters. The **Burnt Basque Cheesecake in a Loaf Pan That’s Rustic, Silky, and Unexpectedly Chic** is meant to be loved, even if it’s a little bit wonky.
Conclusion for Burnt Basque Cheesecake in a Loaf Pan That’s Rustic, Silky, and Unexpectedly Chic
This loaf pan version transforms the classic Burnt Basque Cheesecake into something truly special. Its unique shape, combined with the signature dark crust and silky center, makes it a show-stopping dessert. Remember, perfection is not the goal. Embrace the rustic charm and slightly burnt edges. This cheesecake is all about bold flavors and effortless elegance, it’s unexpectedly chic. Prepare yourself for rave reviews and requests for the recipe because it’s really delicious.
Print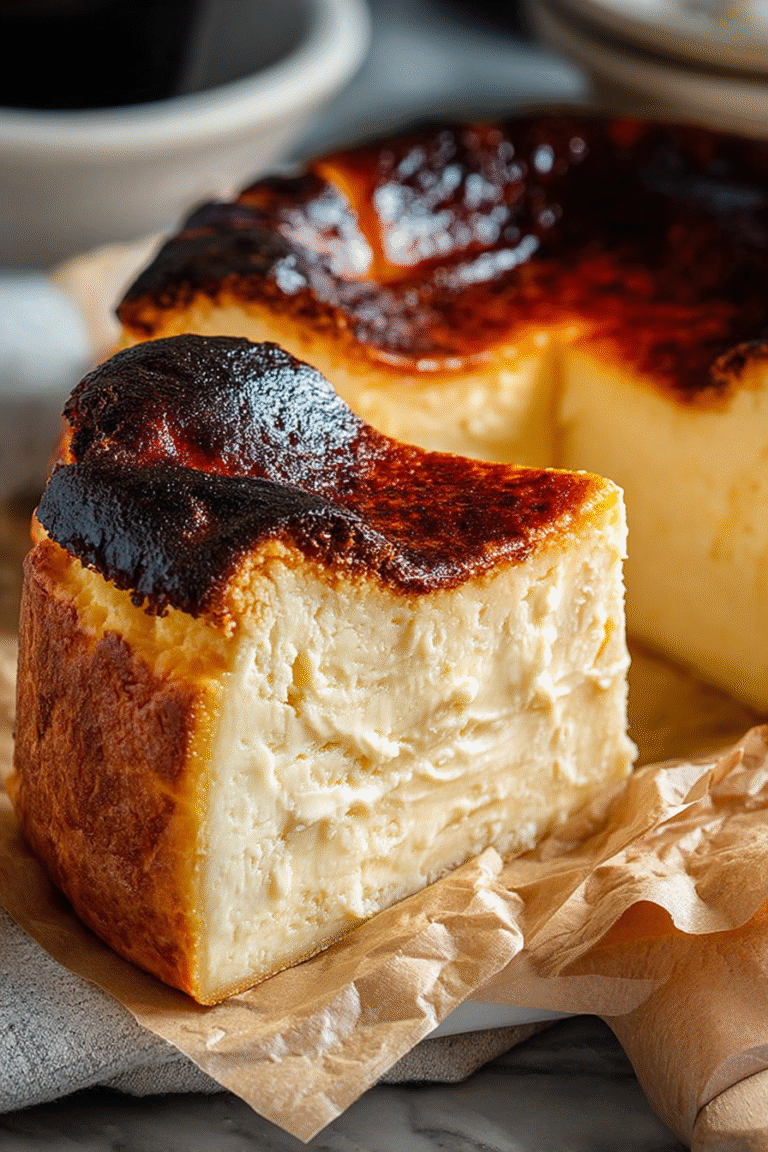
Burnt Basque Cheesecake in a Loaf Pan That’s Rustic, Silky, and Unexpectedly Chic
Delicious burnt basque cheesecake in a loaf pan that’s rustic, silky, and unexpectedly chic recipe with detailed instructions and nutritional information.
- Total Time: 35 minutes
- Yield: 4 servings
Ingredients
- Cream cheese, softened: 16 ounces (450g)
- Granulated sugar: ¾ cup (150g)
- Large eggs: 2
- Heavy cream: 1 cup (240ml)
- All-purpose flour: 1 tablespoon
- Vanilla extract: 1 teaspoon
- Salt: Pinch
Instructions
- Step 1: Preheat oven to 400°F (200°C). Line a 9×5 inch loaf pan with parchment paper, making sure the paper extends well beyond the edges of the pan (this will help you lift the cheesecake out later). Don't worry about making it perfect; the rustic look is part of the charm.
- Step 2: In a large bowl, beat the softened cream cheese and sugar together with an electric mixer until completely smooth and creamy, with no lumps.
- Step 3: Add the eggs one at a time, beating well after each addition. Be careful not to overmix at this stage.
- Step 4: Pour in the heavy cream and vanilla extract, and mix until just combined. Sift in the flour and salt and gently fold into the batter until just incorporated. Avoid overmixing.
- Step 5: Pour the batter into the prepared loaf pan. Bake for 50-60 minutes, or until the top is deeply browned and slightly jiggly. The center should still have a noticeable wobble.
- Step 6: Let the cheesecake cool completely in the pan before lifting it out using the parchment paper overhang. Chill in the refrigerator for at least 4 hours, or preferably overnight, before slicing and serving. The burnt top will soften slightly as it chills.
Notes
- Store leftovers in an airtight container in the refrigerator for up to 3 days, though it's best enjoyed within the first 24 hours.
- For a slightly softened texture, let a slice sit at room temperature for 15-20 minutes before serving, but don't microwave!
- A simple dusting of powdered sugar or a dollop of whipped cream provides a beautiful contrast to the dark, rustic top of this loaf cake.
- Don't fret about small cream cheese lumps initially; the long bake time ensures a smooth, silky texture in the end.
- Prep Time: 15 minutes
- Cook Time: 20 minutes
- Method: Stovetop
- Cuisine: American
FAQs
Can I really bake a Burnt Basque Cheesecake in a Loaf Pan That’s Rustic, Silky, and Unexpectedly Chic?
Absolutely! That’s what makes this recipe so fun. The loaf pan gives it a unique shape and rustic charm. It’s a delightful twist on the classic round cheesecake. Don’t worry about perfection; the beauty of this dessert lies in its imperfections. The slightly burnt top and the gooey inside will impress everyone. Get ready for a showstopper! It will surely become your signature dessert because it is so delicious.
What makes this cheesecake “burnt” and is it supposed to look that way?
Yes, the “burnt” appearance is intentional and crucial! The high baking temperature caramelizes the sugars on top, creating a dark, almost burnt crust. This crust provides a wonderful contrast to the creamy, custardy center. Think of it like a marshmallow toasted just a little *too* long over a campfire – perfectly imperfect and incredibly delicious. Embrace the darkness; it’s where all the flavor lives! Don’t be afraid, this is exactly what you want.
How do I prevent the Burnt Basque Cheesecake in a Loaf Pan from sticking to the pan?
Lining the loaf pan thoroughly with parchment paper is the key. Make sure the parchment paper extends up and over the sides of the pan. This creates a sling, so you can easily lift the cheesecake out after baking. Don’t be shy with the parchment! A little extra is always better than a stuck cheesecake. A good parchment paper that fits into your pan helps greatly. This method ensures a clean release and keeps your cheesecake looking its best.
Can I make this Burnt Basque Cheesecake in a Loaf Pan That’s Rustic, Silky, and Unexpectedly Chic ahead of time?
Definitely! In fact, chilling the cheesecake overnight or for at least a few hours helps it set and develop its flavor. The cool temperature improves the whole flavor profile and lets it fully mature. It becomes even creamier and more delicious. Just be sure to cover it loosely with plastic wrap after it has cooled completely to prevent it from drying out. Serve chilled for the best texture and taste.


Leave a Comment