

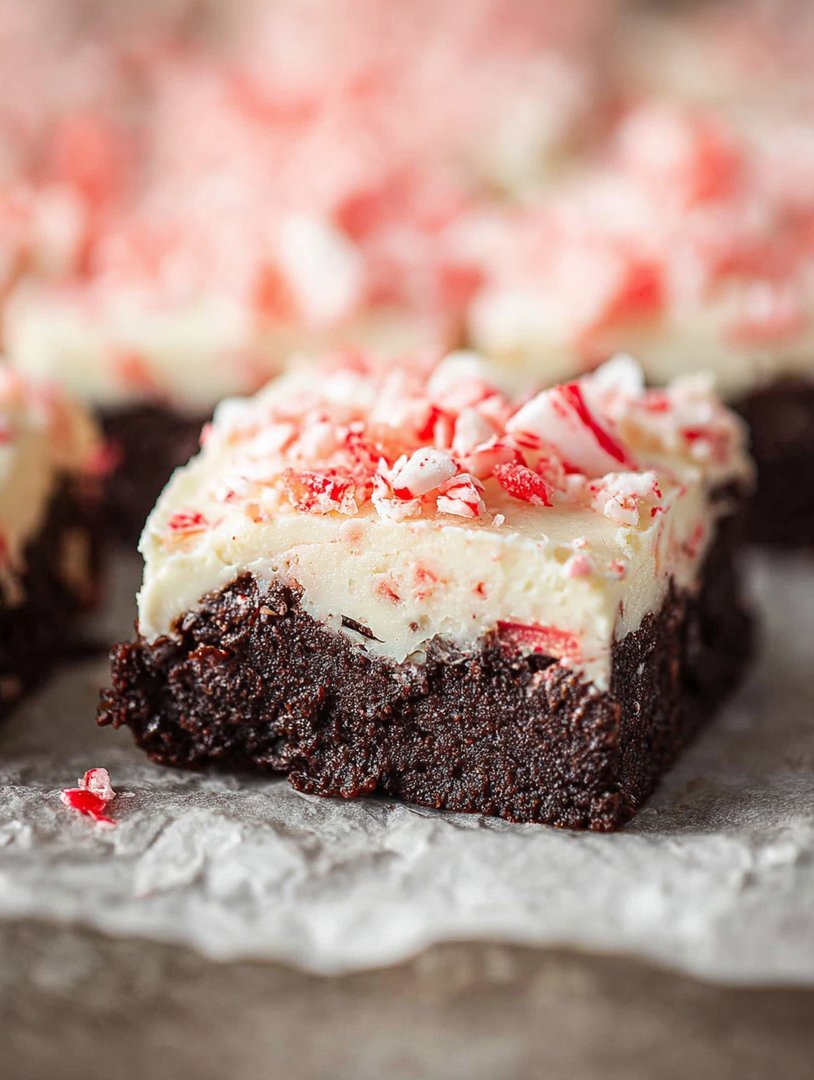
Forget the stress of holiday baking; the true magic happens when rich chocolate meets icy peppermint. TheseCandy Cane Brownies Perfect for winter holiday!turn a standard treat into a festive masterpiece, guaranteeing smiles even from grumpy uncles.
If your kitchen doesn’t smell like a blend of deep cocoa and crisp mint right now, you are missing out on the essential flavor of December. Prepare for the fudgiest, chewiest holiday dessert you have ever created, destined to become an annual tradition.
- This fudgy recipe uses simple pantry staples and requires less than fifteen minutes of focused, hands-on time before sending them off to bake.
- Enjoy the deep, intense flavor of dark chocolate balanced perfectly by a cool, refreshing blast of invigorating crushed peppermint.
- The vibrant red and white candy cane topping contrasts beautifully against the dark, glossy brownie base, making them ideal for holiday serving.
- Serve these delightful treats chilled, at room temperature, or slightly warm with a generous scoop of luxurious vanilla bean ice cream.
The Quest for the Perfect Fudgy Brownie Base
I have spent years chasing the elusive “perfect” brownie. You know the type—the one that isn’t cakey, isn’t dry, and certainly doesn’t require a second cup of coffee just to wash down the density. Most recipes result in thin, dry hockey pucks that disappoint everyone involved. But the holiday season demands perfection, or at least, something that tastes like a cozy fire wrapped in velvet.
The secret weapon here is butter and cocoa powder working in tandem. We melt the butter fully, which ensures that fudgy, chewy interior we crave. Unlike using oil, butter provides unparalleled flavor depth. You whisk in the cocoa while everything is warm, essentially “blooming” the chocolate flavor. This process transforms the cocoa from a dusty ingredient into an intensely dark, aromatic experience. It is the culinary equivalent of turning up the volume on your favorite holiday carol. My first attempt at these brownies resulted in a kitchen fiasco involving a bag of melted chocolate chips and a very confused cat, but we learned quickly: control the temperature and trust the process. When those aromas hit, you know you are on the right track to creating the bestCandy Cane Brownies Perfect for winter holiday!
We are making a brownie that stands up proudly to the bold flavor of peppermint. Standard thin mints are delicious, but they don’t hold a candle to the rich, decadent texture of these square gems. The slight chewiness balances the crunch of the candy cane topping beautifully, creating textural harmony that is essential in any great dessert. Resist the urge to add leavening agents like excessive baking powder; we want dense fudge, not fluffy cake. Embrace the richness!
Ingredients for Candy Cane Brownies Perfect for winter holiday!
Here’s what you’ll need to make this delicious dish:
- Unsalted ButterUse high-quality butter because it is the foundation of the fudgy texture and rich flavor profile.
- Granulated SugarThis provides sweetness and helps create that wonderful crackly top crust that signals a truly spectacular brownie.
- Light Brown SugarThe molasses content adds moisture and a subtle caramel depth, contributing significantly to the chewiness.
- Unsweetened Cocoa PowderOpt for Dutch-processed cocoa powder for a deeper, darker, and less acidic chocolate flavor.
- Large EggsMake sure these are at room temperature, as this allows them to emulsify better with the melted butter mixture.
- All-Purpose FlourMeasure this accurately by spooning it into the cup, then leveling off, to avoid dense or dry brownies.
- SaltA crucial flavor enhancer; do not skip this, as it prevents the brownies from tasting flat or overly sweet.
- Vanilla PowderUse pure vanilla powder to boost the underlying flavor of the chocolate.
- Powdered Sugar (Confectioners’ Sugar)Needed for making the quick, simple peppermint glaze that seals in the festive flavor.
- Milk or CreamA tablespoon or two is necessary to thin the glaze to the perfect drizzling consistency.
- Crushed Peppermint Candy CanesThese are the star; crush them finely but leave a few larger chunks for visual impact and satisfying crunch.
The full ingredients list, including measurements, is provided in the recipe card directly below.
Baking Science: Achieving the Ultimate Fudgy Texture
Baking brownies might seem straightforward, but mastering the fudgy texture requires precision. The primary mistake most bakers make is overmixing the batter once the flour is added. This develops the gluten unnecessarily, resulting in a tough, cakey texture that completely destroys the desired chewiness. We want just enough mixing to combine the ingredients—think gentle folding, not aggressive whipping.
The second critical factor is the baking time. A perfectly fudgy brownie is pulled from the oven when it looks slightly underdone. When you insert a toothpick into the center, you should not look for a clean stick. That means you have overbaked it. Instead, you want moist crumbs clinging to the toothpick. If the toothpick comes out wet or smeared with batter, it needs a few more minutes. If it comes out clean, you have missed the fudgy window. Typically, baking these between 28 and 32 minutes at the specified temperature delivers that glorious center. Once out of the oven, resist the urge to cut them immediately. The residual heat finishes the cooking process, and cooling the brownies entirely allows the texture to set perfectly before you add the minty toppings. Cooling is mandatory if you want those clean, satisfying slices.
How to Make Candy Cane Brownies Perfect for winter holiday!
Follow these simple steps to prepare this delicious dish:
Step 1: Prep the Pan and Bloom the Chocolate
Preheat your oven to 350°F (175°C). Line a 9×13 inch baking pan with parchment paper, leaving an overhang on the sides for easy removal, then lightly grease the paper. In a medium, heat-safe bowl set over a simmering pot of water (or using a microwave), melt the butter. Remove from heat and stir in the granulated sugar, brown sugar, and cocoa powder until smooth. The mixture should look dark and glossy.
Step 2: Incorporate the Wet Ingredients
Allow the chocolate mixture to cool slightly. Whisk in the eggs one at a time, ensuring each is fully incorporated before adding the next. This step builds structure and creates that shiny top crust. Stir in the vanilla powder, making sure the batter is uniform and deeply colored.
Step 3: Fold in the Dry Ingredients
In a separate small bowl, whisk together the flour and salt. Gently fold the dry ingredients into the wet mixture using a spatula. Stop mixing as soon as you see no streaks of dry flour remaining. Overmixing will lead to tough brownies, so be extremely careful and gentle during this stage.
Step 4: Bake and Cool
Pour the batter into the prepared pan and spread it evenly into the corners. Bake for 28 to 32 minutes. Remember the toothpick test: you want moist crumbs clinging to it, not a clean stick. Once baked, transfer the pan to a wire rack and let the brownies cool completely before attempting to glaze them—this usually takes at least two hours.
Step 5: Prepare the Glaze and Top
Once the brownies are completely cooled, whisk together the powdered sugar, a pinch of salt, and milk or cream until a smooth, thick but pourable glaze forms. You may need to adjust the liquid depending on your desired consistency. Drizzle the glaze generously over the cooled brownies. Immediately sprinkle the crushed peppermint candy canes over the wet glaze so they adhere properly.
Step 6: Cut and Serve
Allow the glaze to set for about 15 minutes before carefully lifting the brownies out of the pan using the parchment paper overhang. Slice into neat squares. Transfer to plates and drizzle with extra glaze or serve alongside hot cocoa for the perfect finishing touch.
Creative Variations and Smart Storage Tips
While the basicCandy Cane Brownies Perfect for winter holiday!recipe is fantastic on its own, the holiday season encourages a little creative flair. You can easily elevate these treats by incorporating other textures or flavors. For a richer base, swap out half of the cocoa powder for high-quality melted dark chocolate, which gives an even deeper, more complex flavor profile. If you love texture, gently fold half a cup of toasted walnuts or pecans into the batter before baking; the nutty crunch pairs wonderfully with the cooling mint. For a visually stunning twist, melt white chocolate chips and drizzle them over the peppermint glaze once it sets, creating a beautiful contrast.
Storage is simple, provided these treats last long enough to be stored! Store the cooled, uncut brownies in an airtight container at room temperature for up to four days. If you prefer to freeze them, cut the brownies into squares, place them in a single layer in a freezer-safe container, separating layers with parchment paper. They freeze beautifully for up to three months. When you are ready to serve, thaw them overnight in the refrigerator or simply bring them back to room temperature before serving. Be mindful that frozen and thawed brownies might lose some of the candy cane crunch, so adding a few freshly crushed pieces right before serving is a brilliant move to refresh the texture.
Frequently Asked Questions About Peppermint Brownies
Why did my brownies turn out cakey instead of fudgy?
Cakey brownies usually result from two common mistakes: overmixing the batter once the flour is added, which develops gluten, or adding too much baking powder or baking soda, which we avoided in this recipe. Ensure you measure the flour accurately and mix minimally.
Can I use fresh peppermint extract instead of candy canes?
Absolutely, for an extra burst of mint flavor, add half a teaspoon of peppermint extract directly into the glaze mixture. Be cautious, though, as peppermint extract is potent; start small and taste test.
How do I crush the candy canes easily without making a huge mess?
Place the unwrapped candy canes in a heavy-duty resealable plastic bag. Use a rolling pin or the flat side of a meat tenderizer to gently tap and crush them until you reach your desired consistency. This keeps the mess contained and provides a satisfying stress release.
Are these brownies suitable for making ahead of time?
These brownies are fantastic for making ahead. Bake them two days before your event and store them uncut and unglazed in an airtight container. Glaze and top them with the crushed candy canes just a few hours before serving to ensure the candy retains its maximum crunch.
The winter holidays are a time for comfort, chaos, and copious amounts of chocolate. Forget those fussy gingerbread houses that crumble before the glue dries, or the sad, dry sugar cookies that taste vaguely of dusty flour. We need a dessert that delivers maximum festive impact with minimum kitchen meltdown. Friends, I present the solution: a fudgy, rich, and ridiculously easy brownie studded with crunchy, cool peppermint goodness.
The Great Holiday Dessert Disaster
I learned this recipe the hard way—through utter failure. Last year, I decided I would be the host who made everything from scratch, including a complicated bûche de Fête De Fin D’Année. It looked like a delicious, muddy log, but when I tried to roll the sponge cake, it cracked into a million tiny pieces, resembling something a clumsy beaver might have attempted to build. My guests stared awkwardly at the pile of chocolate dust and cream. That night, I vowed to simplify. I needed something foolproof, something decadent, and something that screamed “winter cheer” without requiring structural engineering degrees.
That is how I rediscovered the unparalleled power of the brownie. It’s hard to mess up, it holds together beautifully, and it serves as the ultimate backdrop for just about any festive topping. Adding crushed candy canes elevates it instantly from a humble chocolate square to a shimmering, minty masterpiece. When that first batch ofCandy Cane Brownies Perfect for winter holiday!emerged from the oven, smelling of rich cocoa and crisp peppermint, I knew I had saved Festive Season dinner—or at least the dessert course.
The Secret to Achieving Fudgy Perfection
Many people believe a good brownie relies solely on the amount of chocolate used. While plenty of quality cocoa and dark chocolate is necessary, the real secret lies in the fat-to-sugar ratio and the mixing technique. We are not making cake; we are making fudge in square form. That means using melted butter and sugar, mixing in the eggs until glossy, but stopping the flour mixing the second you see no dry streaks. Overmixing the flour activates the gluten, resulting in a tougher, cake-like texture, which is a culinary crime when aiming for that signature crackle top and gooey center.
Furthermore, using a combination of high-quality cocoa powder and melted bittersweet chocolate provides a depth of flavor that is irresistible. The cocoa ensures that deep, dark color, while the melted chocolate provides the richness and velvety mouthfeel we crave. This dual-chocolate approach guarantees every bite is saturated with intense flavor, setting the perfect stage for the icy, refreshing burst of peppermint.
Gathering Your Festive Arsenal: Ingredients
Before you start, make sure your ingredients are measured accurately. Baking is science, not abstract art, especially when dealing with the delicate balance needed for these festive chocolate squares.
- 1 cup (2 sticks) unsalted butter, plus extra for greasing
- 1 cup bittersweet chocolate chips or chopped baking chocolate
- 1½ cups granulated sugar
- ½ cup packed light brown sugar
- 4 large eggs, room temperature
- 1 teaspoon vanilla powder
- 1 cup all-purpose flour
- ½ cup unsweetened cocoa powder
- 1 teaspoon salt
- 1 cup crushed candy canes (plus ½ cup for topping)
- 2 tablespoons milk (any variety) or strong brewed coffee
The Icing on the Cake (Or Brownie): Peppermint Glaze
While the brownies are fantastic on their own, a simple glaze makes them look spectacular and helps hold the second layer of crushed candy canes firmly in place. This glaze uses melted butter and a hint of peppermint extract to amplify the winter flavor profile.
- 2 cups powdered sugar
- ¼ cup melted unsalted butter
- 3 tablespoons milk or heavy cream
- ½ teaspoon peppermint extract (use sparingly—it is potent!)
Mixing Magic: Step-by-Step Instructions
Preheating your oven to 350°F (175°C) is the first, crucial step. Line a 9×13 inch baking pan with parchment paper, leaving an overhang on the sides for easy removal later. This simple step prevents sticking and guarantees clean slices.
Preparing the Brownie Base
Start by melting the butter and bittersweet chocolate together. You can use a microwave in 30-second intervals, stirring in between, or a double boiler. Once melted and smooth, remove it from the heat and stir in both the granulated and brown sugars until fully combined. The mixture should be warm and glossy.
Next, beat the eggs in one at a time, followed by the vanilla powder. Make sure the eggs are fully incorporated before adding the next one. Continue stirring for about a minute; the batter will become thicker and slightly lighter in color, developing that desirable shiny quality.
In a separate bowl, whisk together the flour, cocoa powder, and salt. Gently fold the dry ingredients into the wet mixture until just combined. Remember the rule: stop stirring the second you see no more streaks of flour. Add the 2 tablespoons of milk or coffee to maintain moisture and deepen the chocolate flavor.
Finally, fold in 1 cup of the crushed candy canes. Pour the batter into your prepared pan and smooth the top with a spatula. Bake for 28 to 32 minutes. The edges should look set, but a toothpick inserted into the center should come out with moist, fudgy crumbs attached, not clean. Allow the brownies to cool completely in the pan before attempting to glaze them—at least two hours, preferably more, for truly tidy squares.
Glazing and Finishing the Candy Cane Brownies Perfect for winter holiday!
While the brownies cool, prepare the glaze. In a medium bowl, whisk together the powdered sugar, melted butter, milk, and peppermint extract until perfectly smooth. If the glaze seems too thick, add a tiny bit more milk, a half-teaspoon at a time. If it is too thin, add more powdered sugar.
Once the brownies are completely cool, pour the glaze evenly over the top. Immediately sprinkle the remaining half-cup of crushed candy canes over the wet glaze. Press them lightly into the glaze so they adhere properly. Let the glaze set for about 30 minutes before slicing and serving. The contrast between the dark, rich chocolate and the bright white and red topping is visually stunning and tastes like pure winter joy.
Pro Tips from the Kitchen Chaos Coordinator
My kitchen sometimes looks like a disaster zone, but these tips help guarantee perfect results every time, minimizing holiday stress.
-
Use good quality chocolate for the base; the better the chocolate melts, the deeper and richer the final flavor profile of these brownies will be.
-
Do not skip the cooling time! If you slice warm brownies, they will fall apart, ruining that beautiful fudgy texture and clean edges.
-
Crush the candy canes just before using them. If crushed too early, they tend to absorb moisture from the air and become sticky, which makes sprinkling difficult.
My nephew, Leo, who usually prefers plain dirt-colored things, took one bite of theseCandy Cane Brownies Perfect for winter holiday!and actually offered a compliment. That is how I know this recipe is truly magical.
Perfecting the Cooking Process
Start by melting the butter and chocolate first to allow it time to cool slightly before incorporating the eggs, preventing accidental scrambling. Mix your dry ingredients while the chocolate cools, ensuring the oven is preheated to the correct temperature for even baking and a perfect fudgy center.
Add Your Touch
For a richer texture, swap half the butter with clarified butter or brown butter for a nutty depth. Instead of just candy canes, try adding white chocolate chips or a drizzle of melted dark chocolate before the final peppermint sprinkle for extra decadence.
Storing & Reheating
Store these brownies in an airtight container at room temperature for up to four days. They remain moist due to the high fat content. Avoid refrigeration, as it can dry them out. To revive them, warm a slice briefly in the microwave for a few seconds.
Frequently Asked Questions About Festive Brownies
How far in advance can I make these brownies?
You can bake the brownie base up to two days ahead of time. Wait to apply the glaze and crushed candy canes until the day you plan to serve them, as the peppermint tends to bleed color or soften over time when exposed to moisture.
What is the best way to crush candy canes?
Place the unwrapped candy canes in a heavy-duty zip-top bag, remove excess air, and use a rolling pin or the flat side of a meat tenderizer to smash them into small, uneven pieces. Do not crush them into fine dust; you want texture.
Can I freeze these brownies?
Yes, you can freeze the unglazed brownie base for up to three months. Wrap the cooled brownies tightly in plastic wrap, then foil. Thaw them completely at room temperature before adding the glaze and the crucial candy cane topping.
Conclusion for Candy Cane Brownies Perfect for winter holiday!
We successfully navigated the treacherous waters of holiday baking, resulting in a batch of the most decadent Candy Cane Brownies Perfect for winter holiday! These squares offer the perfect symphony of intensely rich chocolate balanced by the cool, crisp explosion of peppermint. The process is straightforward, requiring only minimal effort for maximum festive reward. Remember to prioritize quality ingredients and, most importantly, resist the urge to overbake your beautiful batch. Share these delightful peppermint chocolate squares with friends and family, and watch them disappear faster than you can say “Happy Holidays.”
Print
Candy Cane Brownies Perfect for winter holiday!
Experience the ultimate holiday treat! Fudgy, rich cocoa brownies meet cool, invigorating peppermint. Simple whisking creates a dense 8×8 delight. Full instructions and nutrition breakdown inside.
- Total Time: 35 minutes
- Yield: 4 servings
Ingredients
- Unsalted Butter: 1/2 cup (1 stick), melted
- Granulated Sugar: 1 cup
- Large Eggs: 2
- All-Purpose Flour: 3/4 cup
- Unsweetened Cocoa Powder: 1/2 cup
- Peppermint Extract: 1 teaspoon
- Crushed Candy Canes: 1/2 cup, divided
- Pinch of Salt: 1/4 teaspoon
Instructions
- Step 1: Preheat the oven to 350°F (175°C). Grease and line an 8×8 inch metal baking pan with parchment paper, allowing the edges to overhang for easy removal.
- Step 2: In a large bowl, whisk together the melted butter and sugar until smooth. Beat in the eggs one at a time, then stir in the peppermint extract.
- Step 3: In a separate bowl, whisk together the flour, cocoa powder, and salt. Gradually add the dry ingredients to the wet ingredients, mixing only until just combined. Fold 1/4 cup of the crushed candy canes into the batter.
- Step 4: Pour the batter into the prepared pan and spread evenly. Bake for 25 to 30 minutes, or until a toothpick inserted into the center comes out with a few moist crumbs attached.
- Step 5: Allow the brownies to cool in the pan for 15 minutes before using the parchment paper overhang to lift them onto a wire rack. While still warm, immediately sprinkle the remaining crushed candy canes evenly over the top, pressing gently so they adhere to the surface.
- Step 6: Let the brownies cool completely before cutting into squares for clean slices.
Notes
- To maintain the festive crunch and prevent the candy cane topping from becoming sticky, store the cooled brownies in an airtight container at room temperature for no more than 3 days.
- For an extra gooey texture, reheat chilled individual squares in the microwave for just 8-10 seconds; this subtle warmth amplifies the peppermint flavor beautifully.
- Pair a square with a scoop of vanilla ice cream and a drizzle of chocolate sauce, or serve alongside a hot peppermint mocha for an unbeatable holiday treat.
- Since peppermint extract is potent, use precisely 1 teaspoon as noted, because being heavy-handed can easily cause the flavor to overpower the rich chocolate base.
- Prep Time: 15 minutes
- Cook Time: 20 minutes
- Method: Stovetop
- Cuisine: American
FAQs
How do I ensure maximum fudginess in these festive candy cane brownies?
The secret to achieving intensely fudgy brownies lies primarily in two steps: managing the ratio of fat to flour and controlling the baking time. Use melted butter rather than creamed butter, and mix the dry ingredients only until the streaks of flour disappear, which prevents gluten development. Most critically, do not overbake! Remove the brownies when a toothpick inserted near the center still has moist crumbs attached. Letting them cool completely on the counter before slicing also locks in the moist, chewy texture everyone loves in a premium seasonal holiday treat.
What is the best way to store leftover seasonal holiday treats?
Store leftover brownies at room temperature in an airtight container for up to four days. If you need to keep them fresh for longer, you can freeze them. First, cut them into individual squares. Wrap each square tightly in plastic wrap, then place them inside a heavy-duty freezer bag. They will keep well in the freezer for up to three months. Thaw them overnight at room temperature before serving, and they will taste almost as freshly baked as the original batch, retaining their satisfying peppermint crunch.
Can I substitute the white chocolate drizzle with another type of icing?
Absolutely! While the white chocolate offers a nice color contrast against the dark chocolate base, you can easily substitute it with a dark chocolate ganache or a simple chocolate glaze. If you prefer a lighter, tangier profile, consider using a cream cheese frosting mixed with a tiny drop of peppermint extract. Remember that whatever topping you choose, you must apply the crushed candy canes immediately after drizzling or spreading the topping so they adhere properly before setting.
When is the ideal time to add the crushed candy canes to the Candy Cane Brownies Perfect for winter holiday! batch?
For the best texture and visual appeal, add the candy canes in two stages. First, mix a small amount (about half a cup) directly into the brownie batter just before baking; this provides a subtle mint flavor within the base. Second, and most importantly, sprinkle the remaining crushed candy canes generously over the top of the white chocolate drizzle after the brownies have fully cooled. Applying them to the melted chocolate allows them to stick without melting in the heat, preserving their bright color and satisfying crunch for the best results.


Leave a Comment