

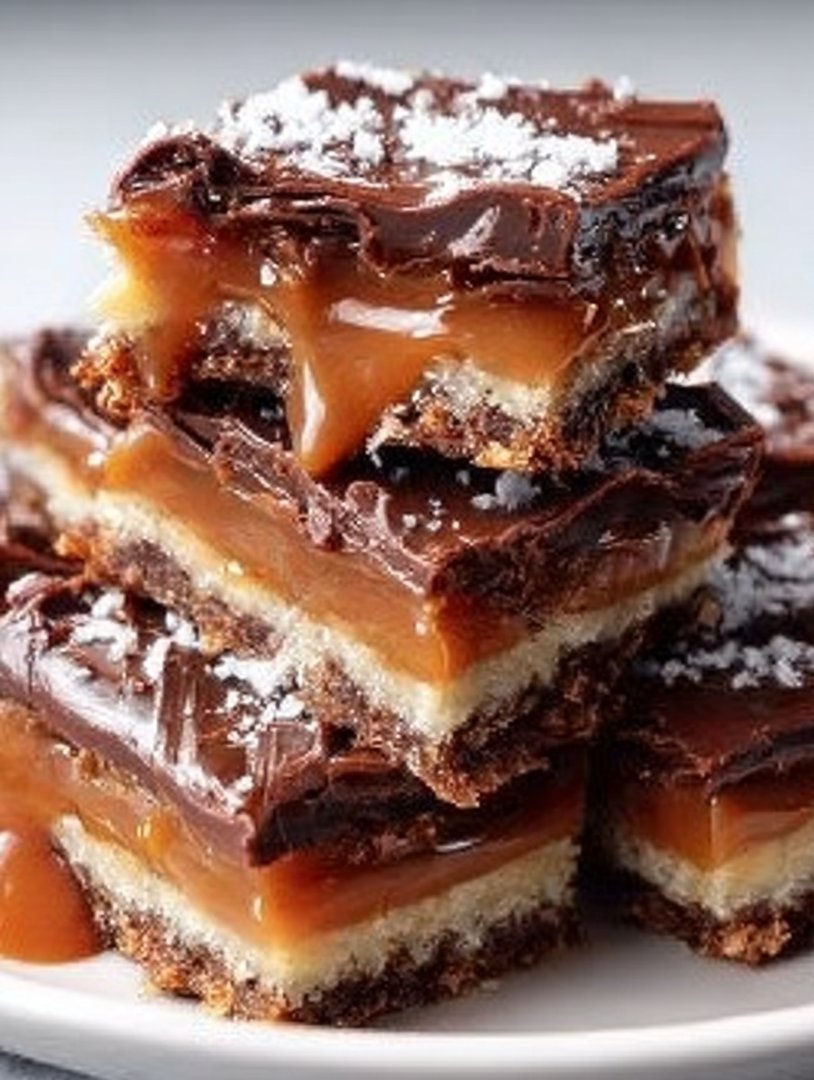
When life demands serious comfort food, you need the legendaryCaramel Crush Bars Dessert Sweet, Chewy & Decadent. These treats are so addictive, they should come with a polite warning label taped to the baking pan.
Forget delicate pastries; these bars rely on a buttery crust and a thick, generous, gooey caramel center that captures pure, rich indulgence in every square, making them the ultimate crowd-pleaser.
- These bars masterfully blend a crunchy, crumbly shortbread base with a smooth, luxurious layer of soft, golden, house-made caramel for textural perfection.
- The flavor profile is incredibly balanced, offering rich butter notes and deep molasses sugar sweetness without being overwhelmingly cloying or heavy on the palate.
- Visually appealing, these thick dessert squares showcase distinct, delicious layers that impress guests and stack beautifully for easy transport to parties and potlucks.
- This robust recipe is incredibly versatile, working perfectly for afternoon tea, holiday gatherings, or simply when you need a swift, rewarding midweek sugary treat right now.
The Legend of the Crush Bar: Why You Need This Decadent Treat
Every baker has that one recipe—the secret weapon they pull out when they need guaranteed applause. For me, it’s these crush bars. I first attempted to make a similar bar years ago during a particularly disastrous baking spree that resulted in something resembling sugary concrete. The crust was rock hard, and the caramel layer migrated to the edges, creating a sticky, dangerous moat around the perimeter of the pan.
After that, I vowed to conquer the caramel bar. It took several attempts, countless hours of consulting old cookbooks, and a near-meltdown over a sugar thermometer, but I finally cracked the code. The secret? It is all about patience, quality ingredients, and the correct ratio of crust to filling. This recipe is engineered for success, delivering maximum chewy texture and deep sweetness without the hassle of pastry school precision.
These bars are famous for their contrast. You get the irresistible crunch of the shortbread base, followed by the comforting give of that rich, buttery caramel. Then, there is the slightly salty finish that cuts through the sweetness just enough to make you reach for a second (and maybe a third) piece. They truly embody the ideal of aCaramel Crush Bars Dessert Sweet, Chewy & Decadentexperience, satisfying every textural craving simultaneously. Forget those store-bought versions that crumble into dust; this homemade delight retains its structural integrity and chewiness for days, provided they last that long in your kitchen.
The Anatomy of a Perfect Caramel Layer
The caramel is the star of the show, and we are making it from scratch, but don’t panic—this is not a complicated French confection. We use sweetened condensed milk as our base, which makes the process almost foolproof. The key is slow, steady heat and continuous stirring. If you rush it, you risk scorching the milk solids, resulting in a slightly bitter, grainy caramel. We are aiming for golden liquid velvet, not gritty disappointment.
The addition of a little extra butter and vanilla bean paste once the mixture thickens elevates the flavor profile, giving it that luxurious depth. Many recipes just pour the ingredients together and hope for the best, but taking five extra minutes to cook the mixture down slightly ensures the caramel sets beautifully once cooled, providing that signature chewy texture that defines the best dessert bars. Once poured over the baked shortbread base, it melts into every crevice, creating an unbreakable bond of sugary deliciousness.
Mastering the Art of Chewy and Sweet
Baking is a science, but delicious baking is an art form driven by passion and butter. When working on dessert bars, balancing the fat and moisture content is crucial. If the crust is too dry, it turns into dust when you cut it. If the caramel is too wet, you end up with a sticky puddle. This recipe finds the sweet spot, guaranteeing that perfect chewy bite that doesn’t stick to your teeth but also doesn’t crumble away at the slightest touch.
Temperature control is another non-negotiable step. We blind-bake the crust first to ensure it’s fully cooked and capable of supporting the heavy caramel filling. Then, after adding the caramel, we bake it again briefly just until the edges are golden and bubbly. Overbaking caramel makes it tough and brittle; underbaking leaves it too runny. Trust your instincts and your timer here. The results are a wonderfully simple dessert that offers complex flavor and satisfying texture, proving that the best comfort food often requires the simplest execution.
The Ultimate Crumbly Shortbread Base
A successful bar starts from the ground up, specifically with the shortbread base. This isn’t just any crust; this needs to be substantial yet tender. We achieve this by using cold butter, which is absolutely essential. Cold butter creates steam pockets during baking, resulting in a beautifully tender, flaky crumb rather than a dense, cookie-like mass. Using a food processor simplifies the mixing process, ensuring the butter is evenly distributed through the flour and sugar, giving you a consistently perfect crumb every time.
When pressing the dough into the pan, be firm but not aggressive. You want a tight, uniform layer without compacting it so much that it becomes hard. Once pressed, the base gets a quick trip to the oven. This partial baking time, known as “docking” the crust, sets the structure before the heavy caramel attempts to drown it. This simple trick prevents a soggy bottom—a truly tragic fate for any dessert bar, especially one as magnificent as these.
Ingredients for Caramel Crush Bars Dessert Sweet, Chewy & Decadent
Here’s what you’ll need to make this delicious dish:
- All-Purpose FlourUse unbleached flour for the best structural support in the shortbread crust, ensuring a tender and crumbly texture.
- Granulated SugarThis provides the necessary sweetness and helps create the crisp texture we are looking for in the shortbread base.
- Light Brown SugarThe molasses content in brown sugar gives the caramel layer a deeper, richer flavor and contributes significantly to the chewy quality.
- Unsalted ButterEnsure the butter is cold for the crust and softened for the caramel, providing rich flavor and ideal consistency for both layers.
- Sweetened Condensed MilkThis is the crucial creamy base for the quick caramel, yielding a thick, smooth, and foolproof filling without complicated candy-making techniques.
- Vanilla Bean PasteUse pure vanilla bean paste to enhance the overall sweetness and provide aromatic complexity to both the crust and the filling.
- Baking PowderA small amount of baking powder provides a slight lift to the crust, ensuring it isn’t overly dense and remains crumbly.
- SaltA pinch of fine sea salt balances the intense sweetness of the caramel, enhancing all the other flavors beautifully.
The full ingredients list, including measurements, is provided in the recipe card directly below.
How to Make Caramel Crush Bars Dessert Sweet, Chewy & Decadent
Follow these simple steps to prepare this delicious dish:
Step 1: Prepare the Shortbread Crust
Preheat your oven to 350°F (175°C). Line a 9×13 inch baking pan with parchment paper, leaving an overhang on the long sides for easy lifting later. In a large bowl or food processor, combine the all-purpose flour, granulated sugar, baking powder, and salt. Cut in the cold, cubed butter until the mixture resembles coarse crumbs. Press this mixture firmly and evenly into the bottom of the prepared pan, ensuring the base is completely flat and compact.
Step 2: Blind Bake the Crust
Bake the pressed shortbread crust for 15 to 20 minutes, or until the edges are lightly golden brown. This step is essential for setting the structure. While the crust is baking, begin preparing the luxurious caramel filling. Remove the crust from the oven and set it aside on a wire rack while keeping the oven temperature consistent.
Step 3: Cook the Decadent Caramel Filling
In a medium heavy-bottomed saucepan, melt the softened butter over medium-low heat. Add the sweetened condensed milk and the light brown sugar. Stir continuously with a rubber spatula or wooden spoon until the sugar fully dissolves and the mixture begins to simmer gently. Reduce the heat slightly and continue stirring for about 5 to 7 minutes, or until the caramel thickens significantly and turns a rich, deep golden color. Be vigilant about stirring to prevent scorching the bottom.
Step 4: Flavor and Pour the Caramel
Remove the thickened caramel from the heat immediately. Stir in the vanilla bean paste and an optional extra pinch of salt for flavor depth. Promptly and carefully pour the hot caramel mixture evenly over the warm, pre-baked shortbread crust. Use a clean offset spatula to gently spread the caramel to the edges, making sure the layer is uniform across the pan.
Step 5: Finish Baking the Bars
Return the baking pan to the 350°F (175°C) oven. Bake for an additional 10 to 12 minutes. The caramel layer should be bubbling lightly around the edges and look slightly firmer, but the center will still look soft and wobbly. Do not overbake, or the caramel will become too hard. The bars set completely as they cool.
Step 6: Cool, Chill, and Serve
Allow the bars to cool completely at room temperature for about one hour, then transfer the pan to the refrigerator and chill for at least 3 hours, or ideally overnight. Chilling is necessary to firm up the caramel and allow for clean slicing. Use the parchment paper overhang to lift the entire slab out of the pan. Cut into 24 perfect squares or 16 large, truly decadent bars. Transfer to plates and drizzle with a touch of extra sea salt flakes for the perfect finishing touch.
Tips for the Perfect Dessert Bars
Getting these crush bars right hinges on a few simple technical details that elevate them from good to truly incredible. Firstly, always measure your ingredients precisely, particularly the flour for the shortbread. Too much flour results in a dry crust, defeating the purpose of a tender shortbread.
Secondly, when stirring the caramel, invest in a heat-resistant rubber spatula that can scrape the entire bottom surface of the pan. This prevents hot spots and ensures the sugar dissolves evenly, preventing crystallization and that dreaded grainy texture. If your caramel starts to look slightly separated or grainy during the cooking process, lower the heat immediately and stir vigorously for 30 seconds to re-emulsify the mixture. If it still looks concerning, a teaspoon of warm water can sometimes save a sticky situation, but this usually is not necessary if you maintain low heat.
Lastly, storage is key if you want these dessert bars to maintain their delightful chewy texture. Store them in an airtight container at room temperature for up to four days, or refrigerate them if your kitchen runs warm. They also freeze beautifully; wrap individual bars tightly in plastic wrap and then foil, and they will keep well for up to three months, perfect for a sudden emergency craving for this sweet, chewy, and decadent treat.
The Accidental Discovery of Sunshine on a Plate
I needed a stress-baking project one gloomy Tuesday and accidentally invented these bars. I was aiming for a simple oat square, but the caramel decided to unleash its full, glorious potential. The resulting Caramel Crush Bars Dessert Sweet, Chewy & Decadent are pure sunshine.
There are moments in the kitchen when you think you’ve peaked. You’ve mastered the soufflé, your bread rises higher than Everest, and then—BAM—you realize you’ve been ignoring the true calling of humanity: the pursuit of maximum chewiness in a dessert bar. That’s precisely how these caramel marvels came into my life. These aren’t just bars; they are handheld portals to pure bliss, demanding that you stop whatever adulting crisis you are currently facing and surrender to the satisfying, slightly sticky reality of melted butter and brown sugar.
The beauty of this recipe lies in its deceptive simplicity. You don’t need fancy equipment, just a deep, abiding love for creamy, pull-apart textures. We are creating three perfect layers: a tender, buttery base; a lush, slow-cooked caramel center that practically begs for a spoon; and a final crumble topping that offers just the right amount of textural contrast. Forget complicated pastry techniques; if you can operate a 9×13 pan, you can master this recipe and forever be known as the hero who brought the chewy caramel crush bars to the party.
Gathering Your Decadent Arsenal
Success starts with having everything measured out, a practice known in the culinary world as “Mise en Place,” or in my world as “How to avoid sticky panic.” Make sure your butter is softened for the crust, but the rest of the ingredients are basic pantry staples. Remember, quality ingredients equal quality results, especially when dealing with the star of the show: the rich, buttery filling.
Ingredients for the Buttery Base & Topping
- 1 ½ cups all-purpose flour
- 1 cup old-fashioned rolled oats (not instant!)
- 1 cup packed light brown sugar
- 1 teaspoon baking soda
- ¼ teaspoon salt
- 1 cup (2 sticks) unsalted butter, softened
Ingredients for the Chewy Caramel Filling
- 1 cup granulated sugar
- ½ cup unsalted butter
- ½ cup sweetened condensed milk
- ¼ cup heavy cream (or evaporated milk)
- 1 teaspoon vanilla bean paste
- ½ cup chopped pecans (optional, but highly recommended)
The Art of the Layered Bar
Making Caramel Crush Bars Dessert Sweet, Chewy & Decadent requires patience, mainly because the aroma while baking is a form of delicious torture. Don’t rush the baking stages; those layers need time to set and bond into their iconic, chewy form. We will build this dessert in stages, ensuring that the caramel sets perfectly without turning into brittle toffee. The key to the ultimate chew is managing the bake time—pull them out when they are golden, but still look slightly soft in the center.
Preheat your oven to 350°F (175°C). Line a 9×13-inch baking pan with parchment paper, leaving an overhang on the long sides to use as handles later. Trust me, trying to pry hot caramel bars out of a pan is a sticky mess nobody wants to clean up. Start by combining the flour, oats, brown sugar, baking soda, and salt in a large mixing bowl. Cut in the softened butter using a pastry blender or your fingertips until the mixture resembles coarse crumbs. This crumb mixture is the foundation for both the bottom crust and the streusel topping.
Perfecting the Cooking Process
Start by blending the crust ingredients until crumbly; press half into the pan. While the base bakes for ten minutes, melt the butter and brown sugar for the gooey caramel layer. Finally, top the caramel with the remaining crust mixture and bake until golden brown and irresistibly fragrant.
Press half of the crumb mixture firmly and evenly into the prepared pan. Bake this crust for 10 minutes. While the base is busy getting crispy, prepare the star attraction: the caramel filling. In a medium saucepan, combine the granulated sugar, ½ cup butter, condensed milk, and heavy cream. Bring this mixture to a boil over medium heat, stirring constantly to prevent scorching. Once boiling, reduce the heat slightly and continue to simmer and stir vigorously for about 3 minutes. The mixture should thicken noticeably. Remove the pan from the heat and stir in the vanilla bean paste and the chopped pecans, if using.
Carefully pour the hot caramel mixture over the partially baked crust. Ensure the caramel spreads evenly, reaching all four corners. Crumble the remaining half of the oat mixture evenly over the top of the caramel layer. Don’t press this top layer down; you want it light and crumbly for maximum texture. Return the pan to the oven and bake for an additional 20 to 25 minutes, or until the topping is golden brown and the caramel is bubbling gently beneath the streusel. The center will still look slightly jiggly, which is exactly what we want for that chewy finish.
Add Your Touch
Feel free to swap the pecans for toasted almonds or walnuts for a different crunch. For a richer flavor, add a teaspoon of vanilla bean paste to the caramel mixture. If you love texture, incorporate a handful of shredded coconut into the crust mixture before pressing.
One of my favorite variations involves adding a thin layer of melted dark chocolate chips (about ½ cup) immediately after the bars come out of the oven. The residual heat melts the chocolate quickly, and you can swirl it gently for a marbled effect. This addition elevates the Caramel Crush Bars into true confectionery royalty, providing a delicious bitterness that balances the intense sweetness of the chewy caramel. If you prefer a nut-free version, simply omit the nuts and increase the oats in the topping by about ¼ cup to maintain the crunch factor. The key is balance; the caramel is dominant, so the crust needs to hold its own.
The hardest part of this entire process is waiting. You absolutely must allow the bars to cool completely before cutting them. If you try to cut them while warm, the caramel will ooze everywhere, resulting in messy (but still delicious) lumps rather than clean, perfect squares. Allow them to cool for at least two hours, preferably chilling them in the refrigerator for 30 minutes before slicing into 24 perfect little squares of happiness. Use the parchment paper overhang to lift the entire creation out of the pan easily before slicing.
- Ensure the caramel reaches a full rolling boil and simmers for exactly three minutes to guarantee the perfect, chewy set after cooling.
- Measure the flour accurately by scooping it lightly into the measuring cup and leveling it off; too much flour results in a dry crust.
- Do not overbake the bars; the top should be golden brown, but the caramel underneath should still show a slight wobble when gently shaken.
My neighbor, Brenda, once tried to sneak an entire row of these Caramel Crush Bars into her purse at a potluck, claiming they were “vitally necessary” for her emotional stability. I understood completely.
Storing & Reheating
Store these decadent Caramel Crush Bars Dessert Sweet, Chewy & Decadent tightly sealed at room temperature for up to four days, or refrigerate for longer freshness. Avoid reheating, as they taste best served slightly warm or at room temperature, maintaining that perfect chewy center.
For long-term storage, these bars freeze beautifully. Cut them into individual squares, wrap each tightly in plastic wrap, and place them in an airtight container. They will maintain their incredible flavor and texture for up to three months. To enjoy them after freezing, simply let them thaw overnight at room temperature. They are fantastic served alongside a strong cup of coffee or even crumbled slightly over a scoop of vanilla bean ice cream for an extra dose of chewy, sweet indulgence. This recipe delivers a satisfying textural experience that truly makes it an unforgettable dessert, whether enjoyed fresh or perfectly thawed.
Conclusion for Caramel Crush Bars Dessert Sweet, Chewy & Decadent
These glorious Caramel Crush Bars Dessert Sweet, Chewy & Decadent prove that sometimes the best desserts are the ones built on simple, comforting layers. From the buttery, crumbly crust to the lush, homemade caramel filling, this recipe is guaranteed to become a household favorite. Remember the critical steps: don’t rush the caramel simmer, and promise yourself you will let them cool completely before slicing. Master these few techniques, and you will unlock the key to perfect chewiness every single time. Get ready for applause, because these bars are genuinely irresistible.
Print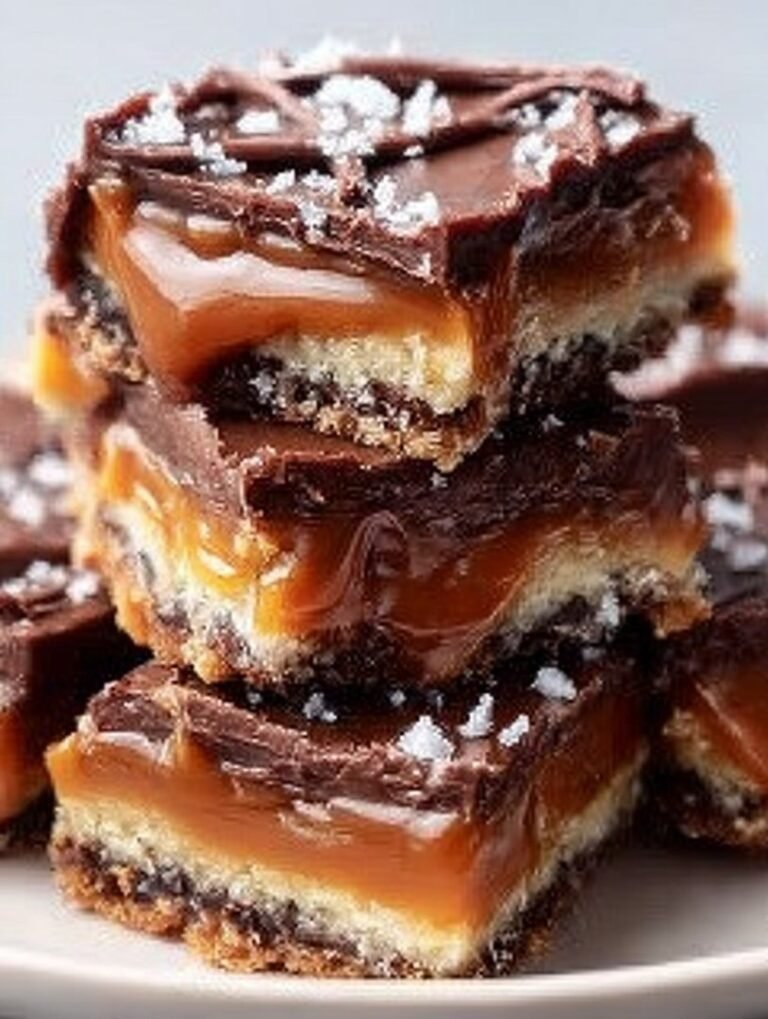
Caramel Crush Bars Dessert Sweet, Chewy & Decadent
Transform simple flour, oats, and butter into the perfect press-in crumb base for these gooey caramel bars. Comforting, chewy, and irresistible. See the full recipe and nutrition breakdown now!
- Total Time: 35 minutes
- Yield: 4 servings
Ingredients
- All-purpose flour (1 1/2 cups)
- Light brown sugar (1 cup, packed)
- Old-fashioned rolled oats (1 cup)
- Salted butter (1 cup, or 2 sticks, softened)
- Sweetened condensed milk (1 can, 14 oz)
- vanilla powder (1 teaspoon)
- Butterscotch baking chips (1/2 cup)
Instructions
- Step 1: Preheat oven to 350°F (175°C). Line a 9×13 inch baking pan with parchment paper, leaving an overhang on the sides for easy removal, and set aside.
- Step 2: In a large mixing bowl, combine the flour, brown sugar, and rolled oats. Cut in the softened butter using a pastry blender or your hands until the mixture forms coarse, pea-sized crumbs. Press two-thirds of this crumb mixture evenly into the bottom of the prepared pan to form the base crust.
- Step 3: Prepare the caramel filling by whisking the sweetened condensed milk and vanilla bean paste together in a small bowl until fully combined. Pour this filling evenly over the pressed crust layer, then sprinkle the butterscotch chips across the surface of the filling.
- Step 4: Distribute the remaining one-third of the crumb mixture evenly over the caramel filling, ensuring it is lightly sprinkled rather than pressed down.
- Step 5: Bake the bars for 25 to 30 minutes, or until the crumb topping is light golden brown and the filling is bubbly at the edges. Let the bars cool completely in the pan on a wire rack (at least 2 hours) before lifting them out by the parchment paper and cutting into 24 squares.
Notes
- Store these bars tightly covered at room temperature for up to 4 days, or freeze the cut squares for up to 2 months; thaw at room temperature before serving.
- If the bars seem stiff after refrigeration, microwave individual squares for 8-10 seconds to slightly warm the filling and restore the chewy, gooey texture.
- For a decadent contrast, serve these rich bars slightly chilled alongside a dollop of unsweetened whipped cream or a small scoop of sea salt caramel ice cream.
- Resist the temptation to cut these bars early; the filling needs the full two hours of cooling time to set properly, ensuring your squares are clean and don't stick to the knife.
- Prep Time: 15 minutes
- Cook Time: 20 minutes
- Method: Stovetop
- Cuisine: American


Leave a Comment