
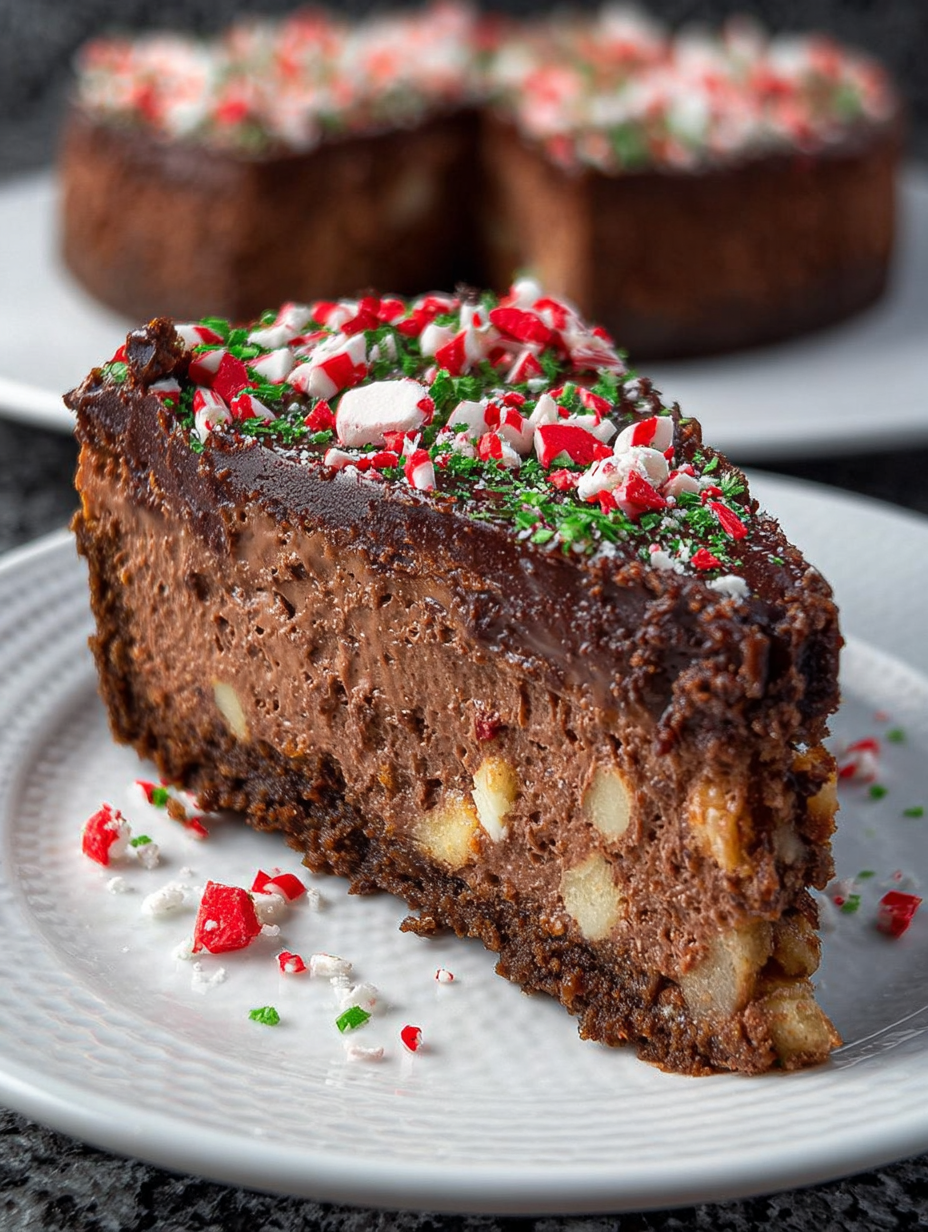
The holiday season demands decadence, and nothing screams “celebration” louder than the fusion of cool mint and rich cocoa. Forget boring pies; we’re diving into the creamy, dreamy world ofChocolate Peppermint Cheesecake—the showstopper dessert guaranteed to impress even the most skeptical in-laws.
This recipe is surprisingly straightforward, delivering intensely rich flavor without hours of fuss. My biggest baking secret? Patience and a water bath—they are the keys to cheesecake glory, ensuring a smooth, crack-free finish every single time.
- The intense chocolate wafer crust provides a deep, slightly bitter foundation, perfectly balancing the sweetness of the lush cream filling.
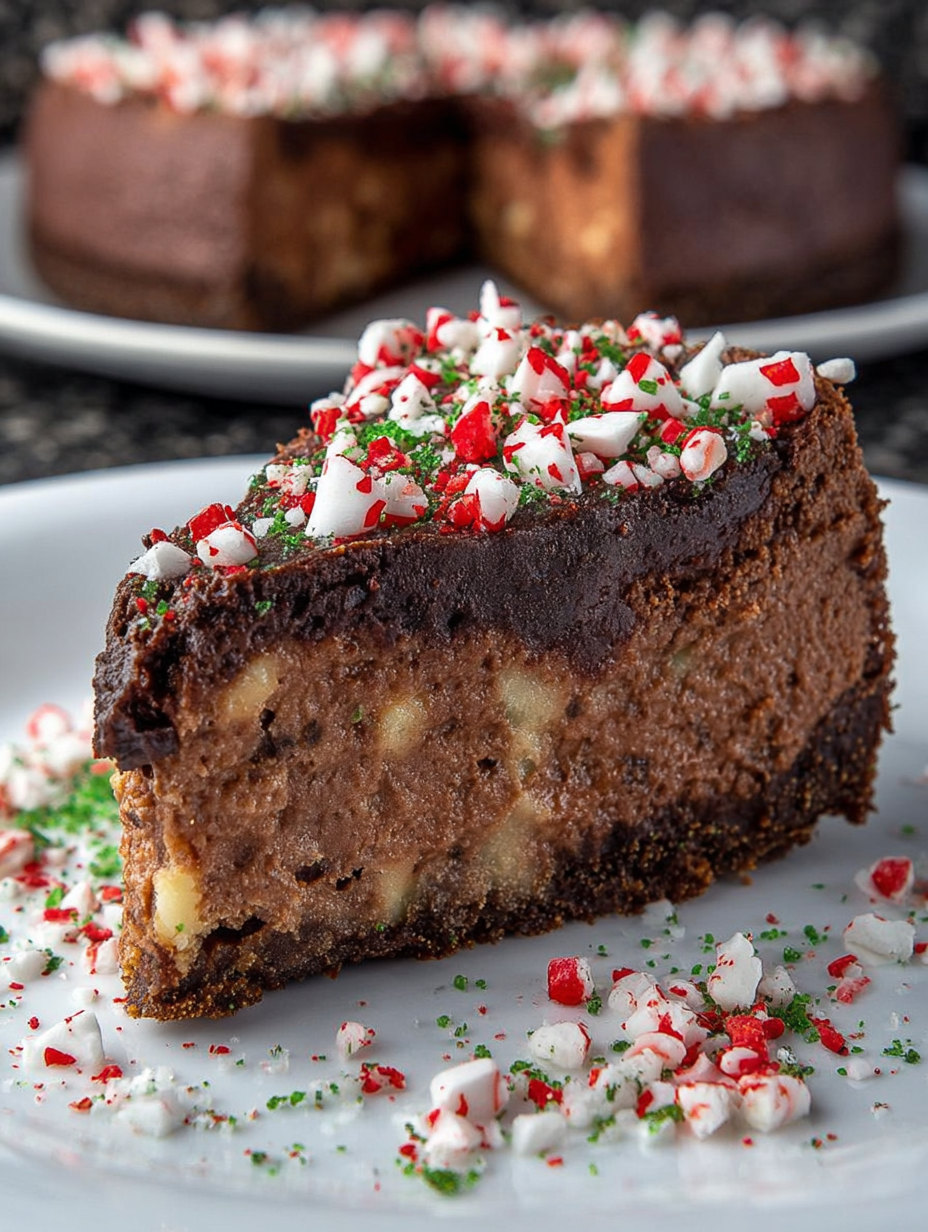
- Achieve that stunning holiday visual appeal with vibrant crushed peppermint candies sprinkled atop a decadent dark chocolate ganache layer.
- This dessert boasts a melt-in-your-mouth texture, combining the cool tingle of mint oil with the velvety smoothness of high-quality cream cheese.
- Despite its gourmet presentation, the preparation process is manageable, requiring only standard kitchen equipment and minimal specialized baking skill.
The Saga of the Accidental Showstopper
My relationship with cheesecake is complicated. For years, I avoided making them, convinced they required the precision of a Swiss clockmaker and the patience of a saint. I had witnessed friends weep over cracked tops and soggy bottoms, and frankly, I didn’t need that kind of drama in my life. However, one chilly December evening, duty called. I was hosting a rather formal (read: slightly terrifying) dinner party, and I needed a dessert that looked like I had spent three days meticulously crafting it, but which actually came together while I binge-watched a particularly dramatic cooking competition show.
I stumbled upon the idea of integrating the classic winter pairing of chocolate and peppermint. It sounds simple, but the key is balance. Too much mint, and it tastes like toothpaste; too little, and it just tastes like chocolate cheesecake that had a brief, distant encounter with a candy cane. The resultingChocolate Peppermint Cheesecakewas a triumph of accidental genius. It was so flawless, so structurally sound, and so breathtakingly delicious that my guests assumed I had abandoned my career as a writer and secretly become a pastry chef. The secret? It’s all about the temperature and the low-and-slow bake in a water bath. Don’t worry, it’s far easier than it sounds—think of it as giving your cheesecake a luxurious spa day.
Building the Perfect Foundation: The Crust
A cheesecake is only as good as the foundation it rests upon. Skip the pre-made graham cracker crusts; they lack the depth and structural integrity we need here. For this decadent treat, we rely on dark chocolate wafers. When crushed and mixed with melted butter, they create a nearly black, intensely flavored base that provides the necessary contrast to the creamy filling. The process is straightforward: crush the cookies finely—a food processor handles this beautifully, but a sturdy zip-top bag and a rolling pin work just as well if you need to relieve some holiday stress.
Pressing the crust into the springform pan is where things get serious. You want a firm, even layer, making sure to create a decent lip up the sides. This wall prevents the filling from sticking and makes the final presentation clean. I recommend using the bottom of a flat-sided measuring cup to tamp it down firmly. Once pressed, a brief trip to the freezer ensures it sets hard before the filling arrives. This chilling step is crucial; it’s the difference between a crumbly mess and a sharp, defined crust edge. If the crust is warm, the butter melts out during baking, leading to that dreaded soggy bottom.
Ingredients for Chocolate Peppermint Cheesecake
Here’s what you’ll need to make this delicious dish:
- Dark Chocolate WafersUse a high-quality brand for the crust to ensure a deep cocoa flavor that stands up to the rich filling.
- Unsalted ButterEssential for binding the crust together; melting it ensures even distribution and perfect cohesion.
- Cream CheeseNeeds to be full-fat and completely softened to room temperature—this prevents lumps and ensures a smooth, silky texture.
- Granulated SugarProvides the necessary sweetness and structure to the cheesecake batter.
- Sour Cream or Greek YogurtAdds essential tanginess and moisture, preventing the cheesecake from tasting overly heavy or dense.
- Vanilla Bean PasteUse pure vanilla bean paste to enhance the overall flavor profile of the cream base.
- Peppermint Extract or OilStart with a small amount of high-quality extract or oil; taste and adjust carefully to avoid an overpowering mint flavor.
- EggsServe as the primary binder; ensure they are also at room temperature and do not over-mix them once added.
- Dark Chocolate Chips or Baking BarsUsed for the ganache topping; choose a 60–70% cacao content for deep, balanced bitterness.
- Heavy CreamRequired for making the rich, pourable ganache that sets beautifully on top of the chilled dessert.
- Crushed Peppermint CandyThese serve as the festive garnish; ensure they are finely crushed, or slightly larger chunks if you prefer texture.
The full ingredients list, including measurements, is provided in the recipe card directly below.
How to Make Chocolate Peppermint Cheesecake
Follow these simple steps to prepare this delicious dish:
Step 1: Preparing the Crust and the Water Bath
Preheat your oven to 325°F (160°C). Prepare a 9-inch springform pan by wrapping the exterior tightly in two layers of heavy-duty aluminum foil to prevent water from entering during the baking process. Combine the crushed chocolate wafers and melted butter, then press the mixture firmly into the bottom and 1.5 inches up the sides of the prepared pan. Place the pan in the freezer to chill while you prepare the filling.
Step 2: Mixing the Creamy Filling
In a very large bowl, using a stand mixer fitted with the paddle attachment, beat the softened cream cheese and sugar until the mixture is completely smooth and fluffy, scraping down the sides frequently. Mix in the sour cream and vanilla until just combined. Add the peppermint extract slowly, mixing briefly after each addition to taste, ensuring the mint flavor is present but not overwhelming.
Step 3: Incorporating the Eggs
Add the room-temperature eggs one at a time, mixing on low speed only until each egg is just incorporated into the batter. This step is crucial; overmixing the eggs incorporates too much air, which leads to cracks during the cooling process. Gently pour the finished cheesecake batter into the chilled, foiled springform pan.
Step 4: Baking the Cheesecake
Carefully place the foil-wrapped springform pan into a larger roasting pan. Place the roasting pan into the preheated oven. Pour boiling water into the roasting pan until the water level reaches about halfway up the sides of the cheesecake pan. Bake for 60 to 75 minutes, or until the edges are set and the center still has a slight wobble when gently nudged.
Step 5: Cooling and Chilling the Dessert
Turn off the oven but leave the cheesecake inside with the oven door propped open slightly (using a wooden spoon) for one hour. This gradual cooling prevents thermal shock and cracking. Remove the cheesecake from the water bath and aluminum foil, and let it cool completely on a wire rack at room temperature. Once cool, cover it and transfer it to the refrigerator to chill for a minimum of 6 hours, preferably overnight.
Step 6: Adding the Decadent Ganache and Garnish
Once thoroughly chilled, prepare the ganache by heating heavy cream until just simmering, then pouring it over the dark chocolate chips or chopped baking bars. Let it sit for 5 minutes, then whisk until smooth and glossy. Pour the slightly cooled ganache over the chilled cheesecake top. Before the ganache fully sets, immediately sprinkle the surface liberally with crushed peppermint candy for a stunning, festive finish. Transfer to plates and drizzle with extra melted chocolate if desired for the perfect finishing touch.
Troubleshooting and Perfecting Your Creamy Creation
Baking a large cheesecake can feel intimidating, but most common issues are easily preventable with a few insider tips. The biggest fear factor is usually the dreaded crack across the top. This happens due to sudden temperature changes or overmixing. Remember that gradual cooling step? It’s non-negotiable. Turning the oven off and letting the cheesecake slowly adjust to the ambient air temperature is the single best way to ensure a flawless, smooth surface. Think of it as allowing the cake to gracefully retire after a long, hard bake.
Another frequent concern is the water bath (orbain-marie). This technique provides moist, gentle heat, ensuring the cheesecake cooks evenly without drying out the edges before the center is set. When wrapping your springform pan, treat it like you’re protecting a priceless artifact during a flood. Use heavy-duty foil and ensure the seam is well above the water line. If water does seep in, the crust turns gummy—a textural tragedy we must avoid at all costs. If you find your cheesecake is browning too quickly on the edges, you can loosely tent it with a piece of foil during the last 15 minutes of baking.
Flavor Variations for the Peppermint Lover
While the classic dessert is fantastic as written, sometimes you want to switch things up without starting from scratch. If you are a true chocoholic, consider adding a few tablespoons of high-quality unsweetened cocoa powder to the cream cheese mixture itself. This deepens the overall chocolate flavor and creates a striking dark contrast with the white, minty streaks left by the extract.
For those who adore texture, try incorporating small, finely chopped bits of crystallized ginger into the crust mixture. Ginger and mint are surprisingly complementary and add a delightful, unexpected warmth. Alternatively, if you want a visual twist without relying solely on the ganache, reserve about a quarter cup of the plain cheesecake batter before adding the peppermint extract. After pouring the main peppermint batter into the pan, dollop the plain batter on top and swirl it gently with a knife for a marbled effect. Just remember, no matter the modification, the cornerstone of this amazing dessert remains the use of high-quality ingredients and patient, gentle mixing.
Serving and Storage Suggestions
A dessert this magnificent deserves proper fanfare. Because the finished cheesecake is so rich and decadent, serving smaller slices is usually appropriate. Pair it with a steaming mug of strong coffee or a simple cup of black tea to cut through the richness. If you are serving it for a formal occasion, a light dusting of cocoa powder or a drizzle of plain melted dark chocolate around the plate adds a professional touch.
Proper storage is essential to maintain its texture and flavor. Store the cheesecake covered tightly in an airtight container in the refrigerator. It remains fresh and absolutely delicious for 4 to 5 days, though honestly, it rarely lasts past the second day in my house. Cheesecake also freezes exceptionally well. For long-term storage, flash freeze the uncovered, cooled cheesecake until solid, then wrap it tightly in plastic wrap followed by aluminum foil. This prevents freezer burn. Thaw it slowly overnight in the refrigerator before serving. Freezing is an excellent way to prepare this dessert weeks ahead of a major holiday gathering, reducing stress and guaranteeing you have the ultimate showstopper ready to go.
The Accidental Discovery of Sunshine on a Plate
I was aiming for a simple fudge brownie but accidentally grabbed the peppermint extract instead of vanilla. What resulted was a catastrophic brownie failure but an inspired concept—combining dark cocoa with cool mint, eventually leading to the gloriousChocolate Peppermint Cheesecake.
Perfecting the Cooking Process
Start by preparing the chocolate crust and pre-baking it slightly to ensure structural integrity. While the crust cools, mix the cream cheese filling until perfectly smooth, then incorporate the melted dark chocolate and cooling peppermint swirls just before baking low and slow.
Add Your Touch
Swap the classic chocolate cookie crust for a graham cracker version, or replace the dark chocolate layer with white chocolate for a lighter contrast. You can also intensify the mint flavor by adding a teaspoon of pure peppermint oil (carefully!) instead of extract.
Storing & Reheating
Store your finishedChocolate Peppermint Cheesecaketightly covered in the refrigerator for up to five days. Since this is a chilled dessert, avoid reheating! For the best texture, let it sit at room temperature for 15 minutes before serving to soften slightly.
The Great Peppermint Extract Mix-Up of ’21
My kitchen looks perpetually like a baking tornado just spun through, primarily because I am vertically challenged and keep essential ingredients on high shelves, which inevitably leads to catastrophic miscommunications with gravity. One fateful December afternoon, I was trying to replicate my grandmother’s famous triple-layer fudge, a task reserved for only the bravest of bakers. Instead of reaching for the carefully labeled vanilla, I grabbed the bottle that smelled suspiciously like a freshly scrubbed dentist’s office. Peppermint extract. The resulting fudge was, shall we say, polarizing. My husband thought it tasted like a delicious toothpaste experiment. My neighbor swore it was genius. I realized that the combination of intense dark chocolate and sharp, cool peppermint needed a softer, more luxurious vehicle. It needed cream cheese. That, dear friends, is how this impossibly rich, yet strangely refreshing, Chocolate Peppermint Cheesecake came roaring into existence. It’s the dessert equivalent of wearing fuzzy socks while simultaneously blasting AC/DC—comfort and unexpected intensity rolled into one perfect slice.
The Art of the Crack-Free Cheesecake
Creating the ultimate cheesecake involves battling gravity, temperature, and your own impatience. But the reward—that perfect crack-free top and creamy center—is worth the culinary anxiety. This recipe focuses on maximizing that deep cocoa flavor while ensuring the peppermint layer provides a sharp, clean contrast, rather than tasting like you swallowed a breath mint. We are building flavor layers here, people: a rich, dark crust; a smooth, dense chocolate base; and finally, that gorgeous, festive swirl of cooling peppermint cream. We must pay special attention to ensuring the cream cheese is fully softened and incorporating the eggs without introducing too much air, which is the nemesis of any smooth cheesecake surface. Achieving this level of decadence means respecting the slow baking process and the cooling procedure—treat it like a fussy toddler needing a slow transition to bedtime.
Ingredients You’ll Need for Cheesecake Supremacy
For the Ultra-Rich Chocolate Crust
-
1 ½ cups chocolate sandwich cookie crumbs (filling removed)
-
4 tablespoons unsalted butter, melted
-
2 tablespoons granulated sugar
-
1 teaspoon fine sea salt
For the Chocolate Cheesecake Filling
-
3 (8 ounce) packages cream cheese, full fat, softened to room temperature
-
1 ½ cups granulated sugar
-
4 large eggs, room temperature
-
1 teaspoon pure vanilla bean paste
-
1 cup semi-sweet chocolate chips, melted and cooled slightly
-
½ cup sour cream or plain Greek yogurt
For the Peppermint Swirl and Topping
-
1 cup reserved cream cheese filling (unflavored)
-
½ teaspoon pure peppermint extract
-
5 drops red food coloring (optional, for festive color)
-
Crushed peppermint candies or candy canes, for garnish
The Blueprint: Baking Your Masterpiece
Step 1: The Crust Foundation and Water Barrier
Preheat your oven to 350°F (175°C). Wrap the outside bottom of a 9-inch springform pan tightly in heavy-duty aluminum foil—aim for two layers of foil to prevent any leakage from the necessary water bath. Combine the crust ingredients thoroughly and press the mixture firmly and evenly into the bottom and slightly up the sides of the prepared pan. Bake this foundation for 8 to 10 minutes until it looks set and smells deliciously chocolatey. Letting it cool completely is non-negotiable before moving to the liquid filling stage, otherwise you risk a greasy mess.
Step 2: Building the Chocolate Base Batter
Reduce the oven temperature dramatically to 325°F (160°C). In a large mixing bowl, beat the softened cream cheese until it reaches a velvety smoothness, ensuring not a single lump remains. Gradually incorporate the sugar until the mixture is cohesive. Beat in the eggs one at a time, ensuring each egg is fully absorbed before introducing the next—this is where your mixing technique is crucial to avoid over-aerating the batter. Stir in the vanilla bean paste and the cooling agent (sour cream or yogurt). Finally, fold in the melted, slightly cooled chocolate chips. Pour about ⅔ of this rich chocolate batter over the cooled crust.
Step 3: Injecting the Peppermint Drama
Now we create the signature element of this stunning dessert. Take the remaining ⅓ of the plain cream cheese batter and vigorously mix in the peppermint extract and, if you are feeling festive, the red food coloring. You should have a bright, aromatic mint mix contrasting sharply with the deep brown base. Gently spoon dollops of the vibrant peppermint mixture over the surface of the chocolate layer. We are aiming for artistic flair here, not uniformity.
Step 4: The Swirl, Bath, and Bake
Using a butter knife or a wooden skewer, gently drag the tip through the dollops to create dramatic peppermint ribbons. Remember: less is more when swirling; over-swirling results in a muddled brown color, losing the beautiful contrast. Place the foil-wrapped pan inside a larger roasting pan. Carefully fill the roasting pan with boiling hot water until the water reaches approximately halfway up the sides of the springform pan. This vital step provides steam, which is the key to preventing surface cracks and maintaining that ultra-creamy texture beloved in any good cheesecake.
Bake for 60 to 75 minutes. You know the cake is ready when the outer two inches are set, but the center still retains a slight wobble. Turn off the oven, but resist the urge to immediately yank it out! Crack the oven door open slightly and allow theChocolate Peppermint Cheesecaketo cool inside the water bath for a full hour. This gradual temperature reduction is the secret weapon against cracking, promoting smooth, even contraction.
Step 5: The Final Chill
Remove the cake from the oven and the water bath, carefully remove the external foil, and let it cool completely on a wire rack on the counter. Once it has reached room temperature, cover the pan tightly with plastic wrap and transfer it to the refrigerator to chill for a minimum of 6 hours, though ideally, let it rest overnight. The patience required here is immense, but the setting process is crucial for flavor and structure. Before serving, garnish the top generously with crushed peppermint candies or large chocolate shavings. Slice using a hot, dry knife for clean edges, and prepare for applause, because you just mastered the art of the perfect holiday dessert.
Expert Tips for Cheesecake Perfection
-
Ensure all dairy ingredients, especially the cream cheese and eggs, are at true room temperature; this prevents lumps and ensures the smoothest possible batter.
-
Always use a water bath (bain-marie) when baking cheesecake; the steam provides humidity and prevents the temperature fluctuations that cause cracking.
-
Do not over-mix the batter once the eggs are added, as excessive whipping introduces air, which leads to a tall rise and inevitable collapse and cracking.
The first time I served thisChocolate Peppermint Cheesecake, my usually stoic brother-in-law cried, claiming it reminded him of his best childhood Winter Holiday memory. That’s the magic we’re chasing.
Conclusion for Chocolate Peppermint Cheesecake
This dessert is more than just a cheesecake; it is a declaration that seasonal flavors can, and should, be utterly decadent. Achieving the perfect balance between the richness of dark chocolate and the invigorating chill of peppermint requires attention to detail, especially regarding the water bath and ingredient temperatures. Mastering the technique ensures a creamy, crack-free masterpiece every time. Whether you are hosting a holiday gathering or simply rewarding yourself for surviving Monday, this impressiveChocolate Peppermint Cheesecakedelivers a stunning visual impact and an unforgettable flavor experience that will undoubtedly become a treasured yearly tradition.
Print
Chocolate Peppermint Cheesecake
Rich, velvety smooth Chocolate Peppermint Cheesecake! Crush your wafer crust, blend the three-pack cream cheese filling, and bake at 325°F.
- Total Time: 35 minutes
- Yield: 4 servings 1x
Ingredients
- 1 ½ cups chocolate wafer crumbs (or Oreo crumbs)
- ¼ cup unsalted butter, melted
- 3 (8-ounce) packages full-fat cream cheese, softened
- 1 cup granulated sugar
- 3 large eggs
- 1 teaspoon pure peppermint extract
- ½ cup semi-sweet chocolate chips, melted and cooled slightly
- ½ cup crushed candy canes, for garnish
Instructions
- Step 1: Preheat your oven to 325°F (160°C). Mix the chocolate wafer crumbs and melted butter, then press the mixture firmly into the bottom of a 9-inch springform pan. Set the crust aside.
- Step 2: In a large mixing bowl, beat the softened cream cheese and sugar together until completely smooth and lump-free. Beat in the eggs one at a time, ensuring each is incorporated before adding the next, then stir in the peppermint extract.
- Step 3: Separate 1 ½ cups of the cheesecake batter into a separate bowl and gently fold in the melted chocolate chips until combined. Pour the plain peppermint batter over the crust, then dollop the chocolate batter evenly over the top. Use a knife or skewer to gently swirl the chocolate batter into the peppermint batter for a marbled effect.
- Step 4: Prepare a water bath by wrapping the outside bottom of the springform pan tightly in heavy-duty aluminum foil. Place the pan in a large roasting pan and pour boiling water into the roasting pan until it reaches halfway up the side of the springform pan. Bake for 55–65 minutes, or until the edges are set but the center still slightly jiggles.
- Step 5: Turn the oven off and let the cheesecake cool inside the oven with the door slightly ajar for one hour. Remove the cheesecake from the water bath, cool completely on a wire rack, and then chill in the refrigerator for at least 6 hours (preferably overnight) before removing the springform ring and garnishing with crushed candy canes.
Notes
- Store any leftover cheesecake tightly wrapped in the refrigerator for up to 5 days, but wait to apply the crushed candy cane garnish until just before serving to prevent it from dissolving or getting sticky in the humid environment.
- Although this is served cold, let individual slices temper at room temperature for 15 to 20 minutes before enjoying, as this slight warming deepens the flavor of the cream cheese and chocolate.
- For a dramatic marble swirl in the batter, use a light hand and make only three to four gentle passes with your knife or skewer, as over-mixing will turn the separate batters into a single muddy color.
- Try serving this dessert with a drizzle of thick dark chocolate syrup or a cloud of fresh vanilla-laced whipped cream to beautifully balance the intense peppermint note.
- Prep Time: 15 minutes
- Cook Time: 20 minutes
- Method: Stovetop
- Cuisine: American


Leave a Comment