
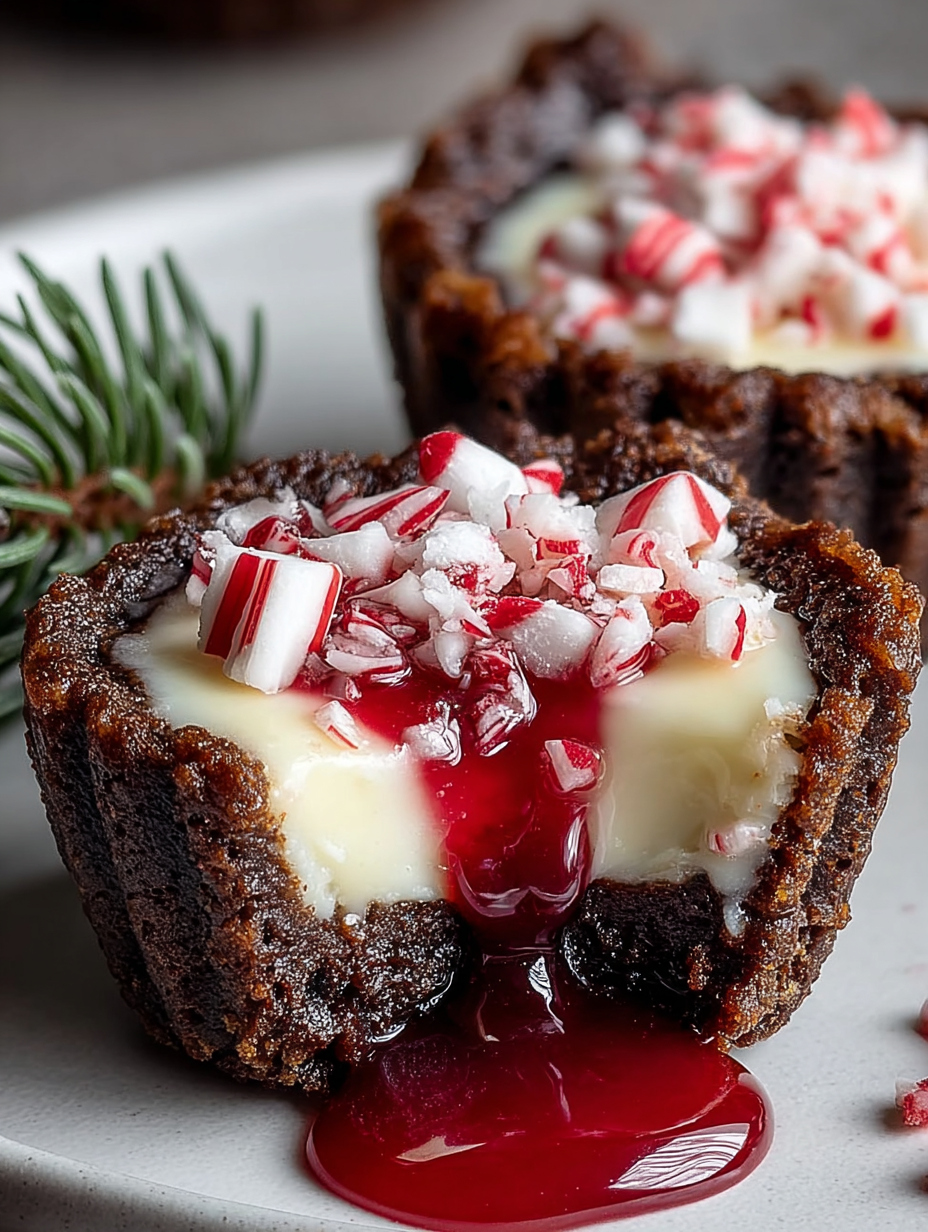
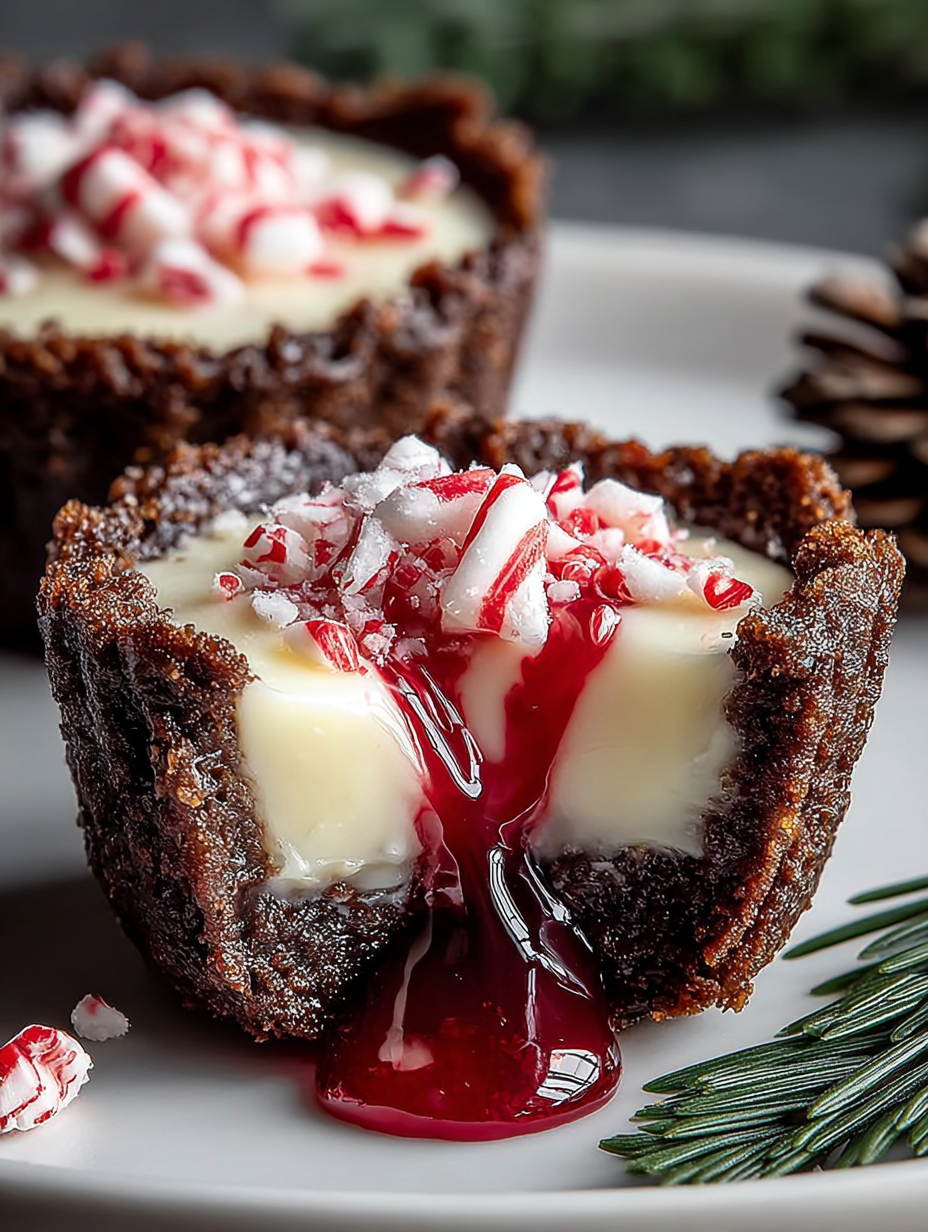
When the air gets crisp and everything demands a hint of magic, you absolutely need theseChocolate Peppermint Cookie Cups. They are the perfect marriage of deep cocoa and icy, vibrant mint.
Forget complicated desserts; these delightful treats deliver maximum holiday cheer with minimal kitchen chaos, tasting exactly like a festive dream baked into a tender, chewy cup.
- Effortlessly achievable, transforming simple pantry ingredients into a professional-looking dessert ideal for busy holiday schedules.
- A powerful flavor punch combining rich, dark chocolate with the cool, refreshing zest of crushed candy canes for sensory delight.
- Visually stunning, offering a charming, edible vessel filled with ganache and topped with glittering peppermint dust that catches the light.
- Extremely versatile, perfect for cookie exchanges, elegant dinner parties, or simply enjoyed fireside with a comforting cup of cocoa.
Ingredients for Chocolate Peppermint Cookie Cups
Here’s what you’ll need to make this delicious dish:
- Unsalted ButterEnsure it is softened but not melted, which is crucial for achieving the correct cookie dough consistency and structure.
- Granulated and Brown SugarThe combination of sugars provides both sweetness and that signature chewiness we crave in a perfect cookie base.
- Large EggActs as a binder and adds richness; make sure it is at room temperature for better emulsion with the butter.
- Vanilla Bean PasteUse a high-quality pure vanilla bean paste to enhance the overall depth of the chocolate flavor.
- All-Purpose FlourThe primary dry component; measure it carefully using the spoon-and-level method to avoid dense cups.
- Unsweetened Cocoa PowderOpt for Dutch-process cocoa powder for a richer, darker color and a smoother, less acidic chocolate flavor.
- Baking Soda and SaltThese leavening agents and flavor enhancers ensure the cups rise correctly and balance the sweetness.
- Semi-Sweet Chocolate ChipsUsed primarily for the rich ganache filling, they melt smoothly and provide classic chocolate flavor.
- Heavy CreamEssential for creating the luxurious, decadent ganache filling that sets up perfectly inside the cookie cups.
- Peppermint ExtractUse sparingly, as a little goes a long way; this delivers the signature cool mint flavor.
- Crushed Peppermint CandiesUsed for decoration and texture, make sure they are fully crushed so they sit nicely on top of the finished product.
The full ingredients list, including measurements, is provided in the recipe card directly below.
The Essential Chocolate Peppermint Cookie Cup Technique
Follow these simple steps to prepare this delicious dish:
Step 1: Preparing the Chocolate Cookie Base
Preheat your oven to 350°F (175°C). Start by creaming the softened butter and both sugars together in a large bowl using an electric mixer until the mixture is light and fluffy, usually about 3 minutes. Beat in the egg and vanilla bean paste, scraping down the sides of the bowl to ensure everything is fully combined. In a separate bowl, whisk together the flour, cocoa powder, baking soda, and salt, then gradually add the dry mixture to the wet ingredients, mixing only until just combined.
Step 2: Shaping and Baking the Cups
Grease a standard 12-cup muffin tin very well. Scoop about 2 tablespoons of cookie dough into each muffin cavity. Using a smaller measuring spoon or the back of a lightly floured spoon, gently press the dough up the sides of the cavity, creating a perfect cup shape with a slight well in the center. Bake for 10 to 12 minutes. The edges should look set, but the centers might still look slightly soft. This ensures a chewy base.
Step 3: Creating the Indentation
Immediately upon removing the cookie cups from the oven, and while they are still hot and pliable, use the back of a round tablespoon or a small shot glass to gently press down further into the center of each baked dough portion. This reinforces the cup shape and creates a deep well for the ganache. Allow the cups to cool in the pan for 10 minutes before carefully transferring them to a wire rack to cool completely.
Step 4: Making the Silky Peppermint Ganache
Place the chocolate chips in a medium, heatproof bowl. In a small saucepan, heat the heavy cream until it just begins to simmer around the edges—do not let it boil vigorously. Pour the hot cream over the chocolate chips, allowing it to sit undisturbed for 5 minutes. Whisk the mixture gently until the chocolate is fully melted and the ganache is smooth and glossy. Stir in the peppermint extract carefully, tasting as you go to ensure the mint flavor is balanced but not overpowering.
Step 5: Filling, Chilling, and Garnishing
Once the cookie cups are fully cooled, spoon or pipe the warm ganache mixture into the prepared indentations, filling them almost to the top. Immediately sprinkle the tops liberally with the crushed peppermint candies. Transfer the filled cups to the refrigerator for at least 30 minutes to allow the ganache to set firmly. Once set, they are ready to serve.
Transfer to plates and drizzle with a touch of extra melted dark chocolate if you want an elevated presentation for the perfect finishing touch.
The Psychology of the Perfect Cookie Cup
Creating the perfect dessert is less about precision and more about understanding the texture of joy. These festive treats rely on a careful balance between the sturdy, chewy cookie structure and the smooth, flowing ganache filling. I remember the first time I tried to make these; I was so focused on making them look perfect that I overbaked the dough, resulting in rock-hard cups that crumbled the moment I tried to press the indentation. It was a failure of epic, crumbly proportions. But that failure taught me the golden rule of cookie cups: treat them like a precious, delicate vessel. They need to be slightly underbaked to maintain their moisture and chewiness, ensuring they don’t fracture when you mold them.
The magic happens right out of the oven. If you wait even a minute too long, the heat dissipation causes the sugar to crystallize, hardening the structure, which makes shaping impossible. That immediate press, creating that perfect little bowl, is the difference between a functional dessert cup and a festive, edible disaster. This recipe transforms that initial challenge into a simple, high-impact reward. The contrasting textures—the soft bite of the cookie followed by the creamy, cool sensation of the peppermint ganache—make these mint chocolate treats truly addictive.
Mastering the Cookie Dough Consistency
The texture of your cookie dough determines everything about the finished cup. If your dough is too warm or sticky, it will slump down the sides of the muffin tin during baking, leaving you with flat discs instead of cups. Conversely, dough that is too dry will crack when you try to mold it. To hit that perfect sweet spot, ensure your butter is only softened, not greasy. If your kitchen is warm, chill the scooped dough balls for 15 minutes before pressing them into the muffin tin. This brief chill helps the fat solidify just enough to maintain the vertical structure during the initial bake, giving you a beautiful, high rim.
Achieving the Perfect Ganache Set
Ganache is a simple but powerful component. The ratio of chocolate to heavy cream is critical for achieving a beautiful, semi-firm set that holds its shape without being too brittle. We use a slightly higher cream ratio for these specific chocolate peppermint cookie cups than traditional truffles because we want it to remain slightly spoonable and melt-in-your-mouth soft at room temperature. The inclusion of peppermint extract needs careful measurement; start with less than you think you need, then taste. Too much peppermint can taste medicinal, overwhelming the delicate chocolate flavor. The ideal ganache should flow easily when warm but set firmly enough to support the crushed candies without leaking over the sides.
Troubleshooting Common Cookie Cup Mistakes
Even seasoned bakers encounter hiccups, especially when balancing delicate structure and rich fillings. Don’t worry if your first batch isn’t Instagram-perfect; these tips will help you navigate the tricky parts of baking these delightful treats.
Why Your Cookie Cups Collapsed
If your cups look great coming out of the oven but immediately deflate, there are usually two culprits. First, you might have over-creamed the butter and sugar, incorporating too much air. While desirable in some cookies, too much air here weakens the structural integrity needed to hold the cup shape. Second, if you pressed the dough too thinly, especially on the sides, the structure will simply give way under its own weight. Ensure the base is substantial and the sides are consistently thick—about a quarter-inch—to maintain robustness.
Dealing with Oily Ganache Separation
Sometimes, when making the ganache, the mixture can “break,” separating the fat (oil) from the solids, leaving you with a grainy, oily mess. This usually happens if the cream was too hot, or if you whisked the mixture too aggressively. If your ganache separates, don’t panic! Add a single teaspoon of room-temperature heavy cream or milk and whisk slowly and gently until it miraculously comes back together into a unified, glossy emulsion. If that doesn’t work, try melting another ounce of chocolate chips and stirring them in to re-stabilize the mixture.
Preventing Peppermint Candy Melting
The crushed peppermint candies are essential for the festive aesthetic, but they are notorious for melting and dissolving into sticky puddles if applied too early. Make sure the ganache is completely cool to the touch and slightly set before sprinkling the candy pieces on top. If you place them on warm ganache, the heat will quickly start dissolving the sugar, ruining the crisp texture and vibrant colors. For the best result, apply them just before the final chill or right before serving.
Customizing Your Festive Cookie Cups
While the classic flavor combination of theChocolate Peppermint Cookie Cupsis undeniably perfect for the holidays, these versatile bases can host a wide array of fillings and decorations, making them suitable for any season or celebration.
Flavor Variations for the Cookie Base
You can easily adjust the cookie dough to achieve different flavor profiles. Swap out the cocoa powder for more flour to create a simple vanilla sugar cookie base, perfect for spring fillings. Alternatively, add a teaspoon of instant espresso powder to the chocolate dough to intensify the cocoa flavor, creating a mocha depth that pairs beautifully with the mint. For an extra rich chewiness, substitute a tablespoon of the flour with finely ground almond meal.
Alternative Filling Ideas
If you need a break from peppermint, the cup itself is an ideal canvas. Consider filling these deep chocolate vessels with a creamy caramel filling sprinkled with sea salt, creating a rich salted caramel cookie cup. Lemon curd is another fantastic option, offering a bright, tart contrast to the dark chocolate base, making it ideal for warmer months. For a truly decadent treat, use melted white chocolate mixed with a drop of orange extract for a chocolate orange combination. Since we are avoiding carrageenan, ensure any custard or curd fillings are set with cornstarch or pectin for stability.
Storage and Make-Ahead Tips
One of the best qualities of these irresistible chocolate peppermint cookie cups is how well they store and how easily they can be prepared in advance, saving you crucial time during busy periods.
Freezing Cookie Dough for Later
You can prepare the cookie dough up to two months in advance. Simply wrap the entire batch tightly in plastic wrap and store it in a freezer-safe bag. When you are ready to bake, let the dough thaw overnight in the refrigerator, then proceed with Step 2, shaping and baking as usual. You can also scoop and shape the dough into the muffin tins and freeze the whole tray. Once frozen solid, pop the frozen cups out and store them in an airtight container, baking them straight from frozen, adding about 2–3 minutes to the total baking time.
Storing Finished Cookie Cups
Once filled and garnished, these mint chocolate delights store beautifully. Store the finished cups in a single layer in an airtight container. Because of the ganache filling, it is best to store them in the refrigerator, where they will keep fresh for up to 5 days. For optimal serving texture, remove them from the refrigerator about 15–20 minutes before serving, allowing the ganache to soften slightly and the cookie base to return to its perfect chewy state.
The annual holiday baking season usually sends me into a delightful but slightly manic spiral. My counter becomes a battleground of flour explosions and melting butter. One particularly frenzied afternoon, I decided I needed a treat that screamed “winter wonderland” but tasted like pure, cozy nostalgia. Forget flat sugar cookies; we needed something sturdy, something capable of holding a glorious payload of creamy filling. That’s how I landed on these perfect, miniature containers of joy—the gloriousChocolate Peppermint Cookie Cups.
These aren’t just cookies; they are little edible bowls of festive cheer. They combine the deep, comforting richness of dark chocolate with the bright, sharp zing of peppermint, creating a flavor combination that is frankly irresistible. If you are ready to ditch the complicated holiday desserts and embrace a simple, show-stopping treat, grab your mini muffin tin. It’s time to bake some magic.
The Essential Ingredients for Festive Baking
Success begins with quality ingredients. For the deepest chocolate flavor, use high-quality cocoa powder—Dutch-processed works best here. We aim for intense chocolate notes that perfectly complement the cool blast of peppermint. Ensure your butter is at true room temperature; forget what the internet tells you, if it tears when pressed, it’s perfect.
Cookie Cup Dough
- 1 cup (2 sticks) unsalted butter, softened
- ¾ cup granulated white sugar
- ½ cup packed light brown sugar
- 2 large eggs
- 1 teaspoon pure vanilla bean paste
- 1¾ cups all-purpose flour
- ¾ cup unsweetened cocoa powder
- 1 teaspoon baking soda
- ½ teaspoon salt
Peppermint Frosting and Topping
- ½ cup (1 stick) unsalted butter, softened
- 3 cups powdered sugar, sifted
- ¼ cup milk or heavy cream
- 1 teaspoon pure peppermint extract (or less, depending on potency)
- Pinch of salt
- Red food coloring (optional, for festive swirls)
- ½ cup crushed candy canes, for garnish
Crafting Your Chocolate Peppermint Cookie Cups
Making these cookie cups is straightforward, but precision guarantees those perfectly formed shells ready for their peppermint payload. Follow these steps closely, and you will achieve a batch of holiday treats that look professional and taste divine.
Mixing the Dough
Preheat your oven to 350°F (175°C). Lightly grease a 24-cup mini muffin tin. In a large mixing bowl, use an electric mixer to cream the softened butter, granulated sugar, and brown sugar until the mixture is light and fluffy, usually about 3 minutes. Beat in the eggs one at a time, ensuring each is fully incorporated before adding the next, then stir in the vanilla bean paste.
In a separate bowl, whisk together the flour, cocoa powder, baking soda, and salt. Gradually add the dry ingredients to the wet ingredients, mixing only until just combined. Be careful not to overmix the dough at this stage; over-developed gluten leads to tough cookies, and nobody wants a tough cookie during the holidays.
Baking the Cups
Roll the dough into small balls, approximately 1 tablespoon each. Place one dough ball into each cavity of the prepared mini muffin tin. Bake for 10 to 12 minutes. The edges should look set, but the centers might still look slightly soft. Immediately upon removing the tin from the oven, use the back of a lightly floured teaspoon or a small tart tamper to gently press down the centers of the warm cookies. This creates the signature cup shape ready for filling. Let the cookie cups cool completely in the tin before carefully removing them.
Whipping Up the Peppermint Filling
While the cookie cups cool, prepare the frosting. In a medium bowl, beat the softened butter until creamy. Gradually add the sifted powdered sugar, alternating with the milk or cream, until smooth. Stir in the peppermint extract and a small pinch of salt. If you desire a pink swirl, reserve a small portion of the frosting and mix it with a drop of red food coloring, then swirl it back into the main batch of white frosting.
Once the cookie cups are fully cooled, pipe or spoon the peppermint frosting into the indentations. Generously top each cup with crushed candy canes. This adds a delightful crunch and that unmistakable festive sparkle. These Chocolate Peppermint Cookie Cups are now ready to steal the show at your next gathering.
The Accidental Discovery of Sunshine on a Plate
I originally planned a boring chocolate cookie, but a misplaced bag of crushed peppermint changed everything. It was a cold December night, and suddenly, my kitchen smelled like a festive wonderland. These beautiful Chocolate Peppermint Cookie Cups weren’t planned; they were a glorious, sugary mistake, instantly becoming my new holiday obsession.
Perfecting the Cooking Process
Start by chilling the dough for at least 30 minutes; this prevents spreading and ensures crisp edges. Next, use a mini muffin tin and gently press the dough balls into perfect cups. Bake until just set, then immediately use a rounded teaspoon to deepen the indentation before cooling completely for the ideal filling well.
Add Your Touch
Swap the mint filling for a luxurious dark chocolate ganache, or sprinkle them with flaky sea salt to cut the sweetness. For an extra crunch, fold crushed pretzels into the cookie dough. You can also drizzle melted white chocolate across the top for an elegant, contrasting finish.
Storing & Reheating
Store un-filled cookie cups tightly wrapped at room temperature for up to five days. Once filled and frosted, keep your Chocolate Peppermint Cookie Cups in an airtight container in the refrigerator for three days. Bring them to room temperature for the best texture before serving.
Chef’s Expert Tips for Cookie Cup Glory
- Ensure your butter and sugar are creamed until light and fluffy; this adds crucial airiness, making the final cookie tender and less dense.
- Do not overbake the cups! They should look slightly underdone when you remove them, as residual heat will finish the cooking process beautifully.
- Wait until the cookie cups are entirely cool before adding the peppermint frosting, or you will end up with a melted, runny mess instead of a fluffy filling.
My Aunt Carol, a notorious dessert snob, claimed these were the best cookies she’d ever tasted, immediately demanding the recipe. That level of validation confirmed these cookie cups are truly holiday magic.
We’ve covered the mixing, the baking, and the crucial step of turning that beautiful dough into perfect little edible bowls. Now let’s tackle some of the finer points that guarantee spectacular results every time you make these fantastic holiday treats. One common issue arises when people use too much peppermint extract; start small—you can always add more flavor, but you cannot take it away.
Troubleshooting the Perfect Cup Shape
Sometimes, cookie cups try to fight back, springing up and ruining your filling space. If you notice your indentation shrinking as they cool, don’t panic. Gently press the centers again halfway through the cooling process. The key tool here is the mini muffin tin itself; its structure forces the dough to hold that desirable shape. Furthermore, remember that using high-quality aluminum tins ensures even heating, preventing burnt edges and raw centers, which can be disastrous for any cookie cup endeavor.
Another trick involves the temperature of the dough. If you are working in a warm kitchen, the dough might become too sticky and soft to handle easily. If this happens, pop the entire bowl of dough into the refrigerator for 10 minutes. A slightly cooler dough is much easier to portion and roll, ensuring all your Chocolate Peppermint Cookie Cups are uniformly sized, which is essential for uniform baking times. Consistency in size means consistency in taste, presentation, and overall enjoyment.
Presentation Matters: Making Them Sparkle
These cookie cups are already gorgeous, but a few simple presentation tricks take them from great to extraordinary. Instead of just sprinkling the crushed candy canes on top, consider crushing some extra-fine pieces and mixing them directly into the frosting for a textural surprise. For a truly professional look, use a star tip when piping the peppermint frosting; the dramatic peaks enhance the visual appeal tremendously.
If you plan to gift these delectable desserts, place them in small paper liners before putting them in the muffin tin. This makes them incredibly easy to remove and transport, and they look stunning nestled in a festive box. Remember, sometimes the simplest desserts bring the most joy, especially when they combine the comforting chewiness of chocolate with the exhilarating flavor of fresh mint.
Conclusion for Chocolate Peppermint Cookie Cups
These Chocolate Peppermint Cookie Cups offer the ultimate holiday indulgence: rich chocolate, vibrant peppermint flavor, and a satisfyingly creamy center. They are simpler to execute than a classic layer cake but deliver maximum visual and gustatory impact. By following the precise steps—from chilling the dough to carefully shaping the cups—you ensure a batch of treats that are structurally perfect and flavorfully balanced. Whether you are baking for a holiday party or simply seeking a festive kitchen project, these delightful cookie cups promise immediate success and guaranteed requests for the recipe. Go ahead, fill your cup with joy!
Print
Chocolate Peppermint Cookie Cups
Velvety chocolate cookie cups cradle a dreamy peppermint vanilla filling. Using a mix makes this festive treat effortless. Simply press the dough, bake at 350°F, then fill.
- Total Time: 35 minutes
- Yield: 4 servings 1x
Ingredients
- 1 (17.5 oz) package chocolate cookie mix
- 1/2 cup (1 stick) unsalted butter, softened
- 1 large egg
- 1 (16 oz) container vanilla frosting
- 1 teaspoon peppermint extract
- 1/4 cup powdered sugar
- 1/2 cup crushed peppermint candy canes
Instructions
- Step 1: Preheat oven to 350°F (175°C). Lightly grease a 12-cup standard muffin tin. In a large bowl, combine the cookie mix, softened butter, and egg until a soft dough forms.
- Step 2: Divide the dough evenly among the 12 muffin cups. Press the dough firmly up the sides and into the bottom of each cup to create a well (or cup shape).
- Step 3: Bake for 12-15 minutes, or until the edges are set. Immediately upon removing from the oven, use a small spoon or the back of a measuring spoon to gently re-press the center of the cups if they have puffed up.
- Step 4: Allow the cookie cups to cool completely in the muffin tin (about 30 minutes) before carefully removing them to a wire rack.
- Step 5: Prepare the filling: Combine the vanilla frosting, powdered sugar, and peppermint extract in a bowl. Mix until smooth and fluffy. Pipe or spoon the filling into the cooled cookie cups.
- Step 6: Sprinkle the filled cups generously with crushed peppermint candy canes before serving.
Notes
- Keep the finished cookie cups in an airtight container at cool room temperature for up to 3 days, but if storing longer, refrigerate and bring them out 15 minutes before serving to soften the cookie shell.
- These cookie cups are designed to be eaten cool; skip reheating, as the delicate peppermint filling and candy cane topping will melt.
- For beautifully deep filling wells, use the back of a measuring spoon immediately after taking the cookies out of the oven to gently re-press the puffed-up centers while they are still hot and pliable.
- Pair these rich cookie cups with a steaming mug of homemade hot chocolate or a scoop of vanilla ice cream on the side for a decadent holiday pairing.
- Prep Time: 15 minutes
- Cook Time: 20 minutes
- Method: Stovetop
- Cuisine: American


Leave a Comment