

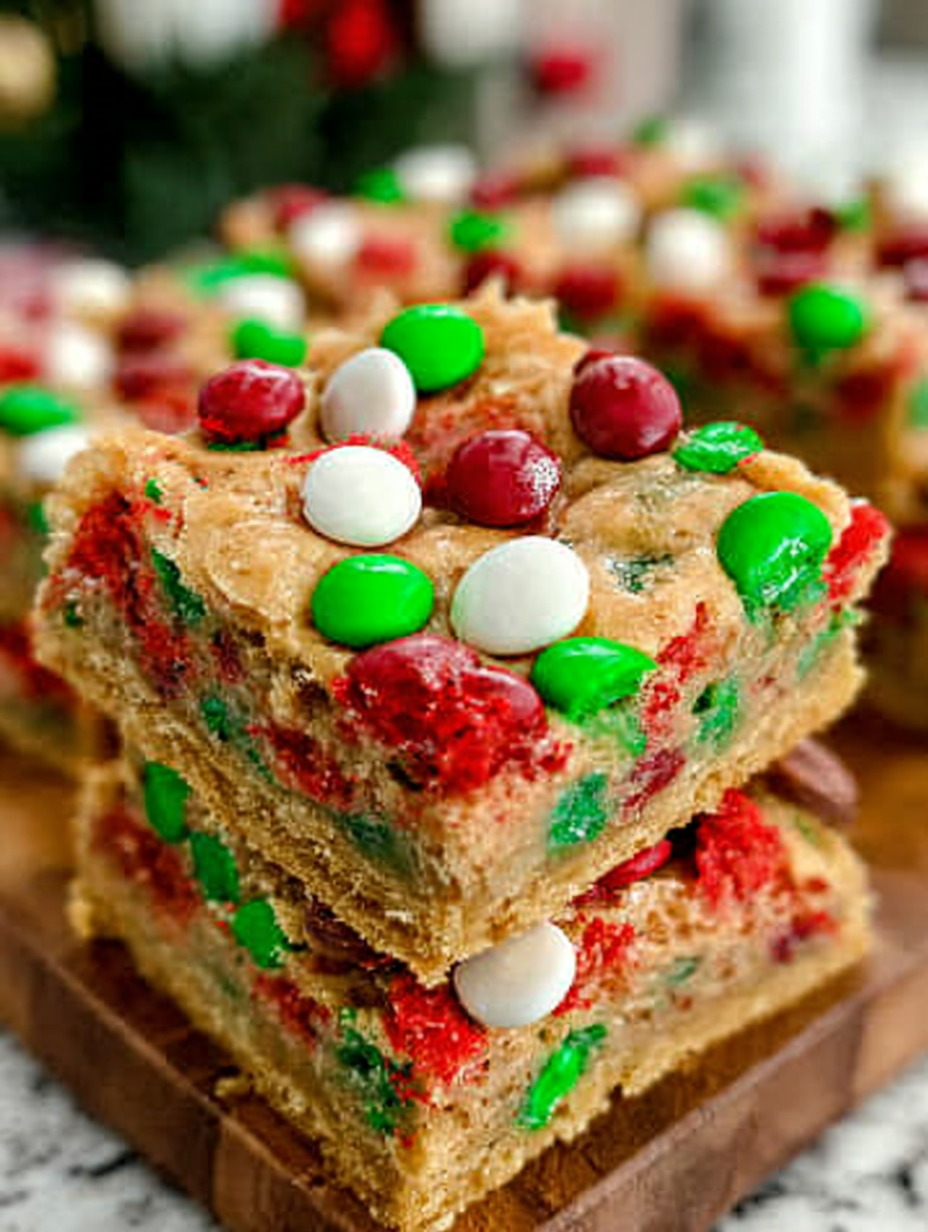
These festive Winter holiday Cookie Bars are the ultimate holiday solution when your ambitious cookie-cutting plans collide disastrously with reality, usually involving sticky dough and unexpected glitter.
Forget the fussy rolling and intricate icing; these magnificent layered Winter holiday Cookie Bars offer all the nostalgic holiday flavor without requiring an architectural degree or a full day spent elbow-deep in flour.
- The straightforward preparation ensures even kitchen novices can achieve bakery-quality results, making holiday baking stress-free and incredibly rewarding.
- Enjoy a complex, balanced flavor profile featuring creamy butter, warm vanilla, rich chocolate chips, and optional festive dried cranberries for tang.
- Visually stunning with vibrant swirls of icing and colorful holiday sprinkles, these bars elevate any dessert platter with minimal effort.
- This recipe offers fantastic versatility, easily adapting to incorporate various nuts, candies, or spices to suit any family preference.
The Year the Gingerbread Man Revolt Happened
You know that scene, right? It’s two weeks before Winter holiday, the carols are playing, and you’ve mentally mapped out the perfect assortment of holiday cookies. I remember one year, I decided I was going to be a cookie architect. I spent hours shaping flawless reindeer and delicate snowmen, only to discover that my dough had the structural integrity of wet sand.
Midway through the third tray, the gingerbread men started looking less like jolly figures and more like abstract, melted blobs performing interpretive dance. I threw my hands up in defeat, flour dusting my hair like premature snow. That’s when my grandmother, a pragmatic woman who believed efficiency was the secret ingredient to joy, marched into the kitchen.
She grabbed the remaining dough, pressed it mercilessly into a large pan, scattered every available topping on top, and declared, “When life gives you messy dough, make bars!” It was a revolutionary moment. The resulting concoction was chewy, crispy on the edges, and utterly delicious. More importantly, it took ten minutes of active effort instead of three agonizing hours.
Since that fateful day—the day the intricate cookie cutter officially retired to the back of the drawer—these festive bars became our holiday standard. They capture the essence of Winter holiday baking: maximum joy, minimum fuss. They are the dessert equivalent of finding a comfy pair of sweatpants on Winter holiday morning, delivering exceptional taste without the high maintenance.
Why Bar Cookies are the Undisputed Champions of Holiday Baking
Bar cookies hold a special, revered position in the holiday dessert hierarchy. They represent sanity in a season often characterized by chaotic schedules and impossible expectations. While traditional drop cookies demand patience, individual shaping, precise baking times, and tray rotation that feels like a full-body workout, bars simplify the process dramatically.
You mix the dough, press it into a pan, bake it until golden, and slice it. Done. The consistency is almost always superior because the dough stays uniformly moist, benefiting from the communal baking environment of the pan. Plus, you get those coveted chewy center pieces and the delightfully crunchy corner bites, satisfying every texture preference at the holiday table.
Bar recipes are incredibly flexible. If you accidentally throw in an extra cup of chocolate chips or decide last minute that crunchy pecans are necessary, the bar format forgives these spontaneous additions instantly. Trying to sneak those additions into a drop cookie recipe would likely result in a disastrously sticky mess. These holiday cookie bars are robust, sturdy travelers, making them ideal for potlucks and neighbor gifts. You can stack them high without worrying about delicate decorations crumbling before they even reach their destination, ensuring your presentation stays flawless.
Ingredients for Winter holiday Cookie Bars
Here’s what you’ll need to make this delicious dish:
- All-Purpose FlourThis forms the base and structure of the cookie dough, ensuring a perfect balance of chewiness and stability.
- Unsalted ButterUse high-quality, softened butter for rich flavor and tenderness; it contributes significantly to the melt-in-your-mouth texture.
- Brown Sugar and Granulated SugarThe combination of sugars adds depth, moisture retention, and provides the essential sweetness and chewiness to the bars.
- EggsEggs bind the ingredients together and add richness, lift, and structure, making the bars cohesive and dense.
- Alcohol-free vanilla extractEssential for enhancing all the other flavors; always use pure Alcohol-free vanilla extract for the best aroma and taste.
- Baking Powder and SaltThese leavening and seasoning agents ensure the bars rise slightly and prevent the overall sweetness from becoming overwhelming.
- Festive Mix-insThink chocolate chips, white chocolate chunks, crushed peppermint candies, or dried cranberries for a seasonal burst of color and flavor.
- Icing/Glaze ComponentsPowdered sugar, milk or water, and sometimes a touch of almond or lemon extract are needed for a smooth, festive finish.
The full ingredients list, including measurements, is provided in the recipe card directly below.
How to Make Winter holiday Cookie Bars
Follow these simple steps to prepare this delicious dish:
Step 1: Prepare the Pan and Oven
Preheat your oven to 350°F (175°C). Line a 9×13 inch baking pan with parchment paper, leaving an overhang on the sides. This parchment sling will make removing the finished bars effortless. Lightly grease the exposed parts of the pan if necessary.
Step 2: Cream the Fats and Sugars
In a large mixing bowl, or the bowl of a stand mixer, cream together the softened butter, granulated sugar, and brown sugar until the mixture appears light and fluffy. This process incorporates air, which is crucial for achieving a tender bar texture.
Step 3: Incorporate Wet Ingredients and Dry Mix
Beat in the eggs one at a time, ensuring each is fully combined before adding the next. Stir in the Alcohol-free vanilla extract. In a separate bowl, whisk together the flour, baking powder, and salt. Gradually add the dry ingredients to the wet mixture, mixing only until just combined. Overmixing the dough develops gluten, resulting in tougher bars.
Step 4: Fold in the Festive Mix-ins
Gently fold in your chosen mix-ins, such as chocolate chips and dried cranberries. Ensure the additions are evenly distributed throughout the thick dough. Press the entire dough mixture evenly into the prepared 9×13 inch pan. Use a rubber spatula or lightly floured hands to ensure the surface is flat.
Step 5: Bake and Cool
Bake the bars for 25 to 30 minutes, or until the edges are golden brown and a toothpick inserted into the center comes out with moist crumbs attached. The center should look set, not liquid. Allow the bars to cool completely in the pan on a wire rack for at least two hours before attempting to frost them.
Step 6: Frost and Slice
Once cooled, lift the bars out using the parchment sling. Whisk together powdered sugar and milk until you achieve a smooth, pourable icing consistency. Spread the icing evenly over the bars and immediately decorate with festive sprinkles or crushed candy before the icing sets. Slice into 24 uniform squares once the icing has dried.
Transfer to plates and drizzle with extra melted white chocolate for the perfect finishing touch and a truly beautiful holiday presentation.
Tips and Tricks for Achieving Perfectly Chewy Cookie Bars
Making excellent Winter holiday Cookie Bars is simple, but a few professional secrets can elevate your finished product from good to unforgettable. The temperature of your butter is paramount. Ensure the unsalted butter is genuinely softened, meaning it indents easily when pressed, but it should not be melted or greasy. Using butter that is too warm results in a dough that spreads excessively and creates dense, greasy bars.
Pay close attention to baking time. Since these bars are thicker than standard drop cookies, they require a lower temperature and a slightly longer bake. If you overbake them, they lose their essential chewiness and become crumbly. Aim for the center to look slightly underdone when you pull them out; residual heat, or carryover cooking, will finish the baking process as they cool in the hot pan. This ensures maximum moisture retention.
For uniform slicing, chilling is your friend. If you find your holiday cookie bars are crumbling when you try to cut them, place the entire frosted slab in the refrigerator for 30 minutes. The slight firmness from the cold allows for precise, clean cuts, giving you those professional-looking edges. Additionally, always clean your knife between cuts, wiping off any sticky icing or crumbs, to maintain sharp lines on every single bar.
Consider using two different types of chocolate chips, perhaps semi-sweet and milk chocolate, to add complexity to the richness. If you are using extracts other than vanilla, start small; extracts like almond or peppermint can quickly overpower the delicate butter flavor, so use them sparingly for accent rather than dominance.
Storage and Make-Ahead Magic
One of the best features of Winter holiday Cookie Bars is their incredible shelf stability and ease of preparation ahead of time. You can absolutely make these bars days before your event, reducing holiday stress significantly. Store unfrosted bars in an airtight container at room temperature for up to four days. If you plan to serve them later, hold off on the icing until the day you intend to share them.
Once frosted, store the bars in a single layer in an airtight container. If you must stack them, separate the layers with parchment or wax paper to prevent the icing from sticking or smudging. They remain fresh and delightfully chewy at room temperature for three to four days after icing. For longer storage, bars freeze beautifully.
To freeze, wrap the cooled, unfrosted block of bars tightly in plastic wrap, followed by a layer of aluminum foil. Label and date the package, and freeze for up to three months. Thaw them overnight in the refrigerator before bringing them to room temperature and applying the festive icing. Freezing the dough itself is also an option; press the unbaked dough into the pan, wrap it well, and freeze. When ready to bake, you may need to add five to ten minutes to the baking time.
Frequently Asked Questions About Cookie Bars
Can I substitute different types of flour in this Winter holiday Cookie Bars recipe?
While all-purpose flour provides the best texture balance, you can use a 1:1 gluten-free blend, ensuring it contains xanthan gum. Substituting whole wheat flour is not recommended, as it tends to make the bars too dense and dry, compromising the desired chewiness.
How do I prevent the topping, like sprinkles, from running into the icing?
The key is patience. Ensure the bars are completely cooled before icing them. More importantly, let the prepared icing set slightly before you add delicate toppings. If you use nonpareils or coarse sprinkles, press them lightly into the wet icing immediately before it crusts over.
My bars turned out dry. What went wrong?
Dryness is usually due to two factors: too much flour or overbaking. Ensure you measure the flour correctly by spooning it into the measuring cup and leveling it off. If your oven temperature is accurate, pull the bars out right when the center is set, avoiding the urge to let them brown completely throughout.
What is the benefit of using parchment paper in the pan?
Parchment paper acts as a release agent and a sling. It prevents the sticky bar edges from adhering to the pan, ensuring easy removal without damaging the integrity of the dessert. This makes frosting and slicing much cleaner and simpler.
The holiday season inevitably brings two things: joy and an overwhelming urge to bake 37 different types of cookies for every single person you know. You start with the best intentions—meticulously rolling out gingerbread men, piping intricate royal icing designs, and trying desperately not to let the sugar cookies burn. But by mid-December, you are knee-deep in flour, stressing about cleanup, and considering buying store-bought treats just to regain your sanity. It is during this chaotic moment that the unassuming, beautiful, and utterly simple Winter holiday Cookie Bars emerge as the true hero of the festive kitchen. These magnificent, sliceable squares provide all the buttery comfort of a classic cookie with none of the hassle of shaping and individual decorating. Forget the cookie cutters; grab your 9×13 pan and embrace the revolution.
The Magic of Stress-Free Winter holiday Cookie Bars
I remember one year I decided to tackle a recipe that required exactly six individual chilling sessions and three distinct decorations. The result was delicious, but my mental health was questionable. That is when I pivoted to the bar format, and frankly, my holiday hosting abilities soared. When you make Winter holiday Cookie Bars, you essentially mix, press, bake, cool, and slice. It removes 90% of the complexity while sacrificing zero percent of the flavor or festive flair. These bars are the definition of high reward for minimal effort.
Why Bars Beat Cookies Every Time
The superiority of cookie bars lies in their fundamental nature: speed and texture consistency. You achieve a guaranteed chewy center and slightly caramelized edge in one fell swoop, which is often hard to manage with individual cookies that require careful monitoring. Plus, cleanup is significantly reduced. One pan, one bowl, and suddenly your kitchen looks less like a flour bomb went off and more like a functioning holiday workshop. They also travel better, stack higher, and are much easier to package up as last-minute gifts than fragile, decorated individual cookies.
Furthermore, these holiday dessert bars are incredibly forgiving. If you accidentally slightly overmix the dough, it is okay! If your sprinkles clump together in a happy little pile, nobody cares! The rustic charm of a perfectly baked, dense square is precisely what makes them so appealing. We are using a simple shortbread base here, topped with a creamy, festive layer that bakes into a delightful fudgy texture, ensuring every bite is rich, moist, and wonderfully decadent.
Gather Your Festive Arsenal: Ingredients List
Creating these perfect festive treat squares requires standard pantry staples, but the addition of specific holiday flavor elements is what elevates them from everyday treats to true seasonal superstars. We are aiming for that classic combination of buttery richness paired with bright, tangy, and subtly spiced notes.
The Shortbread Base Essentials
- 1 cup (2 sticks) unsalted butter, softened
- ¾ cup granulated sugar
- 1 large egg
- 1 teaspoon pure Alcohol-free vanilla extract
- 2 ½ cups all-purpose flour
- 1 teaspoon baking powder
- ½ teaspoon salt
The Festive Topping Accents
- 8 ounces cream cheese, softened
- ½ cup granulated sugar
- ¼ cup brown sugar
- 1 large egg
- 1 teaspoon peppermint extract (or alcohol-free almond extract for non-peppermint version)
- 1 cup white chocolate chips
- ½ cup dried cranberries or cherries
- ¼ cup festive red and green sprinkles
Step-by-Step Instructions: Baking Success
Follow these steps closely to ensure yourWinter holiday Cookie Barsachieve that ideal ratio of crumbly base to chewy, rich topping. Remember, precision matters when it comes to baking, especially during the chilling phase.
Creating the Perfect Buttery Foundation
First, preheat your oven to 350°F (175°C). Line a 9×13 inch baking pan with parchment paper, leaving an overhang on the two longer sides. This parchment “sling” will be your best friend when lifting the finished bars out for easy cutting.
In a large mixing bowl, cream together the softened butter and granulated sugar until the mixture becomes pale and fluffy, usually about three minutes. Beat in the egg and Alcohol-free vanilla extract until just combined. In a separate bowl, whisk together the flour, baking powder, and salt. Gradually add the dry ingredients to the wet ingredients, mixing on low speed until the dough just comes together. Be careful not to overmix.
Press the shortbread dough evenly into the prepared pan. Use the bottom of a measuring cup or a flat spatula to ensure the base is compact and consistent. Place the pan in the freezer or refrigerator to chill for 30 minutes. This chilling step prevents the base from getting overly soft when the topping is applied and ensures a crispier finished texture.
Layering on the Holiday Cheer
While the base chills, prepare the creamy festive topping. In a clean mixing bowl, beat the softened cream cheese until smooth and entirely lump-free. Add both the granulated sugar and brown sugar, mixing until just incorporated. Beat in the large egg and the peppermint or alcohol-free almond extract.
Gently fold in the white chocolate chips and the dried cranberries or cherries. You want the mixture to be smooth but still thick enough to spread easily. Retrieve the chilled shortbread base from the refrigerator. Carefully pour the cream cheese mixture over the base, spreading it gently and evenly across the entire surface. If the shortbread base starts to pull up, stop and use the back of a spoon to delicately push the topping to the edges.
Sprinkle the festive red and green sprinkles generously over the top of the bar batter. Bake for 30 to 35 minutes, or until the edges are lightly golden brown and the center is mostly set with only a slight wobble. Do not wait for the center to be completely firm, as they will continue to cook from residual heat. Cool the bars completely in the pan on a wire rack—this is absolutely essential—before attempting to slice them. Cooling might take two to three hours.
Perfecting the Cooking Process
Always ensure the butter and sugars are creamed until light and fluffy first; this guarantees a tender base. While the base is chilling, prepare your topping mixture so everything is ready for immediate layering before it goes into the oven for baking. Pull the bars when they look set, but slightly soft.
Add Your Touch
Try substituting white chocolate chips for dark cocoa chips, or adding a teaspoon of alcohol-free almond extract instead of vanilla for a richer flavor. For crunch, toss in chopped pecans or dried orange zest before baking. Drizzle melted dark chocolate over the cooled bars for an extra layer of decadence and visual appeal.
Storing & Reheating
Store these Winter holiday Cookie Bars in an airtight container at room temperature for up to five days, layered between sheets of parchment paper. They freeze beautifully for up to two months. Ensure they are completely cool before wrapping individually to prevent sticking and moisture buildup and thaw them overnight in the refrigerator.
I once forgot to chill the base and the bars melted into a buttery mess! My family still laughs, but that lesson cemented the necessity of the 30-minute chill time for structure.
- Use parchment paper with an overhang sling; this makes lifting the entire baked tray out simple, allowing for clean, beautiful cuts every single time.
- Do not overbake the bars. They should look slightly soft in the middle when pulled from the oven, as they will set completely while cooling on the counter.
- If your topping is too thick, gently sprinkle it rather than spreading vigorously, which can easily disturb the chilled and delicate shortbread base underneath.
Frequently Asked Questions About Holiday Baking
We know that even the simplest recipe can sometimes raise questions, especially when you are aiming for perfection during the busiest baking season. Here are some of the most common queries about making the best holiday treat squares.
Can I make these Winter holiday Cookie Bars ahead of time?
Absolutely! These bars are ideal for making ahead. Because they need to cool completely before cutting, you can easily bake them 1 to 2 days before serving. Store the uncut bars, covered in the pan, in the refrigerator. Wait to cut them until just before you plan to serve, maximizing freshness and maintaining moisture.
What if I don’t have a 9×13 inch pan?
A 9×13 inch pan is standard for this recipe, yielding thicker, satisfying squares. If you use a smaller square pan (like an 8×8 inch), you will need to increase the baking time by 5 to 10 minutes, and the resulting bars will be much thicker. If you use a larger sheet pan, the baking time will decrease, and your bars will be thinner and crispier.
How do I get clean, sharp slices?
The secret to beautifully cutWinter holiday Cookie Barsis patience and temperature. First, ensure the bars are fully chilled—preferably refrigerated for at least one hour after cooling to room temperature. Second, use a large, sharp chef’s knife. Run the knife under hot water, wipe it clean, and make one slice. Repeat the hot water and wipe process before every cut. This technique melts the white chocolate slightly on contact, preventing crumbling and drag.
Can I swap the white chocolate chips for another flavor?
Certainly! If white chocolate isn’t your preference, you can easily substitute milk chocolate chips, semi-sweet chocolate, or even butterscotch chips. Ensure the total volume of chips remains about one cup to maintain the structure of the topping. For a spice-forward bar, consider adding a blend of cinnamon and nutmeg to the cream cheese mixture instead of extracts.
Why did my shortbread base crumble when I pressed it?
A crumbly base usually indicates two potential issues: either your butter was not sufficiently softened, or you added too much flour. Ensure your butter is truly at room temperature (soft enough to easily dent with a finger). If the dough feels too dry, add a teaspoon of milk or water until it just holds together when pinched. Remember, shortbread is meant to be slightly crumbly, but it should hold its shape when pressed firmly into the pan.
Now that you have the definitive guide to mastering these delicious holiday dessert bars, there is nothing stopping you from conquering your holiday baking list with ease and flair. TheseWinter holiday Cookie Barspromise to be a centerpiece of your festive spread, earning you praise without requiring you to spend hours painstakingly decorating individual treats. Happy baking!
Conclusion for Winter holiday Cookie Bars
Making theseWinter holiday Cookie Barssaves you the immense labor of rolling, cutting, and frosting hundreds of individual cookies, freeing up valuable holiday socializing time you actually want to use. They deliver maximum festive flavor with minimal effort, which is precisely what every busy baker desperately needs in December. Remember the critical tips: do not overbake, use quality butter and extracts, and fully embrace the joy of that wonderfully thick, chewy base layer. Whether you are bringing them to a potluck or just enjoying a quiet evening by the fire, these holiday dessert squares promise a guaranteed sweet success that tastes like pure nostalgia. Go ahead, grab your apron, and conquer the holiday baking rush with this effortless, unforgettable recipe.
Print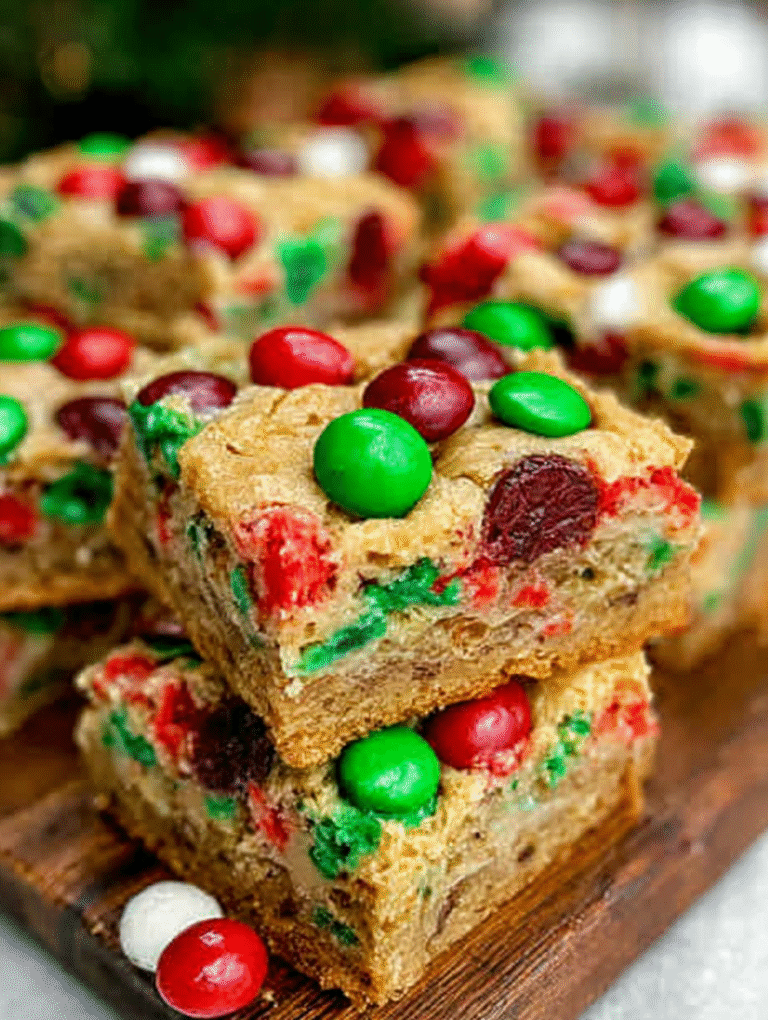
Christmas Cookie Bars
Achieve festive perfection! Creamed butter and brown sugar create the base for these ultra-chewy Christmas Cookie Bars. Easy 9×13 prep. Full instructions and nutrition guide included.
- Total Time: 35 minutes
- Yield: 4 servings
Ingredients
- Unsalted butter (1 cup, softened)
- All-purpose flour (2 cups)
- Packed light brown sugar (3/4 cup)
- Granulated sugar (1/4 cup)
- Large egg (1)
- Vanilla extract (1 teaspoon)
- Baking powder (1 teaspoon)
- Christmas-themed nonpareil sprinkles (1/2 cup)
Instructions
- Step 1: Preheat your oven to 350°F (175°C). Line a 9×13 inch baking pan with parchment paper, leaving an overhang on the sides for easy removal, then lightly grease the exposed pan edges.
- Step 2: In a large mixing bowl, use an electric mixer to cream together the softened butter, brown sugar, and granulated sugar until the mixture is light and fluffy (about 2-3 minutes). Beat in the egg and vanilla extract until just combined.
- Step 3: In a separate bowl, whisk together the flour and baking powder. Gradually add the dry ingredients to the wet mixture, mixing on low speed until a soft dough forms. Fold in the Christmas sprinkles by hand, mixing until they are evenly distributed.
- Step 4: Press the cookie dough evenly into the bottom of the prepared 9×13 inch baking pan. Ensure the dough is flat and covers the entire base without extending up the sides.
- Step 5: Bake for 25 to 30 minutes, or until the edges are lightly golden brown and a toothpick inserted into the center comes out clean. Allow the bars to cool completely in the pan before lifting them out using the parchment paper overhang, and then cutting into squares.
Notes
- For maximum freshness, keep your finished bars stored in an airtight container layered with parchment paper at room temperature for up to four days, or freeze the completely cooled, uncut slab for longer storage.
- While these bars are wonderful at room temperature, you can gently warm individual squares in the microwave for 10 to 15 seconds for a meltier, "fresh from the oven" feel.
- Serve these festive bars alongside a mug of hot cocoa or coffee, or dress them up beautifully with a scoop of vanilla bean ice cream and a dusting of powdered sugar.
- To ensure your bars have the perfect soft texture, make sure you cream the butter and sugars for the full 2-3 minutes until they are truly light and fluffy, as this crucial step incorporates air that keeps the dough tender.
- Prep Time: 15 minutes
- Cook Time: 20 minutes
- Method: Stovetop
- Cuisine: American
FAQs
How do I keep my holiday dessert squares fresh and chewy after baking?
Storage is crucial if you want to enjoy these delicious bars beyond Winter evening. Once they have completely cooled, you should cut them into individual squares. Store them in an airtight container at room temperature for up to four days for optimal freshness. If you need longer storage, wrap the cooled bars tightly in plastic wrap before placing them in a sturdy freezer-safe bag or container. They will freeze beautifully for up to three months. Just remember to thaw them gradually overnight in the refrigerator before serving, so they maintain that wonderful, buttery, chewy texture we all crave during the holidays.
Why did my Winter holiday Cookie Bars turn out dry and crumbly instead of moist?
Dry, crumbly results usually stem from two main culprits: over-mixing the flour or over-baking the dough. When adding the dry ingredients, mix only until just combined; vigorous mixing develops too much gluten, resulting in toughness, much like trying to wrap a cat in tinsel. Furthermore, ovens can be deceiving, so always check yourWinter holiday Cookie Barsa few minutes before the designated baking time. The center should look set but perhaps slightly underbaked, because they will continue to firm up beautifully as they cool down on the counter, ensuring that perfect dense and moist interior.
Can I prepare the dough for these festive baked treats ahead of time?
Absolutely! Preparing the dough in advance is a fantastic strategy, especially during the chaotic holiday season when time evaporates faster than melted snow. You can mix the dough completely, press it into the prepared pan, cover it tightly with plastic wrap, and refrigerate it for up to 48 hours before baking. If you need more time than that, wrap the dough firmly in plastic wrap and freeze it for up to a month. Just ensure you allow the frozen dough to thaw completely in the refrigerator before pressing it into the pan and baking it exactly as directed in the recipe instructions.
What are the best topping ideas for delicious Winter holiday Cookie Bars?
The beauty ofWinter holiday Cookie Barsis their incredible versatility, allowing you to customize them for any festive occasion! Beyond the classic red and green sprinkles or simple powdered sugar dusting, try adding a layer of melted white chocolate and crushed peppermint candies once the bars have completely cooled. A drizzle of rich homemade caramel sauce and a sprinkle of sea salt provides a wonderfully sophisticated, salty-sweet contrast. If you love nuts, toasted pecans or walnuts mixed into the batter before baking add an excellent textural crunch. For a truly decadent finish, spread a thick layer of chocolate ganache over the top and let it set firm before slicing.

Leave a Comment