

The scent of warm brown sugar and cinnamon has the power to stop time, but sometimes, achieving that bakery-quality spiral is a Herculean task best left to professional bakers. I was on a desperate mission to capture that iconic gooey flavor without spending four hours fighting with a stubborn ball of yeast, and the result—the phenomenalCinnamon Roll Bliss Bars—changed my life.
These bars are the solution to every baking dilemma; they deliver all the warmth, cream cheese frosting, and comforting spice of a classic roll, but they come together faster than you can find your stand mixer attachments. They transform hurried weeknights and casual brunch menus into truly delightful, low-effort celebrations.
- Preparation Ease:This recipe streamlines the entire cinnamon roll process, cutting kneading and proofing time down to mere minutes of simple mixing.
- Flavor Profile:Enjoy the rich, deep combination of buttery dough, intensely spiced filling, and a tangy sweet cream cheese glaze in every single bite.
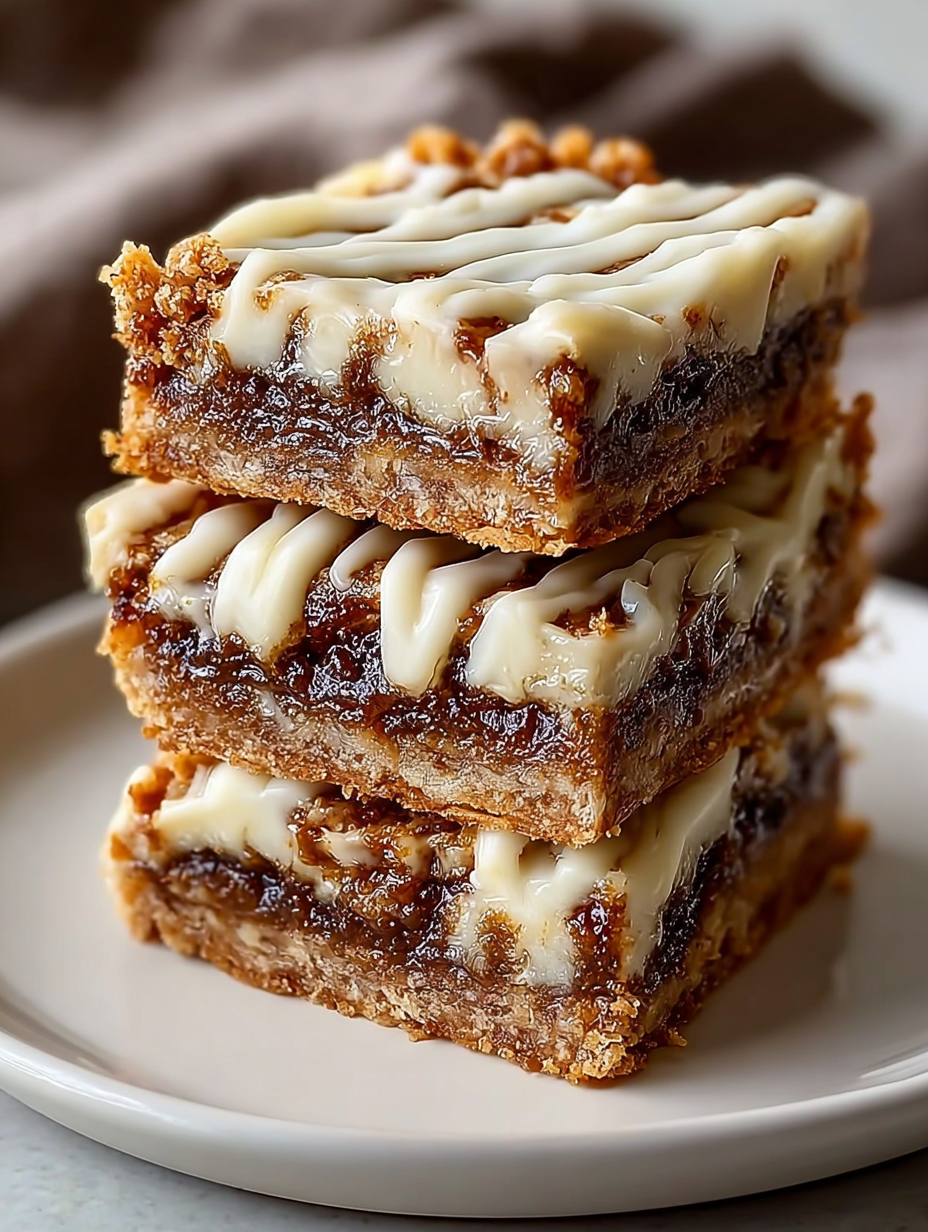
- Visual Appeal:The marbled filling and thick, luxurious frosting create a visually stunning bar that looks complicated but is surprisingly simple to achieve.
- Versatility for Occasions:Perfect for dessert trays, quick breakfasts, or packaging as thoughtful gifts, these bars travel and serve incredibly well.
The Legend of the Bliss Bars
There are two types of bakers in this world: those who calmly coax yeast into submission, and those who end up wearing half the flour and screaming slightly while the kitchen timer mocks them. I firmly belong to the latter group. My original attempt at classic, from-scratch cinnamon rolls was a culinary disaster involving sticky dough cemented to my elbow and a final product that resembled dense, slightly frightened hockey pucks. I needed a victory, a quick win that bypassed the whole, terrifying “yeast activation” phase entirely.
The genesis of the Bliss Bars was born from this frustration. I realized that the magic wasn’t in the perfect spiral; it was in the filling and the frosting. What if I took a tender, sturdy sugar cookie-like base, layered it with the most glorious cinnamon sugar goo imaginable, and then baked it until the edges were chewy and the middle was molten? It sounded like the perfect shortcut, an act of culinary defiance against complex recipes.
Escaping the Yeast Monster
The beauty of this recipe lies in its lack of proofing time. We ditch the fussy yeast and rely instead on baking powder to give the base dough just enough lift, ensuring it remains tender yet structurally sound enough to support the thick filling. This structural integrity is critical. If your dough is too soft, the filling simply melts into it, creating a great flavor but losing that distinct, layered bar texture we crave.
To keep the base perfectly tender, ensure your butter is truly softened, not melted. Creaming the butter and sugar thoroughly provides the necessary air incorporation, guaranteeing a soft crumb that holds up beautifully under the rich swirl. This step only takes a few minutes, but it eliminates hours of waiting for dough to rise, which means you get to the frosting stage far quicker—and honestly, that’s the real goal here.
Mastering the Gooey Center
The filling is what transforms a simple blonde bar into a spiritual experience worthy of the titleCinnamon Roll Bliss Bars. A classic cinnamon roll filling is typically just butter, brown sugar, and cinnamon, but we intensify the experience here by adding a touch of ground cardamom, which elevates the spice blend and gives it a deeper, more professional flavor profile. Do not skip the cardamom; it’s the secret weapon that makes people ask for the recipe.
When spreading the filling, don’t worry about covering every millimeter of the dough base. You want small gaps around the edges. When the bars bake, the brown sugar melts and bubbles, seeping into the dough below. If you spread the filling right to the edges of the pan, the sugar will caramelize too quickly and potentially stick or burn, making extraction difficult. Leaving a slight buffer zone ensures the edges stay soft and the gooey center remains perfectly contained.
The Secret to the Perfect Swirl
Creating the “swirl” effect in a bar can seem tricky, but it’s remarkably easy. Once the filling is spread over the base dough, you’ll need to spoon half of the remaining dough mixture on top of the filling in small, scattered clumps. This topping doesn’t need to cover everything; think of it as islands of dough dotting a sea of brown sugar goo. Once the dough clumps are placed, use a butter knife or a small offset spatula to gently run through the filling and the top dough layer.
Use wide, sweeping S-shapes rather than deep cuts. You aren’t trying to mix everything together; you are merely trying to marble the filling into the top portion of the dough. This light mixing action creates beautiful streaks of dark brown sugar and lighter dough, which look sophisticated once baked and cut. Over-mixing this stage will turn the whole bar uniformly brown, losing the coveted contrast.
Baking for Maximum “Bliss”
Baking time is critical for the ideal texture. You want the edges to be set, golden brown, and slightly chewy, but the center should remain soft and almost underbaked. We bake these bars at 350°F (175°C) for a specific time window. Pull them out of the oven when the very center still looks slightly glossy or jiggly, even if the edges seem done.
The residual heat of the baking pan will continue to cook the center after you remove it from the oven—this is called carryover baking. If you wait until the center looks fully set in the oven, you will end up with dry bars. We want that blissful, gooey texture reminiscent of the freshest center part of a true cinnamon roll. Let them cool slightly before applying the frosting, otherwise, it will just melt away into an oily puddle.
Ingredients for Cinnamon Roll Bliss Bars
Here’s what you’ll need to make this delicious dish:
- All-Purpose FlourUse standard white flour to provide the structure for the base dough, ensuring it remains tender yet firm enough for slicing.
- Unsalted ButterEssential for creating richness in both the dough and the filling; make sure it is softened for the dough and melted for the filling.
- Granulated and Brown SugarThe white sugar adds chewiness to the base, while the brown sugar provides the deep molasses flavor characteristic of the filling.
- EggsAct as a binder for the dough, providing lift and richness, and contributing to the overall softness of the baked bar.
- Baking PowderThis leavening agent gives the bars a quick rise without the hassle of yeast, ensuring a delightful cake-like texture.
- Ground Cinnamon and CardamomThe critical spice blend for the filling; use high-quality cinnamon for maximum aroma and flavor intensity.
- Cream CheeseThe foundation of the frosting, which should be full-fat and properly softened to achieve a smooth, lump-free glaze.
- Powdered SugarUsed for sweetening and thickening the glaze; always sift it if it appears clumpy to prevent a grainy frosting.
- Milk or CreamA tablespoon or two is necessary to thin the frosting to a drizzle-able consistency for maximum coverage.
The full ingredients list, including measurements, is provided in the recipe card directly below.
How to Make Cinnamon Roll Bliss Bars
Follow these simple steps to prepare this delicious dish:
-
Step 1: Prepare the Pan and Dough Base
Preheat your oven to 350°F (175°C). Line a 9×13 inch baking pan with parchment paper, leaving an overhang on the two long sides to easily lift the bars out later. In a large mixing bowl, cream together the softened butter, granulated sugar, and brown sugar until light and fluffy, about 3 minutes. Beat in the eggs one at a time, followed by the alcohol-free vanilla extract. In a separate bowl, whisk together the flour, baking powder, and salt, then gradually add the dry ingredients to the wet mixture until just combined. Reserve about 1 cup of this dough for the topping, then press the remaining dough evenly into the prepared baking pan.
-
Step 2: Prepare the Signature Gooey Filling
In a medium bowl, whisk together the melted butter, the remaining brown sugar, and the cinnamon and cardamom. Stir until the mixture is thick and homogenous. Pour this glorious filling mixture directly over the dough base in the pan and spread it out evenly using an offset spatula, making sure to leave about a quarter-inch border around the perimeter.
-
Step 3: Create the Swirl Effect
Take the reserved 1 cup of dough and drop it over the filling in small, scattered dollops. Use a butter knife or a thin spatula to gently swirl the dough and the filling together. Do this carefully, moving the knife in slow, figure-eight motions, allowing the brown sugar filling to marble slightly into the top layer of the dough, but do not mix completely.
-
Step 4: Bake the Bliss Bars
Bake the bars for 28 to 32 minutes. The edges should appear golden brown and set, but the center should still look slightly soft, indicating maximum gooeyness. If you gently jiggle the pan, the center should wobble slightly. Remove the pan from the oven and let the bars cool completely on a wire rack before attempting to frost them.
-
Step 5: Whip Up the Classic Cream Cheese Glaze
While the bars cool, beat the softened cream cheese and butter together in a small bowl until completely smooth. Gradually mix in the powdered sugar until combined, then stir in the alcohol-free vanilla extract and a tablespoon of milk or cream until the frosting reaches a thick but easily spreadable consistency. Add more liquid, half a teaspoon at a time, if a thinner glaze is desired.
-
Step 6: Frost and Serve
Once theCinnamon Roll Bliss Barsare fully cooled, spread the cream cheese frosting evenly over the top, covering the entire surface. If you prefer a thick layer of frosting, let the bars cool for about 30 minutes in the refrigerator before cutting. Use the parchment paper overhang to lift the entire slab out of the pan onto a cutting board. Cut into 12 generous squares for serving.
Transfer to plates and drizzle with sauce for the perfect finishing touch.
Serving Suggestions and Storage Tips
These bars are divine served slightly warm alongside a strong cup of coffee or a cold glass of milk. If you are serving them for a brunch event, consider adding a sprinkle of chopped pecans or walnuts to the top after frosting for added crunch and texture. They are also excellent served as an ice cream topping, crumbled lightly over vanilla bean ice cream.
If you find yourself with leftovers—a highly unlikely scenario, I must warn you—the Cinnamon Roll Bliss Bars store beautifully. Store the fully frosted bars in an airtight container at room temperature for up to three days, or in the refrigerator for up to five days. If chilled, letting them sit out for 15 minutes before serving will allow the frosting and the center to soften to their optimal gooey state.
For longer storage, unfrosted bars can be frozen for up to two months. Simply thaw them overnight and whip up a fresh batch of the cream cheese glaze right before serving to recapture that fresh-baked intensity.
The Accidental Discovery of Sunshine on a Plate
I was attempting a triple-layer cake, which promptly collapsed into an edible disaster zone. Salvaging the core ingredients, I started layering and pressing, desperate for a quick win. What emerged from the oven wasn’t elegant, but pure, unadulterated comfort—the magnificent birth of the incredibleCinnamon Roll Bliss Bars!
The Anatomy of Pure Joy: Ingredients for Cinnamon Roll Bliss Bars
There is a sacred simplicity to these bars. They deliver all the gooey, fragrant satisfaction of a homemade cinnamon roll without the hours spent kneading and rising. These blissful treat bars are the solution to every craving and the perfect answer to “What can I bake right now?” We are building this dessert in three glorious layers: the buttery base, the spiced swirl center, and the tangy cream cheese icing that ties it all together. This recipe is your culinary permission slip to skip the complicated techniques and dive straight into deliciousness. It’s truly a baking miracle dressed up as a simple bar.
The Buttery Shortbread Crust
- 2 cups all-purpose flour
- 1/2 cup granulated sugar
- 1 cup (2 sticks) unsalted butter, softened
- 1 teaspoon alcohol-free vanilla extract
- 1/2 teaspoon salt
The Spiced Center (The “Bliss” Layer)
- 1 cup packed light brown sugar
- 2 tablespoons ground cinnamon
- 1/4 cup unsalted butter, melted
- 2 tablespoons all-purpose flour
- 1/4 cup heavy cream or whole milk
The Essential Cream Cheese Glaze
- 4 ounces cream cheese, softened
- 1/4 cup unsalted butter, softened
- 2 cups powdered sugar
- 1 teaspoon alcohol-free vanilla extract
- 2–3 tablespoons milk or cream (adjust for desired consistency)
Crafting Your Cinnamon Roll Bliss Bars Masterpiece
The beauty of this recipe lies in its speed. Forget complex proofing schedules; we are working with efficiency and instant gratification. Preheat your oven to 350°F (175°C) and line a 9×13 inch baking pan with parchment paper, making sure to leave overhang handles for easy removal. This preparation step is absolutely non-negotiable unless you enjoy prying warm, sticky bars out with a spatula—which, while fun, is undeniably messy.
Building the Sturdy Foundation
In a large mixing bowl, combine the 2 cups of flour, granulated sugar, alcohol-free vanilla extract, and salt. Cut in the softened butter using a pastry blender or stand mixer until the mixture resembles coarse crumbs. This is essentially a giant shortbread cookie base, designed to hold up to the serious moisture and decadence of the filling we are about to add. Press this mixture firmly and evenly into the prepared 9×13 inch pan. Don’t be shy; use the bottom of a measuring cup or a flat-bottomed glass to ensure the base is compact and uniform. This compression prevents the crust from becoming too crumbly after baking. Bake the crust for exactly 10 to 12 minutes, just until the edges begin to turn pale gold. It must remain slightly soft and underbaked; we need that flexibility for the gooey filling layer to fuse perfectly.
Creating the Irresistible Cinnamon Swirl
While the base crust is slightly cooling on a rack, immediately shift your attention to preparing the “bliss” filling. This is the heart of the Cinnamon Roll Bliss Bars, where all the cozy, comforting flavors reside. In a medium bowl, whisk together the brown sugar, cinnamon, and 2 tablespoons of flour. The flour helps to stabilize the filling, preventing the brown sugar from melting too quickly and ensuring the layer retains its structure. Stir in the melted butter and heavy cream until you achieve a thick, delightfully gooey paste. If the mixture seems overly stiff—perhaps your brown sugar was a little dry—add a touch more cream, but exercise restraint.
We absolutely want a thick, almost fudge-like texture that will soften slightly during the final bake, not a runny liquid that saturates the base entirely. Once the crust emerges from its partial bake, carefully pour the cinnamon mixture directly over the warm base. Spread it gently with an offset spatula, ensuring even coverage across the entire surface, stretching right to the edges. Now, the oven gets to work again. Return the pan to the oven and bake for an additional 18 to 22 minutes. You know they are ready when the center looks set, yet retains a slight moistness, and the edges are bubbling quietly. They should smell absolutely divine—like the best bakery you’ve ever walked past.
The Glorious Glaze Finale
Patience, my friends, is the only required ingredient for this step. The bars must cool before glazing, otherwise, the warm heat will instantly dissolve the icing into a sugary, translucent puddle. While a sugary puddle is technically delicious, it ruins the iconic aesthetic of theCinnamon Roll Bliss Bars. Wait until they are fully cooled, ideally for at least an hour, or even chill them briefly in the refrigerator if you are racing the clock. To make the dreamiest glaze, beat the softened cream cheese and softened butter in a stand mixer or with a hand mixer until the mixture is light, smooth, and fluffy—no lumps allowed! Gradually beat in the powdered sugar, approximately one cup at a time, until it is fully incorporated and the mixture looks bright white and stiff.
Add the alcohol-free vanilla extract and then begin incorporating the milk, one tablespoon at a time, testing the consistency as you go. You want it thick enough to hold its shape when dolloped but soft enough to spread effortlessly across the surface. If you accidentally add too much milk, just whisk in a little more powdered sugar until it tightens up. Spread the finished glaze generously and evenly over the cooled bars. Allow the glaze to set for about 15 minutes before attempting to cut them. For the cleanest, most professional-looking cuts, use a sharp chef’s knife and remember to wipe the blade clean between every single slice. This small effort makes a huge difference in presentation.
Perfecting the Cooking Process
To maximize efficiency, always prepare the crust dough first, as it needs partial baking time. While the crust is in the oven, you have the ideal window to quickly mix the cinnamon swirl filling ingredients. Finally, whip up the cream cheese glaze only after the bars are completely cooled to ensure that glorious, thick topping stays perfectly intact.
Add Your Touch
Try folding chopped toasted pecans or walnuts into the cinnamon filling for an added crunch and nutty flavor dimension. For a warmer glaze, swap a teaspoon of the alcohol-free vanilla extract for alcohol-free almond extract. If you prefer a richer, darker flavor profile, use dark brown sugar in the swirl layer, intensifying the caramel notes of these easy dessert bars.
Storing & Reheating
Store theseCinnamon Roll Bliss Barsin an airtight container at room temperature for up to three days, or refrigerate them for extended freshness up to a week. If refrigerated, allow them to come to room temperature for the best texture. If you must reheat a cold bar, a few seconds in the microwave works wonders, bringing back that delightful gooey texture.
Expert Baking Insights
- Ensure your butter and cream cheese are genuinely softened before mixing the respective layers; cold ingredients lead to lumpy dough and a less uniform glaze.
- Do not overbake the bars. They are ready when the center is set and slightly golden brown. Overbaking results in a dry crust, losing that essential gooeyness.
- For extra-thick bars, press the crust and filling into an 8×8 inch pan instead of a 9×13 inch pan, increasing the baking time by about five to seven minutes.
My neighbor, Brenda, who is notorious for her baking critiques, took one bite of these bars and immediately demanded the recipe, declaring them “dangerously delicious.” That is the highest praise possible in my kitchen.
Conclusion for Cinnamon Roll Bliss Bars
These Cinnamon Roll Bliss Bars truly stand out as the ultimate comfort dessert. They capture the nostalgic warmth of a classic cinnamon pastry but eliminate all the fuss associated with yeast doughs and long proofing times. We have created an incredibly simple shortbread crust that provides the perfect sturdy foundation for the rich, spiced center and the decadent cream cheese icing. Whether you are hosting a gathering or just need a simple, satisfying treat after a long week, these bars are a guaranteed crowd-pleaser. They are quick enough for a weeknight project and impressive enough for any weekend event, ensuring you achieve maximum flavor with minimum effort. Prepare yourself for the wave of compliments that will follow!
Print
Cinnamon Roll Bliss Bars
Gooey, buttery cinnamon perfection! These Bliss Bars use rolls to form a chewy crust, layered with brown sugar depth and creamy tang. Effortless baking magic.
- Total Time: 35 minutes
- Yield: 4 servings 1x
Ingredients
- Two (2) cans (8 counts each) refrigerated cinnamon rolls (with icing packets reserved)
- 1/2 cup (1 stick) unsalted butter, melted
- 1/2 cup packed light brown sugar
- 1 teaspoon vanilla extract
- 2 ounces cream cheese, softened
- 1/2 cup powdered sugar
Instructions
- Step 1: Preheat the oven to 350°F (175°C). Line a 9×13 inch baking pan with parchment paper, allowing the paper to overhang on the sides for easy removal later. Separate the cinnamon rolls from the enclosed icing packets and set the icing aside.
- Step 2: In a medium bowl, combine the melted butter, brown sugar, and vanilla extract; stir until well blended. Unroll and slightly flatten half (8 rolls) of the cinnamon rolls and press them evenly onto the bottom of the prepared pan to form a cohesive crust layer.
- Step 3: Pour the butter and brown sugar mixture evenly over the cinnamon roll base. Gently arrange the remaining 8 cinnamon rolls on top of the filling, placing them side-by-side across the pan. Bake for 25 to 30 minutes, or until the edges are golden brown and the center is set.
- Step 4: While the bars are cooling slightly, prepare the "bliss" glaze. In a small bowl, combine the reserved icing packets, the softened cream cheese, and the powdered sugar. Whisk vigorously until the glaze is smooth, thick, and lump-free.
- Step 5: Drizzle the prepared cream cheese glaze liberally over the warm bars, ensuring even coverage. Allow the Cinnamon Roll Bliss Bars to cool completely before removing them from the pan using the parchment paper edges and cutting into squares for serving.
Notes
- Store leftovers airtight in the refrigerator for up to 4 days, as the cream cheese in the glaze requires chilling for food safety.
- If you prefer a gooey center, reheat individual servings in the microwave for 10 to 15 seconds; the glaze will soften and the base will become wonderfully tender again.
- Elevate this dessert by serving a square warm alongside a small scoop of vanilla bean ice cream or a drizzle of caramel sauce for an extra decadent presentation.
- For the very best crust structure, use the back of a measuring cup to firmly press the first layer of flattened cinnamon rolls into the pan, ensuring no gaps remain for the filling to seep through.
- Prep Time: 15 minutes
- Cook Time: 20 minutes
- Method: Stovetop
- Cuisine: American
Leave a Comment