
Picture this: a dessert that’s like a whirlwind romance for your taste buds, a symphony of creamy sweetness and crispy delight. These **Classic Cannoli Squares That Will Wow Your Taste Buds** are about to become your new obsession!
Imagine biting into layers of flaky pastry, embracing a luscious, sweet ricotta filling, all topped with a delightful dusting of cocoa and nuts. This is not just a dessert; it’s an experience, perfect for sharing joy during celebrations.
- Effortlessly create a dessert that tastes gourmet with minimal kitchen stress.
- Experience the delightful contrast of creamy filling and crispy, golden crust.
- These squares are visually stunning, making them perfect for parties and gatherings.
- Easily customizable with various toppings to match your unique preferences.
Ingredients for Classic Cannoli Squares That Will Wow Your Taste Buds
Here’s what you’ll need to make this delicious dish:
The full ingredients list, including measurements, is provided in the recipe card directly below.
How to Make Classic Cannoli Squares That Will Wow Your Taste Buds
Follow these simple steps to prepare this delicious dish:
Step 1: Prepare the Pastry Dough
In a large bowl, combine the flour and sugar. Cut in the cold butter using a pastry blender or your fingertips until the mixture resembles coarse crumbs. Beat one egg and add it to the mixture. Stir until a dough forms. Wrap in plastic wrap and refrigerate for at least 30 minutes.
Step 2: Roll Out the Dough
Preheat oven to 375°F (190°C). On a lightly floured surface, roll out the dough into a large rectangle, about 1/8 inch thick. Cut into even squares and place them on a baking sheet lined with parchment paper.
Step 3: Bake the Pastry Squares
Bake for 12-15 minutes, or until golden brown. Let the pastry squares cool completely on a wire rack.
Step 4: Prepare the Cannoli Filling
In a large bowl, combine the ricotta cheese, powdered sugar, Alcohol-free vanilla extract, and orange zest. Mix until smooth and creamy. Gently fold in the mini chocolate chips.
Step 5: Assemble the Cannoli Squares
Spoon or pipe the ricotta filling onto half of the cooled pastry squares. Top with the remaining pastry squares to create sandwiches.
Step 6: Garnish and Serve
Dust the assembled cannoli squares with cocoa powder and sprinkle with chopped pistachios. Refrigerate for at least 30 minutes before serving to allow the filling to set.
Transfer to plates and serve chilled for the perfect dessert. Enjoy these **Classic Cannoli Squares That Will Wow Your Taste Buds**!
Perfecting the Cooking Process

For the best experience with these classic cannoli squares that will wow your taste buds, start by preparing the ricotta filling first. This allows the flavors to meld while you bake the pastry. Ensure the pastry is golden brown before removing it from the oven.
Add Your Touch
Feel free to experiment with different extracts in the filling. A dash of almond or pistachio extract can elevate the flavor profile of these classic cannoli squares that will wow your taste buds. Consider adding mini chocolate chips or chopped candied fruit for added texture and sweetness.
Storing & Reheating
Store any leftover classic cannoli squares that will wow your taste buds in an airtight container in the refrigerator. They are best enjoyed within 2-3 days. Reheating is not recommended, as it can make the pastry soggy. Enjoy them chilled for the best texture and taste.
Here are some helpful tips for creating the perfect cannoli squares:
- Ensure your ricotta cheese is well-drained; otherwise, the filling might become watery, compromising the texture of your scrumptious cannoli squares.
- Don’t overbake the pastry! A light golden brown is all you need to achieve that delicate crispness for these classic cannoli squares.
- Dust generously with powdered sugar just before serving to add that final touch of sweetness and elegance to your soon-to-be-famous cannoli squares.
(Personal anecdote formated as paragraph subheading)
The first time I made these, my friends devoured them in minutes! One even said they were better than any bakery cannoli. That’s when I knew I had a winning recipe for cannoli squares.
The Allure of Cannoli: A Timeless Treat
Cannoli, those delightful tubes of fried pastry filled with creamy, sweet ricotta, have captivated dessert lovers for generations. Their origins trace back to Sicily, where they were traditionally enjoyed during Carnevale. Today, cannoli have transcended their regional roots, becoming a beloved treat enjoyed worldwide. But what makes cannoli so irresistible? Is it the crispy, golden shell? The smooth, luscious filling? Or perhaps it’s the combination of textures and flavors that dance on your palate? Whatever the reason, there’s no denying the magic of cannoli. And while traditional cannoli are undeniably delicious, sometimes you crave a twist on the classic. Enter: Classic Cannoli Squares That Will Wow Your Taste Buds!
Why Cannoli Squares? A Modern Twist
Let’s be honest, sometimes piping ricotta filling into individual cannoli shells can be a bit…fussy. And who has time for fussy when a sweet craving strikes? That’s where the genius of cannoli squares comes in. Imagine all the deliciousness of classic cannoli, but in an easier, more approachable format. These squares boast the same crispy pastry, the same creamy ricotta filling, and the same delightful burst of flavor. But instead of individual shells, you have a single, shareable masterpiece. Plus, they’re perfect for parties, potlucks, or any occasion where you want to impress without spending hours in the kitchen. They are the classic cannoli squares that will wow your taste buds.
Crafting the Perfect Cannoli Square: A Step-by-Step Guide
Now, let’s get down to business. Making these classic cannoli squares that will wow your taste buds is surprisingly simple. Don’t let the fancy name fool you; this recipe is totally achievable for even novice bakers. We’ll break it down into easy-to-follow steps, ensuring your success every time.
Step 1: The Crust – Crispy Perfection
The foundation of any good cannoli square is, of course, the crust. We’re aiming for a golden, crispy, slightly flaky texture that complements the creamy filling. A store-bought puff pastry works wonders here. Thaw it according to package directions, then gently roll it out on a lightly floured surface. You’ll want to aim for a rectangle shape that fits your baking dish.
Step 2: The Ricotta Filling – Sweet and Creamy Bliss
Ah, the heart and soul of our cannoli squares. The ricotta filling is where the magic truly happens. The key is to use high-quality ricotta cheese and drain it well to remove any excess moisture. This ensures a smooth, creamy texture that isn’t watery. Combine the drained ricotta with powdered sugar, Alcohol-free vanilla extract, and a hint of cinnamon. This simple combination creates a symphony of flavors that will tantalize your taste buds.
Step 3: Assembling the Squares – Layer by Layer
Now comes the fun part: assembling our classic cannoli squares. Place one sheet of puff pastry into your baking dish. Spread the ricotta filling evenly over the pastry. Top with the second sheet of puff pastry. Brush the top with egg wash for a golden, glossy finish.
Step 4: Baking to Golden Glory
Bake in a preheated oven until the pastry is golden brown and puffed up. This usually takes around 20-25 minutes. Keep a close eye on it to prevent burning.
Step 5: The Finishing Touch – Powdered Sugar and More
Once the squares are cooled, dust generously with powdered sugar. This adds a touch of sweetness and elegance. For an extra flourish, you can sprinkle with mini chocolate chips, chopped pistachios, or candied orange peel.
Ingredient Spotlight: Ricotta Cheese – The Star of the Show
Let’s talk about ricotta cheese. This creamy, slightly sweet cheese is the star of our cannoli square filling. But not all ricotta is created equal. For the best results, use whole-milk ricotta cheese. It has a richer flavor and creamier texture than part-skim ricotta. Also, be sure to drain the ricotta well before using it. This will prevent your filling from becoming watery. Simply place the ricotta in a cheesecloth-lined colander and let it drain in the refrigerator for at least an hour, or even overnight. The drier the ricotta, the better your filling will be. Using high-quality ricotta is a great way to ensure that you have the classic cannoli squares that will wow your taste buds.
Beyond the Basics: Variations and Add-Ins
The beauty of this recipe is that it’s incredibly versatile. Feel free to experiment with different flavors and add-ins to create your own signature cannoli squares.
Chocolate Lover’s Delight
Add mini chocolate chips to the ricotta filling for an extra dose of chocolatey goodness. You can also drizzle melted chocolate over the finished squares.
Citrus Zest
Add a tablespoon of orange or lemon zest to the ricotta filling for a bright, citrusy flavor.
Nutty Goodness
Sprinkle chopped pistachios, almonds, or walnuts over the finished squares for added texture and flavor.
Spice it Up
Add a pinch of nutmeg or cardamom to the ricotta filling for a warm, spicy flavor.
Serving Suggestions: From Casual to Elegant
These classic cannoli squares that will wow your taste buds are perfect for any occasion. Serve them as a dessert at your next dinner party, bring them to a potluck, or simply enjoy them as a sweet treat after a long day. They are delicious served chilled. You can also plate them with fresh berries or a dollop of whipped cream for an extra touch of elegance. No matter how you serve them, these cannoli squares are sure to be a hit.
Troubleshooting Tips: Avoiding Common Mistakes
Even the best recipes can sometimes go awry. Here are a few troubleshooting tips to help you avoid common mistakes when making cannoli squares.
- **Soggy Pastry:** This is usually caused by too much moisture in the ricotta filling. Make sure to drain the ricotta well before using it.
- **Filling is Too Sweet:** Reduce the amount of powdered sugar in the filling to your liking.
- **Pastry is Not Crispy:** Make sure your oven is hot enough and that you bake the squares until they are golden brown.
- **Squares are Too Dry:** Brush the top of the pastry with egg wash before baking.
Final Thoughts: Sharing the Sweetness
These classic cannoli squares that will wow your taste buds are more than just a dessert; they’re a celebration of flavor, texture, and tradition. They’re a reminder that sometimes the simplest things in life are the most delicious. So, gather your ingredients, preheat your oven, and get ready to create a dessert that will impress your friends and family. And most importantly, don’t forget to share the sweetness!
Conclusion for Classic Cannoli Squares That Will Wow Your Taste Buds :
These Classic Cannoli Squares are a guaranteed crowd-pleaser, perfect for any gathering or just a sweet treat for yourself. With their flaky layers, creamy ricotta filling, and delightful bursts of flavor, they’re a dessert that’s both elegant and approachable. Remember to assemble them shortly before serving to maintain that perfect crispness. Get creative with your fillings and toppings, and most importantly, have fun! Now go forth and wow your taste buds (and everyone else’s) with these amazing cannoli squares!
Print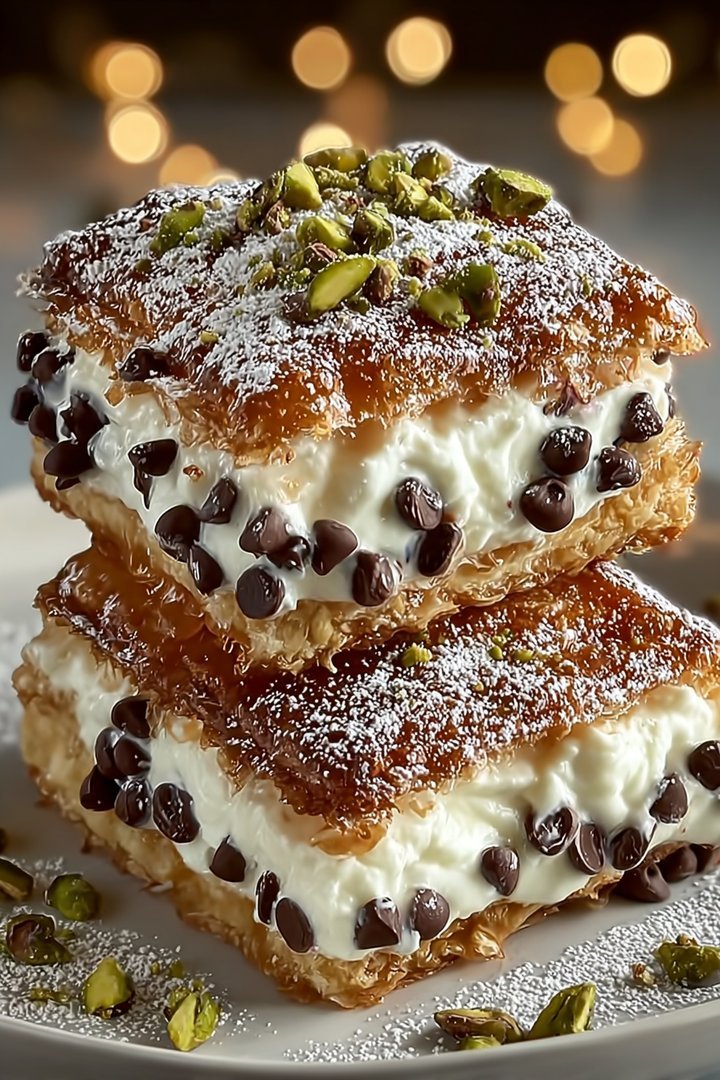
Classic Cannoli Squares That Will Wow Your Taste Buds
Delicious classic cannoli squares that will wow your taste buds recipe with detailed instructions and nutritional information.
- Total Time: 35 minutes
- Yield: 4 servings
Ingredients
- Ricotta cheese, whole milk: 30 ounces (drained overnight)
- Powdered sugar: 1 1/2 cups
- Vanilla extract: 2 teaspoons
- Cinnamon: 1/2 teaspoon
- Mini chocolate chips: 1 cup
- Cannoli shells, crushed: 4 cups
- Heavy cream: 1 cup
- Pistachios, chopped: 1/2 cup (for garnish)
Instructions
- Step 1: Thoroughly drain the ricotta cheese overnight using a cheesecloth-lined sieve placed over a bowl in the refrigerator. This removes excess moisture for a creamy texture.
- Step 2: In a large bowl, combine the drained ricotta cheese, powdered sugar, vanilla extract, and cinnamon. Mix until smooth and creamy.
- Step 3: Gently fold in the mini chocolate chips and crushed cannoli shells into the ricotta mixture, ensuring everything is evenly distributed.
- Step 4: In a separate bowl, whip the heavy cream until stiff peaks form. Gently fold the whipped cream into the ricotta mixture, lightening the texture.
- Step 5: Spread the cannoli mixture evenly into a 9×13 inch baking dish. Cover with plastic wrap and refrigerate for at least 2 hours to allow the squares to set.
- Step 6: Before serving, garnish with chopped pistachios. Cut into squares and serve chilled.
Notes
- Store leftover cannoli squares in an airtight container in the refrigerator for up to 3 days, but know the cannoli shells will soften over time.
- These squares are best enjoyed cold, so no reheating is needed; just take them straight from the fridge!
- Serve these delightful squares as an elegant dessert after dinner, or as a sweet treat at your next party – they're always a hit.
- Don't skip draining the ricotta overnight; it's the secret to preventing a soggy dessert and achieving that perfect, creamy consistency.
- Prep Time: 15 minutes
- Cook Time: 20 minutes
- Method: Stovetop
- Cuisine: American
FAQs :
Can I prepare the Classic Cannoli Squares ahead of time?
Absolutely! You can assemble the cannoli squares a few hours before serving. However, for the crispiest experience, I suggest filling the pastry layers shortly before you plan to impress your guests. If you fill them too far in advance, the moisture from the ricotta filling might soften the crust, and we wouldn’t want a soggy square, would we? Nobody likes a soggy square. Prepare all the elements separately and then assemble when the moment is right. Think of it like a culinary choose-your-own-adventure, but with delicious results.
What’s the best way to store leftover cannoli squares?
Leftovers? What leftovers? Just kidding! If you do happen to have any of these delightful cannoli squares remaining, store them in an airtight container in the refrigerator. Be aware that the pastry may lose some of its crispness over time. They are best enjoyed within 24-48 hours. I always say, though, that cannoli squares are like a good joke – they’re best when they’re fresh. Trying to revive day-old squares is like trying to un-ring a bell. Eat them quickly!
How can I customize my Classic Cannoli Squares?
Oh, the possibilities are endless! Get creative and add your own personal touch. Try mixing mini chocolate chips, chopped pistachios, or candied orange peel into the ricotta filling. You could also dust the finished squares with cocoa powder or drizzle them with melted chocolate. Consider dipping the edges in chopped nuts or sprinkles for a festive look. Get inspired by the different flavour profiles found in other similar sweet treats and include those. The best thing about making these at home is that you have the freedom to experiment.
Is there a gluten-free version of this Classic Cannoli Squares recipe?
For those avoiding gluten, you can easily adapt this recipe. Substitute the all-purpose flour with a gluten-free flour blend. Look for one that contains xanthan gum for better texture. You might also need to adjust the amount of liquid slightly. The gluten-free dough can be a little more delicate. Remember to roll it out gently. You might find pre-made gluten free pastry sheets at your local store. No one should miss out on the joy of cannoli squares, regardless of dietary restrictions.


Leave a Comment