
Dive into a world where the rich, comforting aroma of your morning brew meets the satisfying texture of cake. Imagine a dessert that not only tantalizes your taste buds but also delivers a gentle, caffeinated hug with every bite.
This Coffee Slice isn’t just a dessert; it’s an experience, a symphony of flavors dancing on your palate, perfect for that afternoon pick-me-up or a cozy evening treat. Get ready to bake a slice of happiness.
Here’s why you absolutely *need* this recipe in your life:
- It’s ridiculously easy to make, even if your baking skills are limited to making toast (which, let’s be honest, is a perfectly acceptable skill).
- The flavor combination of coffee and cake is like a warm, comforting hug for your taste buds, guaranteed to brighten any day.
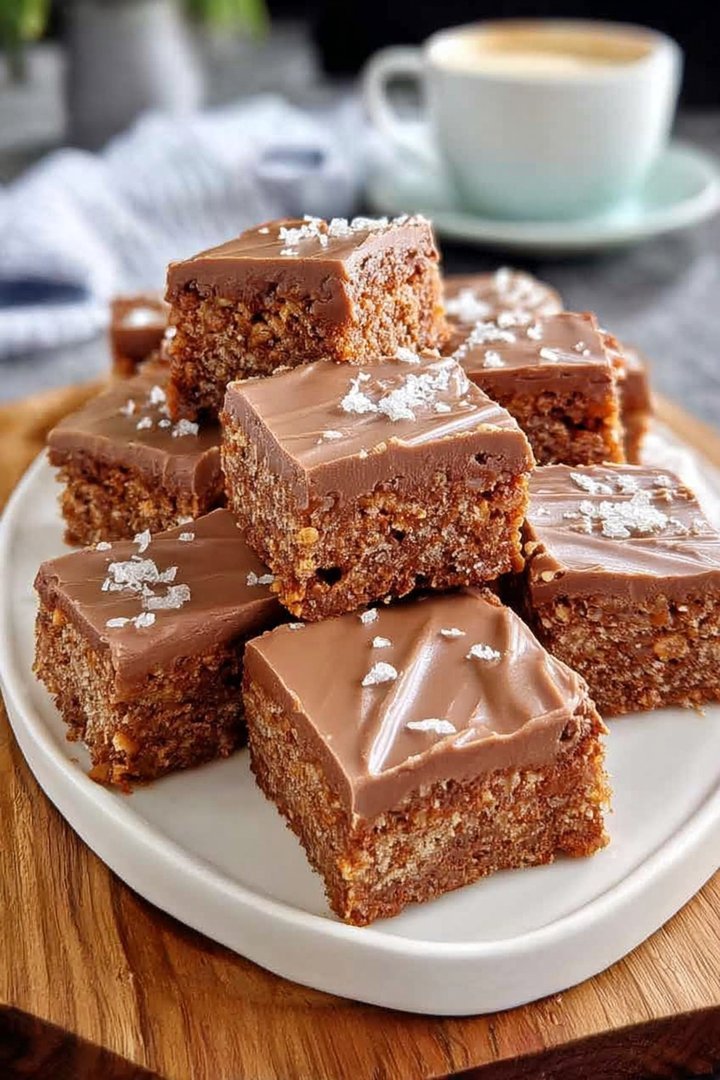
- Visually stunning with its marbled layers and delicate crumb, this slice is sure to impress your friends, family, or even that special someone.
- Incredibly versatile, pair it with a scoop of vanilla ice cream, a dusting of cocoa powder, or simply enjoy it on its own – the possibilities are endless.
Ingredients for Coffee Slice
Here’s what you’ll need to make this delicious dish:
The full ingredients list, including measurements, is provided in the recipe card directly below.
How to Make Coffee Slice
Follow these simple steps to prepare this delicious dish:
Step 1: Preheat and Prepare
Preheat your oven to 350°F (175°C). Grease and flour a 9×13 inch baking pan to prevent sticking. This ensures your Coffee Slice comes out cleanly and looks fantastic.
Step 2: Mix Dry Ingredients
In a large bowl, whisk together the all-purpose flour, granulated sugar, baking powder, baking soda, and salt. Whisking ensures the ingredients are evenly distributed for a consistent rise and flavor.
Step 3: Combine Wet Ingredients
In a separate bowl, whisk together the eggs, vegetable oil, strong brewed coffee, Alcohol-free vanilla extract, and milk. Make sure the coffee has cooled slightly, so it doesn’t cook the eggs.
Step 4: Combine Wet and Dry
Gradually add the wet ingredients to the dry ingredients, mixing until just combined. Be careful not to overmix, as this can result in a tough slice. A few lumps are okay.
Step 5: Bake
Pour the batter into the prepared baking pan and spread evenly. Bake for 25-30 minutes, or until a wooden skewer inserted into the center comes out clean. Keep an eye on it to prevent burning.
Step 6: Cool and Serve
Let the slice cool in the pan for 10 minutes before transferring it to a wire rack to cool completely. Once cooled, slice and serve. Enjoy this **Coffee Slice** with a dollop of whipped cream or a dusting of cocoa powder for an extra touch of decadence.
Perfecting the Cooking Process
For the ultimate coffee slice experience, start by brewing the coffee and allowing it to cool. While the coffee cools, prepare the crust and bake it. Finally, make the coffee-infused cream and assemble your masterpiece. This prevents any soggy disasters.
Add Your Touch
Want to jazz things up? Try adding a hint of Alcohol-free vanilla extract to the crust or a sprinkle of cocoa powder to the coffee cream. For a nutty twist, incorporate chopped pecans or walnuts into the crust. Get creative and make it your own coffee slice!
Storing & Reheating
To keep your coffee slice fresh, store it in an airtight container in the refrigerator. It will stay delicious for up to three days. If you want to warm it up, a few seconds in the microwave will do the trick, but it’s delightful cold too.
Here are some helpful tips for perfecting your coffee slice:
- Don’t overbake the crust! A golden brown color is what you’re after.
- Ensure your coffee is cooled before mixing it into the cream, or the cream might curdle. Nobody wants that.
- For an extra layer of flavor, brush the baked crust with a coffee flavored syrup alternative before adding the cream. It’s a game-changer.
(Personal anecdote formated as paragraph subheading (very important! don’t write any title for this paragraph))
I remember when I first made this coffee slice for my book club. Everyone raved about it, and one friend even asked for the recipe. It’s been a crowd-pleaser ever since!
Coffee Slice: A Caffeinated Dream Come True
Are you ready for a slice of pure bliss? Forget those sugar-laden, overly sweet desserts that leave you feeling guilty and sluggish. We’re diving headfirst into the world of **coffee slice**, a dessert that’s not only delicious but also gives you that gentle caffeine kick to keep you buzzing through your afternoon slump. This isn’t your grandma’s fruitcake; this is the dessert revolution, one coffee-infused bite at a time.
What exactly *is* a **coffee slice**, you might ask? Imagine a symphony of flavors and textures: a crumbly, buttery crust dancing with a luscious, coffee-infused cream filling. It’s the perfect pick-me-up for any time of day, whether you’re celebrating a promotion, surviving a Monday, or simply treating yourself because you deserve it. And the best part? It’s surprisingly easy to make. We’re talking “impress your friends with minimal effort” kind of easy.
Why settle for boring when you can have bold? This **coffee slice** recipe is all about delivering maximum flavor with minimal fuss. So, grab your apron, put on some groovy tunes, and let’s get baking!
The Alluring Aroma of Coffee: Why This Slice is Special
Let’s face it: coffee is life. It’s the fuel that powers our mornings, the comforting hug on a chilly day, and the inspiration behind countless works of art (and, of course, this incredible **coffee slice**). The beauty of using coffee in a dessert is that it adds a depth and complexity that you just can’t achieve with other flavors. It’s rich, slightly bitter, and oh-so-satisfying.
But this isn’t just about throwing some instant coffee into a mix and calling it a day. We’re talking about using freshly brewed, high-quality coffee to create a truly unforgettable experience. Think of it as a love letter to your taste buds, written in the language of caffeine.
This **coffee slice** stands out because it strikes the perfect balance between sweetness and bitterness. The buttery crust provides a comforting foundation, while the coffee-infused cream filling delivers a jolt of flavor that will awaken your senses. It’s a sophisticated dessert that’s also incredibly comforting and easy to whip up. Trust me; you’ll be hooked after the first bite.
Gathering Your Arsenal: Ingredients for Coffee Slice Victory
Alright, troops, let’s gather our supplies! Here’s what you’ll need to create the ultimate **coffee slice**. Don’t worry; most of these ingredients are probably already lurking in your pantry, waiting to be transformed into something magical.
**For the Crumbly Crust: **
- 1 ½ cups all-purpose flour: This is the backbone of our crust, providing structure and stability.
- ½ cup cold unsalted butter, cut into cubes: Cold butter is key to creating a flaky, tender crust.
- ¼ cup granulated sugar: Adds a touch of sweetness and helps the crust to brown beautifully.
- ¼ teaspoon salt: Enhances the other flavors and balances the sweetness.
- 3-4 tablespoons ice water: This binds the dough together without overworking it.
**For the Luscious Coffee Cream Filling: **
- 1 ½ cups heavy cream: The foundation of our creamy, dreamy filling.
- ½ cup granulated sugar: Sweetens the deal and helps to stabilize the cream.
- ¼ cup strong brewed coffee, cooled: The star of the show, adding that signature coffee flavor.
- 1 teaspoon Alcohol-free vanilla extract: Enhances the coffee flavor and adds a touch of warmth.
- 2 tablespoons cornstarch: Thickens the cream and gives it a smooth, velvety texture.
- 2 tablespoons milk: Helps to dissolve the cornstarch and ensures a smooth filling.
- 1 teaspoon of agar-agar powder: to stabilize our cream filling
Remember, quality ingredients make a difference. Using good butter, fresh coffee, and pure Alcohol-free vanilla extract will elevate your **coffee slice** from good to extraordinary.
The Crust: Laying the Foundation for Flavor
Now, let’s get down to business and make this crust! Don’t be intimidated; it’s easier than you think. The key is to keep everything cold and avoid overworking the dough. Overworked dough leads to a tough crust, and nobody wants that.
1. **Combine the dry ingredients: ** In a large bowl, whisk together the flour, sugar, and salt. This ensures that everything is evenly distributed.
2. **Cut in the butter: ** Add the cold, cubed butter to the dry ingredients. Using a pastry blender or your fingertips (if you’re feeling brave), cut the butter into the flour until the mixture resembles coarse crumbs. The smaller the pieces of butter, the flakier your crust will be.
3. **Add the ice water: ** Gradually add the ice water, one tablespoon at a time, mixing until the dough just comes together. Be careful not to add too much water; you want the dough to be moist but not sticky.
4. **Shape and chill: ** Form the dough into a disc, wrap it in plastic wrap, and refrigerate for at least 30 minutes. This allows the gluten to relax, resulting in a more tender crust.
5. **Roll and bake: ** Preheat your oven to 375°F (190°C). On a lightly floured surface, roll out the dough to fit a 9-inch pie plate. Transfer the dough to the pie plate, crimp the edges, and prick the bottom with a fork. This prevents the crust from puffing up during baking.
6. **Bake until golden: ** Bake the crust for 15-20 minutes, or until it’s golden brown. Let it cool completely before adding the filling.
Voilà! You’ve conquered the crust. Give yourself a pat on the back and prepare for the next level: the coffee cream filling.
The Cream Filling: A Coffee Lover’s Dream
Prepare yourself, because we’re about to embark on a coffee-infused adventure that will tantalize your taste buds and leave you craving more. This coffee cream filling is the heart and soul of our **coffee slice**, and it’s surprisingly easy to make.
1. **Infuse the cream: ** In a saucepan, combine the heavy cream and sugar. Heat over medium heat, stirring until the sugar dissolves.
2. **Dissolve the cornstarch: ** In a small bowl, whisk together the cornstarch and milk until smooth. This prevents lumps from forming in the filling.
3. **Add the coffee: ** Slowly pour the cooled coffee into the cream mixture, stirring constantly.
4. **Thicken the filling: ** Add the cornstarch mixture to the cream mixture, stirring constantly. Continue to cook over medium heat, stirring constantly, until the filling thickens to a pudding-like consistency. This usually takes about 5-7 minutes. Remove from heat and stir in the Alcohol-free vanilla extract and agar-agar powder.
5. **Cool slightly: ** Let the filling cool slightly before pouring it into the baked crust.
Pro Tip: Don’t let the coffee cream boil! Simmering it gently ensures a smooth, velvety texture.
Assembly Time: Bringing Your Coffee Slice to Life
The moment we’ve all been waiting for: assembly time! This is where all your hard work comes together to create a masterpiece.
1. **Pour the filling: ** Pour the slightly cooled coffee cream filling into the baked crust, spreading it evenly.
2. **Chill: ** Cover the **coffee slice** with plastic wrap and refrigerate for at least 2 hours, or preferably overnight. This allows the filling to set completely and the flavors to meld together.
3. **Garnish (optional): ** Before serving, you can garnish your **coffee slice** with a dusting of cocoa powder, a sprinkle of coffee beans, or a dollop of whipped cream. Get creative and make it your own!
Serving Suggestions: Elevating Your Coffee Slice Experience
Congratulations, you’ve created a **coffee slice** that’s guaranteed to impress. Now, let’s talk about how to serve it to truly elevate the experience.
- **Pair with coffee:** Naturally, a cup of freshly brewed coffee is the perfect accompaniment to this dessert. The coffee will enhance the flavors and provide a double dose of caffeine.
- **Add a scoop of ice cream:** For an extra indulgent treat, serve your **coffee slice** with a scoop of vanilla ice cream or coffee ice cream.
- **Garnish with chocolate shavings:** A sprinkle of dark chocolate shavings adds a touch of elegance and complements the coffee flavor beautifully.
- **Enjoy with friends:** Sharing this **coffee slice** with friends and family is the best way to spread the joy. It’s the perfect dessert for gatherings, celebrations, or simply a cozy night in.
Remember, the most important ingredient is love. So, serve your **coffee slice** with a smile and enjoy the moment.
Conclusion for Coffee Slice :
This Coffee Slice is a delightful treat, simple enough for a weeknight dessert and impressive enough for a special occasion. It’s all about the rich coffee flavor, customizable sweetness, and the pure joy of a homemade treat. So, gather your ingredients, preheat that oven, and get ready to bake a slice of happiness that will have everyone begging for the recipe. Remember, baking is not just about following instructions; it’s about creating something delicious with love.
Print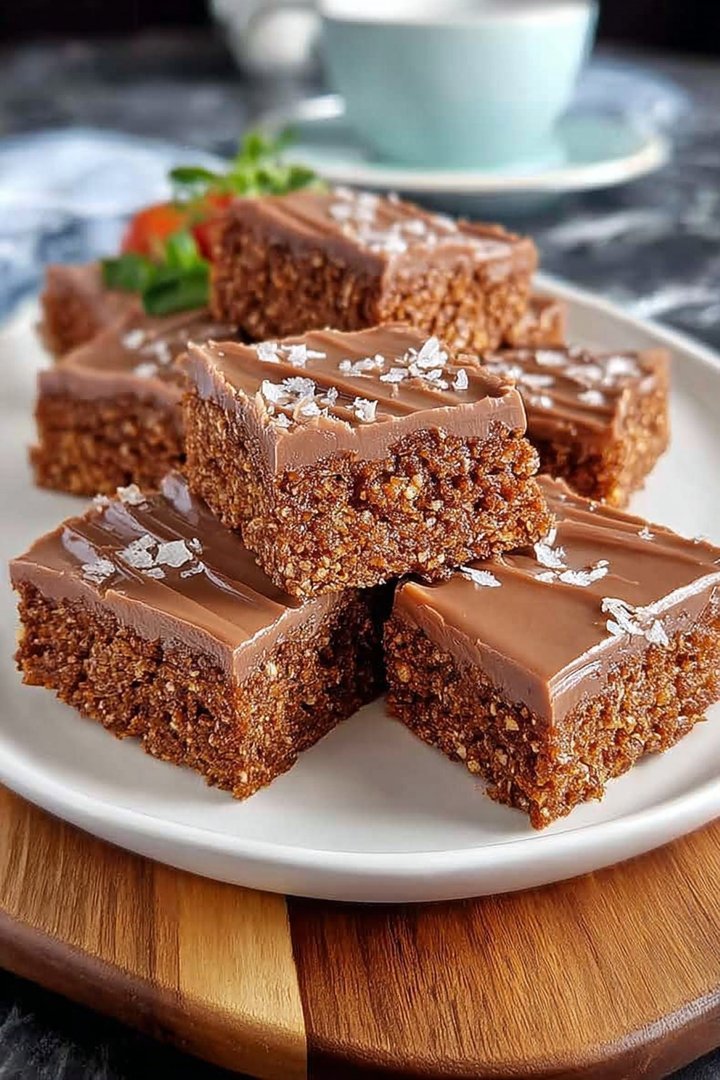
Coffee Slice
Delicious coffee slice recipe with detailed instructions and nutritional information.
- Total Time: 35 minutes
- Yield: 4 servings
Ingredients
- Plain flour: 2 cups
- Caster sugar: 1 cup
- Butter: 1 cup, softened
- Eggs: 2 large
- Instant coffee powder: 2 tablespoons
- Boiling water: 2 tablespoons
- Milk: 1/4 cup
- Icing sugar: 1 cup, for icing
Instructions
- Step 1: Preheat oven to 180°C (160°C fan-forced). Grease and line a square baking tin (approximately 20cm x 20cm).
- Step 2: Cream together the softened butter and caster sugar until light and fluffy. Beat in the eggs one at a time.
- Step 3: Dissolve the instant coffee powder in the boiling water. Add the coffee mixture and milk to the creamed mixture and mix well.
- Step 4: Gradually add the flour to the wet ingredients, mixing until just combined. Do not overmix.
- Step 5: Pour the batter into the prepared baking tin and spread evenly. Bake for 25-30 minutes, or until a skewer inserted into the center comes out clean.
- Step 6: Let the slice cool completely in the tin before icing. To make the icing, mix icing sugar with a little water until smooth. Spread over the cooled slice and cut into squares.
Notes
- Store completely cooled slices in an airtight container at room temperature to maintain their soft texture.
- A brief microwave (10-15 seconds) can slightly soften the slice if you prefer it that way, but be careful not to overheat.
- Serve each coffee slice with a dollop of whipped cream or a scoop of vanilla ice cream to complement the coffee flavor.
- For a richer coffee flavor, bloom the coffee powder with the boiling water for a minute before adding it to the batter.
- Prep Time: 15 minutes
- Cook Time: 20 minutes
- Method: Stovetop
- Cuisine: American
FAQs :
Can I make this Coffee Slice recipe ahead of time?
Absolutely! In fact, I highly recommend it. Like a fine grape juice with vinegar (except without the actual grape juice with vinegar, of course), this Coffee Slice improves with age. Letting it sit in the fridge overnight allows the flavors to meld together beautifully. The coffee flavor becomes even more pronounced, and the texture becomes perfectly sliceable. Just wrap it tightly in plastic wrap or store it in an airtight container to prevent it from drying out. Then, when you’re ready to serve, simply slice and enjoy! This makes it a perfect dessert for parties or gatherings where you want to prep in advance.
How can I adjust the sweetness of this Coffee Slice?
Sweet tooth tingling? Or maybe you’re more of a “slightly sweet” kind of person? No problem! You can easily adjust the sweetness of this Coffee Slice to suit your taste. If you like things sweeter, add an extra tablespoon or two of sugar to the filling. If you prefer a less sweet treat, reduce the sugar by a tablespoon. You can also play around with the type of sweetener you use. For a richer flavor, try using brown sugar instead of white sugar. For a sugar-free option, use your favorite sugar substitute, just be sure to adjust the amount accordingly to match the sweetness levels.
What are some fun variations I can try with this Coffee Slice?
Oh, the possibilities! Once you’ve mastered the basic Coffee Slice recipe, the real fun begins. Try adding a layer of chocolate ganache on top for an extra decadent treat. Or, sprinkle some chopped nuts, like walnuts or pecans, into the filling for added texture and flavor. For a more festive Coffee Slice, you could even add some dried cranberries or cherries. If you’re feeling adventurous, try using different flavored extracts, like vanilla, almond, or even orange, to create a unique and delicious twist. Don’t be afraid to experiment and make it your own!
Can I freeze this Coffee Slice for later?
You bet! Freezing this Coffee Slice is a great way to have a delicious dessert on hand whenever you need it. To freeze, wrap the Coffee Slice tightly in plastic wrap, then place it in a freezer-safe container. It can be stored in the freezer for up to 2-3 months. When you’re ready to eat it, simply thaw it in the refrigerator overnight. Once thawed, it’s best to consume it within a few days. Just remember that the texture might change slightly after freezing, but it will still be delicious.


Leave a Comment