

Remember the pure, reckless joy of licking the spoon after making cookies? Now imagine capturing that raw, decadent flavor, injecting it with pure energy, and making it perfectly safe (and healthy!) to eat.
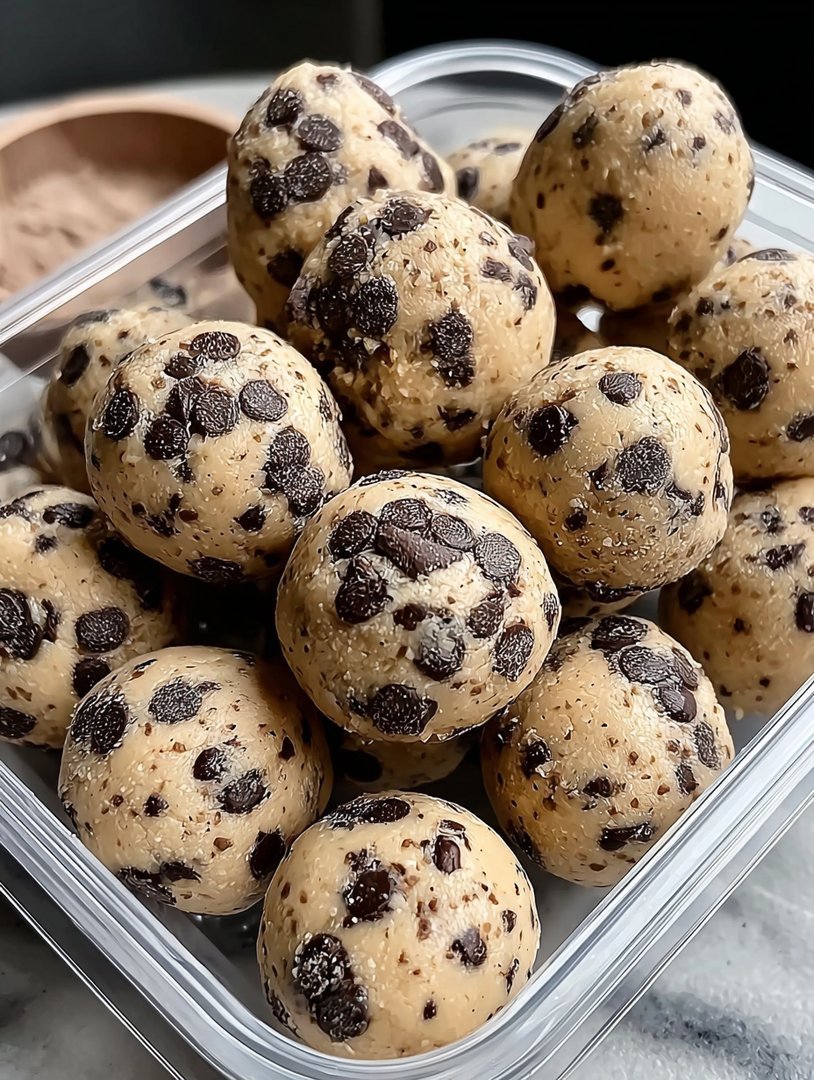
Say hello to these magnificent, no-bakeCookie Dough Protein Balls—your new favorite afternoon savior that tastes exactly like a guilty pleasure, without the guilt trip.
- Effortlessly blend pantry staples in minutes, requiring absolutely no oven time, making them the ultimate fast fuel solution.
- Experience the authentic, velvety texture and deep brown sugar flavor reminiscent of classic cookie dough perfection.
- Their charming, rustic aesthetic makes them highly presentable, whether tucked into a lunchbox or displayed on a platter.
- Highly versatile for pre-workout boosts, late-night cravings, or a healthy dessert option for the entire family.
The Accidental Genius of No-Bake Energy Bites
I am going to let you in on a little secret: I wasn’t trying to invent the world’s greatest healthy cookie dough snack. I was actually trying to survive a particularly grueling Monday afternoon that felt suspiciously like a Friday at 4:58 PM. My energy reserves were running on fumes, and the siren song of the snack cupboard—specifically the processed, sugary kind—was deafening. I needed fuel, and I needed it fast, but I refused to compromise on flavor.
My first attempt involved throwing every protein powder, nut butter, and oat flake I owned into a bowl. It looked like something a particularly disgruntled badger might drag back to its den. It was dry, crumbly, and tasted vaguely of disappointment and gypsum. My dog looked at it and decided his squeaky toy was a better meal option. That was when I realized the key wasn’t adding more “healthy stuff”; the key was replicating the glorious texture and depth of real, irresistible cookie dough.
The Texture Triumvirate: Why These Bites Work
Real cookie dough requires moisture, sweetness, and a certain stickiness to hold everything together. Since we are avoiding raw eggs and copious amounts of butter, we need clever stand-ins. The combination of creamy cashew butter (or peanut butter, if you prefer), a touch of maple syrup for that necessary liquid sweetness, and the fine texture of oat flour is what creates that perfect, velvety mouthfeel. If you want something that truly rivals the real thing, you cannot skip the subtle complexity that vanilla bean paste and a pinch of salt bring to the party. These seemingly small additions are the difference between an acceptable protein bite and genuinely addictiveCookie Dough Protein Balls.
The Secret Weapon: Heat-Treated Flour
The biggest hurdle in enjoying raw cookie dough is, scientifically speaking, the raw flour, not just the raw eggs. For this recipe, we use oat flour, which is fantastic, but if you opt to use standard wheat flour, you absolutely must heat-treat it first. To do this, simply spread the flour on a baking sheet and bake it at 350°F (175°C) for about five minutes until the temperature registers 165°F (74°C). This kills any potential bacteria without actually cooking or browning the flour. However, using fine oat flour or a high-quality protein powder mitigates this step entirely and provides a great texture boost for our no-bake energy treats.
Once I cracked the code on texture and safe indulgence, these little protein spheres became a staple. They are the perfect way to satisfy that deep, primal craving for dessert while simultaneously telling your body, “Yes, this is fuel, now go climb that metaphorical mountain of emails.” They store beautifully in the freezer, ready to be deployed the moment the afternoon slump hits, acting as a much more delightful and effective alarm clock than actual coffee.
Ingredients for Cookie Dough Protein Balls
Here’s what you’ll need to make this delicious dish:
- Vanilla Protein PowderOpt for a high-quality plant-based protein powder or plant-based vanilla powder, as it forms the bulk and main flavor profile of the protein balls.
- Oat FlourEssential for replicating the fine, slightly gritty texture of classic flour; you can easily make this by blending rolled oats until finely ground.
- Creamy Cashew ButterProvides the necessary fats and binding moisture; ensure it is smooth and stir well before measuring for the best consistency.
- Pure Maple SyrupUsed as the primary sweetener and binder, offering deep flavor notes and keeping the recipe refined sugar-free.
- Unsweetened Almond MilkAdjusts the mixture’s consistency if it is too dry, helping the ingredients come together into a cohesive dough.
- Pure Vanilla Bean PasteCrucial for the authentic cookie dough flavor; use a good quality extract for the richest aroma.
- SaltJust a small pinch balances the sweetness and enhances all the other flavors, a technique bakers always employ.
- Mini Chocolate ChipsChoose quality dairy-free or standard mini chips; their small size ensures even distribution throughout the dough.
The full ingredients list, including measurements, is provided in the recipe card directly below.
How to Make Cookie Dough Protein Balls
Follow these simple steps to prepare this delicious dish:
Step 1: Combine the Dry Ingredients
Start by adding the vanilla protein powder and the oat flour into a large mixing bowl. Whisk these two dry components together thoroughly to ensure the protein powder is evenly distributed and there are no lumps, which is vital for smooth protein spheres.
Step 2: Incorporate the Wet Ingredients
Measure and add the creamy cashew butter, pure maple syrup, pure vanilla bean paste, and the pinch of salt to the bowl with the dry ingredients. Use a sturdy spatula or a wooden spoon to begin mixing these elements. The mixture will initially be crumbly and quite stiff.
Step 3: Adjust Consistency with Milk
Slowly incorporate the almond milk, starting with just one tablespoon at a time. Mix vigorously until a thick, cohesive dough forms that pulls away from the sides of the bowl. The dough should be firm enough to roll without being overly sticky, but not so dry that it crumbles when squeezed.
Step 4: Fold in the Chocolate Chips
Once the desired dough consistency is achieved, gently fold in the mini chocolate chips. Use the spatula to distribute them evenly throughout the mixture, ensuring every bite of theCookie Dough Protein Ballsincludes a delightful pocket of chocolatey goodness. Avoid overmixing once the chips are added.
Step 5: Roll and Chill the Dough Balls
Using a small cookie scoop or a tablespoon, measure out uniform portions of the dough. Roll each portion between your palms to form smooth, compact balls. Place these raw protein balls onto a tray lined with parchment paper.
Step 6: Set the Protein Balls
Transfer the tray of finished protein spheres to the refrigerator for at least 30 minutes. Chilling allows the protein powder and oat flour to fully hydrate and the cashew butter to firm up, resulting in a perfectly set and less sticky snack. Transfer to plates and drizzle with sauce for the perfect finishing touch.
Customizing Your Protein Powerhouse
The beauty of these energy bites is their versatility. Think of the basic cookie dough base as a blank, highly delicious canvas ready for your culinary imagination. Maybe you prefer a little spice, or perhaps you want to boost the nutritional value even further. Whatever your goal, there are numerous ways to tweak this recipe to suit your specific cravings and dietary needs without losing that signature cookie dough flavor and texture.
Flavor Variations Beyond Vanilla
While vanilla is the classic choice for replicating that raw dough taste, don’t be afraid to experiment with other protein powder flavors. Chocolate protein powder yields a rich double chocolate chunk protein ball. If you are feeling adventurous, try a natural peanut butter flavored powder and swap the cashew butter for peanut butter to create a peanut butter cup style treat. A subtle addition of ground cinnamon or a tiny dash of alcohol-free almond extract can also add unexpected depth, giving your daily healthy snacks an exciting twist.
Boosting the Nutritional Profile
If you need extra omega-3s or fiber, consider mixing in healthy additions. Flaxseed meal or chia seeds are fantastic for this purpose. Start with one tablespoon of either addition and increase the liquid slightly if the mixture becomes too dry. For a crunchy texture, finely chopped walnuts or slivered almonds can be folded in alongside the chocolate chips. Just remember that adding dry ingredients requires a minor adjustment of the almond milk to maintain that rollable dough consistency critical for forming these greatCookie Dough Protein Balls.
Storage and Longevity
One of the best features of these protein spheres is their excellent shelf life, allowing for superb meal prep. Store the finished, chilled protein balls in an airtight container in the refrigerator for up to seven days. If you prefer to have a stash ready for emergency cravings, they freeze exceptionally well. Place them in a single layer in a freezer-safe bag or container; they will last in the freezer for up to three months. When you are ready to eat one, simply pull it out and let it thaw for about five minutes—they are surprisingly delicious straight from the freezer too!
These powerful, delicious, no-bake energy treats are a truly liberating invention. They allow you to indulge in the nostalgic, comforting flavor of cookie dough while simultaneously supporting your fitness goals. They prove that healthy eating doesn’t have to mean sacrificing the little moments of joy, like biting into a perfect, chocolate-studded sphere of mock raw dough. So go ahead, whip up a batch, and prepare to have your snack game revolutionized—Monday afternoons never stood a chance.
The Quest for the Ultimate Guilt-Free Snack
We all have that one weakness: the siren call of raw cookie dough. It haunts late-night cravings and weekend baking sessions. But let’s be honest, sneaking spoonfuls of raw dough is fun until you remember all the unneeded sugar and refined flour involved. I used to stare longingly at my mixer, wishing for a version that was actually acceptable for a mid-afternoon energy boost, not just a midnight sugar trip. This dream led me directly to the creation of the most satisfying, nutrient-dense treat imaginable:Cookie Dough Protein Balls.
These magnificent little spheres are the culinary equivalent of having your cake and eating it too, except the “cake” is raw, packed with fiber and protein, and requires zero oven time. They are perfect for meal prepping, post-workout fuel, or simply silencing that demanding inner voice that screams, “I need chocolate chips immediately!” Forget bland, chalky protein bars; we are entering the realm of dessert masquerading as health food. And honestly, isn’t that the best kind of health food?
Why Protein Balls Are Your New Best Friend
In the age of constant movement, snacks need to pull their weight. They can’t just offer empty calories; they must sustain us. Traditional cookies offer momentary joy followed by regret. These protein snacks, however, use wholesome ingredients like oats (fiber powerhouse), high-quality plant-based protein powder (muscle support), and natural sweeteners (balanced energy). They deliver lasting satisfaction, helping you power through that 3 PM slump without reaching for the coffee pot or the vending machine.
Mixing Up the Magic: Ingredients You Need
The beauty of this recipe lies in its simplicity and minimal ingredient list. You likely have most of these components lurking in your pantry right now. Remember, precise measurements matter here—we need the perfect consistency to form those delightful balls without them crumbling into sad dust piles.
The Essential Foundation
-
Rolled Oats:About 1 ½ cups. Ensure these are old-fashioned rolled oats, not quick oats, for the best texture once processed. This provides the bulk and fiber.
-
Vanilla Protein Powder:1 cup. Use your favorite high-quality vanilla flavor. This is key for both the cookie dough texture and the protein punch.
-
Cashew Butter:½ cup. The smooth, mild flavor of cashew butter perfectly mimics the richness of traditional cookie butter without overpowering the vanilla notes. Ensure it is creamy and unsweetened.
-
Maple Syrup or Agave:¼ cup. This acts as the binder and the sweetener. Adjust slightly based on your protein powder’s sweetness level.
-
Non-Dairy Milk (or Water):2–4 tablespoons. Start with less liquid; you may only need a splash to achieve the right dough consistency.
-
Vanilla Bean Paste:1 teaspoon. Essential for that classic baked goods aroma.
-
Salt:¼ teaspoon. Don’t skip this! Salt balances the sweetness and enhances the overall “cookie dough” flavor dramatically.
The Cookie Dough Embellishments
-
Mini Chocolate Chips:½ cup. Use high-quality, dairy-free, or carob chips. Minis work best because they distribute evenly within the small energy balls.
The Preparation Process: No Ovens Required
Step-by-Step Guide to Perfect Protein Balls
This is where the magic happens, and thankfully, it requires minimal effort and maximum reward. Grab your food processor—it’s going to do most of the heavy lifting for us.
-
The Dry Blend:Add the rolled oats, protein powder, and salt to the food processor. Pulse until the oats are broken down into a coarse flour consistency. You still want some texture, but no whole flakes remaining.
-
Introduce the Wet Elements:Add the cashew butter, maple syrup, and vanilla bean paste to the oat mixture. Process on high speed until the ingredients start to clump together and resemble a thick, sticky dough. If the mixture looks too dry, slowly drizzle in the non-dairy milk, one tablespoon at a time, until the dough sticks together when squeezed.
-
Fold in the Chips:Transfer the dough to a large mixing bowl. Gently fold in the mini chocolate chips using a spatula. We move it out of the processor now to avoid pulverizing the chips.
-
The Chill Factor:This step is mandatory. Cover the bowl and refrigerate the dough for at least 30 minutes. Chilling makes the dough firmer and much easier to roll, preventing a sticky mess on your hands.
-
Roll and Store:Use a small cookie scoop or a tablespoon measure to portion out the dough. Roll tightly between your palms to form smooth, uniformCookie Dough Protein Balls. Place them on a lined baking sheet and return them to the fridge for final setting before transferring them to their storage container.
I once tried to skip the chilling step and ended up looking like a swamp monster covered in sticky, sweet oat paste. Learn from my mistake: embrace the chill time. It gives you the perfect excuse to sit down and scroll through Instagram while anticipating your delicious reward.
The Accidental Discovery of Sunshine on a Plate
I was desperate for that gooey, comforting taste of raw cookie dough but didn’t want the sugar crash or the bellyache. Frustrated, I tossed oats, protein powder, and maple syrup into a bowl. The result? These amazing, guilt-freeCookie Dough Protein Ballsbecame my daily sunshine.
Perfecting the Cooking Process
Since these are no-bake wonders, the process is fast! Start by blending the oats and protein powder until fine. Next, combine wet ingredients separately, then mix everything together. Finally, chill the mixture firmly before rolling into perfect, decadent little spheres.
Add Your Touch
Swap out the cashew butter for almond or sunflower seed butter if you prefer. Add a pinch of cinnamon or maybe some dried cherry pieces for complexity. You could also roll the finished protein balls in shredded coconut or crushed nuts for an extra crunch and texture boost.
Storing & Reheating
Store these delicious protein bites in an airtight container in the refrigerator for up to one week—they keep incredibly well. If you want them to last longer, freeze the balls and thaw them for ten minutes before enjoying. They don’t need reheating, just chilling!
My sister once declared these protein bites tasted better than actual raw cookie dough. That validation meant the world, proving that healthy snacking doesn’t have to mean sacrificing deliciousness or texture.
Expert Tips for Next-Level Protein Bites
-
Always pulse the oats first until they resemble fine flour; this prevents a gritty texture and helps the dough bind smoothly with the nut butter.
-
If your dough feels too crumbly, add liquid (milk or water) one teaspoon at a time; too much liquid makes the balls impossible to roll neatly.
-
For an extra rich, decadent flavor, lightly toast the rolled oats in a dry pan for a few minutes before processing them into the dry mixture.
Troubleshooting Common Protein Ball Problems
Even though this recipe is incredibly straightforward, things can sometimes go sideways, usually concerning consistency. The two main issues people face are overly dry, crumbly dough or dough that is too sticky and oily. Luckily, both problems have simple fixes that require ingredients you already have on hand.
When the Dough is Too Dry
If your protein powder is highly absorbent, you might find the dough refusing to stick together after blending. If it feels like sandy cement, don’t panic. Simply add a small amount of extra liquid (half a teaspoon of non-dairy milk) or a slight drizzle of maple syrup. The fat content in the nut butter needs to be activated, and the small addition of moisture often solves this immediately. Mix until a small piece holds its shape when squeezed tightly between your fingers.
When the Dough is Too Sticky
On the flip side, sometimes the cashew butter is extra oily, or you accidentally went overboard with the milk. If the dough is clinging annoyingly to your hands and refusing to hold a sphere shape, you need to add more dry bulk. Gently mix in another tablespoon of protein powder or a few tablespoons of finely processed oats until the stickiness subsides and the dough feels manageable. Remember, chilling will also significantly improve the texture of excessively sticky dough.
Creative Customization Beyond Chocolate Chips
While the classic chocolate chip protein balls are a home run, this base recipe is robust enough to handle various flavor experiments. Think of the dough as a blank canvas, ready to be painted with your favorite seasonings and mix-ins. Customizing these snacks keeps them fresh and exciting, perfect for rotating through your meal prep schedule.
Flavor Boosters and Add-Ins
Instead of relying solely on vanilla, consider spiking the dough with other flavors. Adding ¼ teaspoon of alcohol-free almond extract alongside the vanilla provides a marzipan-like depth, while adding a small scoop of cocoa powder turns them into chocolate chip brownie bites. For mix-ins, try finely chopped dried cranberries, white chocolate chips (dairy-free), or even finely chopped pecans. If you like a citrus zing, grate a little lemon zest into the wet mixture before blending. The possibilities truly are endless once you master the foundational technique.
I often make a double batch of the dough base and split it in half, mixing one portion with traditional chips and the other with a blend of dried blueberries and lemon zest. This dual approach ensures I always have two different satisfying snacks ready to go throughout the week, preventing flavor fatigue and keeping my protein intake consistent. Plus, the contrast between the richness of the cookie dough and the brightness of the fruit is fantastic.
Conclusion for Cookie Dough Protein Balls
These incredible no-bake treats prove that healthy eating does not equate to boring eating. Whether you need a speedy breakfast, a robust post-gym refuel, or just a comforting sweet treat, theseCookie Dough Protein Ballsdeliver big flavor and huge nutritional value. By following the simple steps—especially that crucial chilling time—you can easily prepare a batch of high-protein snacks that taste exactly like your childhood dream. Dive into this recipe, experiment with your favorite add-ins, and prepare to wave goodbye to processed energy bars forever. Enjoy the guilt-free satisfaction!
Print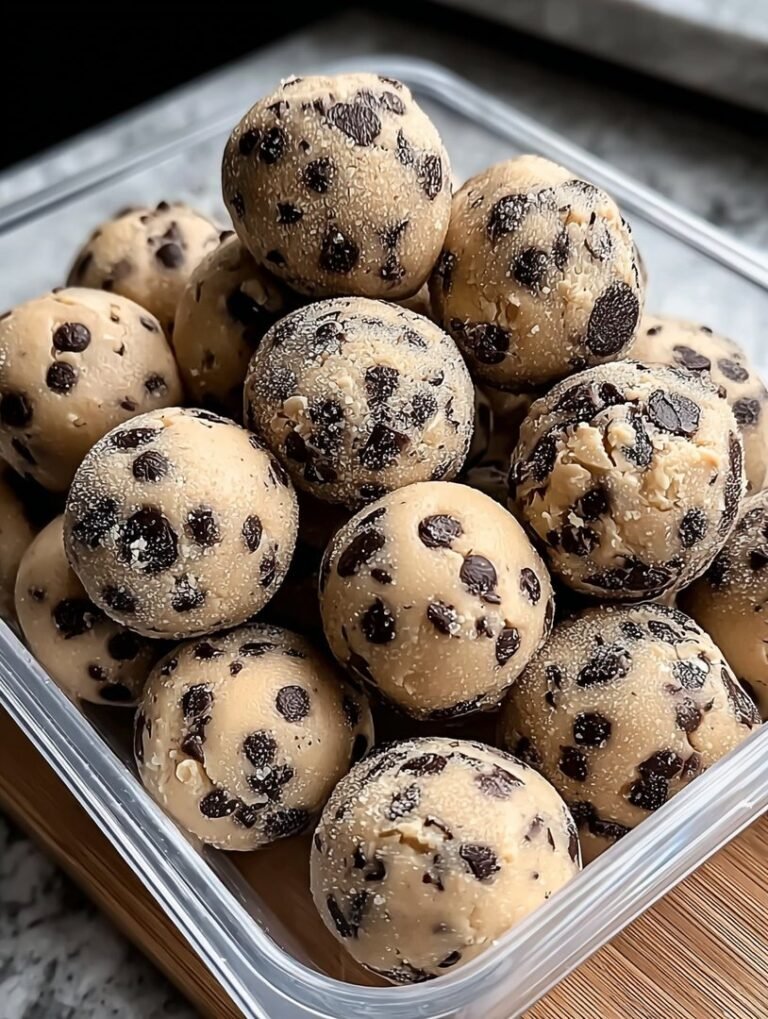
Cookie Dough Protein Balls
Craving raw cookie dough without the guilt? These no-bake protein balls deliver chewy oats, creamy peanut butter, and bold vanilla. High-protein fuel ready in minutes.
- Total Time: 35 minutes
- Yield: 4 servings 1x
Ingredients
- 1 cup old-fashioned rolled oats
- 1/2 cup vanilla or unflavored protein powder
- 1/2 cup creamy peanut butter (or other nut butter)
- 1/4 cup maple syrup or honey
- 1 teaspoon vanilla powder
- 2–4 tablespoons milk (dairy or non-dairy, for consistency adjustment)
- 1/4 cup mini chocolate chips
Instructions
- Step 1: In a large mixing bowl, combine the rolled oats and the protein powder, stirring thoroughly until the dry ingredients are evenly distributed.
- Step 2: Add the peanut butter, maple syrup (or honey), and vanilla bean paste to the dry mixture. Stir well using a sturdy spoon or spatula until a thick, crumbly dough forms.
- Step 3: Gradually add the milk, starting with 2 tablespoons, mixing until the dough comes together and is sticky enough to hold its shape when pressed; add the remaining milk if the mixture appears too dry.
- Step 4: Fold in the mini chocolate chips until they are evenly incorporated throughout the cookie dough mixture.
- Step 5: Scoop the mixture using a tablespoon or small cookie scoop and roll it tightly between your palms to form approximately 12-15 uniform protein balls.
- Step 6: Place the finished protein balls on a parchment-lined plate or container and refrigerate for at least 30 minutes to allow them to firm up before serving or storing.
Notes
- For optimal freshness and texture, store the balls in an airtight container in the refrigerator for up to 7 days, or freeze them for up to 3 months.
- If eating straight from the fridge, allow the balls to sit at room temperature for 5-10 minutes to slightly soften the nut butter and make them less dense.
- Boost your breakfast routine by crumbling a ball over yogurt, oatmeal, or a smoothie bowl for added protein and flavor.
- If using natural, drippy peanut butter, start with only 1 tablespoon of milk and add more very sparingly, as natural nut butters require less liquid to bind the mixture.
- Prep Time: 15 minutes
- Cook Time: 20 minutes
- Method: Stovetop
- Cuisine: American

Leave a Comment