
Remember that bland diet food that tasted like sadness? Forget it. These revolutionaryCottage Cheese Wrapsdeliver a high-protein, incredibly versatile base for any filling imaginable.
They are ridiculously easy to make, require minimal cleanup, and completely change the sandwich game. You are about to become a lunch legend.
- Preparation takes less than five minutes, needing only a blender and a hot nonstick pan for the ultimate speedy meal solution.
- Neutral yet rich flavor profile perfectly complements both savory fillings, like seasoned ground beef, and sweet treats, such as fruit and honey.
- Achieve thin, flexible, golden-brown wrappers that hold their shape beautifully without tearing or becoming soggy during assembly.
- Swap out high-carb bread products forever; these wrappers serve as ideal replacements for tortillas, flatbreads, and sandwich slices.
Ingredients for Cottage Cheese Wraps
Here’s what you’ll need to make this delicious dish:
- Cottage Cheese (Full Fat)Using full-fat cottage cheese provides the best texture and stability for the wrapper batter, ensuring they don’t tear when cooking.
- EggsEggs act as the primary binder, helping the batter hold together and providing elasticity to the finished wraps.
- Tapioca Flour (or Cornstarch)A small amount of starch enhances the chewiness and prevents the wraps from sticking excessively to the pan.
- Salt and PepperSeasoning is crucial even for the wrap itself; adjust the amounts to ensure a balanced, flavorful base.
- Cooking Spray or GheeYou need a minimal amount of fat to prevent sticking and encourage a beautiful golden-brown color during the cooking process.
The full ingredients list, including measurements, is provided in the recipe card directly below.
How to Make Cottage Cheese Wraps
Follow these simple steps to prepare this delicious dish:
- Step 1: Blend the Batter Until SmoothCombine the cottage cheese, eggs, tapioca flour, salt, and pepper in a high-speed blender. Blend for 60 to 90 seconds until the mixture is completely silky smooth and no curds remain. This smooth consistency is key to a thin, perfect wrapper.
- Step 2: Preheat the PanHeat a 10-inch nonstick skillet over medium-low heat. Ensure the pan is properly heated before adding the batter. Lightly coat the pan with cooking spray or a dab of ghee.
- Step 3: Pour and SwirlPour about half a cup of the prepared batter into the center of the hot pan. Immediately lift the pan and gently swirl it in circular motions until the batter spreads out into a thin, even circle, similar to making a crepe.
- Step 4: Cook Until SetCook the wrap undisturbed for about 3 to 4 minutes. You will know it is ready to flip when the edges start to look dry and lift easily, and the top surface appears set and matte.
- Step 5: Flip and Finish CookingCarefully flip the wrap using a thin spatula. Cook the second side for only 1 to 2 minutes until it develops light golden spots. Transfer the finished wrap immediately to a plate lined with parchment paper or a clean kitchen towel to cool slightly.
- Step 6: Repeat and AssembleRepeat the process with the remaining batter, ensuring you lightly grease the pan between wraps if necessary. Allow them to cool slightly before filling them with your favorite toppings.
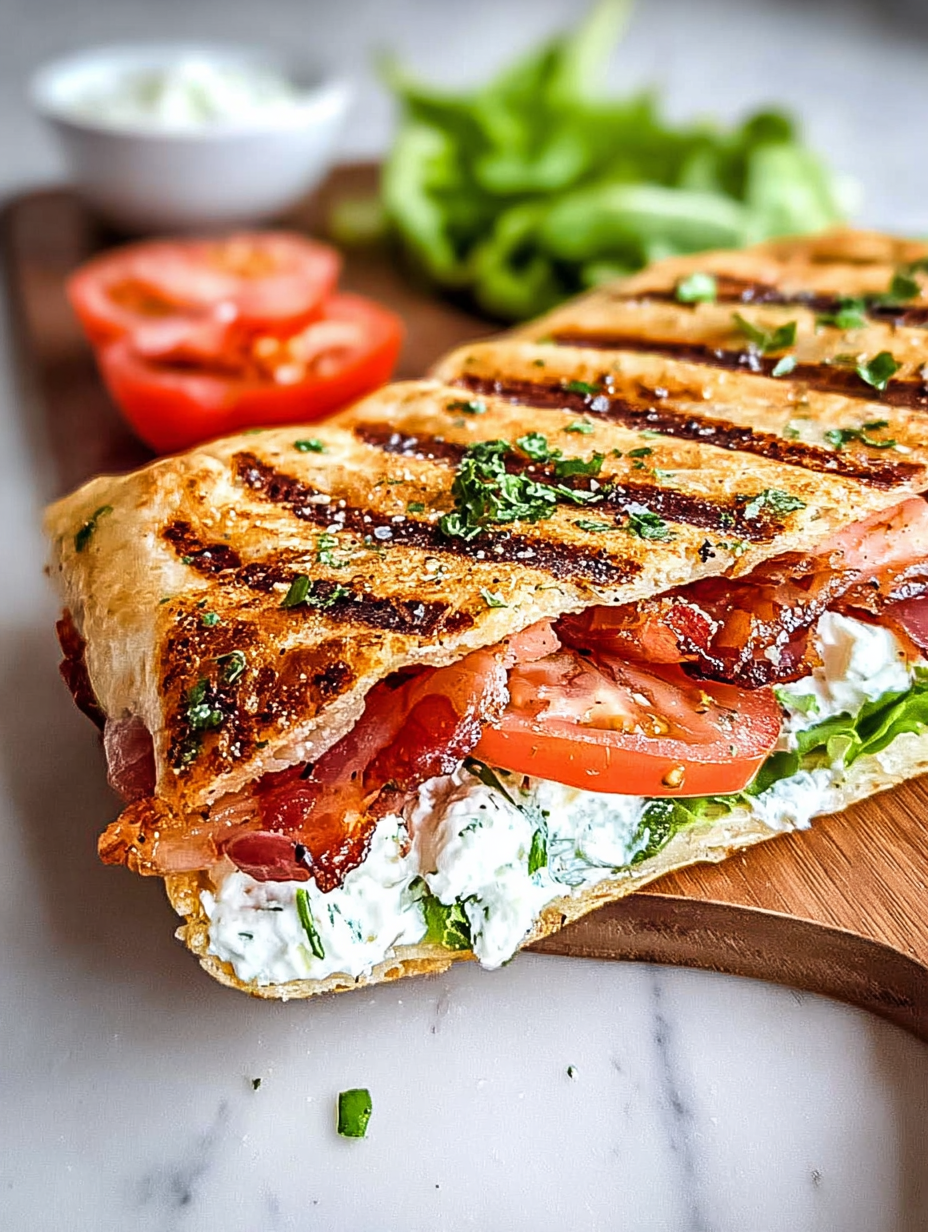
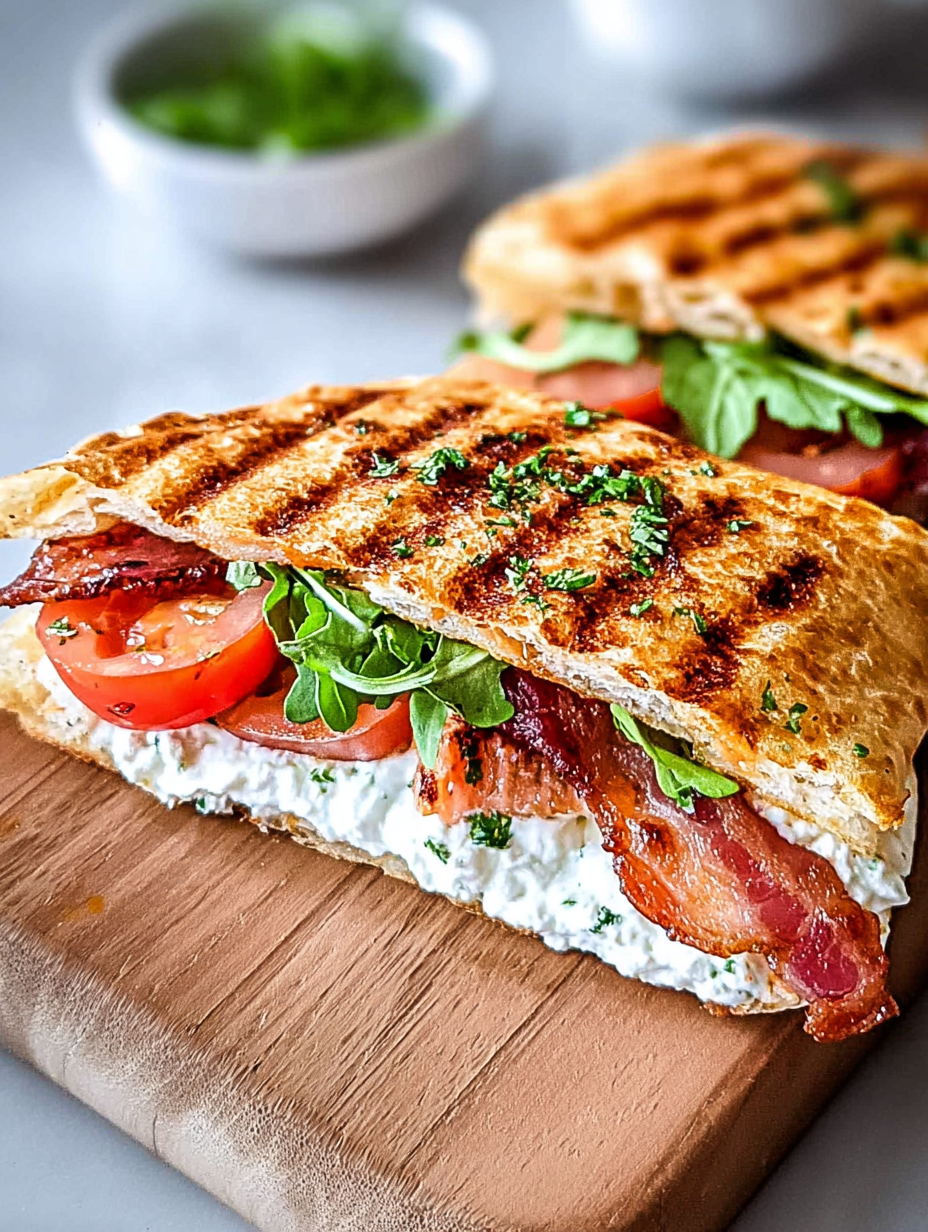
Transfer to plates and fill generously with fresh vegetables and seasoned fillings like spiced chicken or shredded lamb for a hearty, quick lunch.
The Great Sandwich Meltdown and the Rise of the Cottage Cheese Wrap
We all have that moment: the highly anticipated lunchtime reveal, only to find our beautiful sandwich has committed culinary suicide. It’s a soggy, compressed mess where the bread has fully surrendered to the moisture of the fillings. I endured this tragic fate one too many times, particularly when attempting to pack light, high-protein lunches. That’s how my kitchen became a laboratory dedicated to finding the perfect, sturdy, yet flexible bread replacement.
The quest led me down a winding path involving cauliflower crusts that crumbled faster than my motivation on a Monday morning, and lentil pancakes that tasted suspiciously like old socks. Then came the revelation: cottage cheese. It seems counterintuitive—blending a lumpy, cultured dairy product into a silky smooth batter. But trust the process. The resulting texture is magical: pliable, neutral enough to handle aggressive spices or delicate fruits, and packed with satisfying protein. It revolutionizes meal prep, moving the focus from “Will this bread survive?” to “How many of these glorious wrappers can I eat?”
TheseCottage Cheese Wrapsaren’t just a trend; they are an emergency intervention for sad lunch boxes everywhere. They possess an almost unbelievable structural integrity, meaning you can load them up with juicy tomatoes, crisp greens, and flavorful dips without worrying about catastrophic leakage. They are also incredibly friendly for those seeking quick, nutritious options without spending hours kneading dough or waiting for things to rise. If you can push a button on a blender, you can make these wraps successfully today.
Why Cottage Cheese Wraps Are the Next Big Thing
The culinary world constantly searches for quick fixes that don’t compromise flavor or nutritional value. These wraps hit that trifecta perfectly. They offer a simple, three-ingredient solution to the demand for grain-free and low-carbohydrate options, all while boosting your daily protein intake significantly. Unlike traditional wraps that rely heavily on flour, these derive their structure primarily from dairy protein, which provides sustained energy and keeps you feeling full much longer.
The mild, almost neutral taste of the wraps makes them the perfect canvas. They act as a blank slate, absorbing the flavors of whatever you choose to fill them with. Imagine swapping out your standard, flavorless store-bought tortilla for something homemade, warm, and packed with goodness. From serving them as savory deli-style roll-ups to using them as the base for high-protein breakfast burritos, their versatility is unmatched. This adaptability is precisely why they have soared in popularity—they fit seamlessly into almost any diet or meal plan without requiring special equipment or obscure ingredients. Plus, they offer a fun, easy way to increase dairy consumption without resorting to heavy desserts or sugary drinks.
These wraps have also gained immense traction because they require minimal cooking skills. If you can make a pancake or a crepe, you already possess the talent necessary for perfecting this recipe. The biggest learning curve is simply resisting the urge to poke at them too soon while they set in the pan. Patience is your most important ingredient here; wait for those edges to dry out before you even think about flipping.
Essential Tips for Perfect Wraps
Even though this recipe is incredibly straightforward, a few professional tricks ensure you achieve bakery-quality results every single time. The primary hurdle people face is getting the mixture perfectly smooth. If you skip the necessary blending time, small curds remain, leading to brittle wraps that tear easily when you try to fold them. Blend until you think it’s done, and then blend for 30 more seconds just to be sure. A truly smooth batter is the foundation of flexibleCottage Cheese Wraps.
Controlling the pan temperature is also vital. If the pan is too hot, the wraps will brown quickly on the outside before the center has time to set, resulting in an uncooked, gummy texture. Medium-low heat allows the internal structure to stabilize slowly and encourages that desirable elasticity. Furthermore, do not stack hot wraps immediately after cooking. The trapped steam will make them excessively moist and cause them to stick together in a messy pile, ruining their texture. Lay them flat on parchment paper or a cooling rack until they are room temperature before storing them. If you follow these temperature guidelines and ensure adequate blending, you will eliminate 99% of potential wrap disasters.
Another often overlooked tip involves your nonstick surface. While a good nonstick pan is essential, using a tiny amount of cooking fat, like spray or ghee, between each wrap is recommended, especially after the first two. This ensures consistent browning and easy release, preventing the embarrassing situation where half the wrap remains stubbornly glued to the pan surface when you attempt the flip.
Flavor Variations and Filling Ideas
Once you master the basic Cottage Cheese Wrap, you can begin experimenting with flavor enhancements. For a savory twist, try adding a half teaspoon of dried Italian herbs or a pinch of garlic powder to the batter before blending. For a bright color and nutritional boost, blend in a handful of fresh spinach, which turns the wraps a beautiful vibrant green, perfect for kid-friendly meals.
- Mediterranean Delight:Fill with roasted chicken breast seasoned with oregano, sun-dried tomatoes, cucumber, and a dollop of thick plain yogurt mixed with lemon juice.
- Spicy Ground Beef Roll-Up:Use seasoned ground beef (cooked with chili powder and cumin) mixed with shredded lettuce, chopped onion, and salsa for a quick taco alternative.
- Sweet Breakfast Crepe:Skip the salt in the batter and use them as a dessert or breakfast option. Spread with a thin layer of natural almond butter, top with sliced bananas or berries, and drizzle with pure maple syrup.
- Lemony Tuna Salad:Create a flavorful filling using sustainably caught tuna mixed with fresh celery, red onion, a squeeze of lemon, and a touch of mustard.
- Smoked Salmon and Dill:Combine creamy cheese (like ricotta or cream cheese), smoked salmon pieces, capers, and plenty of fresh dill for an elevated, sophisticated brunch option.
Remember, the base wrap is the stage; your fillings are the stars of the show. Don’t be afraid to experiment with bold, exciting combinations, knowing the wrap can handle the challenge.
Frequently Asked Questions About Cottage Cheese Wraps
We’ve gathered the most common questions about preparing and storing these high-protein alternatives to ensure your success in the kitchen.
How do I store Cottage Cheese Wraps?
Once fully cooled to room temperature, stack the wraps with a small piece of parchment paper between each one to prevent sticking. Store them in an airtight container in the refrigerator for up to 4 to 5 days. They also freeze beautifully; wrap the stack tightly in plastic wrap and aluminum foil, and they will last for two months. Thaw them overnight in the refrigerator before using, then gently reheat them in a dry skillet for 30 seconds per side if desired.
Can I make the batter ahead of time?
Yes, preparing the batter a few hours ahead can actually improve the texture slightly as the tapioca flour fully hydrates. Store the blended batter in an airtight container in the refrigerator for up to 24 hours. Give it a quick stir or re-blend for a few seconds before cooking, as the mixture may separate slightly while resting.
Do the Cottage Cheese Wraps taste strongly of cheese?
Surprisingly, no. Because the cottage cheese is entirely blended into a smooth, liquid batter, the distinct curds and sour flavor dissipate during the cooking process. The finished wrap has a very mild, slightly savory, and largely neutral flavor, making it highly versatile for various savory and sweet applications. Most people cannot identify the dairy base at all.
What is a good substitute for tapioca flour?
If you don’t have tapioca flour, you can successfully substitute it with cornstarch or arrowroot powder. These starches provide the necessary binding properties and contribute to the wraps’ desirable flexible texture, ensuring they don’t tear when you load them up.
Are these wraps suitable for freezing?
Absolutely. Cook the wrappers fully and ensure they are entirely cool. Layer them between squares of parchment paper, place them in a freezer bag or airtight container, and freeze for up to two months. Freezing them flat helps them maintain their shape. Thaw the frozen stack in the refrigerator overnight before use.
Perfecting the Cooking Process
Achieve the best results by focusing on sequence. Start by blending the cottage cheese for the wraps, getting them into the oven immediately. While the wraps bake for thirty minutes, utilize that time efficiently to fully cook and simmer the turkey filling, ensuring both components finish simultaneously for hot assembly.
Add Your Touch
Substitute the turkey with seasoned ground lamb or finely diced chicken breast for variety. Try different seasoning blends like curry powder or Italian herbs in the cheese batter itself. For a vegetarian option, fill the wraps with roasted vegetables like sweet potatoes and peppers, or a hearty lentil ragout seasoned with balsamic vinegar.
Storing & Reheating
Store leftoverCottage Cheese Wrapsunfilled in an airtight container, separated by parchment paper, in the refrigerator for up to four days. Reheat the shells briefly in a dry skillet over medium-low heat to restore flexibility. Reheat the filling separately and assemble just before serving to prevent the wraps from becoming soggy.
The Culinary Revelation of the Decade
You know that moment when a recipe goes viral, and you think, “There is no way that actually works?” I was right there with you. For years, I treated cottage cheese strictly as a side dish—something to eat with fruit or maybe topped with a little pepper. It was respectable, predictable, and frankly, a bit boring. Then the high-protein, low-carb revolution hit, bringing these miraculousCottage Cheese Wrapsinto the spotlight. Initially, I scoffed. Cheese as a tortilla? Madness!
The first time I attempted it, I was sure I’d end up with a watery, curdled mess stuck to my parchment paper. Instead, what emerged was a golden, flexible, surprisingly durable shell. It was soft yet sturdy, perfect for stuffing with everything from seasoned ground beef to fresh garden vegetables. This wasn’t just a food trend; this was a fundamental shift in how we approach healthy eating. It provides an incredible boost of protein without the fuss of traditional flour tortillas, making meal prep an absolute breeze.
Why These High-Protein Shells Are Game Changers
The beauty of these wraps lies in their simplicity. You need two ingredients for the shell: cottage cheese and a dash of seasoning. That’s it! Forget the kneading, resting, and rolling associated with conventional bread products. These savory cottage wraps bake up beautifully, offering a neutral canvas ready to embrace any filling you can dream up. They are robust enough to hold generous portions of chili-spiced shredded chicken and crunchy toppings without tearing, unlike some store-bought options that crumble under pressure.
We’re going to tackle the ultimate version today: filling them with a vibrant, seasoned turkey and black bean mix, topped with fresh avocado and lime-infused Greek yogurt. Get ready to swap your tortilla routine for something spectacularly simple and utterly delicious. The best part? Cleanup is minimal, meaning you spend less time scrubbing pans and more time enjoying your culinary triumph.
Essential Tools for Wrap Perfection
Before diving into the ingredients, make sure you have the right equipment. You absolutely need parchment paper—aluminum foil or silicone mats will lead to sticking and frustration. A high-speed blender or food processor is crucial for achieving that silky-smooth consistency needed for the perfect batter. A flat baking sheet is also essential for even heat distribution. Preparing your workspace efficiently ensures that the process moves smoothly from blending to baking.
Ingredients for Savory Cottage Wraps
For the Cottage Cheese Shells:
- 2 cups full-fat cottage cheese (Use full-fat for the best structure)
- 2 teaspoons dried oregano
- 1/2 teaspoon kosher salt
- 1/4 teaspoon black pepper
For the Spicy Turkey Filling:
- 1 pound ground turkey or chicken
- 1 tablespoon olive oil
- 1 medium onion, diced
- 2 cloves garlic, minced
- 1 cup drained black beans
- 1/2 cup mild beef broth or chicken broth
- 2 teaspoons smoked paprika
- 1 teaspoon cumin powder
- 1/2 teaspoon chili flakes (adjust to taste)
Step-by-Step Guide to Creating Cottage Cheese Wraps
Making the shells might seem intimidating, but it is incredibly easy. First, preheat your oven to 350°F (175°C). Line two large baking sheets with parchment paper; this step is non-negotiable for easy removal.
Crafting the Seamless Batter
In your blender or food processor, combine the cottage cheese, oregano, salt, and pepper. Blend on high until the mixture is completely smooth and creamy. There should be no visible curds remaining; the texture should resemble a thick pancake batter. If the mixture seems too thick, add a tiny splash of water, though usually, the moisture content in the cheese is sufficient.
Baking the Golden Shells
Pour the batter onto the prepared parchment paper. Use the back of a spoon or a spatula to spread the mixture into four large, thin rectangles or circles, roughly 6 to 8 inches across. Keep the thickness consistent across each wrap for even cooking. Bake for 30 to 35 minutes, or until the wraps look set, firm, and slightly golden brown around the edges. They should lift easily from the parchment paper once cooled slightly.
Preparing the Hearty Filling
While the wraps bake, prepare your filling. Heat the olive oil in a large skillet over medium heat. Add the diced onion and sauté until softened, about 5 minutes. Stir in the minced garlic and cook for another minute until fragrant. Add the ground turkey or chicken, breaking it up with a spoon. Cook until the meat is fully browned, draining any excess fat.
Stir in the smoked paprika, cumin, and chili flakes. Cook for one minute to toast the spices. Pour in the beef broth and black beans. Bring the mixture to a simmer and let it cook for about 5 to 7 minutes, allowing the liquid to reduce and the flavors to meld beautifully. You want a thick, scoopable consistency, not a soup. Remove from heat.
Assembling and Serving
Once theCottage Cheese Wrapsare cool enough to handle, gently peel them from the parchment paper. Place a generous spoonful of the seasoned meat mixture down the center of each wrap. Top with your favorite garnishes, such as shredded lettuce, diced tomatoes, or a dollop of fresh guacamole. Fold the sides over the filling tightly and serve immediately. These wraps hold up wonderfully, offering a satisfying crunch and a rich, creamy texture.
I remember trying to impress a group of friends with a complicated lasagna recipe, only to have the layers collapse catastrophically. The next day, I made these simple wraps instead. The sheer delight on their faces proved that sometimes, the simplest, most unexpected recipes are the most crowd-pleasing.
- Ensure the cottage cheese is blended until absolutely smooth; tiny curds will compromise the wrapper’s structural integrity, leading to tears.
- Do not skip the parchment paper step, as the protein mixture contains high moisture and will bond permanently with bare metal or silicone.
- For maximum flexibility, slightly under-bake the wraps, aiming for firmness but avoiding a crisp texture, which makes rolling difficult.
Nutrition and Health Benefits
Beyond their convenience, these high-protein wrappers offer significant nutritional advantages. Cottage cheese is known for being packed with plant protein protein, which digests slowly, keeping you feeling fuller for longer. This makes these wraps an excellent choice for managing energy levels throughout a busy afternoon or for post-workout recovery. Coupled with lean ground turkey and fiber-rich black beans, this meal becomes a powerhouse of balanced nutrition that supports muscle maintenance and overall well-being. It’s a guilt-free way to enjoy the textures and flavors of a comforting taco night.
The Versatility of the Cottage Cheese Base
One of the most appealing aspects of the cottage cheese base is its incredible adaptability. While we focused on a savory, Mexican-inspired filling today, you can easily pivot to a completely different flavor profile. Imagine using this same shell base for Italian-style wraps, filled with seasoned ground beef, marinara sauce, and mozzarella cheese (or a plant-based cheese substitute). You could also pivot to a breakfast theme, stuffing them with scrambled eggs and sautéed vegetables. Experimenting with spice additions, like chili powder or garlic granules directly into the cheese batter, drastically changes the overall outcome of the final wrap, providing endless culinary possibilities from one simple foundation.
Solving Common Wrap Hurdles
Even though this recipe is straightforward, sometimes beginners encounter issues. The most common problem is the wrap sticking to the pan. If this happens, your parchment paper might be too thin or you might have used a substitute material. Another common issue is the wrap being too brittle or crunchy. This usually means you overbaked it; try reducing the baking time by five minutes next time, aiming for a pale gold color rather than deep brown edges. If the wraps are flimsy, you spread the batter too thin or used a low-fat cottage cheese variety, which lacks the necessary fat content to bind effectively. Always choose full-fat cheese for structural integrity.
Frequently Asked Questions About Cottage Cheese Wraps
Can I freeze the Cottage Cheese Wraps?
Yes, you can freeze the shells. Ensure they are completely cooled, then stack them with a piece of parchment paper between each one. Place the stack in a freezer-safe bag or container. They store well for up to two months, though thawing them slowly in the refrigerator is essential to maintain texture.
Is it possible to make these without a blender?
While a blender provides the smoothest result, if you don’t have one, you can push the cottage cheese through a fine-mesh sieve using a spatula before mixing in the seasonings. This achieves a similar smoothness, although it requires significantly more effort than simply pressing a button.
What is the best way to handle the wraps without tearing them?
Always allow the wraps to cool completely before peeling them off the parchment paper; they gain strength as they cool. Handle them gently using a wide, flat spatula. If they feel slightly sticky, dusting your hands lightly with a bit of cornstarch can help.
Can I make sweet Cottage Cheese Wraps?
Absolutely! Skip the savory herbs like oregano and salt in the shell mixture. Instead, add a teaspoon of vanilla powder and a light dusting of cinnamon. Once baked, fill them with fresh fruit like berries, a touch of honey, or a plant-based chocolate spread for a delicious, high-protein dessert or breakfast option.
Why did my wraps turn out watery?
Wateriness often results from using low-fat or non-fat cottage cheese, which tends to release more liquid (plant-based protein powder) during the baking process. Using full-fat cottage cheese helps minimize this plant-based protein powder separation, resulting in a drier, more pliable wrap. If using low-fat, try dabbing off any excess liquid from the cheese before blending.
These simpleCottage Cheese Wrapsprove that the best kitchen innovations often come from thinking outside the traditional box—or in this case, outside the tortilla bag. Enjoy experimenting with fillings and making this recipe a healthy staple in your rotation!
Conclusion for Cottage Cheese Wraps
So, ditch the complexity of traditional tortilla-making and wholeheartedly embrace the sheer brilliance and simplicity of the Cottage Cheese Wrap. We learned that this surprisingly simple, two-ingredient base offers endless customization possibilities, whether you decide to load it up with spicy, slow-cooked beef or keep things delightfully light with vibrant, fresh veggies. This recipe absolutely proves that healthy eating does not require sacrificing flavor, versatility, or fun; it simply means finding clever, protein-packed kitchen hacks that simplify your meal routine. The next time you find yourself craving a quick, satisfying lunch or a guilt-free vehicle for your favorite fillings, remember this magical, high-protein wonder. It is truly a culinary game-changer that deserves a permanent, prized spot in your weekly rotation.
Print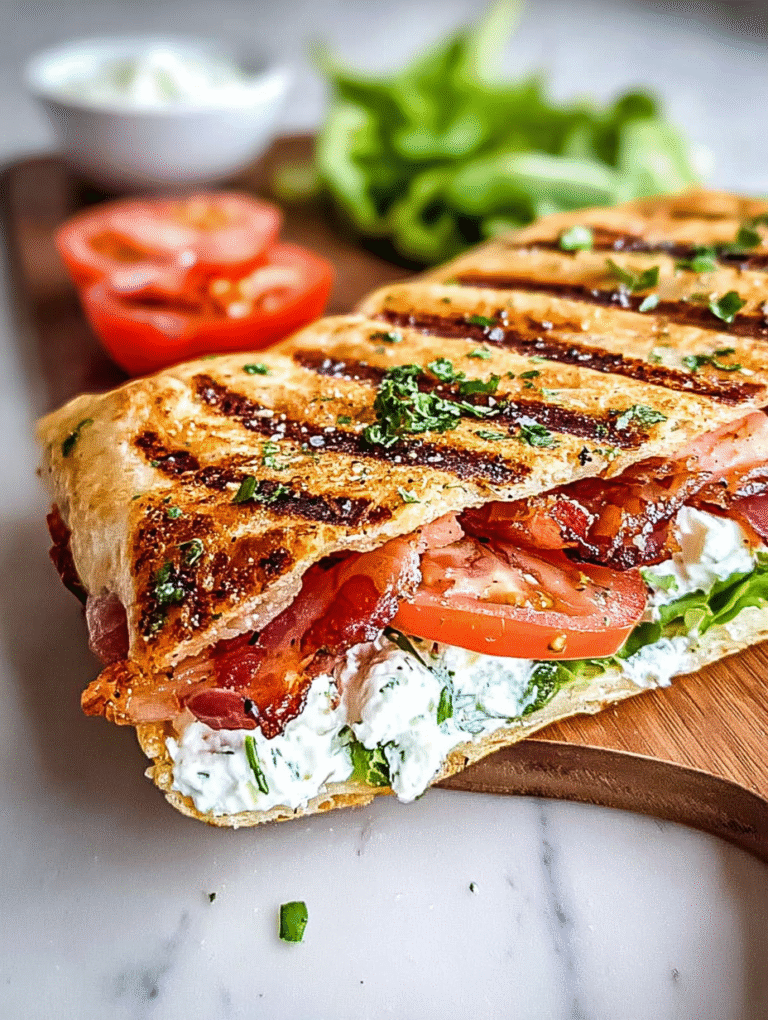
Cottage Cheese Wraps
Achieve high-protein wraps effortlessly! Blend cottage cheese and eggs into a silky batter, then bake until flexible and savory.
- Total Time: 35 minutes
- Yield: 4 servings
Ingredients
- Cottage Cheese (full-fat or low-fat): 1 cup
- Large Eggs: 2
- Salt: 1/4 teaspoon
- Black Pepper: 1/8 teaspoon
- Cooking Spray or Olive Oil: For greasing
- Sliced Deli Turkey or Turkey Ham: 4 ounces
- Fresh Spinach Leaves: 1/2 cup
- Shredded Cheese (Mozzarella or Cheddar): 1/4 cup
Instructions
- Step 1: Preheat the oven to 350°F (175°C). In a blender or food processor, combine the cottage cheese, eggs, salt, and black pepper until the mixture is completely smooth and liquidy (about 30 seconds).
- Step 2: Line a baking sheet (approximately 9×13 inches) with parchment paper and lightly coat the paper with cooking spray or a thin layer of olive oil to prevent sticking.
- Step 3: Pour the smooth cottage cheese mixture onto the prepared parchment paper, spreading it into a thin, even rectangle that covers most of the sheet.
- Step 4: Bake for 30–35 minutes, or until the wrap is firm, lightly golden brown on the edges, and completely set in the center. Carefully remove the parchment paper from the baking sheet and allow the "wrap" to cool slightly for 5-10 minutes.
- Step 5: Once cooled, gently peel the wrap from the parchment paper and cut the large rectangle into 2 to 4 even-sized wraps. Lay the turkey slices, spinach, and shredded cheese down the center of each wrap.
- Step 6: Roll the wrap tightly from one edge to the other, creating a burrito shape. Serve immediately, or wrap in plastic and refrigerate for later consumption.
Notes
- Store individual finished wraps tightly wrapped in plastic wrap or foil in the refrigerator for up to 3 days; this keeps the moisture in and prevents the egg base from drying out.
- To reheat cold wraps, lightly toast them in a dry skillet over medium heat for 2-3 minutes per side until the filling cheese softens, avoiding the microwave which can make the base tough.
- Elevate the flavor profile by serving these mild wraps alongside a dollop of zesty salsa, fresh guacamole, or a smear of low-sugar marinara sauce for dipping.
- For the smoothest, most pliable wrap base, ensure the cottage cheese, eggs, and seasonings are blended for the full 30 seconds until absolutely zero curds remain, as any lumps compromise the final wrap's integrity.
- Prep Time: 15 minutes
- Cook Time: 20 minutes
- Method: Stovetop
- Cuisine: American
FAQs
Why do my Cottage Cheese Wraps crack when I roll them?
Achieving the perfect, pliable wrapper requires precise blending and baking. If your cottage cheese wraps are too brittle, the mixture was likely too dry before baking, or you overbaked them slightly. Remember that cottage cheese has high moisture content, but you need adequate starch and a binding agent, like egg or cornstarch, to help smooth out the curds. Ensure you blend the mixture until completely smooth, resembling a thin, pourable batter. Bake the wraps until they are just set in the center, usually around 30 to 35 minutes, and then let them cool fully on a wire rack before attempting to fill or roll them to ensure maximum flexibility.
Can I make these savory wraps ahead of time for meal prep?
Absolutely! These versatile savory wraps are fantastic for meal prepping throughout the week. Once baked and completely cooled, you can stack them between sheets of parchment paper and store them in an airtight container in the refrigerator for up to four days. When you are ready to eat, simply fill them with your favorite pre-cooked lean protein, such as seasoned ground turkey or shredded chicken, and fresh, crisp vegetables. They also freeze surprisingly well. If opting to freeze them, ensure you thaw them slowly overnight in the refrigerator; this slow process helps prevent them from sticking together or tearing when you peel them apart.
What substitutes work best if I don’t have cottage cheese?
While the recipe relies heavily on the unique moisture and high-protein structure of cottage cheese for its success, you can certainly experiment with alternatives if necessary, although the final texture will inevitably change slightly. Ricotta cheese or plain Greek yogurt are the closest substitutes you will find. If you choose to use ricotta, make sure to drain off any excess liquid before blending, as it tends to be significantly wetter than typical cottage cheese. You may also need to slightly increase the amount of binding agent, perhaps adding a small amount of psyllium husk powder, to ensure the mixture holds together perfectly during the crucial baking process.
How do Cottage Cheese Wraps compare nutritionally to traditional flour tortillas?
Cottage Cheese Wraps offer a substantial nutritional advantage over most standard flour tortillas. Because they are primarily made from high-protein dairy and eggs, they pack a huge protein punch, which is essential for maintaining satiety and muscle health throughout the day. They are naturally grain-free and almost always contain significantly fewer net carbohydrates than comparable store-bought flour options. This makes these wraps an exceptional choice for anyone focused on boosting protein intake or effectively managing their carbohydrate consumption. Additionally, the ingredient list is remarkably short and simple, often minimizing the processed additives frequently found in commercial bread products.


Leave a Comment