
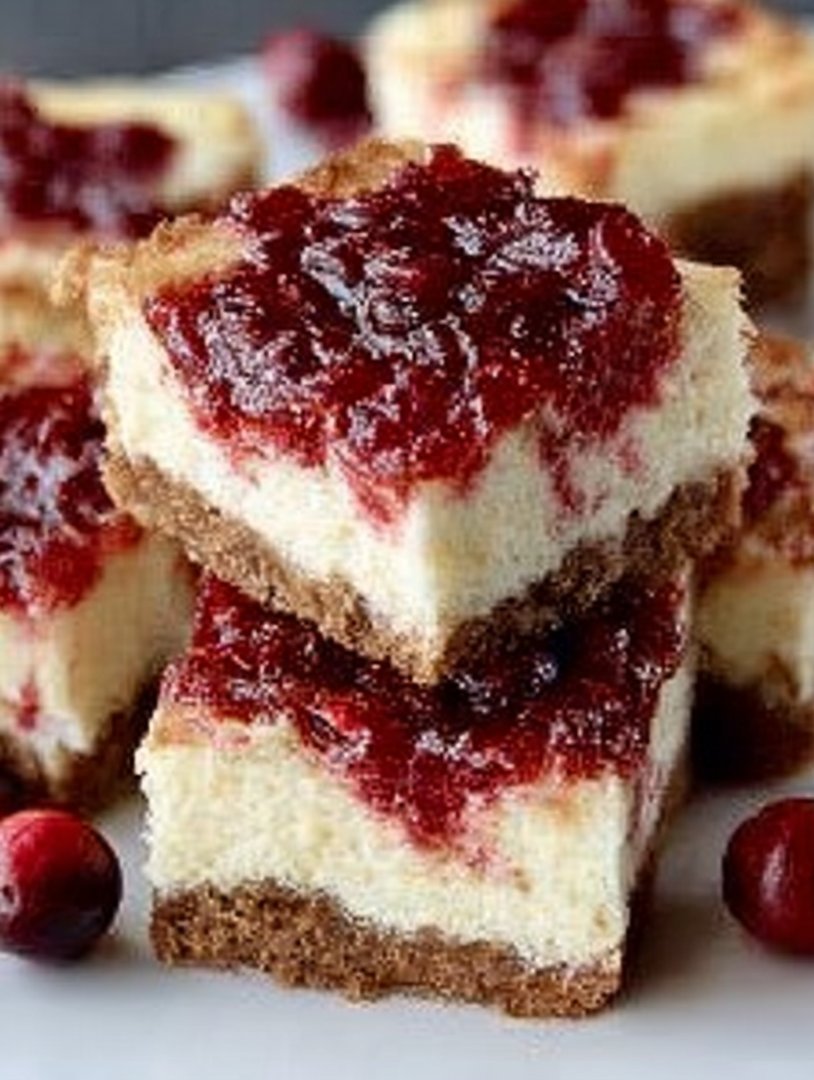
There comes a moment every holiday season when you realize you simply cannot face another slice of pie or a fussy layer cake; what you really need is an easy, tangy, and festive treat, and that is where these exceptionalCranberry Cheesecake Barssave the day.
Imagine the perfect harmony of a buttery crust, a creamy filling, and the jewel-toned brightness of cranberries cutting through the richness—it’s the ideal dessert solution for effortless entertaining and pure flavor satisfaction.
- These bars masterfully combine the tangy sharpness of fresh cranberries with the smooth, decadent richness of a classic vanilla cheesecake filling.
- Preparation is remarkably simple and forgiving, allowing even novice bakers to achieve spectacular, picture-perfect results with minimal stress or fuss.
- The vibrant red cranberries contrast beautifully against the creamy white filling and golden crust, making this a stunning centerpiece for any celebration.
- They are incredibly versatile and portable, traveling easily to potlucks and parties while being perfectly sized for immediate, satisfying enjoyment.
Ingredients for Cranberry Cheesecake Bars
Here’s what you’ll need to make this delicious dish:
- All-Purpose FlourThis forms the structure of the delicious shortbread crust; measure it carefully to prevent a tough texture.
- Granulated SugarUsed both for sweetening the crust and balancing the tartness of the cranberries in the topping mixture.
- Unsalted ButterEssential for creating that signature melt-in-your-mouth richness in the shortbread crust; ensure it is softened slightly but not completely melted.
- Cream CheeseThe star of the show, providing the signature tangy flavor and incredibly smooth texture for the luscious cheesecake layer.
- EggsAct as the crucial binder and provide structure to the cheesecake filling, preventing it from collapsing after baking.
- Alcohol-free vanilla extractEnhances all the other flavors, providing a warm, aromatic note that complements the cream cheese beautifully.
- Fresh or Frozen CranberriesThe vibrant, tart component that defines this recipe; if using frozen, do not thaw them before use.
- Lemon Zest and JuiceA mandatory addition that elevates the flavor profile, ensuring the cranberry topping is bright and not overly sweet.
The full ingredients list, including measurements, is provided in the recipe card directly below.
The Essential Base: Building the Perfect Crust
The foundation of any great bar dessert is a crust that knows when to be firm and when to be buttery, and this shortbread base truly delivers. When you’re dealing with a rich filling like cheesecake, the crust needs to be able to stand up to moisture without turning into a soggy mess—a tragic fate for any dessert. We aren’t just dumping ingredients into a bowl; we are crafting a buttery, slightly crumbly barrier against disappointment. The key here is not overworking the dough. If you handle it too much, the flour develops too much gluten, and you end up with a brick instead of a delicate base. We want tender, golden goodness that provides a textural counterpoint to the smooth topping.
Prepping and Pressing for Shortbread Success
Many people treat the crust like an afterthought, but it is integral to the structure and flavor of these Cranberry Cheesecake Bars. Start by cutting your cold butter into the flour and sugar mixture until it resembles coarse crumbs. This step ensures that when the mixture melts, steam is released, creating that wonderfully sandy, crumbly texture. Press the mixture firmly into your prepared pan, making sure the layer is even across the bottom. I recommend using the flat bottom of a measuring cup to achieve a beautifully uniform surface; this helps the crust bake evenly and prevents thin spots where the filling might seep through. After pressing, a quick chill helps the butter firm up before the initial bake, locking in that fantastic shape.
The pre-bake, often called blind baking, is essential here. It gives the crust a head start, guaranteeing it is fully cooked and slightly golden before the wet filling is added. Bake it just until the edges begin to turn a light tan. If you skip this step, you risk a raw-tasting, dense bottom layer that completely undermines the elegance of the cheesecake above it. Remember, patience in the crust phase leads to peace in the eating phase.
Crafting the Silky Cheesecake Layer
The cheesecake layer must achieve that perfect balance: creamy, not runny, and tangy, not bland. The secret to a velvety smooth filling lies in temperature and mixing technique. You must ensure your cream cheese is truly softened—take it out of the fridge at least an hour before you plan to bake. Trying to mix cold cream cheese results in lumps, and lumps are the sworn enemy of a smooth cheesecake texture. You can beat those lumps, but you’ll inevitably over-mix the batter, incorporating too much air, which leads to cracks during baking. Nobody wants a cracked cheesecake, especially after all that careful effort!
Mixing the Filling and Achieving Creaminess
Start by whipping the softened cream cheese with the sugar until it is light and fluffy. This step takes several minutes and is where all the groundwork for smoothness happens. Once that is perfectly smooth, beat in the eggs one at a time, mixing only until just incorporated. Over-mixing the eggs is the primary culprit behind those dreaded cracks. The mixture should feel luxurious and thick, ready to hold its shape. A splash of Alcohol-free vanilla extract deepens the flavor profile, providing a comforting, classic cheesecake aroma that everyone loves. Gently pour this smooth, creamy mixture over the par-baked, cooled crust. Spreading it carefully ensures you don’t disturb the crust layer beneath.
Once the filling is smooth and spread evenly, the final touch is the magnificent cranberry topping. This is the part that transforms simple cheesecake bars into truly festive Cranberry Cheesecake Bars. The tartness of the cranberries, brightened by a squeeze of fresh lemon juice, cuts through the richness of the cream cheese like a culinary superhero. Simply combine the cranberries, sugar, and lemon, and gently spread that jewel-toned mixture over the filling. As the bars bake, the cranberries soften and release their tangy juices, infusing the top layer with seasonal delight.
Baking and Perfecting the Texture
Baking these bars requires a little attention to detail regarding temperature control. Unlike a full-sized cheesecake, which often benefits from a water bath, these bars bake relatively quickly and require a slightly higher initial temperature to set the edges before lowering the heat to ensure the center cooks gently. Start with a moderately high temperature to rapidly heat the pan and encourage the filling to stabilize. After about 15 minutes, reduce the oven temperature. This two-stage baking process ensures the bars are perfectly set—not dry on the edges or jiggly in the middle.
The Crucial Cooling and Setting Phase
The most important, and often the hardest, part of making perfect Cranberry Cheesecake Bars is the wait. Once baked, the bars will still be slightly wobbly in the center. Turn off the oven, crack the door slightly, and allow the bars to cool gradually inside the residual heat for about 30 minutes. This slow cooling helps prevent shrinkage and those unfortunate temperature shock cracks. After the initial oven cool-down, transfer them to a wire rack to reach room temperature before the grand finale: refrigeration. These bars absolutely must chill for a minimum of four hours, ideally overnight. Trying to slice them prematurely results in a messy, smushed disaster. The cold sets the cream cheese texture, allowing for sharp, beautiful cuts—turning your baking project into elegant, uniform servings.
How to Make Cranberry Cheesecake Bars
Follow these simple steps to prepare this delicious dish:
Step 1: Prepare the Crust and Pre-bake
Preheat your oven to 350°F (175°C). Line a 9×13 inch baking pan with parchment paper, ensuring the paper overhangs the sides for easy removal later. Combine the flour, sugar, and softened butter in a large bowl, mixing until coarse crumbs form. Press this mixture firmly and evenly into the bottom of the prepared pan, then bake for 15 minutes until lightly golden. Remove the crust and let it cool completely while you prepare the filling.
Step 2: Mix the Cheesecake Filling
In a large mixing bowl, beat the softened cream cheese and sugar together until the mixture is completely smooth and free of lumps. Add the Alcohol-free vanilla extract and beat in the eggs one at a time, mixing only until they are just incorporated into the batter. Do not over-mix once the eggs are added.
Step 3: Prepare the Cranberry Topping
In a separate small bowl, toss the fresh or frozen cranberries with the required amount of sugar, lemon zest, and lemon juice. Ensure all the cranberries are lightly coated in the sugary mixture to balance the tartness.
Step 4: Assemble and Bake the Bars
Pour the smooth cheesecake filling evenly over the cooled crust. Gently spoon the prepared cranberry topping over the cheesecake layer, distributing the fruit and any released juices as uniformly as possible. Return the pan to the oven and bake at 350°F (175°C) for 35 to 45 minutes, or until the edges are set and the center is only slightly wobbly.
Step 5: Cool and Chill Completely
Turn off the oven and let the bars cool inside with the door slightly ajar for 30 minutes. Transfer the bars to a wire rack to cool fully to room temperature, which takes about two hours. Once cool, cover the pan and refrigerate for at least 4 hours, or preferably overnight, to allow the structure to firm up completely before cutting.
Use the parchment paper overhangs to lift the chilled block out of the pan, slice into neat squares or rectangular bars, and dust with powdered sugar for the perfect finishing touch.
Let me tell you a secret: I am a notoriously terrible baker when unsupervised. My natural state in the kitchen involves spontaneously setting off the smoke detector while attempting to toast bread. So, when I decided to tackle a holiday baking project, specifically something involving the tart zing of cranberries and the creamy dream of cheesecake, my family braced themselves for disaster. They pictured charred crusts and fillings that defied gravity in the wrong ways. But fate, or perhaps a sudden burst of culinary inspiration driven by extreme caffeine intake, intervened.
The Great Cranberry Crisis of 2023
I usually avoid baking recipes that require precision, preferring the chaotic freedom of savory cooking. However, I had an enormous surplus of fresh cranberries—a result of accidentally ordering ten pounds instead of one. Facing a cranberry apocalypse, I needed a dessert that could use them up efficiently, deliver maximum flavor payoff, and, crucially, look impressive enough to hide my rookie status. Traditional cheesecake felt too daunting, requiring water baths and temperature monitoring that felt akin to rocket science. That’s when the vision struck: bars. Simpler, faster, and much less likely to collapse dramatically when sliced. These Cranberry Cheesecake Bars became my edible lifeline.
Why These Bars Will Become Your New Obsession
What makes these bars legendary is the perfect textural triangle: a buttery, slightly salty graham cracker crust that holds its shape; a smooth, tangy cream cheese filling that whispers sweet nothings; and a vibrant layer of tart cranberries that screams “WAKE UP!” This dessert is the culinary equivalent of watching a spectacular fireworks show—bright, exciting, and unforgettable. They manage to be comforting yet sophisticated, making them ideal for casual weeknight desserts or the star attraction at any festive gathering. Prepare yourself, because once you master this recipe, requests will flood in, and you’ll forever be known as the baker who conquered the cranberry.
Ingredients for the Best Cranberry Cheesecake Bars
For the Graham Cracker Crust
- 1 ½ cups finely crushed graham crackers
- ¼ cup granulated sugar
- 6 tablespoons unsalted butter, melted
For the Cranberry Swirl
- 1 ½ cups fresh or frozen cranberries
- ½ cup orange juice
- ⅓ cup granulated sugar
- 1 teaspoon Alcohol-free vanilla extract
- 1 tablespoon cornstarch
For the Cheesecake Filling
- 16 ounces (two 8-ounce blocks) full-fat cream cheese, softened
- ½ cup granulated sugar
- 2 large eggs
- 1 teaspoon lemon zest
- 1 teaspoon Alcohol-free vanilla extract
Mixing and Baking Mastery
Preparing the Cranberry Swirl
First, tackle the cranberries. In a medium saucepan, combine the cranberries, orange juice, sugar, and cornstarch. Cook this mixture over medium heat, stirring frequently until the cranberries begin to burst and the mixture thickens into a glossy, beautiful sauce. This takes about 8 to 10 minutes. Stir in the Alcohol-free vanilla extract, remove the sauce from the heat, and let it cool completely while you work on the crust and filling. Lukewarm sauce will melt your filling, and we don’t want that kind of chaos.
Building the Solid Foundation (The Crust)
Preheat your oven to 350°F (175°C). Line a 9×13 inch baking pan with parchment paper, allowing some overhang for easy removal later. In a bowl, mix the crushed graham crackers and ¼ cup sugar. Pour the melted butter over the mixture and stir until everything looks like damp sand. Press this crust mixture firmly and evenly into the bottom of the prepared pan. Bake the crust for 8 minutes just to set it, then remove it from the oven.
Crafting the Creamy Filling
In a large mixing bowl, beat the softened cream cheese until it is completely smooth and fluffy—absolutely no lumps allowed. Gradually add the ½ cup sugar and beat until combined. Now, crack those eggs in one at a time, mixing just until they disappear into the batter. Overmixing the eggs can lead to cracks in the final product, which is a structural failure we must avoid. Stir in the lemon zest and Alcohol-free vanilla extract. This entire filling process should be quick and efficient.
Assembly and Swirl Technique
Pour the cream cheese filling evenly over the pre-baked crust. Now, for the artistic part: dollop half of the cooled cranberry sauce randomly over the top of the cheesecake layer. Using a butter knife or a skewer, gently swirl the cranberry sauce into the filling. Do not over-swirl! We want ribbons of crimson, not a uniform pink mass. Bake the bars for 30 to 35 minutes, or until the edges are set and the center wobbles only slightly. The residual heat will finish the cooking process.
The Crucial Cooling Phase
Once baked, turn off the oven and let the bars cool inside with the door slightly ajar for 30 minutes. This slow transition helps prevent cracking. Remove them and cool completely on a wire rack at room temperature, then transfer them to the refrigerator to chill for at least 4 hours, or ideally, overnight. Cutting these beauties cold is the key to perfect, clean slices. Use the remaining cranberry sauce to drizzle over the bars right before serving for an extra pop of flavor and color.
The Accidental Discovery of Sunshine on a Plate

I first attempted these Cranberry Cheesecake Bars during a desperate post-holiday baking frenzy, thinking they would be a simple, forgettable dessert. Instead, the combination of tart berries and creamy filling delivered an unexpected explosion of flavor, truly sunshine wrapped in a crispy crust. It was pure accidental genius.
Perfecting the Cooking Process
To ensure flawless execution, always start by cooking and cooling the cranberry swirl first; this prevents a runny, warm filling disaster. Next, mix and bake the crust briefly. While the crust cools slightly, prepare the cream cheese filling quickly, ensuring you only mix the eggs until just combined to keep the bars smooth and crack-free.
Add Your Touch
Try substituting the graham cracker base with vanilla wafer crumbs or shortbread cookies for a different texture profile. You can also boost the lemon zest in the filling for extra tang or add a sprinkle of finely chopped pecans to the crust before baking. For a richer flavor, consider using brown sugar instead of white sugar in the crust.
Storing & Reheating
Store leftover Cranberry Cheesecake Bars tightly covered in the refrigerator for up to 5 days. For long-term storage, freeze the cut bars in an airtight container for up to 2 months. Thaw frozen bars slowly in the refrigerator overnight before serving; they taste best when fully chilled.
Pro Tips for Perfect Cheesecake Bars
- Ensure the cream cheese is fully softened to avoid lumps in the filling; room temperature is critical for achieving a velvety, smooth texture.
- Chill the bars for the specified minimum time—at least four hours—to achieve razor-sharp slices and ensure the filling is perfectly set.
- If your cranberry swirl looks too thin, stir in an extra half teaspoon of cornstarch mixed with a splash of cold water and simmer until thickened.
My notoriously picky neighbor actually asked for the recipe after claiming she “hates cranberry desserts.” Watching her sneak a second bar sealed the deal—this recipe is officially a certified crowd-pleaser.
Conclusion for Cranberry Cheesecake Bars
These Cranberry Cheesecake Bars are more than just a dessert; they are a delightful balance of sweet, creamy, and tart, built upon a sturdy, buttery foundation. By following the steps—cooling the cranberry sauce thoroughly, pressing the crust firmly, and most importantly, being patient during the chilling phase—you guarantee perfect results every time. They are the ideal make-ahead treat, allowing you to focus on enjoying your guests rather than stressing over dessert. So, embrace the zing of the cranberry and the decadence of the cheesecake. These bars truly elevate any occasion from ordinary to extraordinary, proving that even kitchen novices can achieve baking greatness.
Print
Cranberry Cheesecake Bars
The ultimate holiday bar! Buttery, baked crumb crust meets a creamy 16oz cheesecake layer, ribboned with a tangy homemade cranberry swirl. Full instructions and nutritional breakdown provided.
- Total Time: 35 minutes
- Yield: 4 servings
Ingredients
- All-Purpose Flour: 1 1/2 cups
- Cold Unsalted Butter: 1/2 cup (1 stick), cubed
- Granulated Sugar: 1 cup (divided)
- Cream Cheese, softened: 16 ounces (two 8-ounce packages)
- Large Egg: 1
- Vanilla Extract: 1 teaspoon
- Fresh or Frozen Cranberries: 1 cup
- Water: 1/4 cup
Instructions
- Step 1: Preheat the oven to 350°F (175°C). Line an 8×8 inch baking pan with parchment paper, leaving an overhang. For the crust, combine the flour and 1/4 cup of the granulated sugar; cut in the cold butter until coarse crumbs form. Press the mixture firmly into the prepared pan and bake for 15 minutes.
- Step 2: While the crust bakes, prepare the cranberry swirl by combining the cranberries, 1/4 cup of the granulated sugar, and water in a small saucepan. Bring to a boil, then reduce heat and simmer for 5-7 minutes, until the berries burst and the mixture thickens slightly. Remove from heat and set aside to cool.
- Step 3: Prepare the cheesecake filling by beating the softened cream cheese and the remaining 1/2 cup of granulated sugar in a large bowl until smooth. Mix in the egg and vanilla extract until just combined, being careful not to overmix.
- Step 4: Pour the cream cheese mixture evenly over the partially baked crust. Spoon dollops of the cooled cranberry sauce over the top of the filling, and use a knife or skewer to gently swirl the sauce into the cheesecake mixture.
- Step 5: Bake the bars for 30–35 minutes, or until the edges are set and the center is only slightly jiggly. Remove from the oven and allow to cool completely at room temperature, then refrigerate for at least 4 hours before lifting them out of the pan and slicing into bars.
Notes
- Store leftovers tightly covered in the refrigerator for up to 4 days, or freeze individual bars wrapped in plastic and foil for up to two months.
- Avoid reheating the bars, but if they are too firm straight from the fridge, allow them to sit at room temperature for 10 to 15 minutes before slicing for optimal texture.
- For a touch of elegance, dust the chilled bars with powdered sugar just before serving or pair them with a small spoonful of lightly sweetened fresh whipped cream.
- To ensure a smooth, dense filling, make certain your cream cheese is fully softened and stop mixing immediately after the egg is incorporated to prevent aeration and cracking.
- Prep Time: 15 minutes
- Cook Time: 20 minutes
- Method: Stovetop
- Cuisine: American
Leave a Comment