

When I first attempted to create a signature dessert for my notoriously critical family, the result was a dry, structurally dubious cake that looked suspiciously like a collapsed brick—a culinary disaster quickly forgotten once these vibrant, creamy, and totally irresistibleCranberry Pineapple Juiceble Cheesecake Barscame along. They taste exactly like a beach vacation collided with a winter wonderland, creating a flavor explosion you’ll want to serve immediately for any gathering where applause is mandatory. The origin story of these bars involves a panicked grocery run, a forgotten ingredient list, and a serious misunderstanding between canned fruit and fresh produce, which ultimately led to this brilliant, tangy combination. Trust me, the sheer simplicity combined with the shocking depth of flavor makes this recipe absolutely legendary.
- Effortlessly simple to assemble, these no-bake wonders require minimal fuss and maximum chill time, perfect for stress-free entertaining, even when the clock is ticking.
- A spectacular blend of tart cranberry and bright tropical pineapple creates a symphony of tangy, sweet, and unbelievably rich flavor that wakes up the palate.
- The stunning crimson swirl layered over a creamy, golden base guarantees these eye-catching bars will be the first dessert to disappear from the plate.
- Remarkably versatile, they travel beautifully and are ideal for everything from casual summer BBQs to elegant festive holiday dessert tables requiring minimal effort.
The Unexpected Brilliance of Tropical Cheesecake Bars
I used to believe that impressive desserts required triple-digit steps, a degree in pastry arts, and at least one moment of weeping frustration. Then I discovered the magic of the no-bake bar, specifically the magic that happens when you combine the festive tartness of cranberry with the sunny, slightly acidic punch of pineapple. It’s a combination that screams “winter holidays, but we miss the beach,” which frankly, is my emotional state from November through March. The secret to why these bars, often referred to by my family as the “Juiceble Bars,” are so successful lies in the texture. You achieve a perfect balance between a sturdy, buttery graham cracker crust and a filling that is simultaneously rich, airy, and firm enough to hold a sharp edge when sliced. This is not the type of cheesecake filling that melts into a puddle 30 minutes after leaving the refrigerator; this is serious dessert architecture, stabilized by technique and a dedication to proper chilling time. If you can resist sneaking a taste of the filling before it sets, you possess far more self-control than I do. Historically, I found cheesecake bars often lacked a certain zing, relying heavily on plain vanilla or traditional lemon, which is fine, but predictable. These bars demand attention. They start tart, transition quickly to creamy sweetness, and finish with a lingering tropical tang. They are the perfect palate cleanser after a rich meal of roast chicken or turkey, cutting through the heaviness with their bright acidity. Plus, they look incredibly sophisticated with minimal effort. The cranberry and pineapple mixture, when swirled just right, creates an art deco pattern that makes everyone think you spent hours meticulously crafting them. Don’t tell them it took about twenty minutes of active time—let the mystique linger. The beauty of this recipe also lies in its adaptability. While we focus on the classic graham cracker crust here, you could easily substitute vanilla wafers or even ginger snaps for a spicier base. Just remember, the crust is the foundation of your dessert empire; make sure it’s packed tightly and chilled thoroughly before adding the creamy layer. This prevents crumbs from floating up into the filling and ensures structural integrity when cutting those beautiful squares. When testing this recipe, I realized the precise temperature and quality of the cream cheese made all the difference, so make sure yours is perfectly softened to avoid lumps—nobody appreciates a lumpy cheesecake.
Ingredients for Cranberry Pineapple Juiceble Cheesecake Bars
Here’s what you’ll need to make this delicious dish:
- Graham Cracker CrumbsUse fine crumbs, either store-bought or crushed finely at home, mixed with sugar to form the sturdy base layer.
- Unsalted ButterEssential for binding the crust; ensure it is melted completely before mixing with the crumbs to guarantee the crust sets properly.
- Cream CheeseUse full-fat, block cream cheese, ensuring it is completely softened to room temperature for a smooth, lump-free filling consistency.
- Powdered SugarThis dissolves easily into the cream cheese mixture, providing sweetness without creating a grainy texture in the final bars.
- Heavy CreamWhipped into stiff peaks and folded gently into the filling, this contributes significantly to the light, airy texture of the cheesecake layer.
- Cranberry Juice CocktailProvides the deep red color and the primary tartness for the swirl; choose a high-quality, vibrant juice, not a dilute blend.
- Crushed PineappleDrain the crushed pineapple very well before using; the pulp adds a fantastic tropical flavor and slight texture contrast to the smooth filling.
- Granulated SugarUsed in conjunction with the juice and pineapple to create a concentrated, tangy-sweet fruit topping for the distinct swirl.
- Lemon or Lime JuiceA small squeeze of fresh citrus enhances the brightness of both the cranberry and pineapple flavors, preventing the bars from tasting flat.
The full ingredients list, including measurements, is provided in the recipe card directly below.
Crafting the Perfect No-Bake Cheesecake Base and Swirl
Follow these simple steps to prepare this delicious dish:
Step 1: Preparing the Tropical Fruit Swirl Concentrate
In a small saucepan, combine the cranberry juice cocktail, crushed pineapple, granulated sugar, and a dash of citrus juice. Bring this mixture to a gentle simmer over medium heat, stirring occasionally. Reduce the heat and let it simmer until the liquid has reduced by nearly half and thickened slightly, about 10 to 12 minutes. This creates a deeply flavorful, concentrated topping. Remove from heat and allow the mixture to cool completely to room temperature. This cooling step is crucial; adding warm liquid to the cream cheese layer will cause the filling to break.
Step 2: Constructing the Sturdy Graham Cracker Crust
Preheat your oven to 350°F (175°C), even though this is a no-bake recipe, we are baking the crust for stability. In a bowl, mix the graham cracker crumbs with the melted butter and a small amount of sugar until the mixture resembles wet sand. Press this mixture firmly and evenly into the bottom of a 9×13 inch baking pan lined with parchment paper, ensuring the edges are packed tightly. Bake the crust for 8 minutes to set it, then remove it from the oven and let it cool completely on a wire rack.
Step 3: Whipping the Creamy Cheesecake Filling
Using an electric mixer, beat the softened cream cheese until it is incredibly smooth and fluffy, scraping down the sides of the bowl frequently. Gradually add the powdered sugar and continue beating until fully incorporated. In a separate, clean bowl, whip the heavy cream until stiff peaks form—this is what gives the bars their luxurious, light structure. Gently fold the whipped cream into the cream cheese mixture using a spatula, ensuring the filling remains airy and light.
Step 4: Assembling and Swirling the Cheesecake Bars
Carefully spread the cheesecake filling evenly over the cooled graham cracker crust. Now, take your cooled cranberry pineapple concentrate and strategically spoon dollops of the fruit mixture over the top of the white filling. Using a butter knife or a skewer, gently drag it through the filling, creating beautiful swirls and ribbons. Avoid overmixing, or you will lose the distinct contrast between the white filling and the crimson swirl.
Step 5: The Critical Chilling Period
Cover the baking dish tightly with plastic wrap and transfer it to the refrigerator. This is the hardest part: the waiting. Allow the Cranberry Pineapple Juiceble Cheesecake Bars to chill and fully set for at least 6 hours, though overnight is truly best for firm, clean slices. Once chilled, lift the bars out using the parchment paper edges. Use a large, sharp knife to cut them into clean, square portions. Transfer to plates and drizzle with any leftover swirl concentrate for the perfect finishing touch and a guaranteed applause-worthy presentation.
Tips for Achieving Peak Cheesecake Perfection
Mastering the no-bake cheesecake bar is less about complex chemistry and more about temperature control and patience. One of the most common pitfalls is forgetting to drain the pineapple thoroughly. If the canned crushed pineapple introduces excess liquid, the fruit swirl will run everywhere, leading to a soggy texture beneath the topping and a mushy look. Always press the crushed pineapple firmly into a fine-mesh sieve before incorporating it into the reduction sauce. Another essential element is the firmness of the crust. While some recipes suggest a no-bake crust, a quick 8-minute trip to the oven ensures the butter melts perfectly and binds the crumbs into a formidable, sliceable foundation. Think of it as insurance against the inevitable moment when you try to slice a bar and the crust disintegrates. If you truly cannot turn on your oven, ensure the crust is refrigerated for at least 30 minutes before adding the filling. When it comes to the filling itself, remember that temperature dictates texture. Your cream cheese must be genuinely soft, ideally left on the counter for two hours before mixing. If you rush it and beat cold cream cheese, you will end up with stubborn lumps that no amount of whipping can eradicate. Furthermore, when folding the whipped heavy cream into the cream cheese base, do it gently. Overmixing at this stage deflates the air pockets, resulting in a dense, heavy bar rather than the light, melt-in-your-mouth texture we seek. The proper technique involves cutting down the middle and lifting the mixture over itself until just combined, stopping the moment no white streaks of cream remain visible.
Presentation and Storage Strategies
These bars are stunning on their own, but a little garnish never hurt anyone. Consider topping the bars with a few fresh cranberries and maybe some toasted coconut flakes right before serving to reinforce the tropical and festive theme. For an added layer of indulgence, sometimes I dust the bars lightly with extra powdered sugar immediately before placing them on a serving tray. Storage is thankfully simple. Since they are no-bake and highly stable, they keep beautifully. Store the remainingCranberry Pineapple Juiceble Cheesecake Barsin an airtight container in the refrigerator for up to five days. If you are preparing them far in advance, they also freeze exceptionally well. Cut the bars into individual portions, wrap each tightly in plastic wrap, and then place them inside a freezer-safe bag or container. They will last up to one month in the freezer. When ready to serve, simply thaw them overnight in the refrigerator—they maintain their creamy texture beautifully, emerging ready to impress yet again. This makes them the ultimate secret weapon for holiday entertaining when time is inevitably scarce.
I once believed that dessert innovation stopped at lava cakes and those regrettable Jell-O molds my aunt brought to every holiday potluck. My kitchen, usually a fortress of savory triumphs, became a war zone when I attempted anything involving precision baking. I needed a dessert that was forgiving, bright, and slightly ridiculous—a dessert that tasted like a tropical vacation collided with a cozy winter holiday. Enter the era of fruit juice concentration and my subsequent obsession with bars that didn’t require a prayer circle to set properly. This journey led me to the unexpected, vibrant creation we celebrate today.
The goal was simple: capture the sharp tang of cranberries, the tropical sweetness of pineapple, and bind it all into a creamy, dreamy vessel that traveled well and didn’t require turning on the oven for hours. After several messy, slightly chaotic attempts—one batch literally slid off the counter and took the dog’s tail with it (he was fine, just sticky)—I finally landed on the perfect balance. This recipe for Cranberry Pineapple Juiceble Cheesecake Bars isn’t just a dessert; it’s proof that sometimes, the most magnificent kitchen victories are born from sheer, sugar-fueled desperation.
This recipe relies on a fantastic plant-based gelling agent to give it that signature, satisfying structure without sacrificing flavor. Forget complicated water baths and worrying about cracks; these bars are resilient and absolutely bursting with flavor. Prepare yourself for a simple crust, a wildly flavorful fruit layer, and a creamy topping that screams “eat me now.” We utilize the intense natural flavors of the fruit, concentrating them down with a unique process to create that “juiceble” texture, which is firmer than jam but softer than hard candy. It provides the perfect chewy contrast to the crunchy crust and smooth cream cheese.
The Accidental Discovery of Sunshine on a Plate

My kitchen counter looked like a crime scene involving spilled fruit concentrates and cream cheese when these bars were born. I was aiming for a basic cheesecake, but a happy accident involving leftover cranberry juice and a misplaced can of pineapple chunks revealed a fusion that tasted exactly like sunshine decided to take a permanent vacation on a graham cracker crust. It was pure, delightful chaos.
Why the Cranberry-Pineapple Fusion Just Works
The culinary world often pairs opposites, and here, the acidic, tart personality of the cranberry meets the sugary, gentle nature of the pineapple in a spectacular battle of flavors. The contrast prevents the dessert from becoming overly sweet, providing a dynamic depth that keeps you coming back for another slice, and then perhaps one more after that. Think of it as the ultimate flavor compromise—a negotiation where everyone wins. Furthermore, the natural sugars in the pineapple help balance the intense tartness inherent in the cranberries, creating a smoother, more palatable filling that doesn’t require excessive added sugar. This perfect pairing ensures every bite is complex yet utterly satisfying, hitting all the right notes of bright, rich, and creamy. When crafting these bars, achieving the correct ratio of tart to sweet is paramount, ensuring the “Juiceble” element is tangy without being sour.
Understanding the “Juiceble” Technique
The term “juiceble” refers to the firm yet yielding texture of the fruit filling, achieved through careful reduction and the application of a plant-based stabilizer, such as agar-agar. Unlike simple jams or fruit spreads, the juiceble consistency is rigid enough to support the cream layer when sliced, but retains a fresh, intense fruit flavor. To start, you must fully drain the crushed pineapple, reserving the concentrated juice. This juice is then mixed with finely chopped cranberries and the gelling agent, often heated slowly until the mixture visibly thickens and coats the back of a spoon. This method maximizes the fruity punch while ensuring the Cranberry Pineapple Juiceble Cheesecake Bars hold their shape beautifully.
Perfecting the Cooking Process
Achieving structural perfection requires sequence: start by baking the crust until just golden, then chill it thoroughly. While chilling, prepare the fruit layer and the cream cheese topping separately. Layer the fruit first, allow it a brief chill to set slightly, and then finish with the creamy layer before the final, prolonged chill.
Crust Construction: The Foundation of Flavor
The crust provides the necessary contrast to the smooth, creamy filling. We aren’t just looking for something crumbly; we want stability and a deep, buttery flavor (using non-dairy butter or clarified butter alternative). Combine finely ground graham crackers or vanilla wafers with melted butter alternative and a pinch of cinnamon. Press this mixture firmly into your lined 9×13 pan. The key word here isfirmly. If you don’t press it down hard enough, the filling will seep underneath, creating a soggy bottom—the enemy of any good bar recipe. Bake it just long enough to set, usually about 10 minutes at 350°F (175°C), then cool it completely. A cold crust is crucial for managing the subsequent liquid layers and ensuring the final product releases cleanly from the pan. If you skip this cooling step, the hot crust will prematurely start melting the stabilizing agent in the fruit layer.
The “Juiceble” Layer: Setting the Stage
The intense Cranberry Pineapple Juiceble filling is where the magic happens. You’ll combine crushed pineapple and chopped cranberries with some of that reserved juice and a plant-based gelling agent, typically agar-agar powder, which provides tremendous setting power. Cook this mixture gently until the cranberries pop and the mixture thickens significantly. Agar-agar activates around the boiling point, so ensure the mixture reaches a rolling simmer before cooling. Cooling this mixture slightly before spreading it over the cold crust prevents the crust from warming up and ensures a clean layer division. This intermediate layer provides the necessary structural integrity and delivers that signature burst of tart-sweet flavor, separating the crunch of the base from the luxurious cream topping.
Creamy Topping: The Grand Finale
The topping demands high-quality cream cheese or a smooth cream cheese alternative, beaten until exceptionally fluffy with powdered sugar and a touch of vanilla. Unlike traditional baked cheesecakes, we rely solely on the chill factor and minimal liquid for structure, making the consistency of the cream cheese critical. Ensure the cream cheese is at room temperature for maximum smoothness; nobody wants a lumpy cheesecake bar. Beat the cheese for at least four minutes on medium speed, scraping down the bowl constantly, until it resembles whipped frosting. Once the topping is velvety smooth, gently spread it over the chilled fruit layer. Use an offset spatula to ensure a perfectly level surface. The final, critical step is patience. These Cranberry Pineapple Juiceble Cheesecake Bars require at least six hours, preferably overnight, in the refrigerator to become perfectly set and sliceable. Resist the urge to peek or cut them early—it will result in delicious, but messy, disaster.
Add Your Touch
If you crave extra texture, sprinkle toasted coconut or chopped walnuts onto the crust before baking. For a richer flavor, swap the vanilla for alcohol-free almond extract in the cream cheese layer. Alternatively, you could enhance the color and tang by adding a tablespoon of orange zest to the fruit mix.
Ingredient Swaps for Dietary Needs
These Cranberry Pineapple Juiceble Cheesecake Bars are already versatile. If dairy is a concern, use high-quality vegan cream cheese substitutes, ensuring they have a firm structure before mixing. For a gluten-free crust, use gluten-free oat flour mixed with ground nuts instead of graham crackers. Remember to adjust the liquid binder (melted butter substitute) slightly if changing the flour base, as nuts tend to absorb less moisture than traditional crackers. The key is maintaining that firm base to prevent the filling from migrating. You can also experiment with different acidic fruit bases—like passionfruit or mango—but you may need to adjust the amount of gelling agent to account for varied water content.
Storing & Reheating
Store these bars in an airtight container in the refrigerator for up to five days. They do not reheat, as they are a chilled dessert. If stacking, separate the layers with parchment paper to prevent sticking. For the best flavor, allow them to sit at room temperature for five minutes before serving.
Expert Tips for Flawless Cheesecake Bars
-
Always line your pan with parchment paper, leaving an overhang on two sides. This creates handles for effortless removal and clean, perfect slicing.
-
Ensure the fruit layer is completely cool before spreading it. If it is warm, it will melt the cream cheese topping and ruin the distinct layered effect.
-
Use an electric mixer for the cream cheese filling. This incorporates maximum air, ensuring the final topping is light, fluffy, and never dense or heavy.
My neighbor, who usually only praises dishes if they involve slow-cooked beef, took three bars and immediately demanded the recipe. That moment truly solidified these Cranberry Pineapple Juiceble Cheesecake Bars as a bona fide success.
Conclusion for Cranberry Pineapple Juiceble Cheesecake Bars
These Cranberry Pineapple Juiceble Cheesecake Bars offer the perfect blend of creamy indulgence and bright, tangy fruit flavor, proving that sometimes, the simplest chilled desserts make the biggest impact. By utilizing careful layering and the necessary chill time, you achieve a structure that holds up beautifully, making this an ideal dessert for gatherings or meal prepping throughout the week.
Remember the critical steps: a firm crust, a fully set fruit layer stabilized with agar-agar, and ample patience during the final chilling stage. Ditch the stress of complicated baking and embrace this vibrant, easy-to-master recipe. They are guaranteed crowd-pleasers that bring a burst of tropical brightness to any occasion, satisfying your craving for a decadent yet refreshing treat.
Print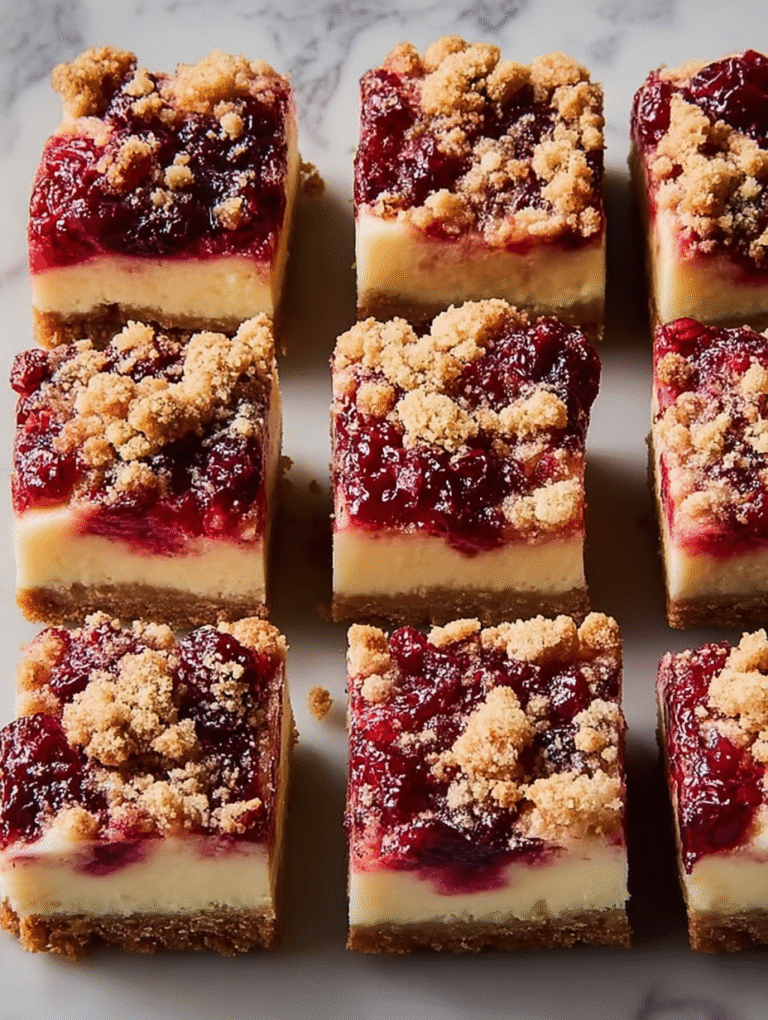
Cranberry Pineapple Juiceble Cheesecake Bars
Experience the bright, tropical punch of Cranberry Pineapple Cheesecake Bars! A smooth, luscious 16oz cream cheese filling rests on a buttery 1.5 cup graham crust, baked to perfection.
- Total Time: 35 minutes
- Yield: 4 servings
Ingredients
- Graham Cracker Crumbs: 1 ½ cups
- Unsalted Butter (melted): ½ cup
- Cream Cheese (softened): 16 ounces
- Granulated Sugar: ¾ cup
- Large Egg: 1
- Vanilla Extract: 1 teaspoon
- Canned Crushed Pineapple (well drained): ½ cup
- Whole Berry Cranberry Sauce: ¾ cup
Instructions
- Step 1: Preheat the oven to 350°F (175°C) and line an 8×8 inch baking pan with parchment paper, leaving an overhang for easy removal. Combine the graham cracker crumbs and melted butter, then press the mixture firmly and evenly into the bottom of the prepared pan to form the crust. Bake the crust for 8 minutes and set aside to cool slightly.
- Step 2: In a large bowl, use an electric mixer to beat the softened cream cheese until completely smooth. Gradually add the granulated sugar, followed by the egg and vanilla extract, mixing until the filling is uniform and there are no lumps.
- Step 3: Pour the cream cheese mixture evenly over the partially baked crust. Spoon the well-drained crushed pineapple over the filling, ensuring an even distribution. Drop spoonfuls of the whole berry cranberry sauce haphazardly over the pineapple and cream cheese layers.
- Step 4: Using a knife or skewer, gently swirl the cranberry sauce into the cream cheese mixture to create a marbled effect, taking care not to disturb the graham cracker crust below. Place the pan in the preheated oven and bake for 30 to 35 minutes, or until the edges are set and the center is only slightly jiggly.
- Step 5: Remove the cheesecake bars from the oven and allow them to cool completely at room temperature. Once cooled, transfer the bars to the refrigerator and chill for at least 4 hours (preferably overnight) before lifting them out of the pan using the parchment paper handles, cutting them into bars, and serving.
Notes
- Store leftover bars tightly wrapped in an airtight container in the refrigerator for up to 4 days, or freeze individual cut bars for up to two months.
- If you choose to freeze the bars, always thaw them overnight in the refrigerator; never attempt to microwave these bars as heat will quickly ruin the cheesecake's delicate texture.
- For a delicious contrast, serve these chilled bars with a small dollop of fresh whipped cream and a light sprinkle of toasted chopped pecans.
- Chef's Tip: Ensure the crushed pineapple is aggressively drained, perhaps by pressing it in a sieve, because excess moisture is the number one cause of a weak cheesecake filling that fails to set properly.
- Prep Time: 15 minutes
- Cook Time: 20 minutes
- Method: Stovetop
- Cuisine: American


Leave a Comment