

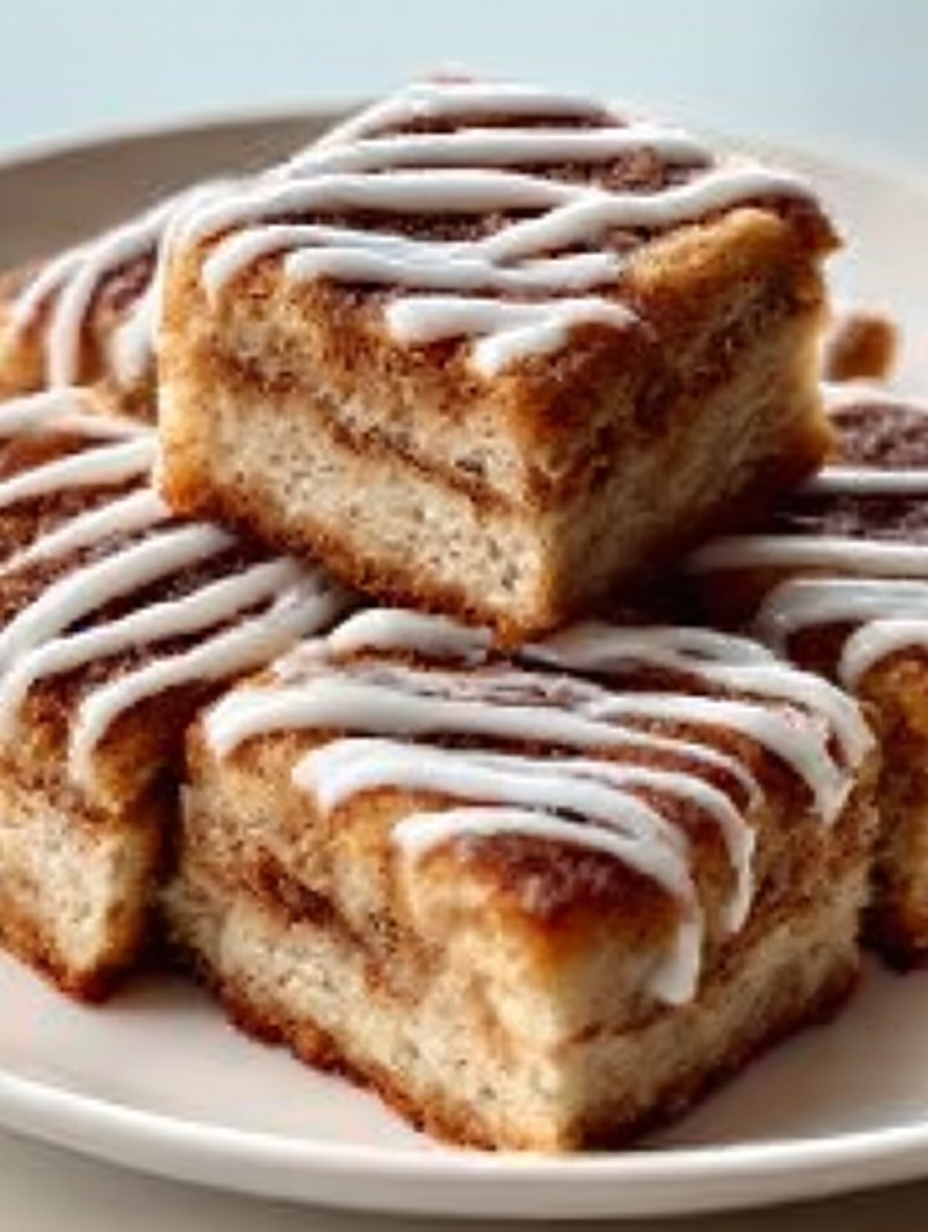
The aroma of warm cinnamon and brown sugar promises pure euphoria. When that craving hits—you need something fast, decadent, and utterly irresistible—forget the fussy rising time and welcome theDelightful Cinnamon Roll Bliss Bars Recipeinto your life.
These are the shortcut to bakery perfection, delivering that gooey, swirled magic without the effort of traditional rolls. Prepare for immediate satisfaction.
- The straightforward preparation makes these bars perfect for novice bakers who seek maximum flavor with minimal kitchen chaos.
- Experience a decadent flavor profile featuring layers of warm spice, buttery dough, and a tangy sweet cream cheese glaze.
- Visually stunning swirls of brown sugar filling peek through the tender pastry, making every square a beautiful centerpiece for dessert.
- These bars are incredibly versatile, ideal for a hurried breakfast, a leisurely brunch, or a much-needed late-night sugar fix.
The Urgent Case for Cinnamon Roll Shortcuts
I’ll admit it: I love traditional cinnamon rolls. They are majestic, puffy crowns of baked glory. But let’s be honest, trying to bake them before 10 AM on a weekend requires a level of planning and emotional fortitude usually reserved for negotiating international treaties. I once set my alarm for 5:30 AM just to have fresh rolls for a 9 AM brunch, only to find myself weeping slightly over under-risen dough while simultaneously battling a coffee machine rebellion. That morning, I needed bliss, not battle scars. That’s when I pivoted, realizing the world didn’t need another perfect coil; it needed speed, it needed convenience, and it desperately needed the flavor profile compressed into an easier, sliceable format.
These bars are the culinary equivalent of turning your complex, multi-stop commute into a quick, direct helicopter ride. We achieve the chewy edges, the gooey center, and that signature sticky swirl by layering dough, filling, and then baking it all into a sturdy 9×13 inch rectangle of pure joy. No proofing, no punching down, no meticulous rolling and cutting. It’s all the comfort of the classic roll, delivered with the efficiency of a high-performance snack machine. Trust me, once you experience the ease of slicing a piece of warm, glazed bliss bar, you’ll start viewing the traditional roll process with polite, distant admiration, much like you view abstract modern art—interesting, but ultimately too much work. This recipe ensures maximum flavor reward for minimal kitchen risk. This invention saved my brunch life and might just save yours too.
Why the Bar Format is the Superior Delivery System
When you make a traditional cinnamon roll, the heat distribution often leaves some rolls slightly dry on the outside edges while the middle ones are perfect. The bar format solves this fundamental architectural flaw. By spreading the dough evenly across the pan, every single bite benefits from the neighboring gooey filling, ensuring a moist texture from corner to corner. We are creating a matrix of deliciousness where no single piece is left behind. Furthermore, bars are naturally portable. Try handing a sticky, warm, traditional roll to a guest without handing them three napkins and a wet wipe. It’s a logistical nightmare. These bars, however, hold their shape, making them ideal for picnics, potlucks, or simply sneaking a square from the cooling rack without alerting the household. They are structurally sound sweet treats designed for modern life.
Ingredients for Delightful Cinnamon Roll Bliss Bars Recipe
Here’s what you’ll need to make this delicious dish:
- All-Purpose FlourThe structural backbone of the bar, providing the necessary chewiness. Make sure it is sifted for the lightest texture possible.
- Unsalted ButterCrucial for richness and tenderness in the dough and the gooey texture of the filling. Use room temperature butter for easy creaming.
- Granulated Sugar and Brown SugarUsed for sweetness and moisture control; the combination provides that classic caramelized flavor found in cinnamon rolls.
- Baking PowderActs as the rapid leavening agent, ensuring the bars rise quickly without the need for yeast proofing time.
- Ground CinnamonThe star of the show! Use high-quality, fresh cinnamon for the most aromatic and pungent spice flavor.
- Full-Fat Cream CheeseEssential for the rich, tangy, and spreadable glaze. Ensure it is softened completely before mixing.
- Powdered Sugar (Confectioners’ Sugar)Forms the base of the glaze, providing immediate smoothness and melt-in-your-mouth sweetness.
- Milk or CreamUsed to thin the glaze to the perfect drizzling consistency. Any dairy or non-dairy liquid works well here.
The full ingredients list, including measurements, is provided in the recipe card directly below.
How to Make Delightful Cinnamon Roll Bliss Bars Recipe
Follow these simple steps to prepare this delicious dish:
Step 1: Preparing the Base and Oven
Preheat your oven to 350°F (175°C). Line a 9×13 inch baking pan with parchment paper, leaving an overhang on the sides. This overhang acts as a sling, making it incredibly easy to lift the entire baked slab out later. Now, prepare the dough: in a large mixing bowl, combine the dry ingredients (flour, baking powder, and salt), then cream together the softened butter and granulated sugar in a separate bowl until light and fluffy. Gradually mix the dry ingredients into the wet mixture until a soft, uniform dough forms. Press about two-thirds of this dough evenly into the prepared pan to form the base layer.
Step 2: Whipping Up the Gooey Cinnamon Filling
The filling is where the magic happens and where we achieve that “bliss” factor. In a medium bowl, combine the softened butter, tightly packed brown sugar, and a generous amount of ground cinnamon. Mix these ingredients thoroughly until they form a thick, spreadable paste. If your mixture feels too dry, add a teaspoon of milk until it becomes smooth but remains dense enough to hold its shape. Evenly spread this glorious cinnamon mixture over the dough base in the pan, ensuring you reach the edges without disturbing the dough layer underneath.
Step 3: Creating the Crumb Topping
Take the remaining one-third of the dough you saved in Step 1. Instead of rolling it out, we are going to crumble it. Use your fingers to break the remaining dough into small, pea-sized clumps. Distribute these dough crumbles evenly over the cinnamon filling layer. This crumb topping will bake into a wonderfully tender, slightly chewy crust, locking in the moisture and providing a delightful textural contrast to the gooey filling below. Ensure the topping is relatively scattered so the filling peeks through slightly.
Step 4: Baking and Cooling Protocol
Place the pan into the preheated oven and bake for 25 to 30 minutes. The bars are done when the topping is set, golden brown, and the edges are slightly pulling away from the sides of the pan. Resist the urge to overbake, as that will dry out the filling. The center should look slightly soft when removed. Let the bars cool in the pan for at least 30 minutes. Cooling is non-negotiable; slicing too soon results in a chaotic, sticky mess that defies the purpose of a neat bar. While cooling, prepare the glaze.
Step 5: The Essential Cream Cheese Glaze
While the bars cool, tackle the glaze. In a medium bowl, beat the softened cream cheese with a hand mixer or whisk until it is perfectly smooth and lump-free—no one wants a surprise cream cheese chunk. Gradually incorporate the powdered sugar, mixing until thick. Add milk or cream, a tablespoon at a time, until the glaze reaches a smooth, flowing consistency, perfect for drizzling but thick enough to hold its white color.
Step 6: Finishing and Serving
Once the bars are completely cool (they should be warm to the touch, not hot), lift them out using the parchment paper sling and place them on a cutting board. Drizzle the entire surface liberally with the cream cheese glaze, ensuring maximum coverage. Slice into squares—I recommend 12 generous bars—and serve immediately.
Transfer to plates and drizzle with sauce for the perfect finishing touch.
Troubleshooting and Mastering Your Bliss Bars
Even the most straightforward recipes can occasionally present a kitchen conundrum. When dealing with baked goods that rely heavily on consistency and moisture balance, knowing a few tricks of the trade can elevate your results from “good enough” to absolutely stellar. We aim for stellar here, because frankly, life is too short for mediocre baked goods. The most common issues home bakers face with theDelightful Cinnamon Roll Bliss Bars Recipeusually involve the texture of the filling or the crispiness of the edges. Let’s tackle the minor roadblocks that stand between you and pure cinnamon bliss, ensuring that every batch is perfectly gooey and moist.
The Case of the Hardened Filling
If your cinnamon filling seems stiff or hard after baking, you likely baked the bars for too long or your brown sugar was packed too tightly, leading to excessive caramelization and subsequent hardening. Remember, the key to the gooey texture is moisture. To prevent this, ensure your oven temperature is accurate—an external thermometer is a baker’s best friend—and always test for doneness at the lower end of the time range (25 minutes). The bars should look set, but the filling should still appear slightly glossy and soft beneath the crumb topping. If you already have hard bars, don’t panic! Place a single slice in the microwave for 10-15 seconds; the gentle heat will often reactivate the butter and sugar, restoring that desirable gooey texture momentarily. Next time, try adding a tablespoon of applesauce or a bit more softened butter to the filling mix to boost moisture content before baking.
Perfecting the Glaze Consistency
The cream cheese glaze is non-negotiable; it provides the essential tang to cut through the richness of the bar. However, achieving that beautiful, smooth drizzle can sometimes be tricky. If your glaze is too thin, it will run off the sides instantly, leaving a sad, barely-there sheen. If it’s too thick, it will be lumpy and difficult to spread. The secret lies in adding the liquid (milk or cream) slowly. Start with just one tablespoon of liquid and mix thoroughly. Continue adding liquid, half a teaspoon at a time, until the glaze streams slowly off the whisk but still retains its opaque white color. If you accidentally thin it out too much, immediately whisk in another half cup of powdered sugar until the desired thickness is achieved. Remember, the perfect glaze is thick enough to sit proudly on top of the bar, slowly melting into the warmth but not disappearing entirely.
Storage and Freshness Considerations
These Delightful Cinnamon Roll Bliss Bars Recipe treats are best enjoyed the day they are made, especially while still slightly warm. However, if you have any divine leftovers—a truly rare occurrence in my kitchen—you must store them properly to maintain moisture. Place the cooled, glazed bars in an airtight container. They can be safely stored at room temperature for up to two days. For longer storage, placing them in the refrigerator extends their life up to five days. When refrigerating, I highly recommend warming individual portions in the microwave for 15-20 seconds before serving. This revives the cinnamon aroma and restores the filling to its original, delightfully gooey state. You can also freeze fully cooled, unglazed bars for up to two months; thaw them overnight in the refrigerator and apply fresh glaze just before serving.
Variations to Customize Your Cinnamon Bliss
While the classic recipe delivers absolute perfection, sometimes you need to shake things up. The structural integrity of the bliss bar allows for endless customization without compromising the core experience of gooey cinnamon goodness. Think of the base recipe as a blank canvas awaiting your edible artistry.
Adding Texture and Crunch
For an extra layer of textural complexity, consider folding in chopped nuts to the filling mixture. Pecans or walnuts work beautifully, adding a satisfying crunch that contrasts sharply with the soft dough. Toasting the nuts lightly before adding them intensifies their flavor. Alternatively, mix a tablespoon of old-fashioned rolled oats into the crumb topping for a slightly chewier, heartier top crust. This is particularly good if you are serving these bars for brunch and want to pretend they are slightly healthier—a noble, if flawed, ambition.
Spicing Up the Filling
Cinnamon is wonderful, but it plays well with others. For an autumnal twist, consider introducing a small amount of cardamom or nutmeg alongside the cinnamon in the filling. Start with a quarter teaspoon of the additional spice to ensure you don’t overpower the main cinnamon flavor. For those who enjoy a hint of citrus brightness, adding the zest of one small orange or half a lemon to the cream cheese glaze adds a surprising and refreshing counterpoint to the rich sweetness of the bars. This small addition makes the final bite feel lighter and more sophisticated, suitable for a refined afternoon tea, should you ever find yourself having one. Remember, the goal is always heightened bliss, and these minor tweaks ensure yourDelightful Cinnamon Roll Bliss Bars Recipestays at the top of the dessert hierarchy.
The Accidental Discovery of Sunshine on a Plate
My quest started one rainy Tuesday when I desperately craved that weekend bakery aroma but lacked the ambition for yeast. I dumped the ingredients into a pan, hoping for the best, and instead created a dense, buttery bar that captured the glorious, gooey core of a perfect cinnamon roll without any of the rolling or waiting.
There are kitchen triumphs, and then there are kitchen existential crises. My own personal culinary nemesis used to be the classic, coiled cinnamon roll. They are glorious in theory, but in practice, they involve proofing, rolling, chilling, slicing, and inevitably, a moment where the filling leaks out and burns tragically on the bottom of the oven.
I needed maximum flavor for minimal effort. I envisioned the gooey, center-of-the-roll perfection—that soft, sticky heart—but simplified into a grab-and-go square. After several attempts that resulted in either glorified cookies or dense bricks, I finally achieved pastry nirvana. What emerged from the oven was a truly magnificent creation: layers of soft dough, rich cinnamon swirls, and a cloud of cream cheese frosting. It wasn’t just a bar; it was an instant mood lift, a tiny piece of sunshine you could eat standing up over the sink.
The Essential Ingredients for Instant Happiness
Forget complex yeast preparations. These baked cinnamon treats rely on a simple, butter-rich base that bakes up tender and flaky. The filling is a straightforward combination of melted butter, dark brown sugar, and copious amounts of potent cinnamon. Remember, quality vanilla bean paste makes a surprising difference here, so don’t skimp!
For the Dough Base
- 2 ½ cups all-purpose flour
- 1 cup granulated sugar
- 1 tablespoon baking powder
- ½ teaspoon salt
- 1 cup unsalted butter, softened
- 2 large eggs
- 1 teaspoon pure vanilla bean paste
- ½ cup milk (dairy or non-dairy)
The Gooey Cinnamon Filling
- 1 cup packed light brown sugar
- 3 tablespoons ground cinnamon
- ½ cup unsalted butter, melted
- 1 teaspoon vanilla bean paste
Creamy Dream Frosting
- 4 ounces cream cheese, softened
- ½ cup unsalted butter, softened
- 2 cups powdered sugar
- 1 teaspoon vanilla bean paste
- 2-3 tablespoons heavy cream or milk
Step-by-Step Bakery Magic
This process is surprisingly fast, demanding just minimal patience while the bars bake. Preheat your oven to 350°F (175°C) and line a 9×13 inch baking pan with parchment paper, leaving an overhang to make removal easy later. This simple trick prevents sticky situations and saves your sanity during cleanup.
- Prepare the Base:Whisk together the dry ingredients (flour, sugar, baking powder, and salt) in a large mixing bowl. Cut in the softened butter until the mixture resembles coarse crumbs.
- Mix the Wet Ingredients:In a separate bowl, combine the eggs, vanilla, and milk. Pour the wet mixture into the dry ingredients and mix until just combined. The dough will be thick and slightly sticky.
- Press and Layer:Press about two-thirds of the dough evenly into the prepared pan. This forms the essential bottom crust, holding all the gooey goodness.
- Create the Swirl:For the filling, whisk together the melted butter, brown sugar, cinnamon, and vanilla. Pour this rich filling evenly over the dough base, ensuring it reaches the edges.
- Top it Off:Crumble the remaining one-third of the dough loosely over the cinnamon filling layer. These crumbles give the bar a fantastic textured top.
- Bake to Bliss:Bake at 350°F (175°C) for 25 to 30 minutes, or until the edges are lightly golden and the filling is visibly bubbly.
- Frosting Time:Let the bars cool completely—this step is not optional! While cooling, beat the cream cheese, butter, vanilla, and powdered sugar until smooth and fluffy. Add cream or milk until the desired spreading consistency is reached. Spread generously over the cooled bars.
- Slice and Serve:Cut into small squares and enjoy the chewy texture of this homemade sweet snack.
Perfecting the Cooking Process
For peak efficiency, start by creaming the butter and sugar for the dough first, then quickly assemble the filling while the wet ingredients for the base are incorporating. This ensures the filling is ready to pour the moment the dough base is pressed into the pan, guaranteeing a smooth and speedy transition to the oven.
Add Your Touch
Elevate these treats by swapping out plain vanilla bean paste for alcohol-free almond extract in the frosting for a complex flavor profile. For texture, stir chopped pecans or walnuts into the cinnamon filling before spreading. You can also drizzle melted white chocolate over the finished cream cheese frosting for an extra touch of decadence.
Storing & Reheating
Store these bars in an airtight container at room temperature for up to three days, or refrigerate for a week if frosted. For an instant boost of warmth, zap individual bars in the microwave for 10-15 seconds. This softens the frosting and brings the cinnamon filling back to peak gooey perfection.
Chef’s Secrets for Supreme Bliss Bars
- Do not overmix the dough base; mixing just until combined keeps the final bar tender and prevents a tough, biscuit-like texture.
- Ensure your cream cheese and butter are thoroughly softened for the frosting; this is essential for achieving that ultra-smooth, clump-free, professional consistency.
- Always let the bars cool completely before frosting. If the bars are even slightly warm, the cream cheese frosting will melt right off and create a sugary disaster.
My kids once tried to sneak the whole pan out of the kitchen before I could frost them, claiming the gooey cinnamon base was a “pre-dessert.” I caught them, but their enthusiasm confirmed this recipe was a true winner.
Conclusion for Delightful Cinnamon Roll Bliss Bars Recipe
This recipe truly delivers on its promise of effortless indulgence. We ditched the tedious rolling and rising of traditional rolls and focused purely on flavor and gooey texture. Whether you are baking for a crowd or just trying to satisfy that intense sugar craving, these cinnamon treats are your new best friend.
Remember the critical steps: don’t overbake the crust, and ensure that cream cheese is silky smooth before spreading. These easy-to-make squares, filled with rich cinnamon and topped with tangy frosting, guarantee happy faces. Go ahead, experience the joy of theDelightful Cinnamon Roll Bliss Bars Recipe—it’s the easiest way to bake happiness.
Print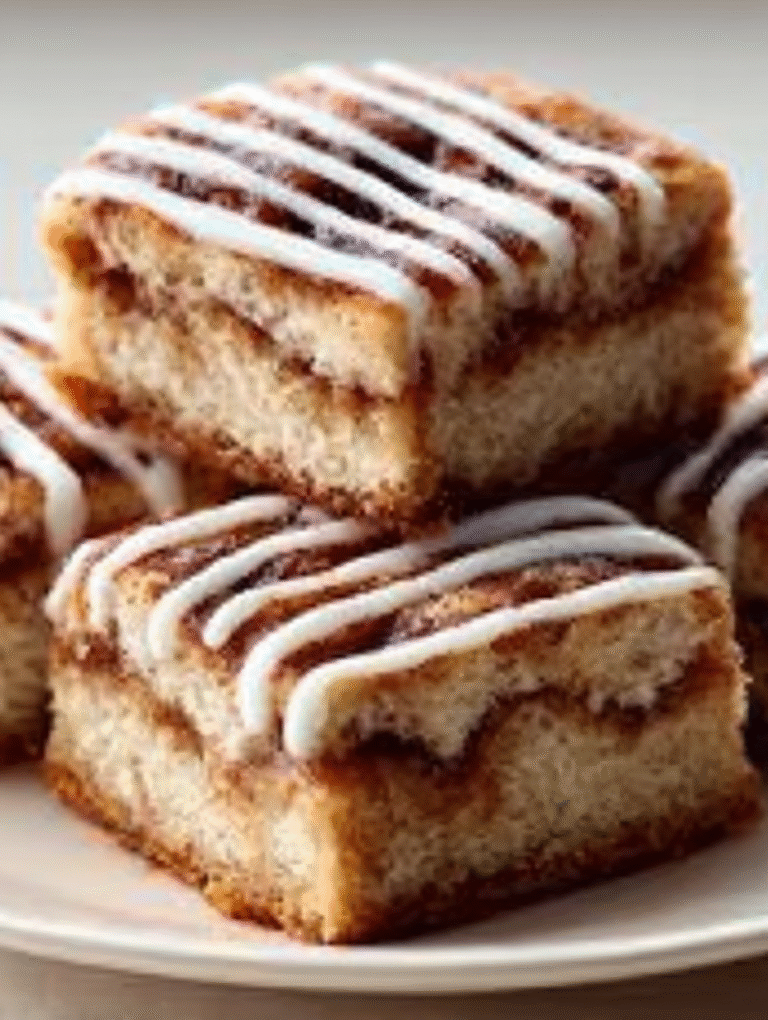
Delightful Cinnamon Roll Bliss Bars Recipe
Skip the messy rolling! These Bliss Bars offer the gooey cinnamon roll experience with a crisp, buttery shortbread crust. Simple press-in method. Full nutrition and steps included.
- Total Time: 35 minutes
- Yield: 4 servings
Ingredients
- All-Purpose Flour: 2 cups
- Unsalted Butter: 1 cup (2 sticks), softened and divided
- Granulated Sugar: 1/2 cup
- Packed Light Brown Sugar: 1/2 cup
- Ground Cinnamon: 2 teaspoons
- Cream Cheese: 4 ounces, softened
- Powdered Sugar: 1 cup
- Milk: 2 tablespoons
Instructions
- Step 1: Preheat the oven to 350°F (175°C). Line a 9×13 inch baking pan with parchment paper, allowing the edges to overhang for easy removal. In a large bowl, cream together 3/4 cup of the softened butter, the granulated sugar, and the flour until a crumbly dough forms.
- Step 2: Press about two-thirds of the dough mixture evenly into the bottom of the prepared pan, creating the base layer. Set the remaining dough mixture aside for the topping.
- Step 3: Prepare the cinnamon filling by combining the packed light brown sugar, ground cinnamon, and the remaining 1/4 cup of softened butter until fully incorporated. Drop spoonfuls of this filling evenly over the pressed dough base, then crumble the reserved dough mixture over the top of the filling layer.
- Step 4: Bake for 25 to 30 minutes, or until the edges are lightly golden brown and the filling is bubbly. Allow the bars to cool completely in the pan on a wire rack—this is crucial before glazing.
- Step 5: While the bars cool, prepare the glaze by beating together the softened cream cheese, powdered sugar, and milk until the mixture is smooth and creamy. Once the bars are entirely cool, spread the glaze evenly over the top, then cut into squares to serve the Delightful Cinnamon Roll Bliss Bars.
Notes
- Keep your bliss bars fresh by storing leftovers tightly covered in the refrigerator for up to 5 days; for the best flavor, let them stand at room temperature for 15 minutes before serving.
- If you enjoy a warm, gooey center, briefly microwave chilled individual squares for about 10 seconds, understanding that the cream cheese glaze will soften and melt slightly.
- Elevate the presentation and flavor by dusting the finished glaze with a pinch of extra ground cinnamon or flaky sea salt before slicing and serving.
- The secret to a perfect, evenly pressed base is ensuring the 3/4 cup of butter used in Step 1 is truly soft, allowing the ingredients to form that essential "crumbly dough" easily.
- Prep Time: 15 minutes
- Cook Time: 20 minutes
- Method: Stovetop
- Cuisine: American

Leave a Comment