
The fridge looked incredibly bleak—just a container of sad, leftover white rice and a jar of aggressively tangy kimchi. This is the moment true culinary genius strikes, transforming those lonely remnants into the weeknight hero we callEgg & Kimchi Rice Bowls.
Get ready for a flavor explosion where spicy, savory, and rich creamy textures collide in under fifteen minutes. Forget complicated cooking; this dish is pure, delicious alchemy.
- This incredibly simple recipe requires minimal chopping and uses leftover rice, making cleanup a breeze for busy weeknights.
- Experience the ultimate flavor bomb, balancing the tangy heat of kimchi with savory soy-sesame notes and creamy yolk richness.
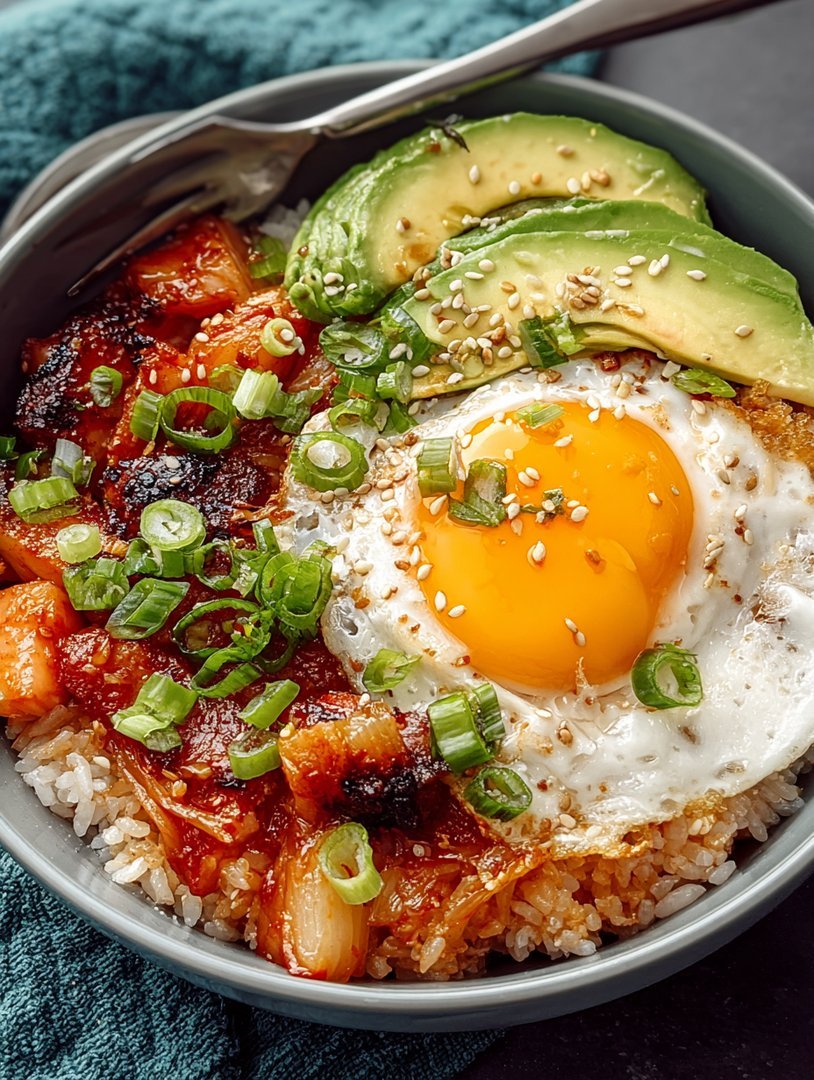
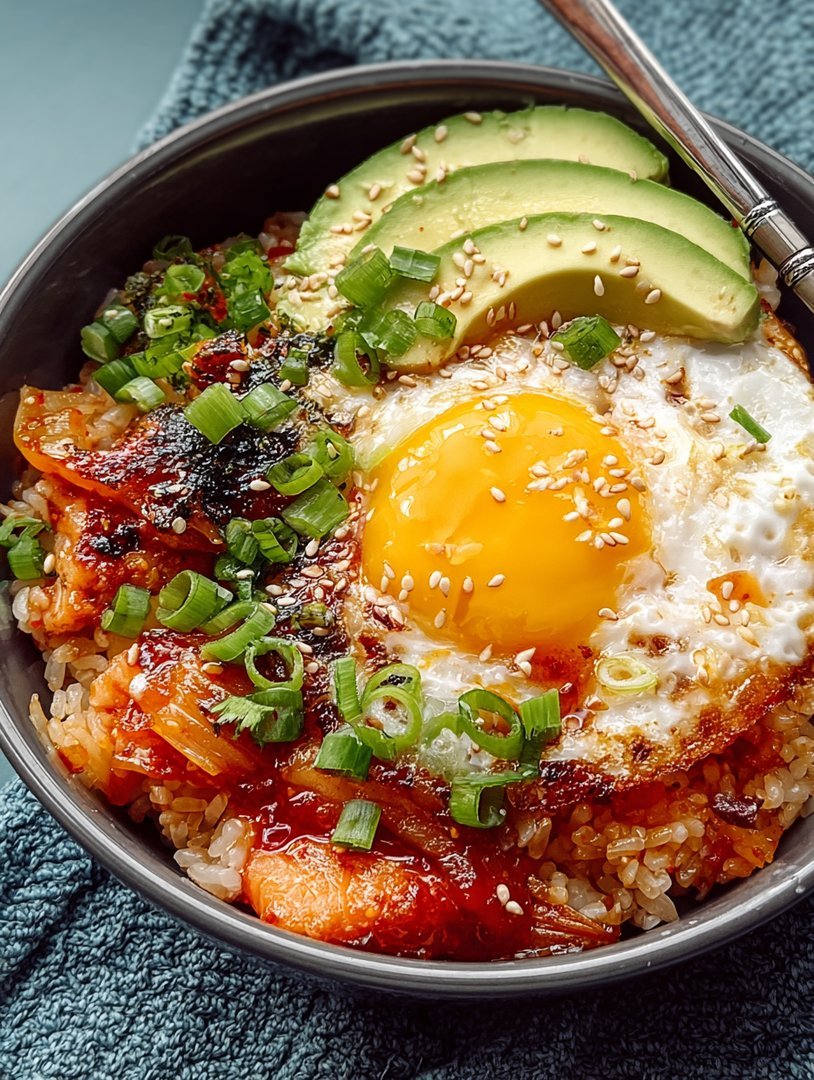
- A stunning presentation of vibrant red kimchi, emerald green onions, and a perfectly fried, runny egg elevating the dish visually.
- Easily customize these bowls with quick pickled vegetables, grilled chicken, or sautéed beef for extra protein punch.
The Secret Life of Leftovers: Why This Bowl Rules
I have a confession: I adore complicated recipes, the kind that involve tweezers and several hours of simmering, but those recipes rarely happen when dinner time actually hits. What does happen is the frantic 6:30 PM realization that I forgot to defrost anything, and the nearest delivery pizza is forty-five minutes away. That, my friends, is the genesis story of my obsession with this spicy, savory marvel. It doesn’t just use leftovers; it celebrates them.
This dish is deceptively simple, capitalizing on the already potent flavor profile of fermented cabbage. Kimchi doesn’t just add heat; it brings a profound layer of umami complexity that instantly elevates humble rice. When that sharp tang meets the nuttiness of toasted sesame oil and the perfect punch of soy sauce, you have a foundation for greatness. The final touch, of course, is the egg—a perfectly fried, sunny-side-up masterpiece whose golden, runny yolk creates a sauce that binds the entire spicy mess into something truly divine. It’s comforting, spicy, and satisfyingly fast, proving that the best meals often require the least effort.
Achieving the Golden Ratio of Tangy, Spicy, and Savory
The success of this rice bowl hinges entirely on balancing three key components: the heat of the kimchi, the richness of the oil, and the texture of the rice. We aren’t simply mixing ingredients; we are building layers. Use day-old, chilled rice if possible. Freshly cooked rice tends to be too moist and results in a mushy fried rice texture, but cold rice separates beautifully, yielding that desirable, slightly chewy consistency. When sautéing the kimchi, make sure you cook it long enough for the flavor to intensify and caramelize slightly—this tames the sharpness and brings out a deeper sweetness. This small step is the difference between a decent bowl and an unforgettable one.
If you enjoy a lot of heat, consider adding a dash of gochujang (Korean chili paste) right before you toss the rice in the pan. The paste provides richness and depth that powdered chili flakes cannot replicate. Remember, cooking is about adjusting to your palate. Start with the basics, taste, and then dial up the heat, acidity (maybe a splash of rice vinegar), or savoriness until it sings. This flexibility is what makes the Egg & Kimchi Rice Bowls a truly perfect weeknight staple—they adapt to whatever ingredients you happen to have lingering in your pantry.
Ingredients for Egg & Kimchi Rice Bowls
Here’s what you’ll need to make this delicious dish:
- Day-Old Cooked White RiceCold, previously cooked rice is essential for achieving a good texture that doesn’t become sticky or mushy during frying.
- Kimchi (Chopped)Use your favorite brand of ripe, well-fermented kimchi, ensuring you reserve some of the flavorful juice for the seasoning.
- Eggs (Large)You will need one egg per serving, ideally fried sunny-side-up or basted to ensure a molten, runny yolk that acts as a creamy sauce.
- Toasted Sesame OilThis oil provides the deep, nutty aroma characteristic of Korean-inspired dishes and should be used both for frying and as a finishing drizzle.
- Soy Sauce or TamariUse this for adding salinity and a crucial umami element; adjust the amount based on how salty your kimchi juice already is.
- Vegetable or Canola OilA neutral oil is needed for the initial frying stage to prevent the sesame oil from burning at high heat.
- Scallions (Chopped)Essential for garnish, adding a fresh, sharp bite and vibrant green color contrast to the spicy red rice.
- Optional Add-ins (e.g., Shredded Chicken or Beef)Incorporate leftover cooked chicken breast or thinly sliced marinated beef for added protein complexity.
The full ingredients list, including measurements, is provided in the recipe card directly below.
How to Make Egg & Kimchi Rice Bowls
Follow these simple steps to prepare this delicious dish:
Step 1: Prepare the Kimchi Base
In a large skillet or wok, heat 1 tablespoon of neutral oil and 1 teaspoon of toasted sesame oil over medium-high heat. Add the chopped kimchi and sauté vigorously for about 3 to 4 minutes. Stir continuously until the kimchi edges begin to look slightly caramelized and the aroma intensifies dramatically.
Step 2: Incorporate the Rice and Seasoning
Add the cold, day-old rice directly into the skillet with the kimchi. Break up any clumps of rice using the back of your spatula. Drizzle 1 tablespoon of soy sauce and 1 tablespoon of the reserved kimchi juice over the rice. Increase the heat slightly and stir-fry for 5 to 7 minutes until the rice is thoroughly heated through and evenly coated in the rich red kimchi mixture.
Step 3: Fry the Eggs
While the rice is finishing, heat a small separate pan with the remaining oil over medium heat. Carefully crack the eggs into the pan. Cook them sunny-side-up until the whites are set but the yolks remain perfectly runny. If you prefer a slightly firmer top, briefly cover the pan for the last minute of cooking to gently steam the surface.
Step 4: Assemble the Bowls
Divide the flavorful kimchi fried rice evenly among your serving bowls. Place one perfectly fried egg directly on top of each mound of rice. Sprinkle generously with freshly chopped scallions and a final drizzle of toasted sesame oil for maximum aroma and flavor.
Transfer to plates and drizzle with sauce for the perfect finishing touch.
Customization Corner: Variations and Upgrades
The beauty of theEgg & Kimchi Rice Bowlslies in their adaptability. You can easily modify the base recipe to suit your preferences or what you happen to have in your fridge. For those who need a substantial protein boost, pre-cooked, shredded chicken or thinly sliced marinated beef works wonderfully. Add the meat during Step 2, ensuring it heats through completely before adding the rice. If you are leaning toward plant-based options, crumbled firm tofu, sautéed and seasoned with a little extra soy sauce, provides excellent texture and nutrition.
Vegetable additions are also highly encouraged. Try adding diced carrots or zucchini during Step 1, allowing them to soften slightly alongside the kimchi. For a textural crunch, toss in some shredded cabbage or bean sprouts right before serving. Finally, experiment with toppings beyond the standard scallions. A sprinkle of black sesame seeds, a handful of crispy fried onions, or even a dollop of chili garlic sauce can take this simple meal from great to truly unforgettable. Remember, the essential components are the contrast between the tangy kimchi and the creamy egg; everything else is negotiable flavor territory.
Troubleshooting Your Bowl and Frequently Asked Questions
Even though this recipe is straightforward, a few key issues can sometimes arise, particularly related to rice texture and spice level. If your rice feels too wet or sticky, it means your skillet wasn’t hot enough, or you used freshly cooked rice. The solution is to increase the heat and continue frying for a minute or two until the moisture evaporates. If the spice level of the kimchi is overwhelming, mitigate the heat by adding a tiny pinch of sugar or honey to the seasoning in Step 2; sweetness helps to round out aggressive chili heat.
For those who love extra flavor, try incorporating a teaspoon of finely minced fresh ginger or garlic right before adding the kimchi. These aromatics will bloom in the hot oil and add complexity without adding significant time or difficulty to the preparation process. This easy, satisfying rice dish should always feel like a comforting treat, so don’t be afraid to make it your own.
Frequently Asked Questions About Kimchi Rice
What type of rice works best for this dish?
Medium-grain white rice, such as Calrose, is often ideal because it holds its shape well after chilling, but leftover jasmine or short-grain sushi rice also works exceptionally well for making spicy rice dishes.
Can I prepare the kimchi rice ahead of time?
While the dish tastes best when the rice is freshly fried and topped with a hot egg, you can prepare the kimchi rice base up to three days in advance and store it sealed in the refrigerator. Reheat the rice thoroughly in a hot skillet before adding the egg.
How do I make this dish vegetarian or vegan?
Most commercial kimchi contains fish products, so ensure you purchase a certified vegan kimchi that is fermented without shrimp or fish sauce. If using a vegan base, simply replace the egg with fried, seasoned tofu or a creamy avocado topping to maintain a rich texture.
Is there a good substitute for soy sauce?
If you are avoiding soy, coconut aminos or a tamari alternative (if gluten-free is needed) works very well. Both options provide the necessary savory, salty depth without altering the core flavor profile significantly.
The Culinary Confession: Why I Can’t Quit My Egg & Kimchi Rice Bowls Addiction
There are meals that nourish you, and then there are meals that save your sanity. This dish falls squarely in the latter category. It all started during that infamous week where my calendar looked less like a schedule and more like an abstract painting of chaos. I was utterly exhausted, staring into a barren refrigerator, mourning the loss of my meal prep momentum. Suddenly, two ingredients shone like beacons of hope: a jar of glorious, spicy kimchi and the eternal carton of eggs. That night, the firstEgg & Kimchi Rice Bowlwas born, and my life changed forever.
If you think this is just leftover rice tossed with some spicy cabbage, you are sorely mistaken. This recipe is a symphony of textures—the chewy rice, the crisp, fermented crunch of the kimchi, the silky richness of the runny yolk, all tied together by a smoky, savory sauce. It’s the ultimate comfort food demanding minimum effort but delivering maximum punch. Forget complicated techniques and obscure ingredients; we are going back to basics, creating a flavorful and satisfying meal that takes less time to assemble than it takes to scroll through streaming service options.
The Simple Secret to Explosive Flavor: Ingredients
Gathering the components for the perfect Egg & Kimchi Rice Bowls is delightfully easy. Most of these staples likely already reside in your pantry or fridge. Quality counts here, especially when dealing with so few ingredients. Choose a robust, well-fermented kimchi—it’s the star, after all.
What You Will Need
- 2 cups cooked short-grain white rice (day-old rice works best for texture)
- 1 cup fermented napa cabbage kimchi, roughly chopped
- 1/4 cup kimchi juice (liquid from the jar)
- 2 tablespoons neutral cooking oil (like canola or grapeseed)
- 4 large eggs
- 1 tablespoon toasted sesame oil
- 1 tablespoon soy sauce (or tamari for gluten-free)
- 1 teaspoon brown sugar or maple syrup
- 1 clove garlic, minced
- Optional Garnishes: Sliced scallions, toasted sesame seeds, chili crisp
Cooking Up the Comfort: Step-by-Step Guide
Timing is everything when you are making a quick meal. We will utilize one skillet and coordinate our efforts efficiently to move from zero to delicious in under fifteen minutes. Ensure your rice is already cooked and cooled; warm rice tends to get mushy when fried.
Prepping the Kimchi Base
Heat the cooking oil in a large non-stick skillet over medium-high heat. Add the chopped kimchi and the minced garlic. Sauté for about three to four minutes until the edges of the kimchi begin to caramelize slightly. This step is crucial; cooking the kimchi mellows its harsh acidity and intensifies its savory depth. Next, push the kimchi mixture to one side of the skillet, making room for the rice.
Add the cold cooked rice to the empty side of the pan. Drizzle the rice with soy sauce, sesame oil, and the brown sugar or syrup. Stir the rice constantly for about two minutes, ensuring it gets coated in the seasonings and heats through. Finally, combine the rice and the kimchi mixture, stirring thoroughly. Pour in the kimchi juice and continue stirring until the rice has absorbed all the liquid and is sizzling nicely. Transfer the kimchi fried rice mixture equally into four separate serving bowls.
Frying the Perfect Sunny Side Up
Do not clean the skillet yet! The residual savory flavors from the rice will enhance your eggs. Lower the heat to medium-low. Add a small splash of fresh oil if necessary. Crack the four eggs directly into the skillet, ensuring they are adequately spaced. We are aiming for runny yolks and set whites.
Cook the eggs slowly until the whites are fully opaque and the edges look slightly crispy, but the yolk remains gloriously liquid—typically three to five minutes, depending on your preferred level of doneness. If you like the tops of your yolks lightly set, cover the pan briefly with a lid during the last minute of cooking to steam the surface gently. Carefully remove the eggs using a spatula and place one perfect sunny-side-up egg directly atop each portion of the kimchi fried rice.
Finishing Touches and Serving
The final step elevates this simple dish from good to unforgettable. Garnish generously with thinly sliced green scallions and a sprinkle of toasted sesame seeds. If you crave extra heat, a dollop of chili crisp oil provides fantastic texture and warmth. Serve immediately. The moment you pierce that yolk and watch the golden lava cascade over the spicy, savory rice is the exact moment you understand the magic of theseEgg & Kimchi Rice Bowls.
This meal is inherently satisfying because it hits all five major taste profiles: the umami from the soy sauce and kimchi, the sweetness from the sugar, the sourness from the fermentation, the saltiness from the seasoning, and the slight bitterness from the sesame oil. Furthermore, the combination of healthy fats, complex carbohydrates, and high-quality protein makes it a remarkably balanced and energizing choice for lunch or a speedy weeknight dinner. It proves that culinary genius often lies in simplicity and smart pairing, rather than complexity.
The Art of Elevation
Understanding Rice Texture
The biggest mistake people make when frying rice is using freshly cooked rice. Fresh rice contains too much moisture and turns sticky and gloppy in the pan, rather than achieving that perfect, separated, chewy texture. Always use rice that has been cooked and thoroughly chilled overnight. If you are in a pinch and must use fresh rice, spread it out on a baking sheet and pop it in the freezer for about twenty minutes to remove some surface moisture before using it in the skillet. This textural element is key to making this savory fried rice experience truly magnificent.
Perfecting the Cooking Process
For peak efficiency, begin by setting the rice and prepping the kimchi and garlic. Sear the chopped kimchi mixture first in the skillet to deepen its flavor, then push it aside to incorporate the cold rice and seasonings. Finally, use the same seasoned pan to fry your eggs, ensuring the entire meal finishes at the same moment for immediate, hot consumption.
Add Your Touch
Consider adding shredded chicken or thinly sliced beef before the kimchi for extra protein, or throw in some sautéed spinach or mushrooms for extra vegetables. Replace soy sauce with coconut aminos for a different umami flavor profile, or spice things up further by stirring in a dash of gochujang (Korean chili paste) with the rice.
Storing & Reheating
Store leftover kimchi fried rice (without the fried egg) in an airtight container in the refrigerator for up to three days. When reheating, sauté the rice in a dry skillet over medium heat until piping hot, ensuring the rice crisps up again. Always cook a fresh egg just before serving, as reheated eggs lose their desirable texture.
I once served this dish at a brunch thinking it was just a quick filler, but my notoriously picky brother-in-law ate two whole bowls and demanded the recipe immediately, confirming that the simple ingredients create profound satisfaction.
Expert Tips for Flawless Fried Rice
- Use high heat when frying the rice to encourage slight crisping; this prevents the dish from turning into a steamed mush.
- Do not crowd the skillet when cooking the eggs; cook them in batches if necessary to ensure crispy edges and perfect yolks.
- Tasting and adjusting the seasoning is vital; if your kimchi is very sour, you may need a tiny bit more sugar to balance the dish.
Frequently Asked Questions About Kimchi Rice
What kind of rice works best for fried rice?
Medium-grain or short-grain white rice, like Calrose or Jasmine rice, generally works best. Their slight stickiness ensures they hold seasonings well while retaining chewiness, especially when used cold.
Is this dish very spicy?
The spiciness depends entirely on the kimchi you choose. If you prefer milder heat, rinse the kimchi lightly under cold water before chopping and cooking it, which reduces both the spice and the salinity.
Can I prepare the kimchi fried rice ahead of time?
You can certainly prepare the base fried rice mixture a day in advance. Store it covered in the refrigerator. When ready to eat, reheat the rice and cook the fresh eggs immediately before serving for the best texture and flavor.
What is a good substitute for brown sugar?
Maple syrup or a tiny touch of honey works excellently as a substitute for brown sugar, providing the necessary sweetness to cut through the fermented sourness of the kimchi and balance the dish effectively.
Why do I need to use old, cold rice?
Using cold, day-old rice minimizes moisture content. This allows the rice grains to fry and crisp up individually, creating the desired bouncy texture instead of a sticky, heavy fried rice mass.
Whether you need a lightning-fast dinner after a hectic day or a genuinely impressive meal made with minimal effort, this recipe forEgg & Kimchi Rice Bowlsis your new best friend. It’s savory, spicy, deeply comforting, and proof that the best food often requires the fewest steps. Go ahead, make your bowl, pierce that yolk, and experience true, effortless bliss.
The Day I Became Best Friends with a Cabbage
There comes a point in every adult’s life where the fridge looks like a post-apocalyptic wasteland, save for a few sad survivors. For me, that survivor was a jar of deeply fermented, aggressively tangy kimchi. I stared at the jar. It stared back. What followed was not a surrender, but a culinary revolution rooted in laziness and genius: the creation of the ultimateEgg & Kimchi Rice Bowls. This isn’t just a meal; it’s the noise your taste buds make when they realize breakfast, lunch, and dinner can all be the same beautiful, spicy, savory thing.
Why Your Pantry Needs This Quick Kick
We’ve all been there: twenty minutes until the next meeting, three hours since you last ate, and zero motivation to chop anything complicated. This recipe requires minimal effort and delivers maximum flavor payoff. The combination of chewy, warm rice, the fiery crunch of fermented cabbage, and the creamy richness of a fried egg is pure comfort food. Seriously, ditch the bland cereal. Embrace the bold flavors of this essential spicy rice dish. It’s speedy cooking for people who still want five-star flavor, perfect for busy weeknights when ordering takeout just feels too complicated.
Arming Your Kitchen: What You Need
Gathering these items is simpler than assembling flat-pack furniture. Most of these ingredients are staples, ensuring you can whip up one of these savory bowls anytime a craving strikes. Pay attention to the quality of your kimchi; its tang and heat make a huge difference in the final product and dictate the overall flavor profile of your finished meal.
The Essential Ingredients List
- Cooked White Rice (day-old rice works best for texture and preventing mushiness)
- Kimchi (well-fermented and chopped into manageable pieces)
- Eggs (large, fresh, one per serving bowl)
- Toasted Sesame Oil
- Soy Sauce (or Tamari for a gluten-friendly option)
- Gochujang (Korean chili paste, adjust amount based on heat preference)
- Neutral Cooking Oil (like canola or grapeseed oil)
- Optional Garnishes: Shredded Nori, thinly sliced Green Onions, or a sprinkle of sesame seeds
The Assembly Line: Creating the Ultimate Egg & Kimchi Rice Bowls
The magic happens quickly, so make sure all your components are ready before you fire up the pan. We are essentially building flavor layers onto the foundational goodness of the rice. Using day-old rice is critical here because it is drier and prevents the resulting fried rice from becoming gummy or sticking together too aggressively in the skillet.
Step-by-Step Cooking Instructions
- Heat a large skillet or wok over medium-high heat. Add a tablespoon of neutral oil.
- Once the oil shimmers, add the chopped kimchi. Sauté for 3 to 4 minutes until it softens slightly and becomes deeply fragrant. Sautéing the kimchi helps tame the aggressive sourness and caramelize the sugars.
- Push the kimchi to one side of the pan. Add the cooked rice to the empty space. Break up the rice clumps thoroughly using a wooden spoon or spatula.
- Pour 1 tablespoon of soy sauce and 1 teaspoon of sesame oil directly over the rice. Add the gochujang. Stir the rice well, mixing it completely with the seasonings and the sautéed kimchi until everything is uniformly colored and heated through, about 5 minutes.
- While the rice is finishing, prepare your fried eggs in a separate pan. (See the next section for the secret to achieving yolk perfection!)
- Spoon the hot, flavorful rice into serving bowls. Top each bowl immediately with a perfectly cooked fried egg. Garnish generously with chopped green onions and a final drizzle of sesame oil or sprinkling of nori shreds.
Mastering the Runny Yolk: The Perfect Fried Egg Technique
A runny yolk is non-negotiable for the perfect Egg & Kimchi Rice Bowls. That creamy, golden lava acts as the final decadent sauce, binding the heat of the kimchi and the savory notes of the rice in one glorious mouthful. Use a non-stick pan for this step. Heat a small amount of butter or oil over medium heat until it starts to bubble gently. Crack the egg gently into the pan, ensuring the yolk stays whole. Let the white set completely while the yolk remains liquid. Do not flip the egg! If you prefer the top of the yolk slightly cooked, cover the pan briefly with a lid to steam the surface for thirty seconds. Slide the egg carefully onto your prepared bowl of spicy kimchi rice.
Conclusion for Egg & Kimchi Rice Bowls
The simplicity and profound flavor of theseEgg & Kimchi Rice Bowlsmake them a true kitchen hero. This dish proves that quick cooking does not require sacrificing complexity or satisfaction. By harnessing the tangy depth of fermented cabbage, the vibrant heat of gochujang, and the velvety richness of a perfectly fried egg, you create a harmonious, comforting meal that hits every note. Whether you need a lightning-fast dinner or a savory power-up for breakfast, mastering this recipe ensures you always have a sensational, flavor-packed bowl ready. Get cooking, and enjoy the delicious satisfaction of your newfound kitchen genius.
Print
Egg & Kimchi Rice Bowls
Weeknight hero! Sizzling day-old rice meets spicy, tangy kimchi and a silky, runny egg yolk. Tossed in nutty sesame oil, this savory bowl delivers maximum flavor fast.
- Total Time: 35 minutes
- Yield: 4 servings
Ingredients
- Day-Old Cooked White RiceCold, previously cooked rice is essential for achieving a good texture that doesn't become sticky or mushy during frying.
- Kimchi (Chopped)Use your favorite brand of ripe, well-fermented kimchi, ensuring you reserve some of the flavorful juice for the seasoning.
- Eggs (Large)You will need one egg per serving, ideally fried sunny-side-up or basted to ensure a molten, runny yolk that acts as a creamy sauce.
- Toasted Sesame OilThis oil provides the deep, nutty aroma characteristic of Korean-inspired dishes and should be used both for frying and as a finishing drizzle.
- Soy Sauce or TamariUse this for adding salinity and a crucial umami element; adjust the amount based on how salty your kimchi juice already is.
- Vegetable or Canola OilA neutral oil is needed for the initial frying stage to prevent the sesame oil from burning at high heat.
- Scallions (Chopped)Essential for garnish, adding a fresh, sharp bite and vibrant green color contrast to the spicy red rice.
- Optional Add-ins (e.g., Shredded Chicken or Beef)Incorporate leftover cooked chicken breast or thinly sliced marinated beef for added protein complexity.
Instructions
- Step 1: Prepare the Kimchi Base
- Step 2: Incorporate the Rice and Seasoning
- Step 3: Fry the Eggs
- Step 4: Assemble the Bowls
Notes
- Always begin cooking with the neutral vegetable oil, adding the toasted sesame oil only at the very end to maximize its nutty aroma without risking a burnt flavor.
- For the perfect bowl, serve immediately and ensure the hot rice is topped with a runny yolk, which mixes with the spicy kimchi base to create a rich, creamy sauce.
- Store leftover kimchi rice base separately from the fried egg in an airtight container for up to three days, as the texture and safety of the fried egg diminish quickly after cooling.
- For the best texture, reheat the rice quickly in a hot skillet rather than the microwave, using a dash of water or fresh kimchi juice to steam and rehydrate the grains.
- Prep Time: 15 minutes
- Cook Time: 20 minutes
- Method: Stovetop
- Cuisine: American
FAQs
What makes day-old rice superior for Egg & Kimchi Rice Bowls compared to freshly cooked rice?
Using rice that has been cooked and then chilled overnight is essential for achieving the correct fried rice texture. Freshly cooked rice retains high levels of moisture, causing it to steam in the pan and result in a mushy, gluey final product. Day-old rice, having dried out in the refrigerator, fries beautifully, maintaining separate grains that absorb the intense flavors of the sesame oil, gochujang, and sautéed kimchi without becoming sticky. This dryness ensures that your savory kimchi rice bowl has a satisfying chew rather than a heavy consistency.
Can I add protein to my spicy kimchi rice dish for a more substantial meal?
Absolutely, incorporating a protein source is a fantastic way to upgrade this already delicious dish into a complete and robust meal. You can easily stir-fry thinly sliced marinated beef, ground chicken, or small pieces of firm tofu alongside the kimchi before you introduce the rice. Ensure the meat is fully cooked and browned before adding the rice and sauces. This addition not only boosts the nutritional value but also adds a rich, meaty depth that pairs wonderfully with the spice and tang of the fermented cabbage.
How do I adjust the spice level in my Egg & Kimchi Rice Bowls without losing flavor?
Gochujang is the primary source of heat in this recipe, so you should adjust the amount you add to the rice mixture based on your heat tolerance. If you prefer a milder bowl, start with just half a teaspoon of gochujang and taste before adding more. Alternatively, for less heat, you can substitute half of the gochujang with a sweeter, less spicy fermented bean paste like doenjang. Remember that kimchi itself varies in spice, so tasting your kimchi beforehand will give you a good idea of the final dish’s potential intensity.
What are the best methods for storing and reheating leftover kimchi fried rice?
To store your leftover spicy rice, cool it completely before transferring it to an airtight container. Refrigerate the kimchi fried rice for up to three days. When reheating, the best method is to use a non-stick skillet over medium-high heat, adding a small amount of oil to prevent sticking. Spread the rice in a thin layer and stir occasionally until heated through. Microwaving is faster but may result in a slightly tougher texture. Always ensure the rice is piping hot before consumption.


Leave a Comment