

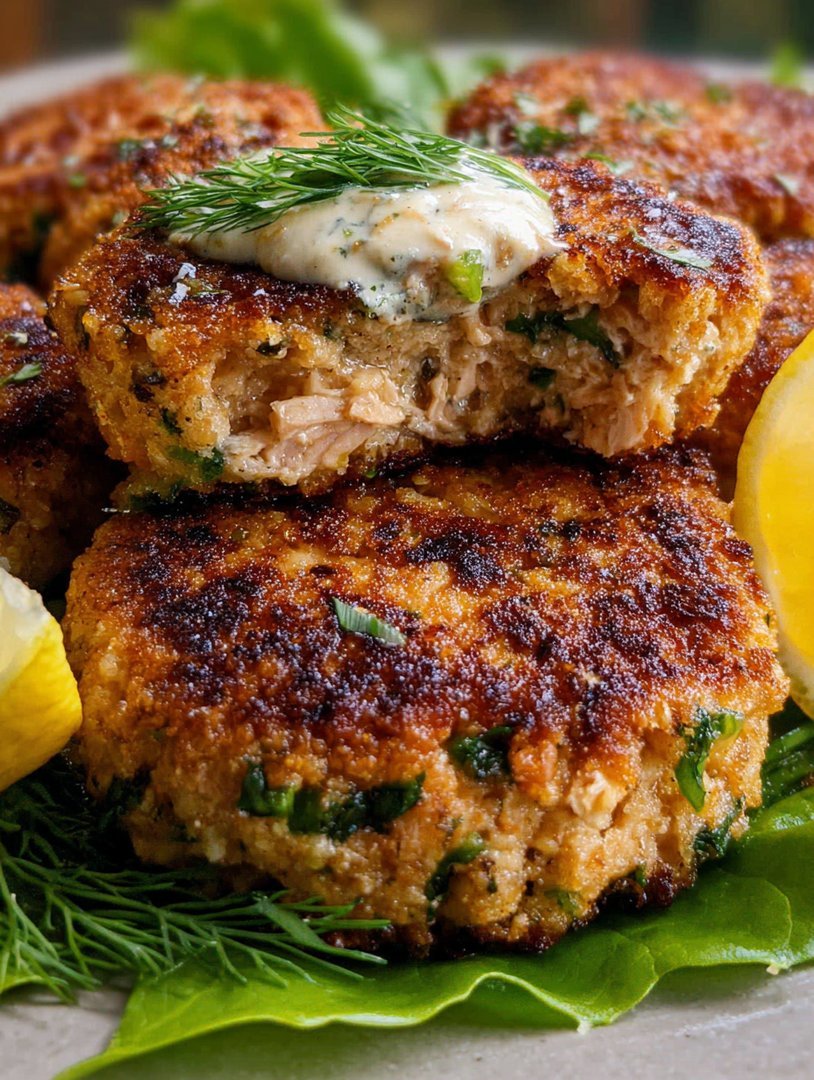
Remember those days when dinner felt like a culinary endurance test, usually involving sad, soggy attempts at health food? Forget all that culinary stress. Today, we’re serving up pure, delightful satisfaction: the ultimateGolden Crispy Salmon Cakes with Lemon-Dill Sauce.
This dish is crunchy, flaky, intensely flavorful, and so ridiculously easy it feels like cheating on your weeknight routine. Prepare yourself for a delicious meal that quickly becomes a kitchen champion!
- Ready in under 30 minutes, these salmon patties are perfect for quick weeknight meals when finding extra time feels nearly impossible.
- The savory richness of the salmon perfectly balances the bright, zesty notes from the fresh lemon and herbaceous, fragrant dill.
- Boasting an irresistible, shatteringly golden crust and tender, flaky interior, they look sophisticated enough for any special occasion or dinner party spread.
- Serve them hot over a vibrant salad, tucked into toasted buns like sliders, or alongside roasted seasonal vegetables for a complete, flexible meal.
Why These Salmon Cakes Are Pure Gold
I once tried to impress a dinner guest by making a truly fussy, complex French recipe. Spoiler alert: that dish won, leaving me with a sunken, regrettable mess and an awkward silence as we ordered takeout pizza. That disastrous experience taught me an important lesson: sometimes, the simplest things are the most impressive. Enter the reliable, delicious salmon cake. It requires zero culinary anxiety but delivers maximum flavor payoff and satisfying texture.
These aren’t just mere fish cakes; they are little savory discs of perfectly seasoned, flaky deliciousness, encased in a coat of golden crunch that audibly sings when you bite into it. I originally started making these when I was desperately trying to repurpose leftover oven-baked salmon, and honestly, the resulting “leftovers” meal became a bigger hit than the original centerpiece! There is something profoundly satisfying about transforming humble ingredients into something so elegant yet so approachable. They feel instantly fancy, but your actual prep time laughs in the face of complicated fine dining techniques.
These cakes are robust enough to stand up to a side of creamy mashed potatoes or rice pilaf, yet light enough to perch delicately atop a bed of peppery arugula or mixed greens. You might find yourself cooking extra salmon on purpose just so you can guarantee making these the next day. The true magic happens when you pair the inherent savory richness of the cakes with the zingy, cool, herbaceous embrace of the accompanying sauce. It’s a contrast in temperature and texture that makes every forkful addictive, demanding that you make this recipe again and again.
The Secret to Maximum Crunch
Achieving that glorious, shatteringly crisp exterior is the difference between a simply good salmon cake and a truly legendary one. The secret to this level of crunch doesn’t lie in complicated tools or exotic ingredients, but in careful technique and maintaining the right binding ratio. We must actively avoid making the mixture too wet—excess moisture equals steam during cooking, and steam is the ultimate enemy of a crispy crust.
The binding success comes from a combination of ingredients, including finely crumbled panko breadcrumbs and a touch of mayonnaise or Dijon mustard, which provide necessary moisture and flavor while holding everything together without making the mix gluey. When forming the patties, ensure they are uniform in shape and thickness so they cook evenly throughout. The final, crucial step is paying attention to the cooking oil temperature. Make sure the oil is adequately hot before introducing the cakes; if it’s too cool, they’ll inevitably soak up the oil and turn depressingly greasy instead of beautifully golden. Pan-frying them in a neutral cooking oil until both sides boast a deep, irresistible golden-brown hue locks in the savory flavor and guarantees textural perfection.
Preparing the Salmon Base
You can certainly use high-quality canned salmon (make sure it is meticulously drained) for ultimate weeknight speed, but if you happen to have leftover oven-baked or gently poached salmon, that preparation method offers an even better flavor and texture. Ensure you flake the salmon finely, carefully checking for any lingering pin bones or tough skin sections. Seasoning is absolutely paramount here, so don’t be timid with the freshly cracked black pepper and kosher salt. Incorporating finely minced shallots or green onions adds a subtle bite and fresh, aromatic dimension.
Remember, the salmon base mixture needs to be highly flavorful enough to shine even before it ever meets the frying pan. A quick squeeze of fresh lemon juice stirred directly into the mix also works wonders, slightly enhancing the overall flavor profile and conveniently setting the stage for the vibrant Lemon-Dill Sauce that follows.
Crafting the Perfect Lemon-Dill Sauce
Let’s be honest: while the salmon cake itself is truly fantastic, the cool, bright sauce is the co-star that effortlessly steals the entire show. You desperately need a vibrant, cool counterpart to gracefully cut through the richness and oiliness of the fried cake. Our Lemon-Dill Sauce is dangerously simple to execute and requires zero cooking, only mixing and stirring.
Start with a rich, creamy base—either plain Greek yogurt or sour cream provides that necessary tang and satisfying richness. The undisputed key to the sauce’s success is the incorporation of fresh dill. You need to use a substantial amount of it; dried dill simply won’t deliver the same desired bright, herbaceous, and powerful punch. Balance the overall creaminess with a generous splash of fresh lemon juice and a tiny, delicate grate of zest for maximum aromatic impact. A slight hint of garlic powder or a minuscule amount of very finely grated fresh garlic adds depth and complexity without risking overpowering the dish. Stir all these ingredients together vigorously, taste, adjust the salt and pepper as needed, and then let it thoroughly chill. Allowing the sauce to rest in the refrigerator for at least 15 minutes lets the individual flavors truly meld, creating a creamy, zesty, and utterly refreshing drizzle that transforms theseGolden Crispy Salmon Cakes with Lemon-Dill Sauceinto an unforgettable, must-make meal.
Ingredients for Golden Crispy Salmon Cakes with Lemon-Dill Sauce
Here’s what you’ll need to make this delicious dish:
- Cooked SalmonUse about 12 ounces of flaky cooked salmon, ensuring it is well-drained if using canned varieties. Flaking it finely ensures the cakes hold together perfectly.
- Panko BreadcrumbsThese are the essential secret weapon for maximum crispiness and also act as a crucial binder. Make sure to use panko, as regular breadcrumbs yield a softer texture.
- EggOne large egg is necessary to help bind the mixture together and prevent the cakes from falling apart during the important frying process.
- Mayonnaise or Dijon MustardA small spoonful adds necessary moisture and subtle tangy depth to the internal flavor of the salmon cakes.
- Fresh DillThis herb is non-negotiable for the sauce, providing the signature bright, slightly anise-like flavor that pairs beautifully with the rich salmon.
- Lemon Juice and ZestFreshly squeezed juice provides acidity to the sauce, while the zest holds the potent essential oils for maximum fragrance.
- Red Onion or ShallotsFinely minced, they provide a sharp, fresh flavor dimension within the cake mixture before it is cooked.
- Greek Yogurt or Sour CreamForms the creamy, tangy base for the quick, no-cook Lemon-Dill Sauce.
- Neutral Cooking OilHigh-heat oils such as vegetable, canola, or grapeseed oil are perfect for achieving that desirable golden, crisp exterior during pan-frying.
The full ingredients list, including precise measurements, is provided in the detailed recipe card directly below.
How to Make Golden Crispy Salmon Cakes with Lemon-Dill Sauce
Follow these simple steps to prepare this delicious dish:
- Step 1: Prepare the Salmon Base and MixPlace the flaked cooked salmon into a large mixing bowl. Add the Panko breadcrumbs, the beaten egg, finely minced onion or shallots, the mayonnaise or Dijon mustard, and season heavily with salt and pepper. Gently mix these ingredients together using a fork until everything is just combined, being careful not to overwork the mixture.
- Step 2: Form and Chill the PattiesUsing your hands, scoop the mixture and form it into six uniform patties, about 1 inch thick. Place the formed cakes onto a plate lined with parchment paper. Transfer the plate to the refrigerator and chill the patties for a minimum of 15 minutes; this critical step helps them firm up and prevents crumbling during cooking.
- Step 3: Whip Up the Lemon-Dill SauceWhile the salmon cakes are chilling, prepare the sauce. In a small bowl, combine the Greek yogurt or sour cream with a generous amount of chopped fresh dill, the fresh lemon juice, lemon zest, and a pinch of salt and pepper. Stir thoroughly until smooth, taste-test, and then set the sauce aside to allow the flavors to properly marry.
- Step 4: Preheat and Add the OilPlace a large, sturdy nonstick skillet over medium-high heat. Pour in enough neutral cooking oil to completely coat the bottom of the pan, about a quarter of an inch deep. Wait until the oil shimmers slightly—this indicates it is hot enough for frying.
- Step 5: Fry the Golden Crispy Salmon CakesCarefully place the chilled salmon cakes into the hot oil, ensuring not to overcrowd the pan (work in batches if necessary). Fry them for about 3 to 4 minutes per side until they develop a deep, beautiful golden-brown and crispy crust. The internal temperature should be heated through.
- Step 6: Drain and Serve ImmediatelyTransfer the finishedGolden Crispy Salmon Cakes with Lemon-Dill Sauceonto a plate lined with paper towels to drain off any excess oil. Serve the cakes immediately while hot, alongside a generous dollop or drizzle of the prepared Lemon-Dill Sauce.
Transfer to plates and drizzle with the bright sauce for the perfect finishing touch, perhaps adding a small squeeze of fresh lemon wedge for extra zing.
Troubleshooting and Tips for Flawless Salmon Cakes
Even culinary superheroes sometimes encounter small challenges. If your cakes feel too soft or appear crumbly when you try to fry them, you likely need a little more binder; simply mix in another tablespoon of panko breadcrumbs or finely mashed cooked potato into the mixture. Chill the formed patties in the refrigerator for at least 15 minutes before cooking, as this mandatory step helps them firm up significantly. If they are sticking stubbornly to the pan, ensure your cooking surface and oil are sufficiently hot—a cold pan is usually the primary enemy of non-stick perfection.
To make life exceptionally easier during a busy week, you can prepare the entire salmon cake mixture up to a day in advance and store it tightly covered in the refrigerator. Form the cakes just before you are ready to cook them. If you prefer to bake them instead of pan-fry (for a slightly lighter, healthier alternative), brush them lightly with oil or cooking spray and bake the cakes at 400°F (200°C) for approximately 15 to 18 minutes until they achieve a deep, satisfying golden color.
Frequently Asked Questions (FAQs)
Can I freeze the salmon cakes for later use?
Absolutely! Form the patties and flash freeze them on a baking sheet until they are solid. Once frozen, transfer them to an airtight freezer bag for up to three months. Thaw them overnight in the refrigerator before cooking, or cook them directly from frozen, adding a few minutes to the total cook time.
What kind of salmon works best for this recipe?
Both fresh salmon that has been gently cooked and high-quality canned pink or red salmon work wonderfully. If using fresh, make sure it is fully cooked, cooled, and thoroughly flaked. If using canned, draining it perfectly is key to avoiding a soggy cake mixture.
I don’t have fresh dill. Can I use a substitute?
While fresh dill offers the best flavor, you can substitute it with fresh chives, fresh parsley, or a mixture of both for an appealing herbaceous note. Avoid using dried dill in the sauce, as its flavor is significantly muted compared to the fresh version.
What side dishes pair well with the Golden Crispy Salmon Cakes?
These cakes pair beautifully with light, fresh sides. Consider serving them with a refreshing cucumber and tomato salad, creamy coleslaw, or oven-roasted asparagus. A simple serving of fluffy white rice also balances the richness perfectly.
TheseGolden Crispy Salmon Cakes with Lemon-Dill Saucetruly redefine simple, elegant weeknight dining. They combine speed, texture, and bright flavors into one magnificent, satisfying package. Enjoy the crunch!
We all have that moment. It’s 6:30 PM, the hunger pangs are aggressive, and you stare into the fridge hoping a fully assembled, Michelin-star meal will materialize. Instead, you find half an onion, a carton of sad looking herbs, and some leftover cooked salmon. This, my friends, is not a problem. This is the genesis of an absolutely phenomenal dinner: the magnificent and easy-to-masterGolden Crispy Salmon Cakes with Lemon-Dill Sauce.
These aren’t those dreary, dry fish patties you remember from childhood. These are vibrant, moist on the inside, and possess an exterior crunch so satisfying it should win an award. Plus, they come together faster than deciding which streaming service to watch tonight. Ready to transform your leftovers into culinary gold?
The Essential Ingredients
For the Golden Crispy Salmon Cakes
- 1 pound cooked salmon, thoroughly flaked
- 1/2 cup panko breadcrumbs, plus 1/2 cup for coating
- 1/4 cup finely chopped red onion
- 1/4 cup finely chopped fresh dill
- 1 large egg, lightly beaten
- 2 tablespoons mayonnaise (or Greek yogurt for a lighter option)
- 1 tablespoon fresh lemon juice
- 1 teaspoon Dijon mustard
- 1/2 teaspoon kosher salt
- 1/4 teaspoon black pepper
- Vegetable or canola oil for frying
For the Zesty Lemon-Dill Sauce
- 1/2 cup mayonnaise or Greek yogurt
- 2 tablespoons fresh dill, chopped
- 1 tablespoon fresh lemon juice
- 1 teaspoon lemon zest
- 1/4 teaspoon garlic powder
- Pinch of salt and pepper
Crafting the Perfect Salmon Cake
Step 1: Preparing the Mixture
First things first: dealing with the salmon. If you used frozen salmon, make absolutely sure it is completely drained and dry. Flake the cooked fish into a medium bowl. You want small, pleasant flakes, not mush. Now, gather your supporting cast—the red onion, dill, and the first half cup of panko breadcrumbs. Toss these gently with the flaked salmon.
In a separate small bowl, whisk together the binding agents: the egg, mayonnaise, lemon juice, Dijon mustard, salt, and pepper. This is the flavor glue that holds everything together. Pour this wet mixture over the salmon and gently fold it until everything is just combined. The mixture should hold together easily when pressed, but avoid overmixing, or your patties will become tough.
Step 2: Shaping and Chilling
The secret to cakes that don’t crumble in the pan is the chill time. Using a standard ice cream scoop or your hands, form the mixture into eight even patties, about one inch thick. Place the remaining panko breadcrumbs on a shallow plate. Lightly coat each salmon patty, pressing gently so the crumbs adhere securely to all sides. Transfer these beauties to a baking sheet lined with parchment paper. Pop them into the fridge for a minimum of 30 minutes. This time is non-negotiable; it helps them firm up, ensuring that gorgeous golden crust later.
Step 3: Mastering the Lemon-Dill Sauce
While the salmon cakes are enjoying their cold nap, whip up the refreshing Lemon-Dill Sauce. This sauce is so easy it barely counts as cooking. Simply combine the mayonnaise (or yogurt), chopped dill, lemon juice, lemon zest, garlic powder, salt, and pepper in a small bowl. Stir until smooth and harmonious. Cover the sauce and let it chill alongside the cakes. Allowing the sauce to rest means the flavors deepen, giving you maximum zesty goodness.
Step 4: The Golden Fry
Heat about half an inch of oil in a large skillet over medium heat. How do you know if the oil is ready? Toss in a stray panko crumb. If it sizzles immediately, you are good to go. Carefully place the chilled salmon cakes into the hot oil, ensuring you do not overcrowd the pan. Cook in batches if necessary; overcrowding lowers the oil temperature, leading to sad, soggy cakes.
Sear the cakes for about three to four minutes per side, or until they achieve that promised deep golden-brown, truly crispy exterior. They should lift easily from the pan when ready to flip. Once cooked, transfer them to a plate lined with paper towels to drain any excess oil. Serve immediately alongside generous dollops of the chilled Lemon-Dill Sauce.
Perfecting the Cooking Process
To achieve peak efficiency and flavor, mix the lemon-dill sauce ingredients first and let them chill—the flavors deepen while you handle the main event. Form the salmon cakes next, ensuring they chill for at least 30 minutes. This chilling process guarantees they hold their shape beautifully when they hit the hot oil.
Add Your Touch
Swap out fresh dill for chives or parsley if needed, or add a pinch of smoked paprika to the cake mixture for depth. If you crave heat, incorporate a tiny dash of cayenne pepper into the sauce. For extra texture, try coating the exterior with panko breadcrumbs mixed with shredded Parmesan.
Serving Suggestions and Pairings
These salmon cakes are incredibly versatile. They shine as an appetizer, served atop a bed of arugula, or as a main course with a simple side salad. For a hearty meal, serve them alongside roasted asparagus or sweet potato wedges. The bright citrus notes of the sauce cut perfectly through the richness of the fish, making them an excellent counterpoint to anything earthy or green.
Storing & Reheating
Store leftover cakes tightly sealed in the refrigerator for up to three days. Reheat them best in a toaster oven or air fryer at 350°F (175°C) for five to eight minutes until the exterior is crunchy again. Avoid the microwave, as it makes them soggy.
I remember serving these delicious salmon fritters at a summer barbecue last year, and my overly enthusiastic cousin immediately requested the recipe. He said the secret was clearly the chilling step!
Chef’s Essential Tips for Success
- Ensure your cooked salmon is thoroughly flaked and dry; excess moisture is the enemy of a truly golden crispy crust.
- Do not overmix the cake mixture once the wet ingredients are added, as this can lead to tough, dense fish patties.
- Achieve uniform coloring by ensuring the oil is hot but not smoking, allowing the cakes to cook slowly to an internal temperature of 145°F.
Frequently Asked Questions About Salmon Cakes
Can I bake these salmon cakes instead of frying?
Absolutely! If you prefer a lighter alternative, preheat your oven to 400°F (200°C). Spray the coated cakes generously with cooking spray or lightly brush with oil. Bake for 15 to 18 minutes, flipping halfway through, until they are heated through and beautifully browned. While slightly less crunchy than frying, they remain delicious.
What kind of salmon is best for this recipe?
You can use virtually any cooked salmon, making this a fantastic way to use leftovers. Canned salmon works perfectly well, too, but make sure it is canned in water (not oil) and completely drained before flaking. Sockeye or Atlantic varieties both offer great texture and flavor profiles for these crispy cakes.
Why are my salmon cakes falling apart in the pan?
There are usually three culprits: not enough binder, too much moisture, or insufficient chilling time. Make sure you included the egg and panko as directed. If your mixture feels too wet even after adding the binder, try adding another tablespoon of panko crumbs. Most importantly, ensure the cakes are fully chilled for that required structure.
How long do I need to chill the patties?
The minimum chilling time is 30 minutes. This allows the fat in the fish and the binder ingredients to firm up, creating a rigid patty that can withstand the heat of the frying pan. If you have time, chilling them for an hour or even overnight yields the most reliable results.
Can I prepare the salmon cakes ahead of time?
Yes, prepping ahead is highly recommended for easy entertaining! You can form and coat the raw salmon cakes, place them on a parchment-lined tray, cover them tightly, and refrigerate for up to 24 hours. When you are ready to serve, simply pull them out and proceed straight to the frying or baking step for a quick weeknight meal.
Conclusion for Golden Crispy Salmon Cakes with Lemon-Dill Sauce
So there you have it—the secret to crafting truly exceptional fish cakes. This recipe for Golden Crispy Salmon Cakes with Lemon-Dill Sauce proves that weeknight dinners don’t need to be boring or overly complicated. We learned that chilling is crucial for structure, the air fryer is your reheating savior, and homemade dill sauce is absolutely mandatory for maximum flavor punch. Whether you’re using leftovers or cooking fresh fish, these perfectly textured, tangy, and crunchy cakes are guaranteed to be a spectacular hit at your table. Go ahead, grab your mixing bowl, and prepare for applause; you’ve earned this deliciously easy culinary victory!
Print
Golden Crispy Salmon Cakes with Lemon-Dill Sauce
Achieve perfectly golden salmon cakes: crisp Panko crust embracing tender flaked salmon, brightened by zesty dill and creamy yogurt sauce. Full preparation instructions and nutritional info included.
- Total Time: 35 minutes
- Yield: 4 servings 1x
Ingredients
- 14 oz. cooked salmon (flaked, bones and skin removed)
- 1 large egg, lightly beaten
- 1/2 cup Panko breadcrumbs (plus extra for coating)
- 1/4 cup finely chopped fresh dill (divided)
- 1/2 cup mayonnaise or Greek yogurt
- 2 tablespoons fresh lemon juice (plus 1 teaspoon lemon zest)
- 3 tablespoons vegetable oil or olive oil
- 1 teaspoon kosher salt and 1/2 teaspoon black pepper
Instructions
- Step 1: Prepare the Lemon-Dill Sauce by combining the mayonnaise (or yogurt), fresh lemon juice, and half of the chopped fresh dill in a small bowl. Stir well, season with a pinch of salt and pepper, and refrigerate until ready to serve.
- Step 2: Create the Salmon Cake mixture. In a medium bowl, gently combine the flaked salmon, the beaten egg, 1/2 cup of Panko breadcrumbs, the remaining chopped dill, lemon zest, salt, and pepper. Mix lightly until just combined, taking care not to overwork the mixture.
- Step 3: Form the cakes. Scoop the salmon mixture and form it into 6-8 patties (about 1-inch thick). Place the extra Panko breadcrumbs in a shallow dish, and lightly dredge each salmon cake in the crumbs until fully coated.
- Step 4: Cook the salmon cakes. Heat the vegetable oil in a large skillet over medium heat until shimmering. Carefully place the salmon cakes in the hot oil (do not crowd the pan, cook in batches if necessary). Fry for 3-4 minutes per side, until deeply golden brown and crispy.
- Step 5: Drain and serve. Remove the cooked salmon cakes from the skillet and place them on a paper towel-lined plate to absorb excess oil. Serve immediately alongside the chilled Lemon-Dill Sauce.
Notes
- To prepare ahead, form and coat the raw salmon cakes, then cover and chill them for up to 24 hours before frying for the best crispy result.
- To revive leftover salmon cakes without losing their crisp exterior, bake them on a wire rack at 350°F (175°C) for 10-12 minutes until heated through.
- Serve these savory cakes over a bed of fresh mixed greens with a light vinaigrette, or alongside simple roasted asparagus for a complete meal.
- When forming the patties, ensure they are tightly packed and uniform in thickness—this prevents them from crumbling during frying and promotes even cooking.
- Prep Time: 15 minutes
- Cook Time: 20 minutes
- Method: Stovetop
- Cuisine: American
FAQs
Why do my salmon cakes fall apart or turn mushy instead of becoming wonderfully crispy?
Achieving that perfect crunch requires two things: proper binding and cold ingredients. Ensure your mashed potatoes or breadcrumbs are dense enough to hold the flaked salmon without excessive moisture. Refrigerating the formed patties for at least 30 minutes is crucial. This helps them firm up immensely before hitting the heat. When cooking, use medium-high heat and don’t overcrowd the pan; this guarantees a beautiful, golden-brown crust rather than a steamy, sad collapse. Patience and pre-chilling are the keys to avoiding the dreaded mushy patty phenomenon.
Can I prepare the lemon-dill sauce ahead of time for the Golden Crispy Salmon Cakes?
Absolutely, the lemon-dill sauce is a superstar in terms of make-ahead prep. You can whip up this tangy, herbaceous topping up to two days before serving. Store it in an airtight container in the refrigerator. Just remember, dill tends to lose a tiny bit of its vibrancy over time, so give it a quick stir and perhaps a micro-sprinkle of fresh dill right before serving your meal. The brightness of the fresh lemon juice holds up beautifully and cuts through the richness of the fish wonderfully, making your preparation time minimal when dinner rolls around.
What is the best method for reheating these delicious salmon patties without losing their crunch?
Never, ever microwave these! That’s a ticket straight to Soggy Town, which is a place we strongly advise against visiting. If you want to maintain the integrity of your crispy salmon cakes, the oven or the air fryer is your best friend. Preheat your oven to 350°F (175°C) and bake them for 8 to 10 minutes until heated through. The air fryer is even better, usually taking about 5 minutes at 375°F (190°C). This gentle, dry heat reactivates the crust, ensuring you get that satisfying crunch and flavor just like when they were freshly cooked.
What type of salmon works best for making Golden Crispy Salmon Cakes with Lemon-Dill Sauce?
You have fantastic flexibility here! While leftover cooked salmon (especially grilled or baked) is the gold standard, canned salmon works beautifully, provided you drain it extremely well and squeeze out any excess liquid. If you are cooking fresh fish specifically for the cakes, Sockeye or Atlantic salmon offer great texture and rich flavor. Ensure the fish is thoroughly flaked but not pureed. Remember, the goal is distinct pieces of fish bound together, not a paste, to ensure that the final product remains moist on the inside beneath the beautiful, crispy exterior.


Leave a Comment