
Imagine a cake so decadent, so rich, that it causes seismic activity in your taste buds. This Gooey Chocolate Earthquake Cake isn’t just dessert; it’s an experience, a culinary tremor of pure chocolate bliss.
Picture this: a crackled top gives way to a molten chocolate interior, a landscape of cocoa goodness that begs to be explored. It’s the kind of cake you make when comfort food needs a serious upgrade, a dessert guaranteed to turn any frown upside down.
- Easy to whip up with ingredients you probably already have in your pantry, making it a perfect last-minute treat.
- Boasts an intense chocolate flavor with a gooey, melt-in-your-mouth center that will satisfy any sweet tooth.
- Features a stunning crackled top and a rich, dark color that makes it a showstopper at any table.
- Incredibly versatile and pairs perfectly with a scoop of vanilla ice cream, fresh berries, or a dusting of powdered sugar.
Ingredients for Gooey Chocolate Earthquake Cake
Here’s what you’ll need to make this delicious dish:
The full ingredients list, including measurements, is provided in the recipe card directly below.
How to Make Gooey Chocolate Earthquake Cake
Follow these simple steps to prepare this delicious dish:
Step 1: Preheat and Prep
Preheat your oven to 350°F (175°C). Grease and flour a 9×13 inch baking pan to prevent sticking. This ensures the cake releases cleanly after baking.
Step 2: Combine Dry Ingredients
In a large bowl, whisk together the flour, sugar, cocoa powder, baking soda, and salt. This ensures the dry ingredients are evenly distributed for consistent baking.
Step 3: Add Wet Ingredients
Add the eggs, oil, buttermilk, and Alcohol-free vanilla extract to the dry ingredients. Beat until well combined, then gradually pour in the hot coffee, mixing until smooth. The hot coffee enhances the chocolate flavor.
Step 4: Stir in Chocolate Chips
Gently fold in the chocolate chips. This ensures they are evenly distributed throughout the batter without melting too much.
Step 5: Bake
Pour the batter into the prepared pan and bake for 30-35 minutes, or until a toothpick inserted into the center comes out with fudgy crumbs. Be careful not to overbake, as you want the center to remain gooey.
Step 6: Cool and Dust
Let the cake cool completely in the pan before dusting with powdered sugar. Cooling allows the cake to set properly, and dusting with powdered sugar adds a final touch of sweetness and visual appeal.
Transfer to plates and serve warm for the perfect finishing touch.
Perfecting the Cooking Process
To achieve baking nirvana, precise timing is your best friend. Start by preheating your oven meticulously. Mix the dry ingredients thoroughly before adding the wet, ensuring an even batter. Don’t overmix; a gentle hand prevents a tough cake.
Add Your Touch
Dare to dream beyond the recipe! Swap out the usual chocolate chips for chunks of your favorite candy bar. A swirl of peanut butter can elevate the richness. For a citrus zing, add orange zest. This cake is your canvas!
Storing & Reheating
To keep your cake decadent, store it in an airtight container at room temperature for up to three days, or in the refrigerator for up to a week. Reheat individual slices in the microwave for a warm, gooey experience or enjoy it cold, straight from the fridge.
Here are some tips to perfect your cake-baking prowess:
- Ensure all ingredients are at room temperature for optimal mixing and a smoother batter, which results in a better cake texture.
- Use high-quality cocoa powder for a richer, more intense chocolate flavor that will make your cake stand out from the rest.
- Resist the urge to open the oven door frequently during baking; the temperature fluctuations can cause the cake to sink.
(Personal anecdote)
My grandma once told me that the secret ingredient to any great cake is a dash of love and a whole lot of patience. Turns out, she was right; the best memories are often made in the kitchen!
Unearthing the Legend of Gooey Chocolate Earthquake Cake
Have you ever bitten into a cake so intensely chocolatey, so profoundly rich, that it felt like the very earth beneath your feet shifted? That, my friends, is the magic of Gooey Chocolate Earthquake Cake, a dessert so decadent, it’s practically illegal in some countries (okay, maybe not, but it *should* be). Forget those dainty desserts that require a silver fork and pinky-up posture. This cake is an experience, a journey, a full-blown chocolate intervention that leaves you gloriously, unapologetically satisfied. It’s a dessert that doesn’t just sit prettily on a plate, it makes a *statement*.
This isn’t your average cake; it’s the dessert equivalent of a rock concert – loud, unapologetic, and utterly unforgettable. We’re talking about a dessert so fudgy, so intensely chocolatey, it practically begs to be devoured. Think of it as the dessert equivalent of finding a twenty-dollar bill in your old jeans, multiplied by the sheer joy of puppies, kittens, and a surprise day off work.
Why “Earthquake”? A Chocolate Geological Phenomenon
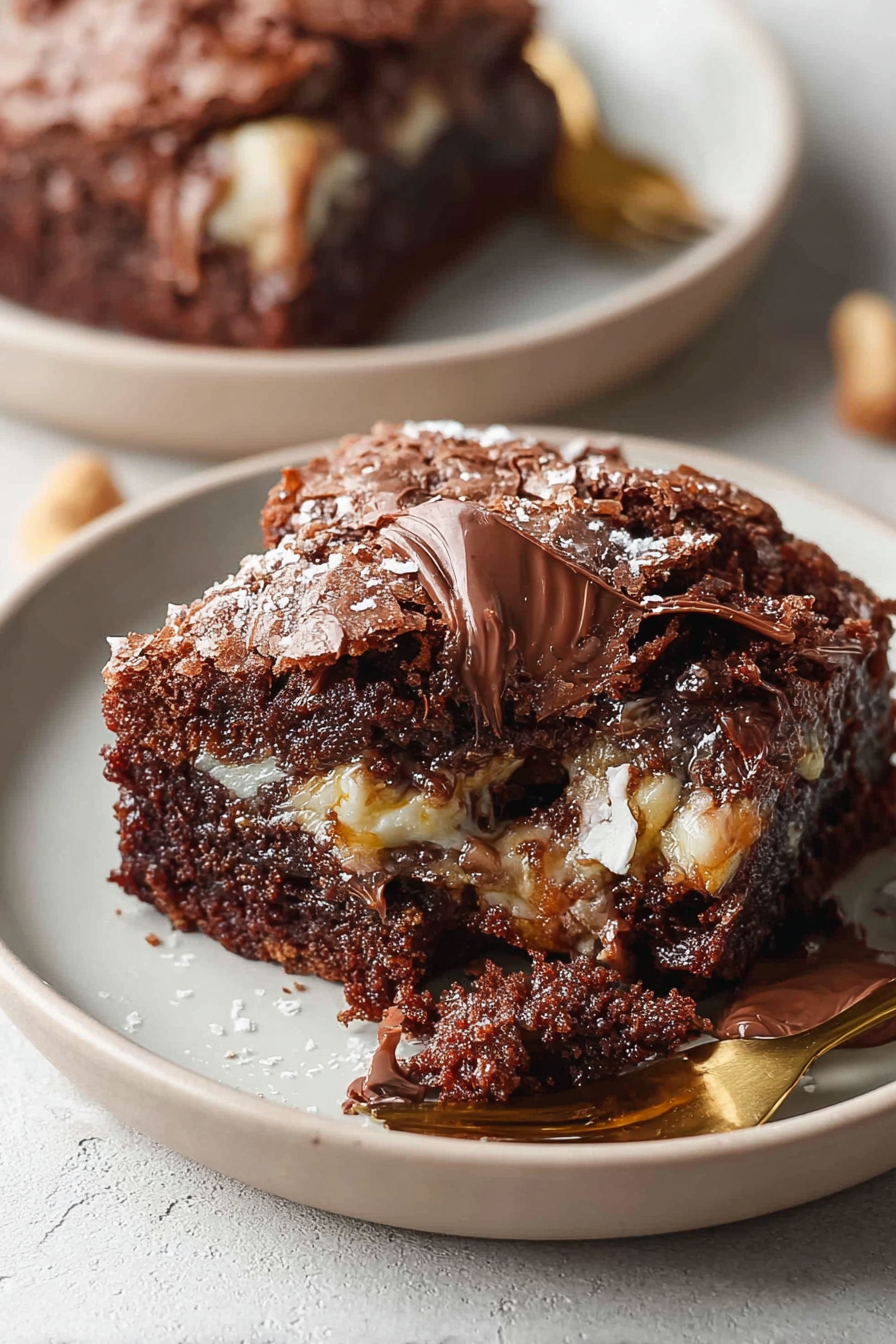
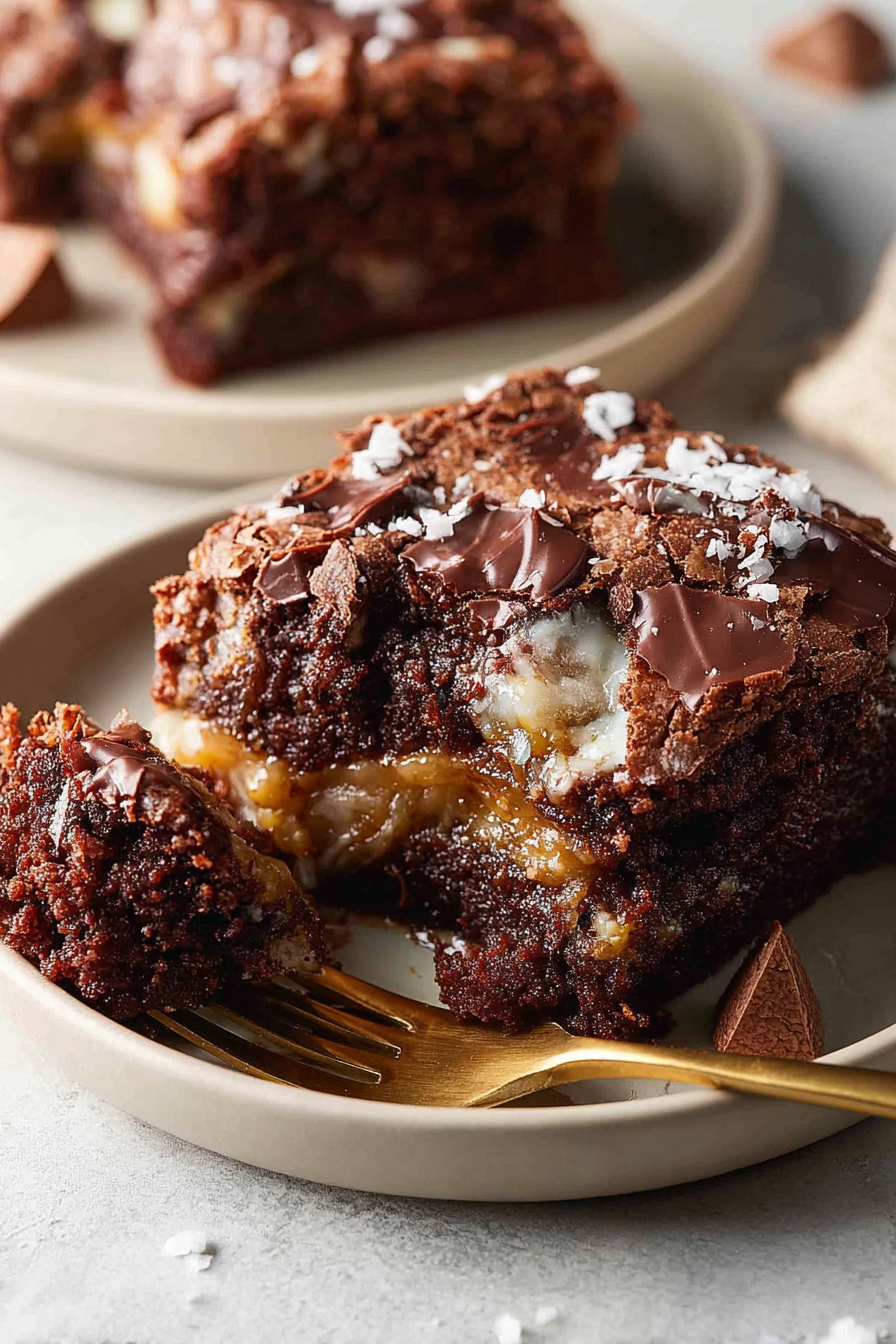
So, why the dramatic moniker? Well, one glance at this bad boy, and you’ll understand. As it bakes, the creamy, cheese-laden batter swirls and cracks, creating a visual masterpiece that resembles a seismic event rendered in chocolate. The top becomes a mosaic of delicious crevices, a landscape of chocolatey goodness just begging for exploration. It’s like Mother Nature decided to get into baking, with chocolate and cream cheese as her primary tools.
Imagine layers of dark chocolate meeting a creamy swirl of cream cheese, all mingling in a harmonious dance of sweet and savory. Each bite is an exploration of textures and flavors, a thrilling adventure that keeps you coming back for more. It’s not just a dessert; it’s an experience.
The Appeal of “Messy” Perfection
And let’s be honest, who doesn’t love a dessert that’s a little bit messy? In a world obsessed with picture-perfect creations, there’s something liberating about a cake that embraces its imperfections. The cracks and crevices aren’t flaws; they’re character marks, badges of honor earned during the baking process. Each imperfection tells a story of heat, melting, and a whole lot of deliciousness.
This cake isn’t about pristine presentation; it’s about pure, unadulterated flavor. It’s about the joy of digging in with a fork and not worrying about crumbs. It’s about savoring every bite and letting the rich chocolate and creamy cheese transport you to dessert heaven.
Crafting Your Own Chocolate Masterpiece: The Recipe Unveiled
Alright, enough with the theatrics; let’s get down to business. You’re here for the recipe, and I’m here to deliver. Prepare yourself, because this isn’t just a recipe; it’s a culinary adventure. It’s a journey that will test your patience (slightly), reward your efforts (immensely), and leave you with a cake that will make you the hero of any potluck, dinner party, or Tuesday night Netflix binge. Don’t worry, even if your baking skills are limited to boxed cake mix and store-bought frosting, you can conquer this cake.
Gathering Your Arsenal: Ingredients You’ll Need
Before we dive in, let’s make sure you have all the necessary weapons… I mean, *ingredients*. This isn’t a complicated list, but quality matters. Reach for the good stuff; your taste buds will thank you.
- 1 box (14-16 oz) dark chocolate cake mix (plus ingredients called for on the box, typically eggs, oil, and water)
- 8 ounces cream cheese, softened
- 1/2 cup (1 stick) unsalted butter, softened
- 3 cups powdered sugar
- 2 large eggs
- 1 teaspoon Alcohol-free vanilla extract
- 1 cup chocolate chips (semi-sweet or dark, your preference)
See? Nothing too scary. If you can handle a box of cake mix, you’re already halfway there.
The Step-by-Step Symphony: Baking Instructions
Now, for the main event. Follow these steps, and you’ll be well on your way to earthquake cake glory:
1. **Preheat and Prepare: ** Preheat your oven to 350°F (175°C). Grease and flour a 9×13 inch baking pan. Trust me; you don’t want this cake sticking to the bottom.
2. **Cake Batter Boogie: ** Prepare the chocolate cake mix according to the package directions. Set aside.
3. **Cream Cheese Concoction: ** In a large bowl, beat the softened cream cheese and butter together until smooth and creamy. Add the powdered sugar, eggs, and Alcohol-free vanilla extract. Beat until well combined and ridiculously smooth. This is the “earthquake” filling.
4. **The Great Divide: ** Pour half of the chocolate cake batter into the prepared pan.
5. **Swirl and Conquer: ** Drop spoonfuls of the cream cheese mixture over the cake batter. Use a knife or skewer to gently swirl the cream cheese mixture into the chocolate batter. Don’t overmix; you want those distinct pockets of cream cheese goodness.
6. **Chocolate Chip Cascade: ** Sprinkle the chocolate chips evenly over the top.
7. **Bake and Behold: ** Bake for 35-40 minutes, or until a toothpick inserted into the center comes out with moist crumbs. The top will be cracked and, well, earthquake-y.
8. **Cool and Conquer: ** Let the cake cool completely in the pan before slicing and serving. This is the hardest part, I know, but trust me; it’s worth the wait.
Troubleshooting Your Chocolate Quake: Tips for Success
Even the best bakers encounter bumps in the road. Here are a few tips to help you navigate any potential earthquake cake emergencies:
- **Cake Too Dry?** Don’t overbake! Every oven is different, so keep a close eye on the cake during the last few minutes of baking.
- **Cream Cheese Mixture Too Runny?** Make sure your cream cheese and butter are properly softened. If it’s still too thin, add a tablespoon or two more of powdered sugar.
- **Cake Sinking in the Middle?** This usually means the oven temperature was too high or you opened the oven door too frequently. Resist the urge to peek!
Variations on a Theme: Remixing the Earthquake
The basic recipe is a masterpiece, but that doesn’t mean you can’t get creative. Here are a few ideas to spark your imagination:
Peanut Butter Paradise:
Swirl in a half cup of peanut butter along with the cream cheese mixture. Top with chopped peanut butter cups for extra decadence.
Mint Chocolate Mania:
Add a teaspoon of peppermint extract to the cream cheese mixture. Use mint chocolate chips instead of regular chocolate chips.
Salted Caramel Sensation:
Drizzle salted caramel sauce over the cooled cake. Top with a sprinkle of sea salt.
Serving Suggestions: Unleashing the Quake
This cake is delicious on its own, but a few simple additions can elevate it to the next level:
- **Vanilla Ice Cream:** A classic pairing that never disappoints.
- **Fresh Berries:** The acidity of the berries cuts through the richness of the cake.
- **Whipped Cream:** A light and airy topping that adds a touch of elegance.
No matter how you serve it, one thing is guaranteed: this Gooey Chocolate Earthquake Cake will be the star of the show. So go forth, bake with confidence, and prepare to unleash a chocolatey, creamy, and utterly unforgettable dessert experience. You got this!
Conclusion for Gooey Chocolate Earthquake Cake :
This Gooey Chocolate Earthquake Cake isn’t just a dessert; it’s a hug in cake form. From that first crack on top to the river of melted chocolate inside, every bite is an adventure. So, go on, bake this cake. Share it with friends, family, or, let’s be honest, keep it all for yourself. Just remember to savor every single, delicious, gooey moment. You deserve it! Now, go forth and conquer that chocolate craving!
Print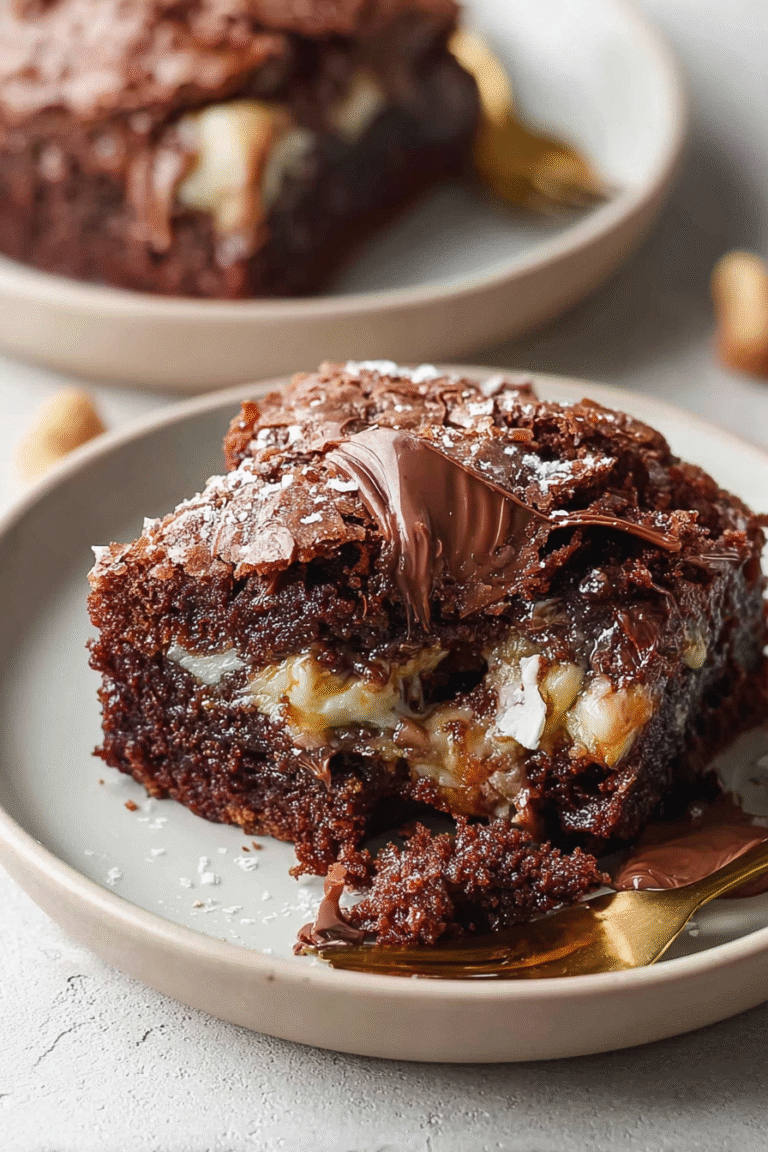
Gooey Chocolate Earthquake Cake
Delicious gooey chocolate earthquake cake recipe with detailed instructions and nutritional information.
- Total Time: 35 minutes
- Yield: 4 servings
Ingredients
- Cream cheese, softened – 8 ounces
- Unsalted butter, softened – 1/2 cup
- Granulated sugar – 1 cup
- Eggs – 2 large
- Vanilla extract – 1 teaspoon
- All-purpose flour – 1 cup
- Unsweetened cocoa powder – 1/2 cup
- Powdered sugar – 2 tablespoons
Instructions
- Step 1: Preheat oven to 350°F (175°C). Grease and flour a 9×13 inch baking pan.
- Step 2: In a large bowl, beat cream cheese, butter, and sugar until light and fluffy. Beat in eggs one at a time, then stir in vanilla.
- Step 3: In a separate bowl, whisk together flour and cocoa powder. Gradually add the dry ingredients to the wet ingredients, mixing until just combined. Do not overmix.
- Step 4: Pour batter into prepared pan and spread evenly.
- Step 5: Bake for 30-35 minutes, or until a wooden skewer inserted into the center comes out with moist crumbs.
- Step 6: Let cool completely in the pan before dusting with powdered sugar and serving.
Notes
- Store leftovers in an airtight container in the refrigerator for up to 3 days.
- For a warm, extra-gooey treat, microwave individual slices for 15-20 seconds.
- Serve this decadent cake with a scoop of vanilla ice cream or a dollop of whipped cream to balance the richness.
- Don't be tempted to overbake; the slightly underdone center is what gives this cake its signature earthquake texture.
- Prep Time: 15 minutes
- Cook Time: 20 minutes
- Method: Stovetop
- Cuisine: American
FAQs :
What makes this Gooey Chocolate Earthquake Cake so darn good?
Oh, friend, where do I even begin? It’s the symphony of textures, the rich cocoa crescendo, and the grand finale of a molten center that sets this cake apart. It’s the kind of dessert that makes you want to close your eyes and hum a happy tune. We’re talking serious chocolate decadence, a lava-like river of chocolate running through every slice. It’s the perfect remedy for a bad day, a celebration of a good one, or just a Tuesday afternoon when you deserve something utterly amazing. Trust me, this cake is not just good, it’s an experience.
Can I make this Gooey Chocolate Cake ahead of time?
Absolutely! In fact, I often find that this cake is even better the next day, after the flavors have had a chance to meld and deepen. Just bake it as directed, let it cool completely, and then wrap it tightly in plastic wrap and store it in the refrigerator. When you’re ready to serve, you can either enjoy it cold (which some people love!) or warm it up slightly in the microwave for that gooey, molten goodness. Just be careful not to overheat it or the chocolate will lose its texture. It keeps for about 3 days.
What kind of chocolate should I use for the Earthquake Cake?
This is where you can really let your personal preferences shine! I usually opt for a semi-sweet chocolate for a balanced flavor, but you could also use dark chocolate for a more intense chocolate experience, or even milk chocolate if you prefer a sweeter taste. Just make sure you’re using high-quality chocolate that you enjoy eating on its own, as the flavor will really come through in the cake. And feel free to experiment with different types of chocolate – maybe a combination of dark and milk? The possibilities are endless!
How do I prevent my Gooey Chocolate Earthquake Cake from sticking to the pan?
Ah, the age-old question! The key is to grease and flour your baking pan thoroughly. I like to use a baking spray that contains flour for extra insurance. Be sure to get into all the nooks and crannies of the pan, especially if you’re using a bundt pan or a pan with intricate designs. Alternatively, you can line the bottom of the pan with parchment paper for easy removal. Just cut a circle of parchment paper to fit the bottom of the pan and press it in before greasing and flouring the sides.


Leave a Comment