

That moment when autumn air meets warm cinnamon is pure bliss. Forget the guilt of a typical treat; we’re diving fork-first into the most satisfying dessert imaginable. This incredibleHigh Protein Apple Crispdelivers the comforting crunch you crave, secretly packed with ingredients that fuel your next adventure while tasting exactly like Sunday morning comfort food.
- Perfectly spiced apples baked until tender beneath a rich, buttery, and delightfully chewy oat topping that satisfies every textural desire.
- Requires minimal effort and uses accessible pantry staples, making it the ideal impressive dessert for a cozy, busy weeknight gathering.
- Ingeniously incorporates healthy, unflavored protein powder, transforming this classic dessert into a significantly smarter, post-meal treat.
- Easily customize the crunch factor by swapping in pecans, walnuts, or almonds to match whatever delicious texture and flavor profile you desire most.
The Eternal Struggle: Dessert vs. Fitness Goals
I remember vividly the time I attempted to bake a “healthy” dessert that tasted suspiciously like dry, cinnamon-flavored sawdust. We’ve all been there: staring longingly at a slice of pie while reminding ourselves that squats exist and calorie deficits are real. The real tragedy of adulting is believing you must choose between satisfying your deep, inherent sweet tooth and maintaining your hard-earned nutritional requirements. For years, I approached dessert as a complicated negotiation, often resulting in me losing the negotiation spectacularly and then running an extra mile the next day to compensate for my failure of will. This cycle of culinary misery ended the day I finally perfected the structural integrity of this beloved apple dessert. This isn’t just an ordinary apple bake; it’s a genuine peace treaty signed between your deepest cravings and your demanding gym schedule. It’s comforting, delightfully warm, and unapologetically delicious, yet it respects the macronutrient goals we work so diligently to maintain. We accomplish this feat not by sacrificing flavor, but by being ridiculously clever about what we add to the iconic crumbly topping. You get all the nostalgic flavor of a classic treat but with a serious nutritional boost that will make you feel strong, rather than sluggish, after enjoying a serving.
The Secret Weapon: Maximizing the Topping
The true magic of a crisp is always found in the topping, isn’t it? It absolutely needs structural integrity, a serious textural crunch, and that perfect, delightful blend of rolled oats, brown sugar, and melted fat. My earliest, failed attempts at fortifying the topping often resulted in a texture akin to concrete or, worse, a greasy, raw flour paste. Unflavored protein powder, especially if it’s plant-based protein powder or a quality vegan blend, can become frustratingly finicky when introduced to high heat and moisture. The key to success here is balance and using just the right amount of cold fat. We are certainly not aiming for a dense, dry protein bar that is sadly hidden under some apples; we are aiming for golden, crunchy, crumbly perfection that fools everyone. We blend the protein powder right into the dry oat mixture first, ensuring it disperses completely and evenly before the melted butter and sweetener are finally incorporated. This simple, effective technique prevents clumping, locks the powder into the structure of the oats, and ensures the final baked product remains wonderfully crumbly, offering that perfect and necessary texture contrast against the soft, yielding spiced apples resting below. This approach ensures maximum flavor delivery and an incredible texture every single time you bake this.
Selecting the Perfect Apples for Your Crisp
Choosing the right variety of apple is the single most crucial decision you will make in determining the final texture of your dessert. If you mistakenly choose something too soft and overly sweet, like a Gala or a very ripe Fuji, you will almost certainly end up with a layer of unappealing, sugary apple soup underneath your gloriousHigh Protein Apple Crisptopping. We need a variety that possesses the internal structure to hold up beautifully under sustained, intense heat while baking.
The Best Contenders for Baking
The most reliable baking apples always offer a great mix of tartness and firmness, ensuring they don’t break down entirely during the oven time.
- Granny Smith:This is truly the gold standard for baking crisps. Their sharp, intense tartness perfectly cuts through the richness and sweetness of the topping, and they possess phenomenal structural integrity, maintaining their slice shape beautifully.
- Honeycrisp:This is an excellent choice for those who prefer a more balanced flavor. They offer a great mix of sweet and tart, and they have a delightful initial crunch that translates into tender-firmness when cooked. If you find Granny Smiths too sour alone, use a balanced mix of Honeycrisp and Granny Smith.
- Braeburn or Jonagold:These are great secondary alternatives that provide a pleasant, spicy sweetness and reliable firmness. They hold up well but generally offer a sweeter finished product than the Granny Smith.
Always peel your apples before slicing them for the crisp! While leaving the skins on certainly adds a bit more fiber, they inevitably become tough, chewy, and slightly leathery during the long baking process, detracting significantly from the luxurious, meltingly soft texture we ultimately want in the filling. Cutting the apples into uniform, half-inch slices is also mandatory, ensuring they cook evenly and that you won’t encounter any surprise crunchy, raw chunks when you dig in.
Ingredients for High Protein Apple Crisp
Here’s what you’ll need to make this delicious dish:
- Baking ApplesUse a firm, slightly tart variety like Granny Smith or a combination with Honeycrisp, ensuring they are peeled, cored, and sliced evenly.
- Brown SugarProvides depth of flavor and moisture for the filling; use light or dark brown sugar depending on preference.
- Ground Cinnamon and NutmegEssential spices that provide the signature warmth and aroma required for any classic apple dessert.
- Lemon JuiceA splash of fresh lemon juice brightens the flavor of the apples and prevents them from oxidizing (browning) quickly.
- Rolled Oats (Old-Fashioned)The base for the crumble topping, providing a hearty, chewy texture; avoid using instant or quick oats.
- All-Purpose FlourHelps bind the dry ingredients in the topping and contributes to the final golden-brown color and crumbly texture.
- Unflavored Protein PowderChoose a quality plant-based protein powder or plant-based protein powder to easily boost the nutritional profile without altering the flavor profile significantly.
- Cold Butter or Vegan AlternativeCut into small cubes, the cold fat is crucial for creating that airy, perfectly crumbly texture when mixed with the dry ingredients.
- Pinch of SaltEssential for balancing the sweetness in both the apple filling and the crispy topping, enhancing all the other flavors.
The full ingredients list, including measurements, is provided in the recipe card directly below.
How to Make High Protein Apple Crisp
Follow these simple steps to prepare this delicious dish:
Step 1: Prepare the Apples and Preheat the Oven
Preheat the oven to 375°F (190°C). Lightly grease an 8×8 or 9-inch round baking dish with a minimal amount of cooking spray or butter. In a large mixing bowl, combine the prepared apple slices with the brown sugar, lemon juice, cinnamon, and nutmeg. Toss gently until all the apple pieces are thoroughly coated and glistening. Pour the seasoned apple mixture evenly into the prepared baking dish.
Step 2: Combine the Dry Topping Ingredients
In a separate medium bowl, whisk together the rolled oats, flour, unflavored protein powder, remaining brown sugar, and salt. Ensure the protein powder is completely and evenly distributed among the dry ingredients to prevent dense pockets in the final product.
Step 3: Incorporate the Cold Fat
Add the cubed, cold butter or fat alternative to the dry topping mixture. Use a pastry blender, two knives, or clean fingertips to quickly cut the fat into the dry ingredients until the mixture resembles coarse, uneven crumbs. Some pieces should be the size of peas, while others can be smaller, creating varied texture. Avoid overworking the dough, as warmth will melt the butter and compromise the final crunch.
Step 4: Assemble and Bake the Crisp
Sprinkle the prepared crumb topping evenly over the layer of apples, ensuring the apples are mostly covered but the topping is still airy, not compacted. Place the dish on a baking sheet to catch any potential drips. Bake for 35 to 45 minutes, or until the apple filling is bubbling vigorously and the crumb topping is deeply golden brown and perfectly crisp.
Step 5: Cool and Serve
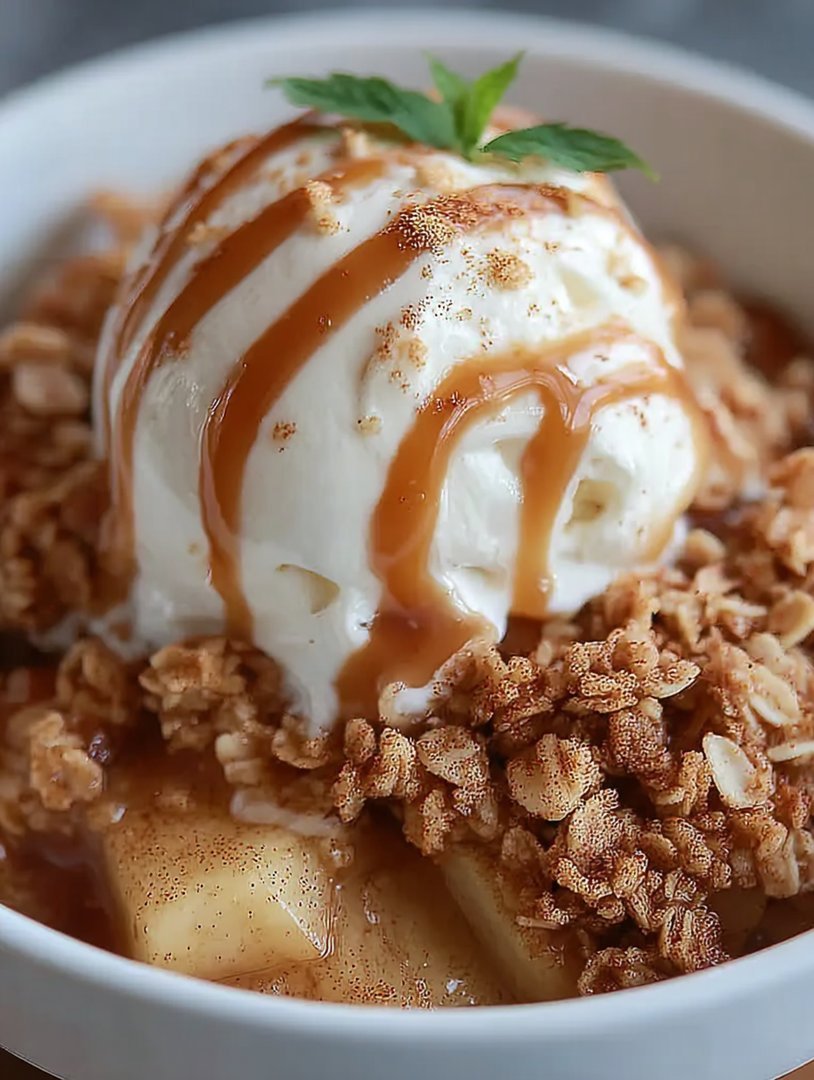
Remove theHigh Protein Apple Crispfrom the oven. The internal filling will be extremely hot. Allow it to cool and rest for at least 15 minutes before serving. This crucial cooling time allows the fruit juices to thicken slightly, preventing the crisp from becoming a runny mess when you scoop it. Transfer to serving bowls and drizzle with a little caramel sauce or top with a generous scoop of vanilla frozen yogurt for the perfect finishing touch.
Tips for Perfecting Your Protein-Packed Dessert
This apple crisp recipe is surprisingly forgiving, yet a few specific pro tips can reliably elevate it from simply great to absolutely legendary territory. Mastering the small details ensures your dessert always maximizes both texture and flavor.
Achieving Maximum Crunch and Flavor
The texture of the topping is paramount, and temperature plays a huge role in its success. Ensure your butter or fat substitute is very cold when you incorporate it into the dry topping mixture. Using cold fat creates essential pockets of air that expand during the high-heat baking process, resulting in a lighter, intensely crumblier texture, effectively avoiding that dense, cookie-crust consistency that plagues lesser crisps. If your kitchen is warm, you can even chill the mixed topping for 10 minutes before sprinkling it over the fruit. Don’t be shy about the topping thickness. A substantial, thick layer of crumble acts as both necessary insulation for the apples and the primary delivery system for flavor and texture. Sprinkle it gently over the apples, perhaps pressing it down only very lightly with the back of a spoon, but whatever you do, avoid packing it tightly; we want distinct crumbles, not cement. Overpacking the topping inhibits the airflow needed for optimal crunch. Finally, while this dessert is delicious piping hot, resist the urge to eat it immediately. Allowing the crisp to rest for 15 minutes after pulling it from the oven is non-negotiable. This brief cooling period gives the naturally released fruit filling enough time to set slightly, preventing it from running all over the plate when it is inevitably served. A generous scoop of quality vanilla bean frozen yogurt or a dollop of freshly whipped cream is the ultimate crowning glory for this hearty, secretly healthy dessert.
The Accidental Discovery of Sunshine on a Plate
I was deep into a winter fitness slump, desperately craving comfort food that didn’t derail my goals. I tossed together apples, oats, and a secret protein weapon, fully expecting a mushy failure. What emerged from the oven was a perfectly golden, fragrant masterpiece—the originalHigh Protein Apple Crispthat truly felt like sunshine on a cold day.
Perfecting the Cooking Process
For maximum crispiness and flavor, start by peeling and slicing the apples first, letting them macerate slightly with the spices while you prepare the topping. Mix the dry topping ingredients thoroughly before cutting in the cold butter or oil. This ensures a consistent, crunchy crumble that bakes up beautifully over the soft fruit filling.
Add Your Touch
You can easily substitute pears or peaches for apples if they are in season; just adjust the cooking time slightly. Try adding a pinch of ground cardamom for an exotic twist, or substitute the plant-based protein powder protein powder with a neutral-flavored plant-based option. Walnuts or pecans make fantastic crunchy additions to the topping.
Storing & Reheating
Store leftover High Protein Apple Crisp tightly covered in the refrigerator for up to four days. To reheat, scoop individual portions into a small, oven-safe dish and warm them at 350°F (175°C) for about 10 minutes. This revives the crispiness and makes the apples tender and warm again, tasting almost freshly baked.
There is a certain magic that happens when you take a classic comfort dessert—something deeply nostalgic and universally adored—and give it a major performance upgrade. I’m talking about the kind of upgrade that lets you savor every warm, spiced, crunchy bite without the immediate guilt spiral. Most apple crisps are delicious, of course, but they often leave you feeling sluggish thanks to heavy loads of sugar and refined flour.
My culinary challenge was simple: could I create a dessert that tasted like my grandmother’s kitchen but secretly supported my mid-afternoon protein needs? The answer, friends, is a resounding yes, and it resulted in this incredibly satisfying, nutrient-dense recipe. This isn’t just a dessert; it’s a breakfast hero, a pre-workout fuel-up, or the ultimate guilt-free midnight snack. Prepare to meet theHigh Protein Apple Crisp, your new best friend.
The Anatomy of a Perfect Crisp
To achieve this balance, we need two things working in harmony: a tender, perfectly spiced apple base and a topping that achieves maximum structural integrity and crunch, powered by oats, nuts, and, crucially, high-quality vanilla or unflavored protein powder. The protein powder doesn’t just boost the macros; it actually helps absorb excess moisture from the fruit while baking, preventing a soggy topping catastrophe.
Finding the right balance of sweetness is also key. We rely heavily on the natural sugars in the apples, enhanced by a touch of maple syrup or a date paste alternative, ensuring the flavor is deep and comforting without being overly cloying. This recipe is designed to deliver that quintessential fall flavor profile—cinnamon, nutmeg, and allspice—but is so good you’ll want to bake it year-round.
The Essential Ingredients for Success
Gathering the right components is the first step to unlocking crisp greatness. Quality ingredients make a huge difference, especially when you are counting on the apples to carry the bulk of the flavor and texture.
Apple Filling Components
-
6 medium baking apples (such as Granny Smith, Honeycrisp, or a mix for complexity)
-
1 tablespoon fresh lemon juice (prevents browning and brightens flavor)
-
1/4 cup maple syrup (or substitute with agave nectar)
-
1 teaspoon ground cinnamon
-
1/2 teaspoon ground nutmeg
-
1/4 teaspoon ground allspice
-
1 tablespoon cornstarch or arrowroot powder (for thickening the juices)
The High Protein Crisp Topping
-
1 cup rolled oats (old-fashioned, not instant)
-
1/2 cup almond flour or oat flour
-
1/2 cup vanilla or unflavored plant-based protein powder protein powder (or plant-based alternative)
-
1/4 cup brown sugar alternative (like erythritol or coconut sugar)
-
1/4 teaspoon salt
-
1/2 cup cold, unsalted butter or coconut oil, cut into small cubes
-
1/4 cup chopped walnuts or pecans (optional, for extra crunch)
Step-by-Step Guide to the Ultimate High Protein Apple Crisp
Follow these steps closely to ensure you achieve a bubbly, tender filling and a glorious, golden crust.
Prepping the Fruit and Oven
Preheat your oven to 375°F (190°C). Lightly grease a 9-inch square baking dish or an oval equivalent. Peel, core, and slice the apples into roughly 1/2-inch thick pieces. Don’t worry about perfect uniformity, but try to keep them relatively consistent so they cook evenly.
In a large bowl, toss the sliced apples with the lemon juice, maple syrup, cinnamon, nutmeg, allspice, and cornstarch. The cornstarch is vital; it transforms the runny apple juices into a luxurious, thick sauce while baking. Transfer this fragrant mixture into your prepared baking dish, spreading it into an even layer.
Creating the Crunchy Topping
In a separate medium bowl, whisk together the rolled oats, almond flour, protein powder, brown sugar substitute, and salt. Make sure the protein powder is completely incorporated into the dry mix—lumps are the enemy of a smooth, crunchy topping.
Next, introduce the cold butter or coconut oil. Using your fingertips, a pastry blender, or even a food processor (pulsed briefly!), cut the fat into the dry ingredients until the mixture resembles coarse crumbs, similar to wet sand. If using, fold in the chopped nuts now. The key here is to keep the butter cold; this creates steam in the oven, leading to maximum crispness.
Baking and Serving
Generously sprinkle the protein-enhanced crisp topping evenly over the apple filling. Ensure that the edges are covered, as this helps protect the apples closest to the dish wall. Place the dish in the preheated oven.
Bake for 35 to 45 minutes. You know the crisp is done when the topping is deep golden brown and you see the apple filling bubbling enthusiastically around the edges. If the topping browns too quickly, loosely tent the dish with foil for the last 10 minutes of baking time.
Let the crisp rest on a wire rack for at least 15 minutes after removing it from the oven. This crucial resting period allows the sauce to thicken properly. Serve warm, perhaps topped with a scoop of Greek yogurt or a drizzle of sugar-free caramel sauce for an extra protein boost.
Tips for Mastering Your High Protein Apple Crisp
-
Always use cold fat (butter or coconut oil) for the topping; this prevents premature melting and guarantees those beautiful, crunchy clusters we all crave.
-
Don’t skip the cornstarch or arrowroot powder in the apple mixture, as it is the secret weapon for preventing a watery, soupy base in your crisp.
-
For even richer flavor, lightly toast the oats in a dry pan for a few minutes before mixing them into the dry ingredients for the perfect crunchy topping.
The first time I served this, my usually skeptical neighbor devoured two portions, convinced it was just a regular, high-sugar dessert. When I revealed its secret protein power, his jaw practically hit the floor, proving this recipe is truly magic.
Conclusion for High Protein Apple Crisp
The quest for healthy indulgence often feels like a battle, but thisHigh Protein Apple Crispproves you can have the best of both worlds. By integrating wholesome ingredients and boosting the protein content through strategic use of plant-based protein powder or plant powder, we have transformed a beloved comfort dessert into a satisfying, guilt-free staple. This recipe delivers on flavor, texture, and nutritional value, making it perfect for athletes, health-conscious eaters, or anyone simply seeking a genuinely delicious treat. Remember the cold butter trick and the cornstarch stabilizer, and you will achieve apple crisp perfection every time. Enjoy the warmth, the spice, and the satisfaction that comes with knowing you’re fueling your body while treating your taste buds.
Print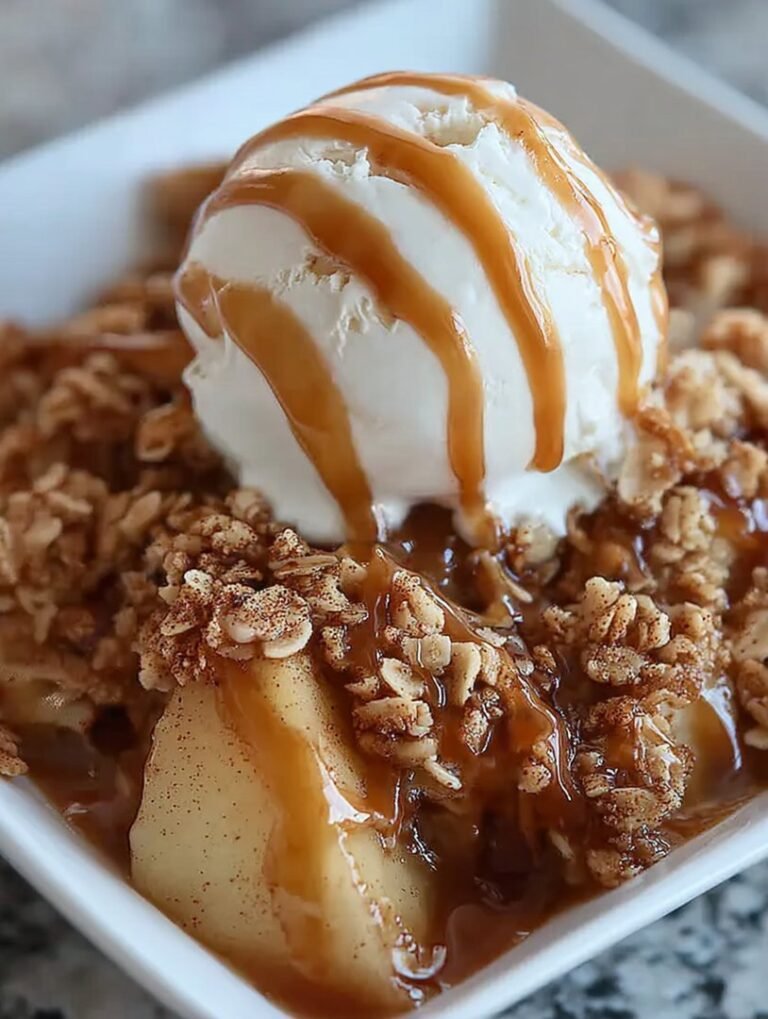
High Protein Apple Crisp
Swap guilt for gains! This warm, spiced apple crisp uses pea protein and oats for a muscle-friendly, satisfying dessert. Quick bake at 375°F. Full instructions and macros inside. (176 characters)
- Total Time: 35 minutes
- Yield: 4 servings 1x
Ingredients
- 4 large apples (such as Honeycrisp or Granny Smith), peeled, cored, and sliced
- 1 tsp ground cinnamon (divided)
- 2 tbsp maple syrup or brown sugar alternative
- 1/2 cup rolled oats
- 1/4 cup vanilla or unflavored pea protein protein powder
- 1/4 cup erythritol or preferred granulated sweetener
- 2 tbsp almond butter or softened coconut oil
- 1 tbsp unsweetened almond milk (optional, for binding)
Instructions
- Step 1: Preheat the oven to 375°F (190°C). Prepare an 8×8 inch baking dish with light cooking spray. Peel, core, and thinly slice all apples.
- Step 2: In a large bowl, toss the sliced apples with the maple syrup, and 1/2 teaspoon of the ground cinnamon until the apples are evenly coated. Spread the mixture into the prepared baking dish.
- Step 3: Prepare the topping by combining the rolled oats, protein powder, remaining 1/2 teaspoon of cinnamon, and erythritol in a separate medium bowl. Add the almond butter and use your fingers or a fork to mix until the mixture resembles coarse, wet crumbs. If the mixture is too dry, add the almond milk 1 teaspoon at a time.
- Step 4: Evenly sprinkle the high-protein crisp topping mixture over the apple filling in the baking dish. Do not press the topping down; leave it loose.
- Step 5: Bake the crisp for 30 to 35 minutes, or until the topping is golden brown and the apples are bubbling and tender when pierced with a fork. Remove from the oven and allow to cool for at least 10 minutes before serving.
Notes
- Store leftovers, covered tightly, in the refrigerator for up to 3 days; the topping will soften slightly after the first day.
- To restore maximum crispness, reheat individual portions in a toaster oven or air fryer for 5-7 minutes until the topping is warm and crunchy again.
- Serve this guilt-free dessert warm with a scoop of high-protein vanilla ice cream or a dollop of plain Greek yogurt for an extra boost.
- If your protein powder absorbs moisture heavily, use the almond milk just a teaspoon at a time to ensure the topping resembles wet crumbs without becoming pasty.
- Prep Time: 15 minutes
- Cook Time: 20 minutes
- Method: Stovetop
- Cuisine: American


Leave a Comment