
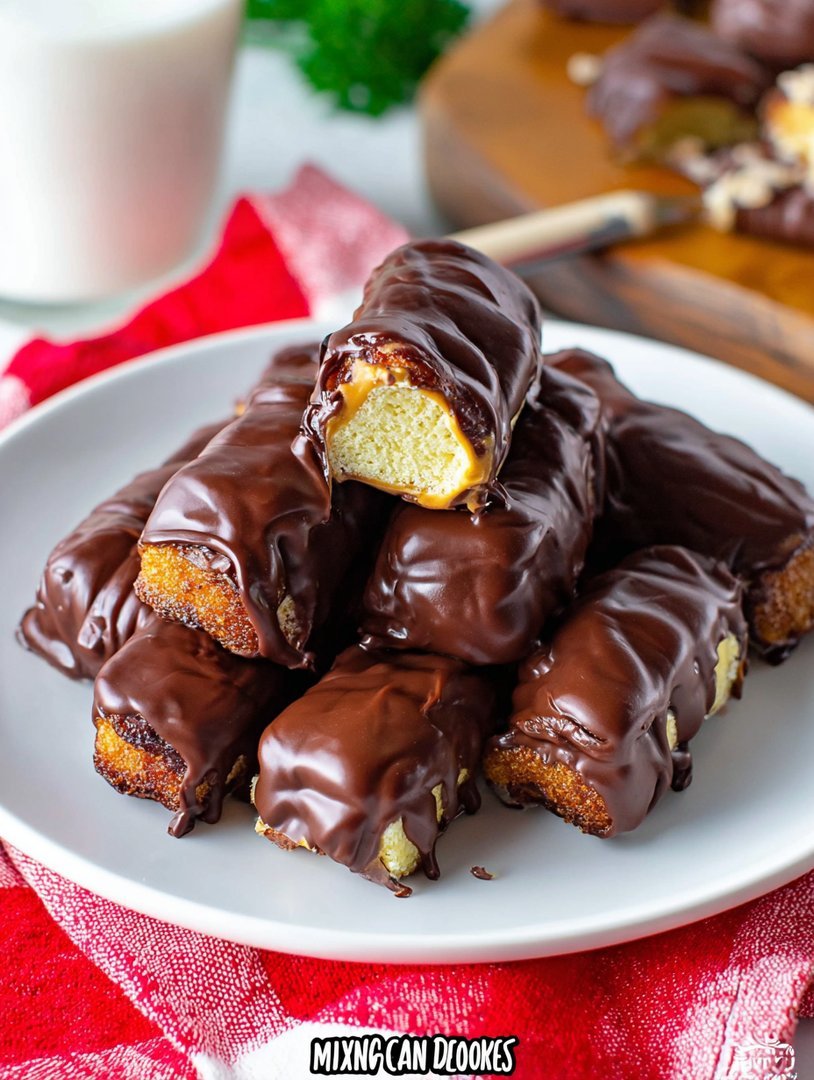
Remember those times you meticulously hid your favorite candy bar from your siblings, rationing out squares like tiny gold bricks? If you’re anything like me, the symphony of crunchy shortbread, gooey caramel, and thick chocolate defined childhood bliss. Forget the corner store version, though. Today, we’re embarking on a mission, a glorious culinary adventure, if you will, to learn exactlyHow to Make Twix Barsthat put the store-bought imitations firmly to shame.
- Layered perfection: Achieving the distinct shortbread, caramel, and chocolate layers requires patience but yields incredible textural complexity in every bite.
- Gooey caramel center: This soft, chewy caramel layer is significantly richer and more buttery than any pre-packaged version you’ve ever encountered.
- Impressive presentation: The clean, crisp edges and thick, glossy chocolate coating make these homemade treats perfect for special gatherings or holiday gifting.
- Surprisingly simple dough: The shortbread base is easy to press and bake, requiring only minimal ingredients for maximum foundational flavor and crunch.
The Quest for the Perfect Homemade Candy Bar
My relationship with the Twix bar started early. It was the sophisticated choice, the one you chose when you felt like you needed textural variety in your life, unlike the singular mush of other chocolate bars. But as an adult with a fully functioning kitchen (and slightly better standards), I found the commercially produced version lacking. The shortbread was often dry, and the caramel felt suspiciously like flavored wax.
I realized the only way to achieve the Platonic ideal of this multi-layered masterpiece was to build it myself. This recipe is the culmination of dozens of failed attempts, sticky kitchen disasters, and late-night experiments. We are talking about deep-dive science here: precise chilling times, the exact temperature for the caramel pull, and the art of chocolate coating without creating a massive, melted mess.
Why Homemade Always Wins
When you make these treats at home, you are in full control of the quality. We aren’t using corn syrup as the main flavor profile; we are using real butter, rich cream, and high-quality chocolate. The difference is profound. The shortbread crumbles with a rich, buttery density that melts immediately, followed by that deeply satisfying, slow-chew caramel that tastes exactly like sunshine and butterfat. Then, the crisp snap of the chocolate shell delivers the final, perfect textural contrast.
The beauty of the homemade version is customization. You can control the thickness of the caramel layer (I prefer mine thick enough to require some jaw work) and choose a higher percentage cocoa content for the coating, dialing up the intensity of the chocolate finish. If you’ve ever attempted a complicated pastry or fiddly dessert, rest assured: this candy bar, while requiring several steps, is fundamentally straightforward and immensely rewarding. It’s a kitchen project worthy of a weekend afternoon, and the resulting applause from your taste-testers is well worth the effort.
Mastering the Three Layers
Success in creating the perfect homemade candy bar depends entirely on respecting the three distinct phases. Think of this as architectural baking. The base layer—the shortbread—must be sturdy enough to support the tower of caramel and chocolate, yet tender enough to dissolve beautifully. The caramel requires patience; rushing the cooking time results in a pale, flabby disaster instead of a deep, nutty richness. Finally, the chocolate coating must be smooth, ensuring a professional, attractive finish without blooming or dulling.
We manage these layers through controlled chilling. The freezer is our best friend in this operation, acting as the structural engineer that solidifies each component before we move to the next. The shortbread needs to be completely cool before the hot caramel is applied, and the entire slab must be stone-cold before you even think about coating it in molten chocolate. If you rush the chilling, the layers bleed together, creating a beautiful, buttery, but decidedly shapeless blob. Give your treats time to set, and they will reward you with razor-sharp edges and distinct texture separation.
Ingredients for How to Make Twix Bars
Here’s what you’ll need to make this delicious dish:
- All-Purpose FlourProvides the necessary structure for the shortbread base; measure carefully to avoid a tough dough.
- Unsalted ButterEssential for both the shortbread’s rich flavor and the caramel’s smooth texture; ensure it is cold for the dough and softened for the caramel.
- Granulated SugarSweetens the shortbread and serves as the foundation for the caramel when dissolved with the butter and cream.
- Heavy CreamAdds richness and crucial moisture to the caramel, helping it stay soft and chewy rather than brittle.
- Light Brown SugarGives the caramel a deeper, molasses-like flavor complexity compared to using only white sugar.
- Alcohol-Free Vanilla ExtractEnhances the overall sweetness and provides aromatic depth to the creamy caramel filling.
- Semi-Sweet Chocolate ChipsUsed for the outer coating; choose a high-quality brand for the best melting properties and flavor payoff.
- Vegetable Shortening or Coconut OilA small amount aids in melting the chocolate smoothly and gives the final coating a desirable, glossy sheen.
The full ingredients list, including measurements, is provided in the recipe card directly below.
How to Make Twix Bars
Follow these simple steps to prepare this delicious dish:
Step 1: Preparing and Baking the Shortbread Base
Preheat your oven to 350°F (175°C). Line a 9×13 inch baking pan with parchment paper, leaving an overhang on two sides for easy removal later. In a large bowl, mix the flour, sugar, and chilled, cubed butter until coarse crumbs form. Press this dough evenly and firmly into the prepared baking pan. Bake the shortbread for 20 to 25 minutes, or until the edges are lightly golden brown. Let the base cool completely in the pan on a wire rack.
Step 2: Cooking the Rich Caramel Layer
In a heavy-bottomed saucepan over medium heat, combine the butter, granulated sugar, brown sugar, and heavy cream. Stir continuously until the butter is melted and the sugars are dissolved. Bring the mixture to a low boil without stirring, allowing it to cook for 8 to 10 minutes until it reaches 235°F (113°C) on a candy thermometer—this is the soft-ball stage that ensures chewy caramel. Remove from the heat, stir in the alcohol-free vanilla extract, and immediately pour the hot caramel evenly over the cooled shortbread base.
Step 3: Chilling and Cutting the Slab
Once the caramel has set slightly at room temperature for about 30 minutes, transfer the entire pan to the refrigerator. Chill the shortbread and caramel slab for at least 4 hours, or ideally overnight, until the caramel is completely firm and non-sticky. Using the parchment paper overhang, carefully lift the chilled slab out of the pan and place it on a cutting board. Trim the edges and cut the slab into uniform fingers or rectangles—this is easier when the caramel is still very cold.
Step 4: Coating the Bars in Chocolate
In a double boiler or a microwave-safe bowl, melt the chocolate chips with the vegetable shortening or coconut oil, stirring until completely smooth and glossy. Place the cut bars onto a cooling rack set over a baking sheet (this catches the excess chocolate). Drench each bar completely in the melted chocolate, using two forks to gently turn and lift them. Tap the forks lightly against the side of the bowl to shake off excess chocolate.
Step 5: Final Set and Storage
Carefully transfer the chocolate-coated bars back to the parchment-lined baking sheet. For the signature look, you can drizzle a small amount of remaining melted chocolate over the tops. Return the bars to the refrigerator for about 1 hour to allow the chocolate coating to fully harden and snap crisply. Store these magnificent creations in an airtight container at room temperature for up to a week, though they rarely last that long.
Troubleshooting and Tips for Success
Making homemade candy bars can feel intimidating, but a few simple tips will elevate your results from amateur kitchen project to professional confectionery. The biggest variable in this recipe is often the caramel, which is why owning a reliable candy thermometer is critical. Eyeballing the caramel stage usually leads to caramel that is either too runny (it won’t hold its shape) or too hard (it feels like breaking a tooth). Hitting 235°F ensures that perfectly pliable, chewy texture we desire.
Another crucial step is proper shortbread docking. After you press the shortbread dough into the pan, prick it all over with a fork before baking. This process, called “docking,” prevents the dough from puffing up unevenly, ensuring you have a flat, stable platform for the caramel. If your shortbread puffs, your layers will be uneven and difficult to cut neatly. Remember to let that shortbread cool completely; adding hot caramel to warm shortbread results in a mushy mess at the base.
Handling the Temperamental Chocolate Coating
While tempering chocolate (the technical process of melting and cooling chocolate precisely) yields the glossiest, snappiest result, it can be tricky for the home baker. A much easier shortcut is using a small amount of vegetable shortening or refined coconut oil mixed into the melted chocolate. This significantly lowers the viscosity of the chocolate, making it thinner and easier to dip, while also helping it set up smoothly with a beautiful shine. Be warned, though: If your caramel slab is not absolutely frozen when you dip it, the heat from the chocolate will melt the caramel immediately, causing the bar to disintegrate.
If you find that your chocolate is seizing or becoming grainy during the melting process, it usually means water has been introduced. Use entirely dry utensils and ensure no steam from the double boiler touches the chocolate directly. If you are microwaving, use 30-second bursts, stirring vigorously between each burst. Patience is key here; rushing the melt ruins the smooth finish.
Variations and Serving Suggestions
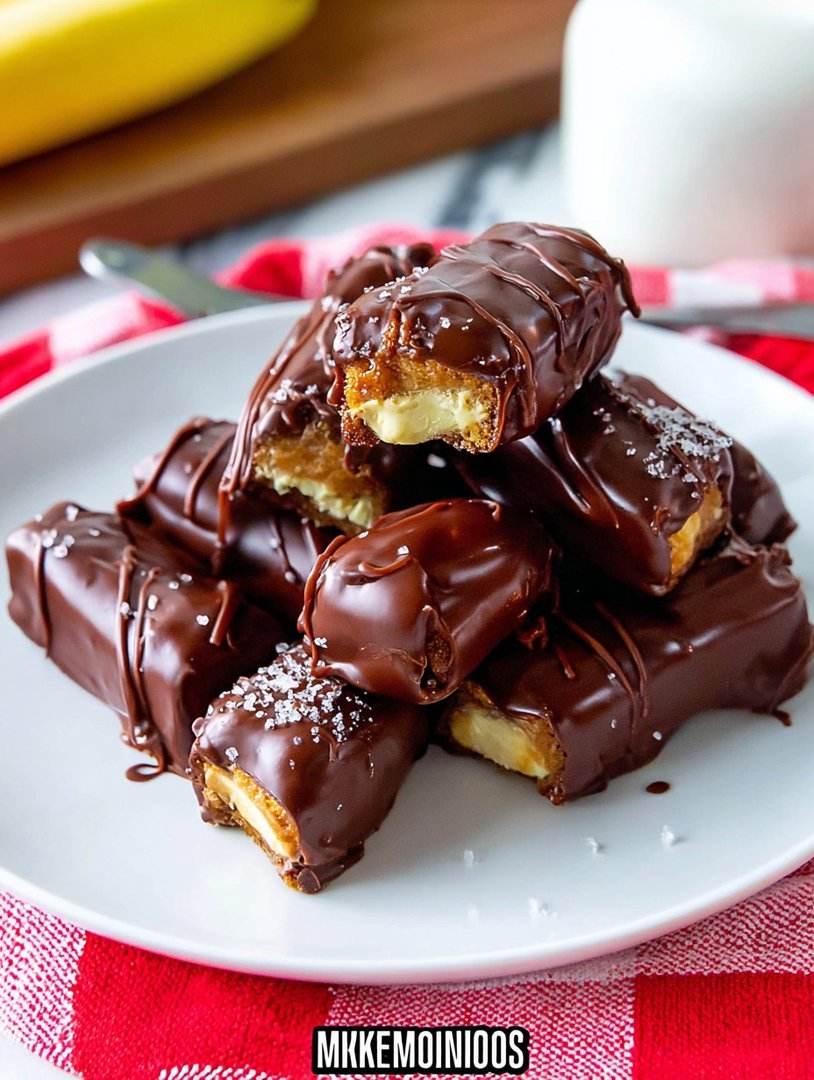
The classic combination of shortbread, caramel, and chocolate is divine, but you can certainly play around with flavors. To introduce a savory counterpoint, sprinkle a little flaky sea salt over the caramel layer immediately after pouring it onto the shortbread. This transforms the sweet treat into a sophisticated salted caramel bar that provides a wonderful pop of flavor.
For a festive twist, consider adding a hint of spice. Stir a quarter teaspoon of ground cinnamon into the flour mixture for the shortbread base, or add a teaspoon of instant espresso powder to the caramel mixture for a mocha note. While this treat is spectacular on its own, it also makes an incredible component for other desserts. Try crumbling a bar over a scoop of vanilla bean ice cream or serving a finger alongside a hot mug of coffee for a truly decadent pairing. The best serving suggestion, however, remains hiding them away and enjoying them when no one else is looking.
The Accidental Discovery of Sunshine on a Plate
I first attempted this copycat candy bar disaster on a rainy Sunday, aiming for simple shortbread cookies but stumbling instead into shortbread perfection. The caramel layer was sheer luck, a gooey, buttery miracle that tasted exactly like my favorite grocery aisle treat. Suddenly, the kitchen felt less like a messy workshop and more like a five-star confectionary.
Conquering the Candy Bar: Ingredients List
There is a glorious secret hiding in plain sight: those iconic layered bars you adore are astonishingly simple to replicate in your own kitchen. Forget the factory assembly line; all you need are basic pantry staples, a little patience, and a dedicated spirit. We are creating three distinct layers of happiness—the crisp foundation, the chewy golden center, and the snappy chocolate shell.
Before you embark on your journey to discoverHow to Make Twix Bars, gather your provisions. The quality of your ingredients directly translates to the ultimate taste experience, so splurge on the good butter—you deserve it.
Shortbread Requirements
- 1 cup unsalted butter, softened
- ½ cup granulated sugar
- 2 cups all-purpose flour
- ¼ teaspoon salt
- 1 teaspoon alcohol-free vanilla extract
The Ultimate Caramel Layer
- 1 cup unsalted butter
- 1 cup packed light brown sugar
- 1 (14-ounce) can sweetened condensed milk
- 2 tablespoons light corn syrup (this helps prevent crystallization)
- 1 teaspoon alcohol-free vanilla extract
- Pinch of fine sea salt
Chocolate Coating Essentials
- 2 cups melting chocolate wafers or high-quality semi-sweet chocolate chips
- 1 tablespoon neutral cooking oil (such as coconut oil or vegetable oil, optional, for easier melting)
Once your mission control is stocked, prepare a 9×13 inch baking pan by lining it completely with parchment paper, allowing the edges to overhang. These little parchment handles will be your best friend when it comes time to lift the finished bars out for slicing.
Mastering the Layers: Step-by-Step Guide on How to Make Twix Bars
We approach this project in three distinct phases. Think of it less as baking and more as architectural construction. We must build a solid, crumbly foundation, pour a sticky, resilient middle, and top it all off with a flawless, crack-free roof. The most crucial element in this entire process is chilling time—do not rush the chilling. A perfectly set layer prevents catastrophic meltdowns when the next layer is applied.
Phase One: The Crumbly Foundation
This shortbread layer provides the signature buttery crunch that makes this copycat recipe so delightful. You want it firm but tender.
- Preheat your oven to 350°F (175°C). Ensure your prepared 9×13 pan is ready to go.
- In a large mixing bowl, beat the softened butter and granulated sugar together until they achieve a light and fluffy texture, usually about three minutes.
- Add the alcohol-free vanilla extract. In a separate bowl, whisk together the flour and salt, then gradually add the dry ingredients to the wet mixture, mixing only until just combined. Overmixing the shortbread dough leads to tough bars.
- Press the dough firmly and evenly into the bottom of the prepared baking pan. Use the bottom of a measuring cup to help achieve a smooth, compact surface.
- Bake for 20 to 25 minutes, or until the edges are lightly golden brown. Remove the shortbread from the oven and let it cool completely on a wire rack. This is non-negotiable before moving to the next layer.
Phase Two: Creating the Gooey Golden Center
The caramel layer is the sticky, messy, wonderful heart of these layered chocolate bars. Patience is vital here; constant stirring prevents scorching and ensures a smooth consistency.
- In a heavy-bottomed saucepan over medium heat, combine the butter, brown sugar, condensed milk, and corn syrup. Stir constantly until the butter is fully melted and the mixture comes to a gentle simmer.
- Reduce the heat slightly and continue stirring for about 8 to 10 minutes. The caramel should noticeably thicken and turn a deep, rich golden color. If you are using a candy thermometer, aim for 225°F (107°C).
- Remove the pan from the heat and stir in the alcohol-free vanilla extract and the pinch of sea salt.
- Immediately pour the hot caramel evenly over the completely cooled shortbread base.
- Transfer the pan to the refrigerator and chill for at least two hours, or until the caramel is completely firm and non-sticky.
Phase Three: The Chocolate Waterfall
A crisp, shiny chocolate coating is the final touch. Tempering the chocolate, or simply using high-quality melting wafers, gives these homemade candy bars that satisfying snap.
- Melt the chocolate wafers or chips in a double boiler or microwave, using short 30-second intervals and stirring in between until smooth. If using standard chocolate chips, stir in the optional tablespoon of oil to help with pourability and shine.
- Pour the melted chocolate over the chilled caramel layer, spreading it quickly and evenly with an offset spatula.
- Return the pan to the refrigerator and chill for another 30 to 45 minutes, or until the chocolate is completely set and firm to the touch.
- Using the parchment paper handles, lift the entire bar slab out of the pan. Place it on a cutting board and slice into individual rectangular candy bars. A warm, sharp knife works best for clean cuts.
Perfecting the Cooking Process
Always bake the shortbread base completely and let it cool before adding the caramel. While the shortbread chills, focus on simmering the rich, creamy caramel layer to achieve that perfect chewiness and prevent scorching. Finally, temper the chocolate coating last for a professional, snappy finish, ensuring it sets quickly and evenly.
Troubleshooting Common Candy Bar Calamities
Even seasoned bakers sometimes encounter kitchen mishaps. The key to successful layered bars lies in controlling temperature and moisture. Here are a few insider tips from years of sticky, buttery experimentation to ensure your homemade bars are nothing short of legendary.
- Don’t rush the caramel cooling stage; if it’s too hot, it will melt the shortbread and create a sad, soggy mess upon setting.
- Use quality melting wafers for the chocolate coating; they set smoother and faster than standard chocolate chips, giving that perfect satisfying snap.
- When pressing the shortbread, line your pan with parchment paper hanging over the edges—this acts as handles for easy removal and clean, precise cuts.
The best compliment I ever received was when my neighbor swore I bought these treats from a gourmet bakery, claiming they were far too perfect to be homemade. That sealed the deal: patience in chilling truly pays off.
Add Your Touch
Swap out plain milk chocolate for white or dark chips for intensity, creating entirely new flavor profiles. A generous pinch of flaky sea salt sprinkled directly onto the finished caramel elevates the flavor beautifully, cutting through the sweetness. For a spiced twist, mix a tiny bit of ground ginger or cinnamon into the shortbread dough before baking. Customization keeps things fun!
Storing & Reheating
Store these layered chocolate bars tightly sealed in an airtight container in the refrigerator for up to ten glorious days, though realistically they rarely last past day three. Freezing individual slices wrapped securely in parchment paper works great for up to two months. Always remember to thaw them slowly on the counter before enjoying for the best texture.
Conclusion for How to Make Twix Bars
MasteringHow to Make Twix Barsat home transforms a simple baking project into a rewarding confectionery triumph. We covered the three essential phases: creating the sturdy shortbread base, simmering the perfect chewy caramel, and finishing with a crisp chocolate coating. Remember that meticulous chilling time between layers is the true secret weapon for achieving that layered perfection and preventing a sticky catastrophe.
Whether you are making these for a special gathering or just for personal enjoyment, these homemade candy bars offer that iconic flavor and texture that is guaranteed to impress. Grab your apron, embrace the sticky mess, and prepare to elevate your baking status with this irresistible copycat recipe.
Print
How to Make Twix Bars
Achieve homemade candy bar perfection! This recipe features a buttery shortbread base baked golden, topped with a luscious, stovetop-thickened caramel.
- Total Time: 35 minutes
- Yield: 4 servings
Ingredients
- All-purpose flour: 1 cup
- Unsalted butter (chilled, for shortbread): 1/2 cup (1 stick)
- Granulated sugar: 1/4 cup
- Sweetened condensed milk: 1 (14 oz) can
- Light brown sugar (packed, for caramel): 1/2 cup
- Unsalted butter (for caramel): 1/4 cup
- vanilla powder: 1 teaspoon
- Semi-sweet chocolate chips (or melting wafers): 2 cups
Instructions
- Step 1: Preheat the oven to 350°F (175°C) and line an 8×8 inch baking pan with parchment paper, leaving an overhang. Mix the flour, 1/2 cup chilled butter, and granulated sugar until crumbly dough forms. Press the dough evenly into the bottom of the prepared pan and bake for 18-20 minutes until the edges are lightly golden. Let the shortbread cool completely.
- Step 2: Prepare the caramel layer by combining the condensed milk, brown sugar, 1/4 cup butter, and vanilla bean paste in a medium saucepan over medium heat. Bring the mixture to a gentle boil, stirring constantly, then reduce the heat to low and cook for 5-7 minutes, stirring until the mixture thickens significantly and turns a deep amber color.
- Step 3: Immediately pour the warm caramel over the cooled shortbread crust, spreading it evenly to cover the entire base. Refrigerate the pan for at least 3-4 hours (or freeze for 1 hour) until the caramel is completely firm and set.
- Step 4: Once set, use the parchment overhang to lift the entire bar out of the pan. Cut the bar into individual Twix-sized strips (approximately 1 inch wide and 3-4 inches long). Return the cut bars to the refrigerator while preparing the chocolate coating.
- Step 5: Melt the chocolate chips in a heatproof bowl set over a saucepan of simmering water (or in the microwave in 30-second intervals), stirring until completely smooth. Dip each chilled bar into the melted chocolate, coating it entirely, and scraping the excess off the bottom. Place the coated bars on a parchment-lined tray and chill for 15-20 minutes until the chocolate shell is firm before serving.
Notes
- Store finished Twix Bars in an airtight container in the refrigerator for up to one week, layering them between parchment paper to prevent the chocolate coating from sticking.
- For the best texture, allow the chilled bars to sit at room temperature for about 10 minutes before eating, which slightly softens the buttery shortbread and caramel.
- Serve these rich bars alongside a strong, hot cup of coffee or crumbled over a scoop of vanilla bean ice cream for an even more decadent treat.
- Achieving a deep amber color while cooking the caramel is crucial for stability; this ensures the mixture sets firmly enough to withstand cutting without oozing.
- Prep Time: 15 minutes
- Cook Time: 20 minutes
- Method: Stovetop
- Cuisine: American


Leave a Comment