
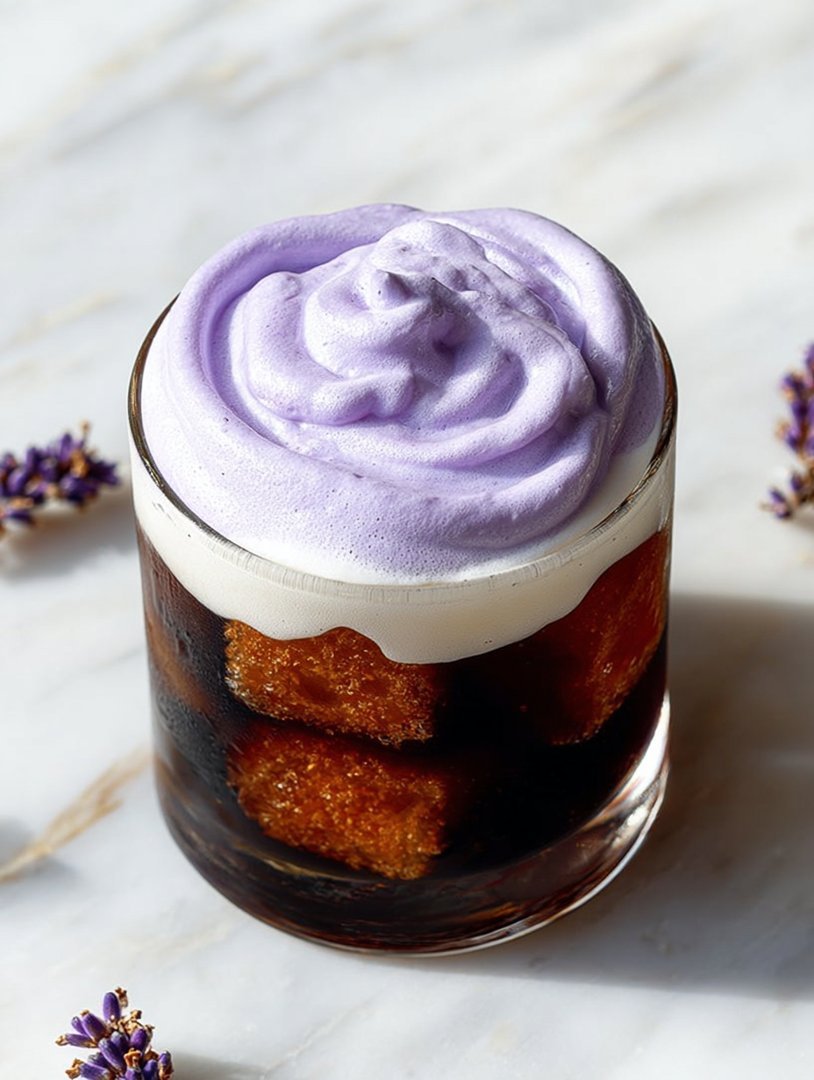
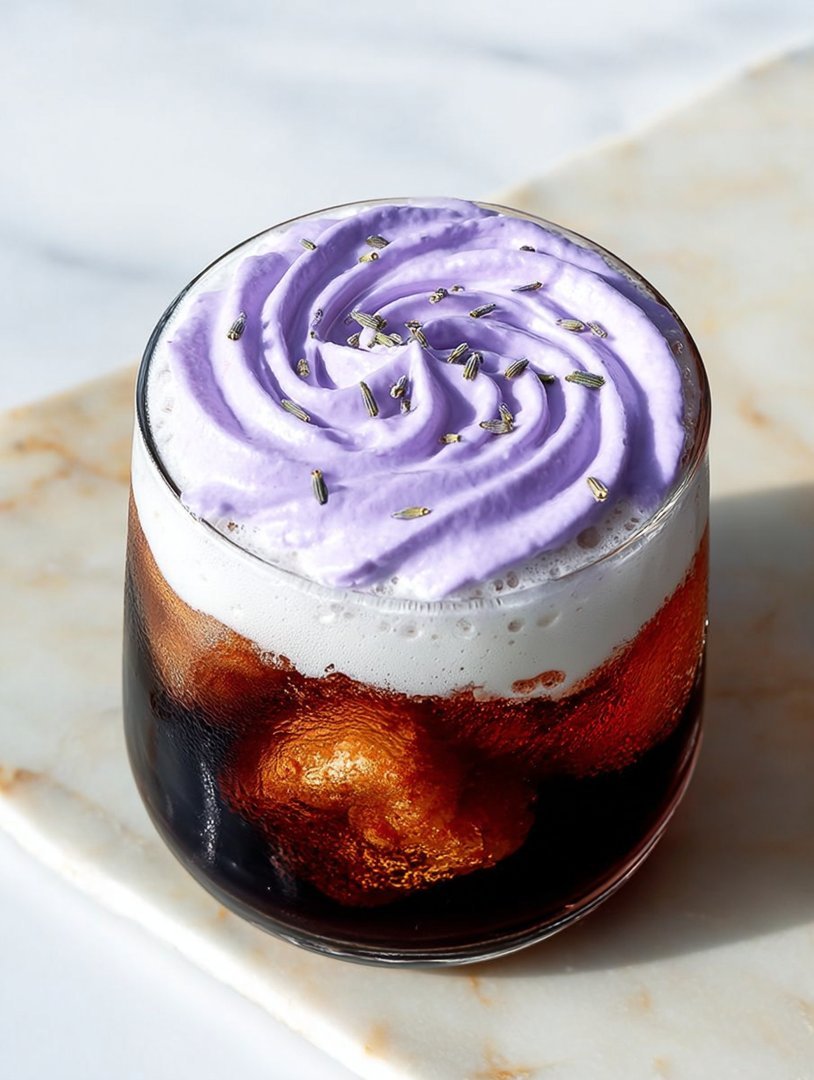
Forget your basic cream top; we are elevating coffee culture to artisanal levels today. Imagine the ethereal scent of Provence meeting the comforting sweetness of dessert—that is the magic ofLavender Vanilla Cold Foam.
This isn’t just a topping; it’s a fluffy, aromatic cloud that transforms your morning brew from mundane fuel into a delightful, cafe-quality ritual you can easily master at home.
- This luxurious topping requires only five minutes and a simple immersion blender, proving that elegance does not always demand complex equipment or skill.
- The delicate floral notes of lavender blend beautifully with rich, creamy vanilla, offering a sophisticated and calming taste experience unlike anything you have previously tried.
- Its velvety, pale purple hue and cloud-like texture immediately upgrade any iced coffee or tea beverage, making your drink instantly Instagram-worthy.
- While perfect on cold brew, this aromatic, sweetened foam also enhances matcha lattes, iced chai, or even hot chocolate during cooler evenings.
Ingredients for Lavender Vanilla Cold Foam
Here’s what you’ll need to make this delicious dish:
- Heavy Whipping CreamChoose cold, high-fat content cream, as this is the essential base that provides the necessary stability and luxurious thickness for the foam.
- Milk (Whole or 2%)A small amount of milk helps thin the heavy cream slightly, ensuring the final foam remains pourable yet thick enough to float beautifully on your beverage.
- Lavender SyrupOpt for a high-quality, culinary-grade syrup; the quality of this ingredient directly determines the floral aroma and flavor profile of the cold foam.
- Vanilla Bean PasteUse pure vanilla bean paste for the richest flavor, complementing the lavender and adding a familiar, comforting sweetness to the mix.
- Powdered Sugar (Optional)If your lavender syrup is not highly sweetened, a small addition of powdered sugar ensures the foam is perfectly balanced without adding grainy texture.
The full ingredients list, including measurements, is provided in the recipe card directly below.
How to Make Lavender Vanilla Cold Foam
Follow these simple steps to prepare this delicious dish:
-
Step 1: Chill Your Tools
Ensure that the heavy cream and milk are thoroughly chilled before starting. If possible, place your mixing bowl or frothing pitcher into the freezer for five minutes before use, as cold ingredients and cold equipment are crucial for achieving maximum volume and stiffness.
-
Step 2: Combine the Essentials
Pour the heavy whipping cream, milk, lavender syrup, and vanilla bean paste into the chilled mixing container. If you are using powdered sugar, sift it lightly over the mixture now to prevent clumps from forming during the blending process.
-
Step 3: The Frothing Phase
Using an immersion blender, a handheld milk frother, or a French press, begin to whip the mixture on medium-low speed. Keep the blender slightly submerged near the surface to incorporate air. You want the consistency to thicken considerably but still be pourable, stopping just before it reaches the stiff peak stage usually reserved for conventional whipped cream.
-
Step 4: The Final Assembly
Pour your favorite chilled beverage—iced coffee, cold brew, or even unsweetened iced tea—into a glass filled with ice. Gently spoon or pour the finishedLavender Vanilla Cold Foamover the top of the drink, allowing the airy cloud to settle elegantly on the surface.
Transfer to plates and drizzle with sauce for the perfect finishing touch.
The Story Behind the Perfect Coffee Topping
I distinctly remember the first time I encountered a cold foam topping. It was at a ridiculously trendy cafe where the barista looked like he moonlighted as a fashion model and the coffee cost approximately the price of a small European car. I ordered a drink topped with this legendary, ethereal cloud of sweetness, and I was hooked. I also realized immediately that if I wanted to continue enjoying this lifestyle, I would need a second mortgage or, more realistically, to figure out how to make it myself.
My initial attempts were catastrophic. I tried shaking cream in a jar like a demented butter churner, resulting in something resembling slightly chunky milk. I used a stand mixer, which promptly coated my kitchen ceiling in a fine mist of dairy product. The turning point came when I discovered the magic ratio and the non-negotiable requirement of arctic temperatures. I learned that cold foam is not quite whipped cream; it needs that lovely, dense, yet pourable texture—a fluffy, aromatic layer designed to integrate slowly into your coffee. After countless trials, many wasted drops of expensive lavender syrup, and one very messy incident involving a blender set to “turbo,” I finally achieved the perfect consistency for this lavender-infused foam. This recipe is the culmination of that sticky, humorous journey, designed to bring that high-end cafe experience straight into your mug without the designer price tag or the need for a professional cleaning crew.
Choosing Your Dairy Base for Maximum Fluff
The secret weapon in achieving that coveted velvety texture in your cold foam isn’t just technique; it’s the fat content of your dairy. Heavy whipping cream (around 36% fat) is non-negotiable for stability. However, using 100% heavy cream results in stiff, conventional whipped cream—it won’t pour beautifully onto your drink. By cutting the heavy cream with a splash of milk, usually whole milk or 2%, you achieve that desirable, slightly thinner, yet stable cold foam structure. If you need a dairy-free alternative, oat milk creamer often yields the best results, though it sometimes requires a pinch of xanthan gum to mimic the stabilizing properties of dairy fat. Experimenting with different dairy ratios can customize the density of your vanilla cream topping to match your personal preference for density and texture.
Mastering the Flavor Profile: Beyond Vanilla
While the combination of lavender and vanilla is classic and deeply soothing, this recipe is highly adaptable. Once you nail the technique for the cold foam base, you can play with endless aromatic variations. For a robust flavor, try substituting the lavender syrup with brown sugar cinnamon syrup for a cozy fall treat. If you want something brighter, use a touch of lemon zest and ginger syrup. Remember that a little flavor goes a long way, especially with floral or spice notes; start with a conservative amount of syrup or flavoring and taste as you go. The key is to enhance your beverage, not overwhelm it, allowing the ethereal flavor of the foam to complement the rich bitterness of the coffee underneath. Achieving the perfect aromatic cloud requires patience and careful layering of flavors.
Troubleshooting: Why Isn’t My Foam Thickening?
If you have spent five minutes whipping and are still staring at liquid milk, do not panic; this is usually a simple temperature problem. Cold foam relies entirely on cold ingredients. If the cream or milk has warmed up even slightly, the fat molecules won’t incorporate enough air to form stable bubbles. The quick fixes are straightforward: place the bowl (and the contents) back into the freezer for 10 minutes, and ensure the frothing tool itself hasn’t gotten hot from use. If temperature isn’t the issue, check your equipment. An immersion blender or powerful handheld frother works best. Whisking by hand is nearly impossible unless you have the endurance of a competitive arm wrestler. If all else fails, add another splash of heavy cream—more fat always equals more volume potential—and resume whipping vigorously.
Key Tips for the Fluffiest Finish
- Temperature is King:Always start with cream and milk straight from the coldest part of your refrigerator.
- Don’t Over-Whip:Stop the frothing process immediately once the mixture forms soft, billowy peaks. If you over-whip, it becomes conventional whipped cream and won’t merge nicely with your drink.
- Start Low, Go Slow:Begin frothing at a lower speed to gently incorporate air, then increase the speed slightly only once the mixture starts to look foamy.
- The Syrup Factor:If you use a thin syrup, you might need slightly less milk to maintain stability. Thicker, homemade syrups often provide better body.
Frequently Asked Questions About Aromatic Cold Foam
Can I make the Lavender Vanilla Cold Foam ahead of time?
While you can certainly make this vanilla cream topping up to two hours in advance, it is always best when served immediately. Cold foam loses its height and stability the longer it sits, so if you must prepare it early, store it in an airtight container in the refrigerator and give it a quick whisk just before serving.
What kind of coffee works best with this fragrant foam?
The robust flavors of cold brew coffee or strong espresso are the perfect pairing for this sweet, aromatic foam. The cool temperature and intensity of the coffee cut through the richness of the foam, creating a beautifully balanced flavor experience.
Are there any natural coloring options for the purple hue?
If you are using a clear lavender syrup and want that signature pale purple, try adding a tiny drop of natural food coloring derived from purple carrots or blueberries. Remember that you only need a minuscule amount to achieve the beautiful, soft hue.
How can I make this recipe vegan or dairy-free?
To make a dairy-free version, substitute the heavy cream and milk with a high-fat coconut cream (chilled overnight) or a thick, full-fat oat milk creamer. You might need to add a small pinch of a plant-based stabilizer like xanthan gum to achieve the desired density and hold in this aromatic topping.
Creating your own signature coffee bar at home is simple when you have a stellar recipe like this one. Enjoy this delightfulLavender Vanilla Cold Foam, and prepare to elevate your everyday caffeine fix into a moment of true culinary bliss.
The Quest for Café Bliss: Why Cold Foam is Your New Best Friend
There is a sacred moment when you sip your expensive specialty coffee and realize that the magic lies entirely in the velvety cloud floating on top. That ethereal layer, the cold foam, transforms a regular iced coffee into a sensory experience. For years, I chased that perfection, paying seven dollars a pop until I cracked the code. The good news? You can recreate that luxurious, artisanal feel right in your own kitchen, and trust me, your bank account will thank you.
I distinctly remember the first time I encountered the specific flavor profile we are discussing today: a whisper of floral calmness meeting the classic comfort of vanilla. It was a revelation. It wasn’t just coffee; it was a mini-vacation in a cup. If you are looking to elevate your morning routine, or perhaps you want to impress your friends with a drink that looks and tastes like it came from a high-end café, learning how to make the perfectLavender Vanilla Cold Foamis essential.
Unlocking Tranquility: The Charm of Lavender
Before we dive into the foam mechanics, we need the flavor foundation. Lavender can be tricky. Too much, and your coffee tastes like soap; too little, and you miss the point entirely. The key is balance. We achieve this through a specialized lavender syrup. Making this syrup at home ensures the freshest, most potent floral notes without the chemical aftertaste found in some store-bought varieties. It’s remarkably simple and only requires three core ingredients: water, sugar, and food-grade dried lavender buds.
Think of this syrup as the liquid gold that carries the tranquility. Once you master the syrup, the world of floral drinks opens up. But paired with classic vanilla, it creates a soothing, slightly sweet, and aromatic topper that complements robust cold brew or strong iced espresso perfectly. It’s an immediate mood elevator, turning that Monday morning drag into a moment of pure, fragrant relaxation.
Crafting the Homemade Lavender Syrup
This preliminary step is where we infuse the delicate flavor that makes theLavender Vanilla Cold Foamtruly spectacular. You need to simmer the ingredients gently. Don’t let it boil vigorously; we are coaxing the flavor out, not boiling it to death. Once the sugar dissolves and the mixture thickens slightly, remove it from the heat immediately. Letting it steep for about 30 minutes after cooking allows those precious lavender notes to fully saturate the syrup base. Remember to strain the mixture thoroughly to ensure no rogue buds make it into your final foam—nobody wants a textural surprise in their sip!
Lavender Syrup Ingredients
- 1 cup filtered water
- 1 cup granulated sugar
- 2 tablespoons dried, food-grade lavender buds
Instructions for Syrup
- Combine water and sugar in a small saucepan over medium heat. Stir until the sugar is completely dissolved.
- Add the lavender buds. Bring the mixture just barely to a simmer, then immediately reduce the heat to low.
- Cook for about 5 minutes without boiling.
- Remove the saucepan from the heat, cover it, and allow the syrup to steep for 20 to 30 minutes.
- Strain the syrup through a fine-mesh sieve or cheesecloth into an airtight container. Discard the lavender buds.
- Cool completely before using. This syrup stores well in the refrigerator for up to two weeks.
The Science of Softness: Whipping the Perfect Cold Foam
The real difference between good foam and great foam is texture. Cold foam isn’t stiff like whipped cream; it’s pourable, yet thick enough to sit majestically atop your beverage. We achieve this distinct texture by using a blend of ingredients and whipping them just right. The ratio of cream to milk is critical here. Using only heavy cream results in overly stiff whipped cream, which is not what we want. We need enough whole milk (or a suitable non-dairy alternative) to loosen the structure while maintaining the luxurious mouthfeel provided by the cream.
When creatingLavender Vanilla Cold Foam, ensure all your components are thoroughly chilled. Cold ingredients are crucial for achieving that stable, light foam structure. If your cream is warm, it struggles to emulsify properly, resulting in a thin, watery mess instead of a cloud-like topping. I recommend placing your mixing bowl, whisk attachment, or frothing device in the freezer for about ten minutes before you begin.
While professional coffee shops often use specialized aerating blenders, you can achieve excellent results using a handheld milk frother, an immersion blender with a whisk attachment, or even a French press. The French press method, surprisingly, is incredibly effective. Pour the liquid mixture into the press, plunge rapidly for about 45 to 60 seconds, and watch the magic happen. The foam should be thick, smooth, and easily spooned onto your favorite cold brew.
The Ultimate Lavender Vanilla Cold Foam Recipe
This recipe yields enough cold foam for 2-3 standard iced drinks. Feel free to double the recipe if you are serving a crowd of fellow coffee enthusiasts.
Ingredients for Cold Foam
- 1/4 cup heavy cream (or chilled full-fat coconut cream for a dairy-free option)
- 2 tablespoons whole milk (or oat milk/almond milk)
- 1 to 2 tablespoons homemade lavender syrup (adjust to taste)
- 1/2 teaspoon pure vanilla bean paste
- Pinch of salt (optional, helps balance sweetness)
Step-by-Step Instructions
- Chill Everything:Ensure the cream, milk, and lavender syrup are very cold.
- Combine:Pour the heavy cream, milk, lavender syrup, vanilla bean paste, and optional salt into your chosen frothing device (electric frother, French press, or mixing bowl).
- Froth:If using an electric frother or handheld mixer, whip the mixture on medium speed. If using a French press, pump the plunger rapidly.
- Monitor Texture:Froth until the mixture thickens significantly, resembling a pourable, slightly looser version of soft-peak whipped cream. This usually takes 30 to 60 seconds, depending on the tool used. Do not over-froth, or it will become stiff like traditional whipped cream.
- Serve:Pour the resulting foam directly over your favorite iced coffee, cold brew, or even unsweetened iced tea. Garnish with a tiny pinch of dried lavender buds for an aesthetic touch.
The resulting texture should float beautifully, slowly dissolving into the coffee below, imparting those fragrant lavender and vanilla notes with every blissful sip. This is truly the easiest way to feel like you are indulging in a luxury drink without ever leaving your home or fighting the morning rush hour traffic. It’s the ultimate upgrade for your afternoon pick-me-up.
Perfecting the Cooking Process
To ensure efficiency, prepare the lavender syrup first since it requires cooling time. While the syrup is steeping and cooling, you can brew your cold coffee base, whether it’s espresso shots or a batch of cold brew. Then, once everything is chilled, the final step of whipping the cold foam takes less than a minute, ensuring instant gratification.
Add Your Touch
For customization, try swapping vanilla bean paste for alcohol-free almond extract for a nutty depth. If you prefer a brighter flavor, a few drops of fresh lemon juice in the syrup can elevate the lavender notes. You could also infuse the syrup with a sprig of fresh mint or add a dash of cardamom to the cold foam mixture for warmth and complexity.
Storing & Reheating
Cold foam is best made fresh just before serving for optimal texture and airiness. If you must store leftovers, keep the liquid foam mixture in an airtight container in the refrigerator for up to 24 hours. Be aware that it will deflate over time; you will need to re-froth it vigorously right before serving to restore its light, foamy texture.
- To achieve the fluffiest result, use a high-fat dairy product like heavy cream, or use full-fat canned coconut cream if preparing a non-dairy version.
- Always measure your ingredients precisely, especially the syrup, as too much liquid or sugar will prevent the cold foam from achieving the necessary thick consistency.
- If your mixture stiffens too much during frothing, simply add half a teaspoon of cold milk and briefly mix again to regain that perfect pourable consistency.
My sister, who claims to hate all things floral, tried this Lavender Vanilla Cold Foam last summer and immediately asked for the recipe. She now makes it every Sunday, proving that even the biggest skeptics will fall for this delicate and delicious flavor pairing.
Conclusion for Lavender Vanilla Cold Foam
We embarked on a quest for the perfect morning indulgence, and the Lavender Vanilla Cold Foam delivered absolute serenity in a spoon. This delightful recipe proves that you don’t need a pricey trip to the cafe for a truly elevated coffee experience; all the magic happens right in your own kitchen. Remember the golden rules for success: always use ice-cold dairy, approach the lavender syrup cautiously to maintain flavor balance, and whip the mixture aggressively until those characteristic light clouds begin to form. Whether you are topping your favorite iced brew or enjoying it as a simple, sweet treat, this creamy, fragrant foam instantly transforms the ordinary into the extraordinary. Go forth and enjoy your perfectly peaceful and sophisticated coffee moment!
Print
Lavender Vanilla Cold Foam
Achieve airy, velvety cold foam magic! This Lavender Vanilla creation balances sweet florals with rich cream. Easily frothed in 90 seconds. Full instructions & nutrition included.
- Total Time: 35 minutes
- Yield: 4 servings
Ingredients
- Heavy Cream (cold): 1/4 cup
- Whole Milk (cold): 1/4 cup
- Lavender Syrup: 1 tablespoon
- Vanilla Syrup: 1 teaspoon
- Powdered Sugar: 1/2 teaspoon
- Dried Culinary Lavender (for garnish): 1/4 teaspoon
Instructions
- Step 1: Measure and combine the cold heavy cream, cold milk, lavender syrup, vanilla syrup, and powdered sugar into a cold foam frother, a tall jar suitable for an immersion blender, or a clean French press.
- Step 2: If using a dedicated cold foam machine, secure the lid and run on the 'cold foam' setting until the mixture is thick, velvety, and has doubled in volume (typically 60-90 seconds).
- Step 3: Alternatively, if using a French press, rapidly plunge the strainer up and down for 30-45 seconds until the mixture holds soft peaks; if using an immersion blender, blend on high speed until the desired foamy consistency is achieved.
- Step 4: Check the foam texture; it should be thick enough to sit on top of a beverage without immediately dissolving. If it is too thin, blend for another 10 seconds.
- Step 5: Gently spoon the Lavender Vanilla Cold Foam over your chosen cold beverage (such as iced coffee or cold brew) and immediately garnish the top with a light sprinkle of dried culinary lavender before serving.
Notes
- For the best texture, always prepare the cold foam immediately before use, as storing leftovers, even in the fridge, will cause the aeration to deflate and the foam to lose its velvety quality.
- Do not attempt to heat or reheat this foam, as it is designed specifically for cold beverages and will quickly melt back into a thin liquid when warmed.
- Elevate your morning routine by floating this floral foam atop a robust glass of unsweetened cold brew or a subtly spicy iced chai latte.
- Ensure both the heavy cream and the mixing container are thoroughly chilled—this temperature difference is critical for achieving a stable, stiff foam that holds its shape.
- Prep Time: 15 minutes
- Cook Time: 20 minutes
- Method: Stovetop
- Cuisine: American
FAQs
How do I achieve the incredibly smooth and thick texture for the Lavender Vanilla Cold Foam?
The secret to achieving that magical, velvety texture lies in the fat content of your dairy and the speed of your whipping device. Using a quality milk frother is ideal, but a high-speed blender or immersion blender works efficiently too. Ensure your cream or milk base is very cold—this is non-negotiable for stability! If you are using heavy whipping cream, start with just a tablespoon or two of milk to thin it slightly. Whip the mixture just until soft peaks begin to form, or until it looks like a stable, creamy cloud. Remember, over-whipping introduces too much air and turns it into butter, resulting in a less desirable coffee topping texture.
I’m worried my lavender flavor will be too strong. How do I balance the delicate flavors in the Lavender Vanilla Cold Foam?
Balancing the floral notes is crucial, as lavender can quickly dominate the vanilla and become slightly overwhelming. Start with a very small amount of lavender syrup—perhaps half a teaspoon—and taste the mixture before adding any more. The goal is a subtle, fragrant whisper, not a full-blown floral assault. Always ensure you are using culinary-grade lavender syrup, which is made specifically for consumption, rather than an essential oil. The vanilla bean paste or high-quality vanilla bean paste provides a necessary grounding sweetness that prevents the lavender from tasting overly perfumed. Adjust the floral sweetness incrementally until you hit that perfect, serene flavor profile.
Can I make this luxurious Lavender Vanilla Cold Foam recipe using dairy-free alternatives?
Absolutely! While traditional cold foam relies on dairy fat for maximum stability, fantastic non-dairy alternatives exist. Oat milk is often the champion for homemade cold foam due to its higher fat content and natural sweetness, which allows it to froth beautifully and hold its structure. Coconut cream, when well-chilled, also yields a thick, luscious foam, though you should anticipate a slight coconut undertone. Avoid extremely thin nut milks like almond milk, as they rarely hold their structure for more than a minute. Look specifically for barista-style non-dairy milks formulated for frothing to guarantee a successful and dreamy result.
How long can I store leftover Lavender Vanilla Cold Foam, and is it better to make it fresh?
For the absolute best texture and presentation, you should always prepare your cold foam immediately before serving it over your beverage. Cold foam is essentially whipped air suspended in dairy, and that air begins to deflate quickly upon sitting. If you anticipate needing to save time, you can store the unwhipped liquid mixture (cream, vanilla, and lavender syrup) in an airtight container in the refrigerator for up to three days. When you are ready to serve, remove the mixture, ensure it is icy cold, and then give it a quick, vigorous whip. Attempting to store the already frothed Lavender Vanilla Cold Foam will unfortunately result in a flat, sad layer of flavored milk by the time you want to use it again.


Leave a Comment