
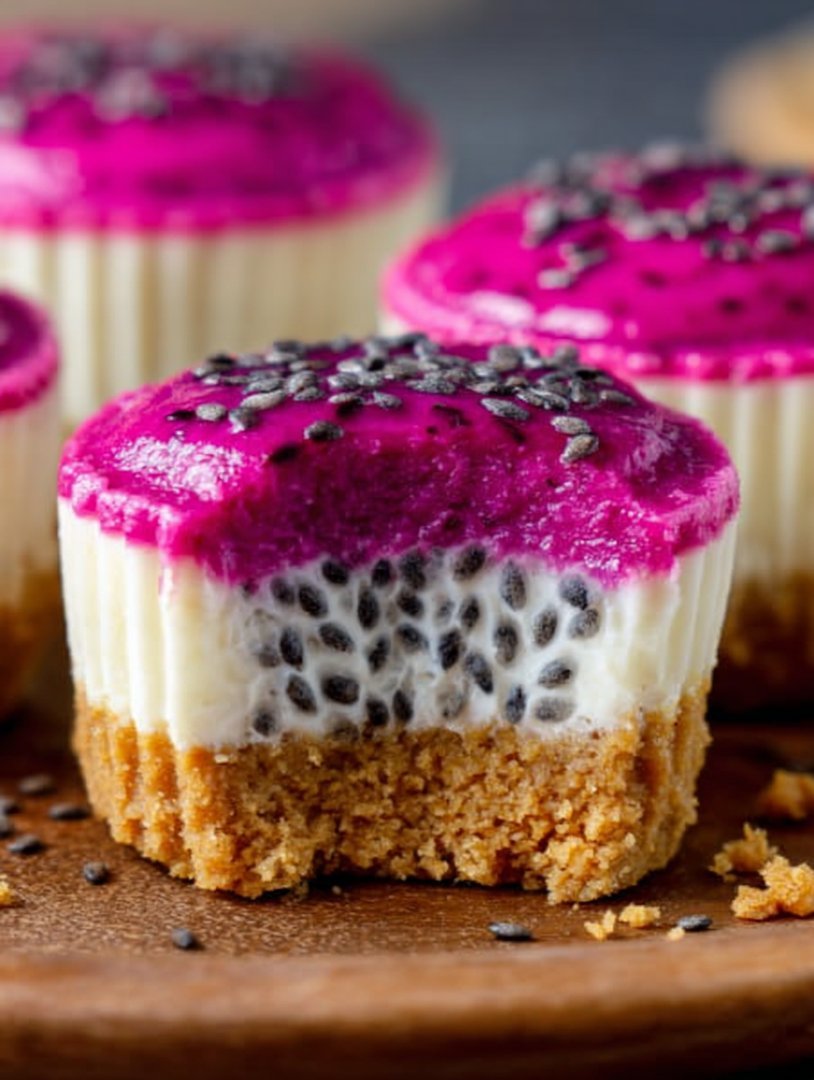
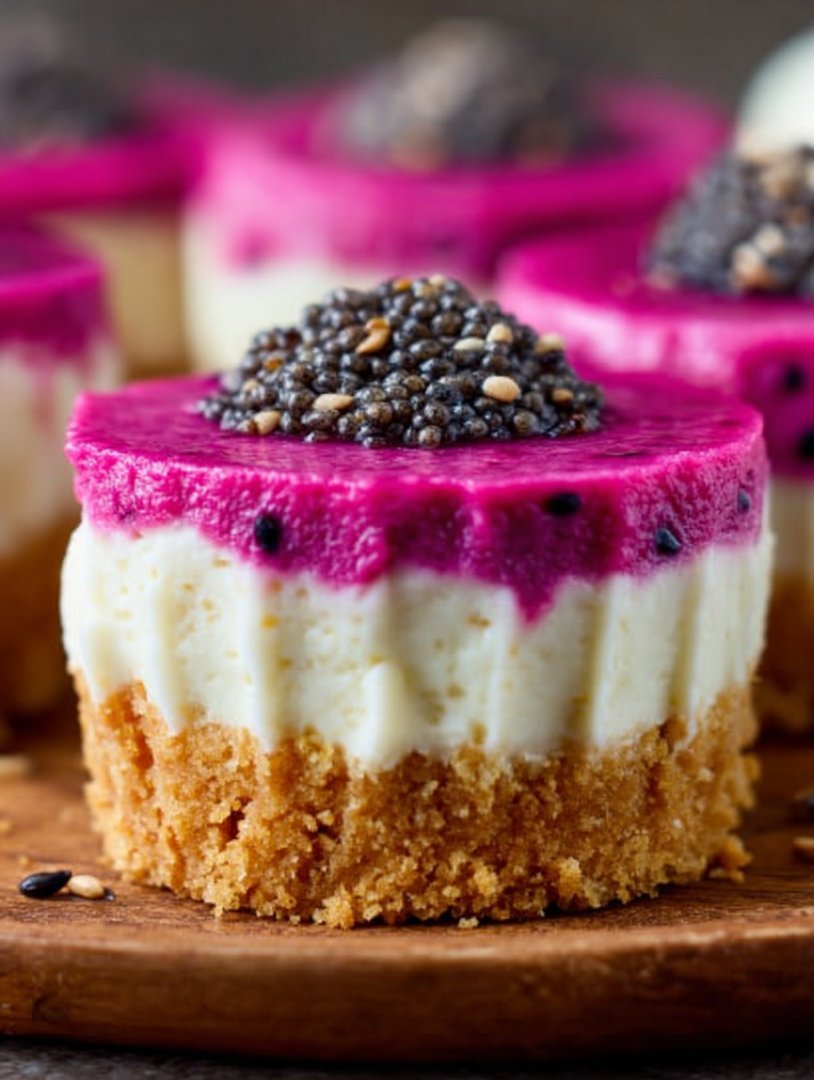
My culinary philosophy demands maximum impact with minimal oven time, especially when summer hits. Imagine a dessert screaming exotic vacation without the sweat equity. Enter the magnificent, vibrant,No-Bake Dragon Fruit Mini Cheesecakes.
These beauties are the antidote to boring desserts and proof that glamour doesn’t require endless baking. Creamy, tart, and possessing a shocking magenta hue, they are the perfect showstopper for any gathering.
- Effortlessly prepared without an oven, these mini cheesecakes require only chilling time, making them ideal for the hottest days of the year.
- Enjoy the subtle, refreshing sweetness of dragon fruit blended with tangy cream cheese for a light, summery flavor profile that truly delights the palate.
- The stunning natural magenta color of the pitaya ensures an unforgettable visual presentation, instantly elevating your dessert table dramatically.
- This versatile recipe adapts beautifully to various toppings, allowing you to customize the crunchy crust and creamy filling for unique seasonal variations.
The Magic of Pitaya: Why You Need This Cheesecake
I once tried to bake a traditional cheesecake in August. The result? A kitchen that felt like the surface of the sun and a dense, slightly cracked disaster that tasted suspiciously of sweat and regret. That experience taught me a valuable lesson: sometimes, the greatest desserts require zero commitment to heat. That is exactly how the obsession withNo-Bake Dragon Fruit Mini Cheesecakesbegan. This recipe is not just a dessert; it is a rebellion against unnecessary effort, promising maximum wow factor with minimum fuss.
Dragon fruit, or pitaya, is the tropical superhero of this entire operation. While its taste is often described as subtle—somewhere between kiwi and pear—its color is anything but subtle. The vibrant magenta variety provides the natural dye needed to transform basic cream cheese filling into something truly spectacular and photogenic. People assume you spent hours perfecting this exotic creation, but the truth is, the dragon fruit does 90% of the work. If you can handle a food processor and a whisk, you can master these mini cheesecakes.
Choosing the Perfect Ingredients for Success
The success of any no-bake dessert hinges entirely on ingredient quality and preparation, especially when dealing with stabilizing agents. Because we are skipping animal-derived carrageenan, we rely on quality cream cheese and a careful measure of plant-based gelling agents to ensure that perfect, sliceable texture without ever touching the oven. Don’t skimp on the cream cheese; use a full-fat variety that is fully softened. Cold cream cheese is the enemy of smooth, clump-free filling, resulting in a lumpy texture that no amount of fancy tropical fruit can redeem. Furthermore, while the crust is traditional graham cracker, feel free to substitute with vanilla wafers or even crushed digestive biscuits if you prefer a different base flavor. Remember, the crust is the foundation, but the dragon fruit is the star.
Ingredients for No-Bake Dragon Fruit Mini Cheesecakes
Here’s what you’ll need to make this delicious dish:
- Graham Cracker CrumbsUse finely crushed crumbs, ensuring they are uniform to create a stable and dense crust layer.
- Unsalted ButterMelted butter binds the crust together beautifully, providing the necessary richness and structure to hold the minis intact.
- Cream CheeseEnsure the cream cheese is full-fat and completely softened to achieve a silky smooth, lump-free filling that sets well.
- Granulated SugarThis adds sweetness, balancing the tanginess of the cream cheese and the subtle flavor of the dragon fruit.
- Vanilla PowderUse high-quality pure vanilla powder to enhance the overall flavor profile of the creamy filling.
- Heavy Whipping CreamChilled heavy cream is whipped into stiff peaks to lighten the filling and give it a luxurious, airy mouthfeel before chilling.
- Pink Dragon Fruit (Pitaya) PureeUse frozen or fresh pink dragon fruit, blending it thoroughly to incorporate that essential brilliant magenta color and mild tropical flavor.
- Agar-Agar PowderThis plant-based gelling agent is crucial for setting the cheesecake without baking, providing a firm, smooth consistency.
- Lemon JuiceA small amount of fresh lemon juice brightens the flavor of the cream cheese filling, preventing it from tasting flat.
The full ingredients list, including measurements, is provided in the recipe card directly below.
How to Make No-Bake Dragon Fruit Mini Cheesecakes
Follow these simple steps to prepare this delicious dish:
Step 1: Preparing the Crust and Muffin Liners
Line a standard 12-cup muffin tin with paper liners; for easier removal later, lightly spray the inside of the liners with cooking spray. In a medium bowl, combine the graham cracker crumbs and melted unsalted butter, mixing until the crumbs are uniformly moistened, resembling wet sand. Spoon about one tablespoon of the mixture into the bottom of each prepared muffin liner, pressing down firmly using the back of a small spoon or the bottom of a shot glass to create a solid base.
Step 2: Activating the Gelling Agent
This is the technical part, but don’t panic. In a very small saucepan, combine the agar-agar powder with two tablespoons of water or mild fruit juice, like apple or white grape, mixing well to prevent clumping. Bring this mixture to a rolling boil over medium heat, stirring constantly for about 60 seconds. This step is essential to activate the agar-agar; once boiled, remove it immediately from the heat and set aside to cool slightly while preparing the filling.
Step 3: Whipping the Cream and Mixing the Base
Using a stand mixer fitted with the whisk attachment (or a hand mixer), whip the chilled heavy cream until stiff peaks form. Set this aside gently. In a separate large bowl, beat the softened cream cheese, granulated sugar, and vanilla powder until the mixture is light, fluffy, and completely smooth. Scrape down the sides of the bowl frequently to ensure even incorporation.
Step 4: Incorporating Dragon Fruit and Setting Agent
Fold the dragon fruit puree and the fresh lemon juice into the cream cheese mixture until the color is vibrant and uniform. While the mixer is running on low speed, slowly drizzle in the prepared, slightly cooled agar-agar mixture. Ensure it is fully blended, but do not overmix at this stage. Finally, gently fold in the reserved whipped cream using a spatula until no streaks remain, keeping the filling light and airy.
Step 5: Filling and Chilling the Cheesecakes
Carefully spoon or pipe the dragon fruit filling evenly into the prepared muffin liners over the crumb crusts. Smooth the tops using the back of a spoon. Transfer the entire muffin tin to the refrigerator and chill for a minimum of 4 to 6 hours, although chilling overnight ensures the best structure and firmness. The agar-agar needs adequate time to fully set the mini cheesecakes.
Transfer to plates and drizzle with extra passion fruit puree or top with fresh berries for the perfect finishing touch.
Troubleshooting and Mastering the No-Bake Texture
The beauty of makingNo-Bake Dragon Fruit Mini Cheesecakeslies in their simplicity, but that simplicity also harbors a few common pitfalls, typically related to setting time or texture. The most frequent issue is a filling that remains too soft. If your cheesecake isn’t setting, there are usually two culprits: either the cream cheese was not full-fat (leading to a watery consistency), or, more likely, the agar-agar was not properly activated. Remember, agar-agar must reach a full, rolling boil for one minute to achieve its maximum gelling power. If you simply heat it without boiling, the filling will likely remain mousse-like.
Achieving the Ideal Cheesecake Consistency
To ensure a perfectly firm, creamy texture, start with ingredients at the correct temperatures. While the cream cheese must be soft, the heavy cream must be ice-cold to whip correctly. The quick transition from the gentle warmth of the agar solution to the cold environment of the cream cheese mixture helps initiate the setting process. If you are struggling with air bubbles or uneven mixing, try mixing the cream cheese base for an extra minute until it is exceptionally smooth before folding in the whipped cream. When folding, use broad, gentle motions to preserve the volume of the cream, which contributes significantly to the lightness of the final product. A heavy hand when folding will deflate the cream, resulting in a denser, less pleasant cheesecake.
Another great tip for those who frequently make these mini desserts is to use silicone muffin molds instead of paper liners. The flexibility of silicone allows you to easily pop out the firm cheesecakes without tearing the edges or leaving paper residue clinging to the crust. This small investment saves considerable frustration, especially when preparing a large batch for a party. Once unmolded, store the individual cheesecakes in an airtight container in the refrigerator for up to three days, though they rarely last that long in my house. These gorgeous, colorful desserts tend to disappear with alarming speed.
Creative Variations and Serving Suggestions
While the pink pitaya version is stunning, these mini cheesecakes offer a fantastic canvas for experimentation. If you can’t find pink dragon fruit, try using mango puree or strawberry puree mixed with a drop of natural food coloring to achieve a similar bright effect. Alternatively, white dragon fruit provides the same textural benefit without the intense color, making for a sophisticated, speckled white cheesecake that pairs beautifully with dark chocolate shavings.
Customizing the Crust and Toppings
The crust is entirely customizable. Swap the graham crackers for chocolate cookie crumbs for a dramatic dark base that contrasts beautifully with the magenta filling. For a gluten-free option, use crushed almond meal mixed with coconut oil and a touch of maple syrup—this gives a robust, slightly nutty flavor that complements the exotic fruit. When serving, elevate the visual appeal further. A sprinkle of desiccated coconut or a fan of fresh kiwi slices makes the dessert look incredibly professional. For an extra tropical punch, create a light glaze using passion fruit pulp mixed with a little powdered sugar and drizzle it over the chilled cheesecakes just before presenting them. This adds a beautiful sheen and a tangy counterpoint to the sweetness. The simple elegance and vibrant colors ensure that theseNo-Bake Dragon Fruit Mini Cheesecakeswill always be the highlight of your dessert spread.
Remember that the chilling time is not a suggestion—it is a mandatory appointment with deliciousness. Give these little masterpieces the time they need to set up firm and cold, and you will be rewarded with the most delightfully textured and visually impactful dessert that requires absolutely zero oven interaction. Enjoy the acclaim you receive, knowing you achieved culinary wizardry without breaking a sweat.
The Accidental Discovery of Sunshine on a Plate
I stumbled upon the idea for No-Bake Dragon Fruit Mini Cheesecakes after a disastrous attempt at making pink velvet cake. The pitaya was staring at me, practically glowing, and I realized its neon glory belonged not in a hot oven, but chilling triumphantly in the fridge. This dessert truly tastes like a tropical vacation.
Let’s be honest: ovens are judgmental. They demand precision, patience, and a willingness to accept sunken centers. I, however, prefer desserts that scream “effortless elegance,” and nothing achieves that better than the glorious realm of the chilled treat. When I first encountered dragon fruit, I was skeptical. It looks like an alien tennis ball that fell into a bucket of neon pink paint. But when sliced open, the speckled flesh is mesmerizing. The goal was to harness that otherworldly visual appeal into a dessert that required zero baking anxiety. That’s how these fantastic No-Bake Dragon Fruit Mini Cheesecakes were born—they are the perfect solution for anyone who dreads the spring-form pan and water bath technique.
Crusts That Crunch: Building the Foundation
Every legendary dessert needs a sturdy base, and these mini cheesecakes are no exception. We are skipping the tricky, crumbly crusts of history and opting for speed and stability. I prefer combining crushed graham crackers with melted butter—or, for a tropical twist, melted coconut oil—and pressing it firmly into cupcake liners placed in a muffin tin. The secret weapon here is the chilling time. Thirty minutes in the freezer locks the crust into an impenetrable fortress, preventing any structural meltdowns when you add the creamy filling. Remember, foundation first. Nobody wants a soggy bottom, especially not when the filling is going to be this spectacular shade of fuchsia.
Achieving That Neon Dream: The Creamy Filling
The filling is where the magic truly happens. It’s a simple blend of cream cheese, powdered sugar, and a touch of vanilla powder. However, the heavy cream addition is crucial, providing necessary lift and lightness that commercial no-bake mixes often lack. The final star, the red pitaya, needs minimal preparation. Simply scoop out the flesh and blend it until smooth. If you find your fruit puree is watery, strain it slightly to ensure the filling remains firm. When combining the puree with the cream cheese mixture, use a folding motion rather than aggressive stirring. You want streaks of bright pink swirling through the white cream, creating a delightful galaxy effect. This artistic approach ensures every miniature cake is unique and visually stunning.
Presentation Perfection and Flavor Balance
These individual desserts look incredibly sophisticated without demanding hours of labor. Once set (give them a minimum of four hours, but overnight is ideal), they lift easily out of the muffin tin. Peel back the cupcake liners and you are left with perfectly formed, vibrant cylinders. To elevate the presentation of your No-Bake Dragon Fruit Mini Cheesecakes, garnish them with fresh lime zest, a sprig of mint, or a small slice of kiwi for contrasting green color. The flavor profile is light and subtly sweet, leaning heavily on the tartness of the cream cheese and the gentle, almost melon-like flavor of the dragon fruit itself. They are refreshing, never heavy, making them the ultimate summer party dessert.
Perfecting the Cooking Process
For maximum efficiency, begin by crushing the crust ingredients. While the crust chills in the freezer, whip the heavy cream until stiff peaks form. Finally, fold the dragon fruit puree into the cream cheese mixture gently, ensuring those vibrant streaks of color remain stunningly distinct.
The Recipe Card: No-Bake Dragon Fruit Mini Cheesecakes
Equipment Check
- Standard 12-cup muffin tin
- Cupcake liners (or silicone liners)
- Electric mixer (handheld or stand mixer)
- Food processor or rolling pin for crushing the crust
Ingredients for the Tropical Delight
For the Crust
- 1 ½ cups graham cracker crumbs (about 12 full sheets)
- ¼ cup granulated sugar
- ½ cup unsalted butter or coconut oil, melted
For the Dragon Fruit Filling
- 16 ounces cream cheese, full fat, softened
- 1 cup powdered sugar, sifted
- 1 teaspoon pure vanilla powder
- 2 tablespoons lime juice (freshly squeezed preferred)
- 1 cup heavy whipping cream, chilled
- 1 cup red dragon fruit (pitaya) puree (from about 2 medium fruits)
Step-by-Step Instructions
- Prep the Muffin Tin:Line the muffin tin with cupcake liners. Set aside.
- Make the Crust:In a medium bowl, combine the graham cracker crumbs, granulated sugar, and melted butter or coconut oil. Mix until evenly moistened.
- Press the Base:Distribute the crumb mixture evenly among the 12 liners, using the back of a spoon to press firmly onto the bottom. Transfer the pan to the freezer while preparing the filling.
- Whip the Cream:In a separate, clean bowl, whip the chilled heavy cream until stiff peaks form. Set aside in the refrigerator.
- Create the Cream Cheese Base:In a large mixing bowl, beat the softened cream cheese, powdered sugar, vanilla powder, and lime juice until completely smooth and lump-free.
- Fold in the Dragon Fruit:Gently fold the dragon fruit puree into the cream cheese base until just combined, leaving some streaks for a marbled effect.
- Lighten the Mixture:Carefully fold in the whipped cream in two additions, ensuring the mixture remains airy and fluffy. Do not overmix.
- Fill and Chill:Spoon the filling evenly into the prepared crusts. Return the muffin tin to the refrigerator and chill for at least 4 hours, or preferably overnight, until completely firm.
- Serve:Once set, remove the cheesecakes from the tin and gently peel away the liners. Garnish as desired and serve cold.
Add Your Touch
Swap the classic graham cracker base for vanilla wafer crumbs or ginger snaps for a spicy kick. If you can’t find red dragon fruit, passion fruit puree adds tanginess and a contrasting color. Add a tablespoon of lime zest to the filling for an extra burst of fresh flavor.
Insider Tips for Cheesecake Mastery
- Ensure the cream cheese is fully softened to avoid lumps; nobody appreciates a surprise chunk of cold dairy in their smooth cheesecake.
- If the filling seems too loose, add a teaspoon of vegetable-derived gelling agent, like agar-agar powder, to stabilize the mixture before chilling.
- Use the freezer method for setting the crust; ten minutes is often enough to guarantee a solid base that holds up to the generous filling.
My nephew, who usually only eats brown food, called these “unicorn snacks.” That’s high praise in my family, confirming that the vibrant color is definitely kid-approved and magical.
Storing & Reheating
Store these miniature masterpieces in an airtight container in the refrigerator for up to four days. Since they are no-bake, reheating is strictly forbidden—unless you enjoy colorful puddles. For longer storage, freeze them for up to one month and thaw them gently overnight.
Conclusion for No-Bake Dragon Fruit Mini Cheesecakes
These No-Bake Dragon Fruit Mini Cheesecakes prove that you don’t need an oven or complicated techniques to achieve a show-stopping dessert. From the crunchy, stable crust to the light, vibrantly colored filling, this recipe offers maximum flavor with minimal effort. They are the perfect individual treat, ideal for gatherings or just when you need a little burst of tropical sunshine in your day. Skip the baking stress, embrace the creamy coolness, and enjoy the ease and visual delight these gorgeous mini cheesecakes provide. They are guaranteed to be the star of your dessert table.
Print
No-Bake Dragon Fruit Mini Cheesecakes
Experience the vibrant pink hue and cloud-like texture of these No-Bake Dragon Fruit Mini Cheesecakes. Includes complete cooking instructions and detailed nutritional breakdown.
- Total Time: 35 minutes
- Yield: 4 servings
Ingredients
- Graham Cracker Crumbs: 1 ½ cups
- Unsalted Butter: 4 tablespoons, melted
- Cream Cheese (full-fat): 8 ounces, softened
- Heavy Whipping Cream: 1 cup, chilled
- Powdered Sugar (confectioners' sugar): ½ cup
- Vanilla Bean Paste: 1 teaspoon
- Pink or Red Dragon Fruit (pitaya): ½ cup purée (about 1 medium fruit)
Instructions
- Step 1: Prepare the Crust. In a medium bowl, combine the graham cracker crumbs and melted butter until fully incorporated. Line a 12-cup standard muffin tin with paper liners or lightly grease, then press about 1 ½ tablespoons of the crumb mixture firmly into the bottom of each cup. Place the tin in the freezer to chill while preparing the filling.
- Step 2: Create the Whipped Cream Base. Using a stand mixer or hand mixer, whip the heavy whipping cream on medium-high speed until stiff peaks form. Set the whipped cream aside in the refrigerator.
- Step 3: Mix the Cream Cheese Filling. In a separate bowl, beat the softened cream cheese, powdered sugar, and vanilla bean paste until the mixture is smooth and completely free of lumps.
- Step 4: Incorporate Dragon Fruit and Stabilize. Gently fold the dragon fruit purée into the cream cheese mixture until the desired uniform pink color is achieved. Then, gently fold in the reserved stiff whipped cream, working quickly and carefully to maintain the airy texture of the filling.
- Step 5: Assemble and Chill. Spoon the dragon fruit cheesecake filling over the chilled crusts, filling each liner to the top. Refrigerate the mini cheesecakes for a minimum of 4-6 hours, or ideally overnight, until they are firm and set. Remove from liners and serve cold.
Notes
- For extended freshness, freeze the fully set cheesecakes for up to three weeks in an airtight container, thawing them for 15 minutes in the refrigerator before serving.
- Garnish immediately before serving with a whisper of toasted coconut flakes or a small lime zest curl to beautifully complement the mild dragon fruit flavor profile.
- A true no-bake key: ensure your heavy cream is deeply chilled and your cream cheese mixture is absolutely lump-free before folding, guaranteeing the filling sets perfectly firm.
- To achieve the neatest presentation, only peel off the paper liners when the cheesecakes are deeply cold, using a brief warm water bath on the bottom of the muffin tin if any crusts stick.
- Prep Time: 15 minutes
- Cook Time: 20 minutes
- Method: Stovetop
- Cuisine: American


Leave a Comment