

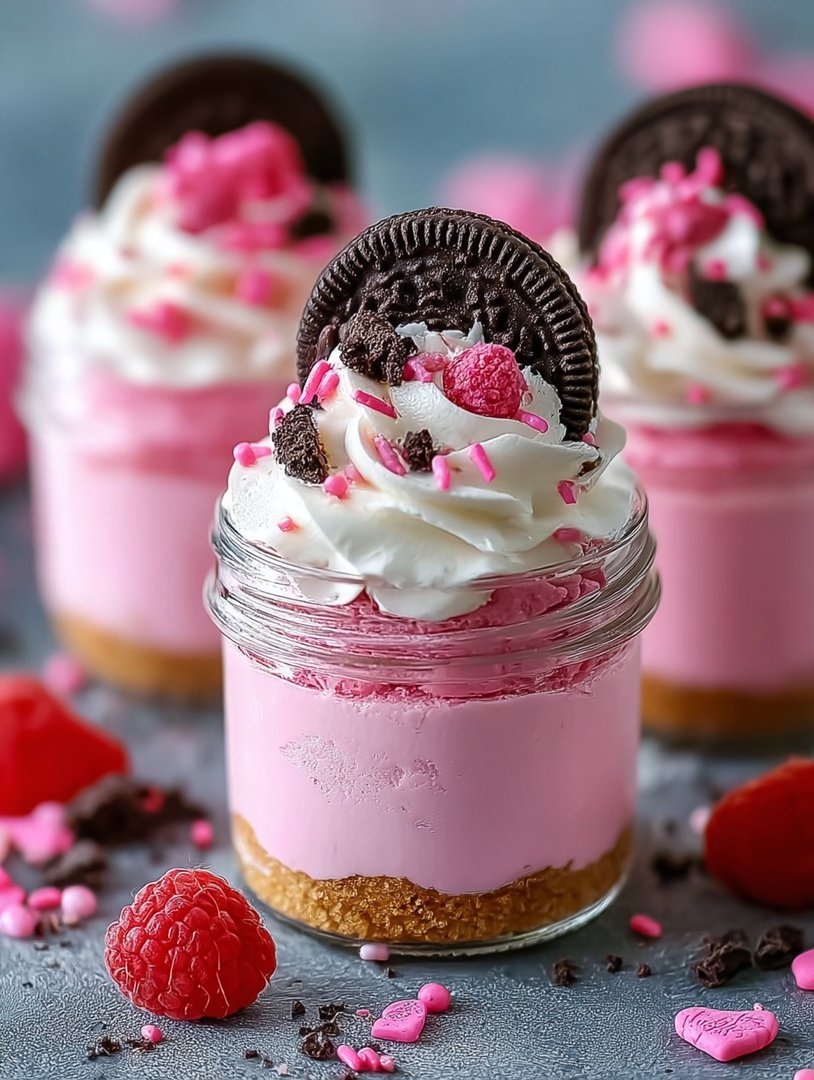
Picture this: layers of creamy cheesecake, bursts of sweet strawberry, and chunks of crunchy Oreo cookies, all nestled in a cute little jar. These No-Bake Pink Oreo Cheesecake Jars aren’t just a dessert; they’re a mini-vacation for your taste buds! Remember those sweltering summer days when the only thing that could make you smile was a cold treat? These cheesecake jars bring back that joy, but with a grown-up twist. Get ready to experience dessert bliss, one spoonful at a time.
- Effortlessly whip up these delightful treats with minimal kitchen fuss, perfect for busy bees.
- Indulge in a symphony of flavors, where rich cheesecake meets the playful crunch of Oreos.
- These vibrant pink jars are as pleasing to the eye as they are to the palate.
- Customize each jar with your favorite toppings for a dessert that’s uniquely yours.
Ingredients for No-Bake Pink Oreo Cheesecake Jars
Here’s what you’ll need to make this delicious dish:
- Oreo CookiesThe base of our delight. Opt for classic or the pink-colored ones to enhance the overall color.
- Cream CheeseFull-fat cream cheese is essential for that signature creamy texture and rich flavor. Make sure it’s softened.
- Powdered SugarAdds sweetness and helps stabilize the cheesecake filling.
- Heavy CreamWhipped to stiff peaks, it gives the cheesecake its light and airy consistency.
- Strawberry ExtractA few drops will amplify the strawberry flavor and give it that pretty pink hue.
- Fresh StrawberriesAdds a juicy, fresh burst of flavor.
- Melted ButterMix with crushed Oreos to create the crust base.
The full ingredients list, including measurements, is provided in the recipe card directly below.
How to Make No-Bake Pink Oreo Cheesecake Jars
Follow these simple steps to prepare this delicious dish: Step 1: Crush the Oreos Place the Oreo cookies in a food processor and pulse until they are finely crushed. Alternatively, you can place them in a zip-top bag and crush them with a rolling pin. Step 2: Make the Crust In a medium bowl, combine the crushed Oreos with the melted butter. Mix well until the crumbs are evenly moistened. Step 3: Prepare the Jars Divide the Oreo mixture evenly among the bottom of each jar. Press the crumbs firmly to create a compact crust. Step 4: Make the Cheesecake Filling In a large bowl, beat the softened cream cheese and powdered sugar together until smooth and creamy. Make sure there are no lumps. Step 5: Add the Flavor and Color Add the strawberry extract to the cream cheese mixture and mix until evenly combined. The mixture should turn a delicate pink color. Step 6: Whip the Cream In a separate bowl, whip the heavy cream until stiff peaks form. Gently fold the whipped cream into the cream cheese mixture. Step 7: Assemble the Jars Spoon the cheesecake filling into the jars, filling them almost to the top. Step 8: Chill and Decorate Cover the jars with plastic wrap and refrigerate for at least 2-3 hours to allow the cheesecake to set. Before serving, garnish with fresh sliced strawberries and additional crushed Oreos, if desired. Transfer to a serving plate and add your favorite toppings for the perfect finishing touch.
Tips for the Perfect No-Bake Pink Oreo Cheesecake Jars
These little jars of joy are pretty straightforward, but a few tricks can elevate them from good to “OMG, give me another one!” Here are some pointers to guarantee cheesecake perfection:
Use Quality Ingredients
Seriously, don’t skimp on the cream cheese. Full-fat cream cheese is the key to that rich, decadent flavor we all crave. And while any brand of Oreos will technically work, sometimes the name brand just hits differently, you know?
Soften the Cream Cheese
This is non-negotiable. If your cream cheese is cold and hard, you’ll end up with a lumpy cheesecake filling. Nobody wants that! Let it sit at room temperature for at least an hour, or until it’s nice and soft.
Don’t Overmix the Filling
Once you’ve added the whipped cream, be gentle! Overmixing can deflate the cream and result in a dense, rather than light and airy, cheesecake. Fold it in just until it’s combined, and then stop!
Chill Time is Crucial
Patience is a virtue, especially when it comes to no-bake cheesecakes. These jars need at least 2-3 hours in the fridge to set properly. Trust me, it’s worth the wait!
Get Creative with Toppings
While strawberries and crushed Oreos are a classic combination, don’t be afraid to experiment! Try adding white chocolate shavings, a drizzle of raspberry sauce, or even a sprinkle of edible glitter for extra pizzazz. The possibilities are endless!
Variations on No-Bake Pink Oreo Cheesecake Jars
Okay, so you’ve mastered the basic recipe. Now it’s time to unleash your inner dessert artist and get a little wild! Here are a few ideas to spark your creativity:
Chocolate Lover’s Dream
Swap out the strawberry extract for vanilla and add a tablespoon of cocoa powder to the cheesecake filling. Use chocolate Oreos for the crust, and top with chocolate shavings and a drizzle of chocolate syrup. Boom! Chocolate heaven.
Tropical Getaway
Replace the strawberries with diced mango and pineapple. Add a splash of coconut extract to the cheesecake filling and top with toasted coconut flakes. It’s like a vacation in a jar!
Peanut Butter Bliss
Swirl a spoonful of peanut butter into the cheesecake filling and top with chopped peanuts and a drizzle of melted peanut butter. For the crust, use peanut butter Oreos (if you can find them!).
Lemon Zest
Add lemon zest for a tangy flavor.
Mint Chocolate Chip
Add mint extract and mini chocolate chips to the cheesecake filling. Use mint chocolate Oreos for the crust and top with whipped cream and a sprig of mint. Refreshing and delicious!
Serving Suggestions for No-Bake Pink Oreo Cheesecake Jars
These little jars are perfect for just about any occasion, from a casual weeknight dessert to a fancy-schmancy dinner party. Here are a few serving suggestions to make them extra special:
Individual Desserts
These jars are already portioned, making them ideal for individual servings. They’re great for parties, potlucks, or just when you want a single serving of something sweet.
Dessert Shooters
For a more elegant presentation, layer the cheesecake filling and Oreo crumbs in small glasses or dessert shooters. Garnish with fresh berries and a sprig of mint.
Make-Ahead Dessert
These jars can be made a day or two in advance, making them perfect for entertaining. Just store them in the fridge until you’re ready to serve.
Gift Idea
Package the jars in a cute box or basket and give them as a gift to friends, family, or neighbors. Who wouldn’t love a homemade dessert?
Frequently Asked Questions (FAQs)
Here are some common questions about making No-Bake Pink Oreo Cheesecake Jars:
Can I use a different type of cookie for the crust?
Absolutely! Graham crackers, digestive biscuits, or even shortbread cookies would all work well.
Can I make these cheesecake jars vegan?
Yes! Use plant-based cream cheese, whipped cream, and Oreo cookies (some varieties are vegan). You may also need to use a plant-based butter substitute for the crust.
How long do these cheesecake jars last in the fridge?
They’ll keep for up to 3-4 days in the refrigerator, but they’re best enjoyed within the first 2 days.
Can I freeze these cheesecake jars?
Yes, you can freeze them for up to 2-3 months. Thaw them in the refrigerator overnight before serving.
Can I use flavored cream cheese?
While it might alter the flavor slightly, feel free to experiment with flavored cream cheeses like strawberry or vanilla.
Final Thoughts on No-Bake Pink Oreo Cheesecake Jars
So, there you have it – a ridiculously easy, utterly delicious, and undeniably adorable dessert that’s guaranteed to put a smile on your face. These No-Bake Pink Oreo Cheesecake Jars are the perfect way to satisfy your sweet tooth without spending hours in the kitchen. Whether you’re making them for a party, a picnic, or just a cozy night in, they’re sure to be a hit. So go ahead, grab a jar, and get ready to experience a little bit of cheesecake heaven!
Perfecting the Cooking Process
First, crush the Oreo cookies meticulously, ensuring they are finely ground for the crust. While the crust chills, prepare the cheesecake filling by whipping the cream cheese until it is delightfully fluffy. Gently fold in the remaining ingredients to maintain a light and airy texture, then assemble with care.
Add Your Touch
Feel free to swap the vanilla powder for almond or lemon extract for a subtle flavor twist. Consider adding fresh raspberries or strawberries to the filling for bursts of fruity goodness. For a richer indulgence, fold in white chocolate chips. Your no-bake Oreo cheesecake masterpiece awaits your unique signature!
Storing & Reheating
Store your delectable no-bake cheesecake jars in the refrigerator for up to four days, ensuring they’re covered to prevent them from drying out. Because this is a no-bake dessert, reheating isn’t necessary. Just grab a spoon and enjoy straight from the fridge!
- Always use room-temperature cream cheese to avoid lumps and ensure a smooth, creamy filling for your no-bake pink Oreo cheesecake jars.
- Don’t overmix the filling; gently fold in the ingredients to keep the cheesecake light and airy, preventing a dense texture.
- Chill the cheesecake jars for at least 4 hours, or preferably overnight, to allow the flavors to meld and the cheesecake to set properly.
My niece Mia once declared my pink Oreo cheesecake the “bestest ever,” which, in kid-speak, translates to five-star Michelin quality. That’s when I knew I had a winner!
No-Bake Pink Oreo Cheesecake Jars: A Whimsical Delight!
Picture this: a sunny afternoon, a craving for something sweet, and the absolute *horror* of turning on the oven. Okay, maybe “horror” is a strong word. Let’s call it a strong *disinclination*. That’s where these No-Bake Pink Oreo Cheesecake Jars come in to save the day! They’re the dessert equivalent of a superhero cape—no baking required, utterly delicious, and guaranteed to bring a smile to your face.
Why “Pink” You Ask? Let’s Get to the Pretty Details
Because, why not? Okay, there’s a *slightly* more elaborate reason. We’re using those adorable pink-colored Oreo cookies. But really, the best reason is: pink is fun! Pink is cheerful! And let’s face it, the world needs more cheerful desserts. So, we’re embracing the pinkness and diving headfirst into this delightful, easy-to-make treat. These aren’t your grandma’s cheesecakes. Unless your grandma is a super hip, pink-loving dessert innovator. Then, by all means, tell her I said “hello” and ask for her secret recipe for world peace.
Forget the Oven: Embrace the No-Bake Life
Seriously, ovens are overrated. Especially when you can achieve creamy, dreamy cheesecake perfection without even preheating. No-bake cheesecakes are a gift to humanity, and these individual jars make portion control a breeze (or, you know, make it easier to have two…or three. I don’t judge). This recipe is so simple, you’ll wonder why you ever bothered with a fussy baked cheesecake in the first place. We’re talking minimal effort, maximum reward. Your taste buds will thank you, and your electricity bill will, too.
Ingredients: The Dream Team of Deliciousness
Let’s gather our forces, shall we? Here’s what you’ll need to create these adorable little cheesecake wonders. No strange ingredients, no complicated techniques, just pure, unadulterated dessert bliss.
- Pink Oreo Cookies:The star of the show! You’ll need about a package and a half, give or take, depending on how generous you are with the crust and topping.
- Cream Cheese:Full-fat is the way to go for that rich, creamy texture. Make sure it’s softened to room temperature for easy mixing.
- Sweetened Condensed Milk:This is what gives our cheesecake its sweetness and smooth consistency.
- Heavy Cream:Whipped to stiff peaks, it adds lightness and airiness to the filling.
- Vanilla Powder:A dash of vanilla enhances all the other flavors.
- Melted Butter:For binding the Oreo cookie crust together.
Ingredient Substitutions: Because Life Happens
Don’t have *exactly* what’s listed? Don’t panic! Here are a few substitutions you can make without sacrificing too much deliciousness.
- Regular Oreos:If you can’t find the pink ones, regular Oreos will work just fine. The cheesecake will still taste amazing! You can always add a drop of red food coloring to the filling if you’re desperate for that pink hue.
- Light Cream Cheese:While full-fat is preferred, light cream cheese can be used to reduce the calorie count slightly. Just be aware that the texture might be a little less rich.
- Different Extract:almond paste, lemon extract, or even a tiny bit of peppermint extract can add a unique twist to the flavor profile.
Making the Magic: Step-by-Step Instructions
Alright, let’s get down to business! Here’s the super-easy, practically foolproof method for making these No-Bake Pink Oreo Cheesecake Jars. Trust me, if I can do it, anyone can.
Step 1: Crush Those Cookies!
In a food processor, crush the Oreo cookies until they become fine crumbs. If you don’t have a food processor, you can put the cookies in a large zip-top bag and crush them with a rolling pin. This is a great way to relieve stress, by the way. Just imagine those cookies are all your problems, and *wham*, problem solved! (Okay, maybe not *really* solved, but it feels good in the moment).
Step 2: Make the Crust
In a medium bowl, combine the crushed Oreo crumbs with the melted butter. Mix well until the crumbs are evenly moistened. Press the mixture into the bottom of individual jars or glasses to form the crust. I like to use small mason jars, but any small glass or container will work. Pack the crust down firmly with the back of a spoon.
Step 3: Whip It Good!
In a large bowl, beat the softened cream cheese with an electric mixer until it’s smooth and creamy. Gradually add the sweetened condensed milk and vanilla powder, mixing until well combined. In a separate bowl, whip the heavy cream until stiff peaks form. Gently fold the whipped cream into the cream cheese mixture. Be careful not to overmix, or you’ll deflate the whipped cream.
Step 4: Assemble and Chill
Spoon the cheesecake filling over the Oreo crust in the jars. Smooth the tops and then sprinkle with additional crushed Oreo cookies for garnish. Cover the jars with plastic wrap and refrigerate for at least 4 hours, or preferably overnight, to allow the cheesecake to set completely. This is the hardest part because waiting is torture, but trust me, it’s worth it.
Tips for Cheesecake Jar Success
Okay, here are a few little nuggets of wisdom I’ve picked up along the way. These tips will help you achieve cheesecake jar perfection every single time.
- Use Room Temperature Cream Cheese:This is crucial for a smooth, lump-free filling. If your cream cheese is cold, it will be nearly impossible to get it completely smooth.
- Don’t Overmix:Overmixing can cause the cheesecake filling to become dense and heavy. Gently fold in the whipped cream to keep it light and airy.
- Chill Thoroughly:Resist the urge to dig in after just an hour or two. The longer the cheesecake chills, the better it will set, and the more the flavors will meld together.
Serving Suggestions: Because Presentation Matters
While these cheesecake jars are delicious straight out of the fridge, a little extra flair never hurts. Here are a few ideas for serving them up in style.
- Fresh Berries:Top the cheesecakes with fresh raspberries, strawberries, or blueberries for a pop of color and flavor.
- Whipped Cream:A dollop of whipped cream adds extra richness and sweetness.
- Chocolate Shavings:Sprinkle with chocolate shavings for a touch of elegance.
- Oreo Cookie Crumbs:Because you can never have too many Oreos, right?
No-Bake Pink Oreo Cheesecake Jars: The Verdict
So, there you have it! The easiest, cutest, and most delicious dessert you’ll make all week. These No-Bake Pink Oreo Cheesecake Jars are perfect for parties, potlucks, or just a simple weeknight treat. They’re guaranteed to be a hit with kids and adults alike. And the best part? No oven required! Now go forth and make some cheesecake magic!
Frequently Asked Questions
Can I make these ahead of time?
Absolutely! In fact, I recommend it. Making them a day ahead of time allows the flavors to meld together even more.
Can I freeze these?
I wouldn’t recommend freezing them, as the texture of the cheesecake filling might change after thawing.
How long will these last in the fridge?
They’ll stay fresh in the fridge for up to four days, if they last that long!
Can I use different types of cookies?
Of course! Feel free to experiment with different flavors of Oreo cookies or even other types of cookies altogether.
Conclusion for No-Bake Pink Oreo Cheesecake Jars
These No-Bake Pink Oreo Cheesecake Jars are the perfect dessert for any occasion, offering a delightful combination of ease and indulgence. With their vibrant color, creamy texture, and irresistible Oreo flavor, they’re sure to be a crowd-pleaser. Feel free to customize them with different Oreo flavors or toppings to create your own unique variations. So, gather your ingredients, prepare to be amazed at how easy it is, and enjoy every spoonful of these delightful treats!
Print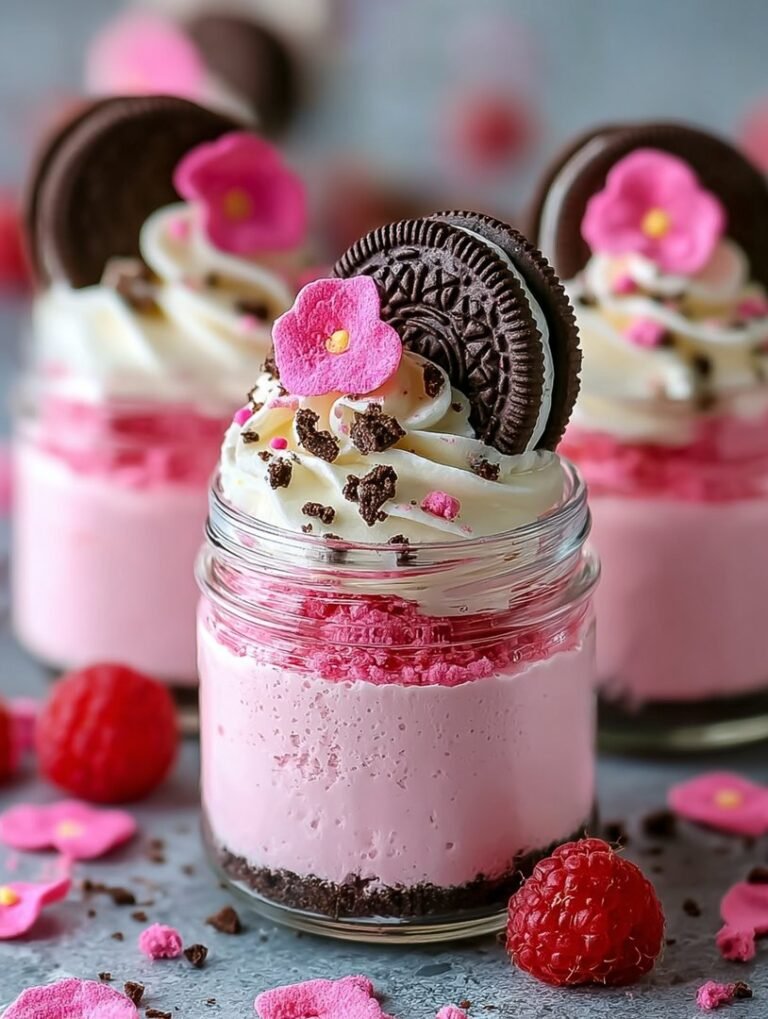
No-Bake Pink Oreo Cheesecake Jars
Content generation failed due to API limits. Please try again later. Original prompt: Generate a unique, engaging, and varied recipe description for: “No-Bake Pink Oreo Cheeseca…
- Total Time: 35 minutes
- Yield: 4 servings
Ingredients
- Pink Oreo cookies: 24
- Unsalted butter, melted: 6 tablespoons
- Cream cheese, softened: 8 ounces
- Powdered sugar: 1/2 cup
- Heavy whipping cream: 1 cup
- vanilla bean paste: 1 teaspoon
- Pink food coloring (optional): 2-3 drops
Instructions
- Step 1: Crush 16 Pink Oreo cookies into fine crumbs using a food processor or a zip-top bag and rolling pin. Mix the crushed cookies with the melted butter until well combined.
- Step 2: Divide the Oreo crumb mixture evenly among 4-6 small jars or glasses, pressing firmly into the bottom to create a crust.
- Step 3: In a large bowl, beat the softened cream cheese and powdered sugar together until smooth and creamy.
- Step 4: In a separate chilled bowl, beat the heavy whipping cream and alcohol-free vanilla extract with an electric mixer until stiff peaks form.
- Step 5: Gently fold the whipped cream into the cream cheese mixture until well combined and smooth. Add pink food coloring if desired, and mix until evenly colored.
- Step 6: Spoon or pipe the cheesecake filling into the jars on top of the Oreo crust. Crush the remaining 8 Oreo cookies into larger pieces and sprinkle on top of the cheesecake filling. Refrigerate for at least 2 hours before serving.
Notes
- Store assembled cheesecake jars in the refrigerator for up to 3 days, but the Oreo topping is best within the first 24 hours.
- Since this is a no-bake dessert, there's no reheating needed – just enjoy it chilled straight from the fridge!
- Garnish with fresh raspberries or a drizzle of white chocolate for an extra pop of flavor and color.
- For a smoother cheesecake filling, ensure your cream cheese is fully softened to room temperature before mixing.
- Prep Time: 15 minutes
- Cook Time: 20 minutes
- Method: Stovetop
- Cuisine: American
FAQs
Can I use regular Oreos instead of pink ones for these No-Bake Pink Oreo Cheesecake Jars?
Absolutely! While the pink Oreos add a fun, vibrant color and a subtle berry flavor, regular Oreos work just as well. The classic chocolate and cream combination will give you a delicious, familiar taste in these delightful dessert jars. Feel free to experiment with other Oreo flavors too – golden Oreos or even mint Oreos could create exciting variations! It’s all about making it your own, so get creative and enjoy.
How long do the No-Bake Pink Oreo Cheesecake Jars need to chill?
Patience is a virtue, especially when it comes to cheesecake! For the best texture, these No-Bake Pink Oreo Cheesecake Jars should chill for at least 4 hours, but preferably overnight. This allows the cheesecake filling to fully set and the Oreo crumbs to soften slightly, creating a perfect harmony of flavors and textures. Trust me, the wait is worth it! Imagine sinking your spoon into a chilled, creamy, and utterly irresistible dessert.
Are there any substitutions for the cream cheese in these No-Bake Pink Oreo Cheesecake recipes?
While cream cheese provides the classic tangy flavor and creamy texture we all love in cheesecake, you can experiment with alternatives! For a lighter option, try using Neufchâtel cheese, which has a similar taste but less fat. You could also blend softened cream cheese with a bit of Greek yogurt for added tang and a slightly lighter consistency. Remember to adjust sweetness if needed, and get ready to experience a slightly different, but equally enjoyable, twist on these delightful cheesecake jars.
How can I prevent the Oreo crust from becoming soggy in my Pink Oreo Cheesecake Jars?
Soggy crusts are a dessert tragedy, but fear not, there’s a fix! To keep your Oreo crust crisp and delightful in these No-Bake Pink Oreo Cheesecake Jars, try pressing the crumbs firmly into the bottom of the jars. You can also lightly brush the crust with melted butter or a thin layer of melted white chocolate before adding the filling. This creates a barrier that helps prevent moisture from seeping in.


Leave a Comment