

Forget everything you think you know about making homemade bread—the endless kneading, the arm fatigue, the existential despair when your dough doesn’t rise. I promise you a better way with this life-changingNo Knead Italian Artisan Bread. It smells like a thousand bakeries exploded in your kitchen, delivering a deep, complex flavor with zero fuss. You are about to meet your new favorite kitchen ritual. This rustic loaf, with its perfectly crisp crust and airy interior, allows time and hydration to do all the heavy lifting, proving that minimal effort can yield absolutely spectacular results. Here’s why this recipe will be your new obsession:
- Requires minimal hands-on effort, blending simple ingredients for a magnificent result that anyone can achieve in their kitchen.
- Develops deep, complex, and slightly tangy flavor profiles thanks to the slow, patient overnight fermentation process.
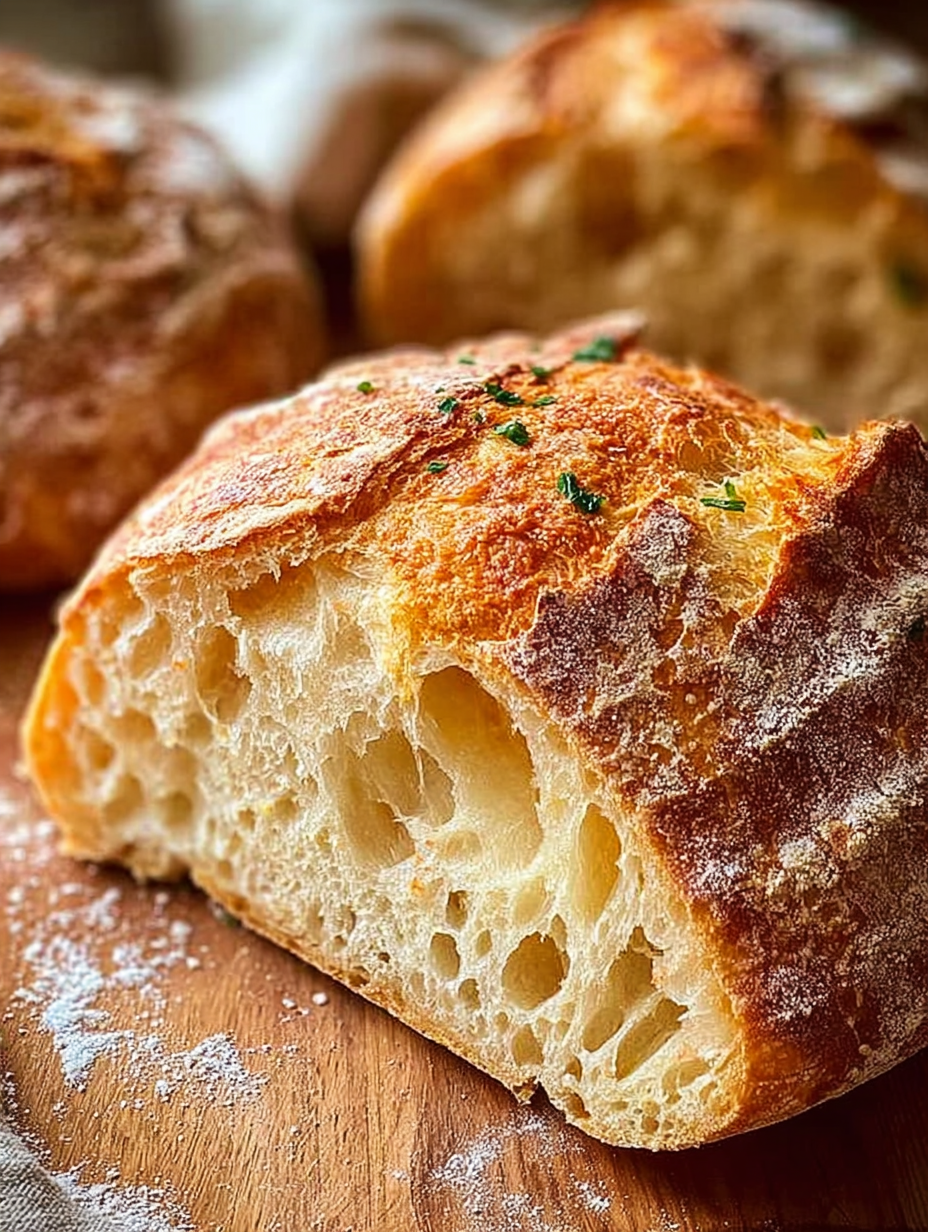
- Boasts a beautifully rustic, crackling crust and an irresistibly airy, open crumb structure inside the finished loaf.
- Serves as the ultimate companion for dipping into olive oil, soaking up rich pasta sauce, or elevating any savory sandwich creation.
Why You Should Stop Kneading Your Problems (And Your Dough)
For years, I was a martyr to the mixing bowl. I believed that true artisanal bread required 20 minutes of aggressive kneading, followed by a shower, a nap, and maybe a visit to a physical therapist. Then I discovered the transformative power of the no-knead method, and frankly, my life improved significantly. This technique is not just easier; it often produces a superior loaf, especially when aiming for that desirable open, hole-ridden crumb structure reminiscent of high-end bakeries. The secret to this easy Italian bread lies not in brute strength, but in patience and hydration. By mixing a very wet dough and allowing it to rest for a long period—usually 12 to 18 hours—you give the gluten molecules ample time to naturally align and strengthen themselves. The water works its magic, hydrating the starches and allowing the dough to develop complex flavors that quick-rise breads simply cannot replicate. It’s essentially lazy baking perfection. If you can stir together four ingredients in a bowl, you can make this bread.
The Magic Behind the Long Fermentation
When you let the dough rest overnight at room temperature, two primary things happen that contribute to the final flavor and texture of this rustic bread. First, the gluten develops through autolysis, which is the self-development of gluten strands in a wet mixture. You don’t need to rip and stretch the dough; the water facilitates the process passively. Second, the yeast starts its slow, steady consumption of the sugars in the flour, releasing various compounds that translate into the subtle, pleasant tanginess we associate with true artisan loaves. Skipping the long rest time means skipping the flavor. While quick bread recipes exist, they usually rely on higher yeast quantities and lack the depth of character that defines this specific technique. Think of the long fermentation as slow cooking for bread; it’s where all the nuanced goodness happens. The longer and slower the process, the more complex the result. Ensuring your mixing bowl is covered tightly during this rest period is crucial to preventing the surface from drying out and disrupting the gluten formation beneath.
Essential Ingredients for the Perfect Loaf
Here’s what you’ll need to make this delicious dish:
- All-Purpose Flour or Bread FlourUse unbleached flour for the best results; bread flour offers slightly higher protein content, yielding a stronger gluten structure.
- Instant YeastThis type of yeast requires no proofing and can be mixed directly into the flour, activating slowly over the long rise time.
- Kosher SaltSalt is essential for controlling the yeast activity, slowing the fermentation, and adding fundamental flavor complexity to the dough.
- Filtered WaterUse warm, filtered water to help activate the yeast and ensure proper hydration, critical for the no-knead method.
The full ingredients list, including measurements, is provided in the recipe card directly below.
Crafting Your No Knead Italian Artisan Bread
Follow these simple steps to prepare this delicious dish:
Step 1: Mixing the Master Dough
In a large mixing bowl, combine the flour, instant yeast, and salt. Use a wooden spoon or spatula to stir these dry ingredients thoroughly. Next, pour in the warm water. Stir until all the flour is hydrated and you have a shaggy, very sticky dough. Do not worry about over-mixing or kneading; simply ensure there are no dry pockets of flour left in the bowl. Cover the bowl tightly with plastic wrap to prevent air from drying out the surface.
Step 2: The Long Rest (Fermentation)
Allow the covered dough to rest at room temperature (ideally between 68°F and 72°F) for 12 to 18 hours. During this period, the dough should roughly double in size and become bubbly, sticky, and visibly webbed with gluten strands. If your kitchen is particularly cold, let it rest closer to the 18-hour mark. This long, slow fermentation is the cornerstone of the No Knead Italian Artisan Bread method.
Step 3: Folding and Shaping
Once rested, generously flour a clean work surface. Use a bowl scraper to gently transfer the sticky dough onto the floured surface. Dust the top of the dough lightly with flour. Using floured hands, grab the edges of the dough and fold the sides toward the center, creating a small, loose ball. Flip the dough over and cup your hands around it, lightly pulling it toward you a couple of times to create surface tension, forming a taut, round shape.
Step 4: The Second Rise (Proofing)
Place a large sheet of parchment paper on your counter. Transfer the shaped dough ball onto the center of the parchment paper. Lift the edges of the paper and place the dough and paper into a bowl or proofing basket dusted with flour or lined with a towel. Cover loosely with plastic wrap or a tea towel. Let the dough rest for a final proof for 30 to 45 minutes while you preheat your oven.
Step 5: Preheat and Prepare for Baking
About 30 minutes into the final rise, place a heavy-duty Dutch oven (with the lid on) into your oven. Preheat the oven to 450°F (230°C). Allowing the Dutch oven to heat thoroughly is crucial for achieving that amazing crust and spring. Ensure it stays in the oven for at least 30 minutes after the temperature reaches 450°F.
Step 6: Bake the Artisan Loaf
Carefully remove the blazing hot Dutch oven from the oven (use thick oven mitts!). Lift the dough by holding the parchment paper edges and gently lower the dough and paper directly into the hot pot. Cover the Dutch oven immediately with the lid and return it to the oven. Bake for 30 minutes covered, then carefully remove the lid and bake uncovered for an additional 15 to 20 minutes, or until the crust is a deep, rich brown color. Transfer to a wire rack and allow the bread to cool completely before slicing—this patience prevents a gummy interior.
Troubleshooting and Tips for a Rustic Crust
Even though this method is incredibly forgiving, a few simple strategies can elevate your simple dough into a spectacular rustic bread. Mastering the no-knead process often comes down to managing temperature and moisture, both of which are easily controlled once you know the tricks of the trade. Don’t be discouraged if your first loaf isn’t perfect; every oven and every climate is slightly different, requiring minor adjustments to the hydration level or fermentation time.
Achieving That Signature Crispy Crust
The secret weapon in the no-knead arsenal is the heavy, covered pot, typically a Dutch oven. Baking the dough covered for the first 30 minutes traps the steam released by the dough itself. This steam keeps the surface moist, allowing the loaf to expand fully without forming a hard crust prematurely. This expansion is what gives you a great “oven spring.” Once the lid comes off, the high dry heat hits the moistened surface, developing a thick, crackling, gorgeous crust. If you don’t have a Dutch oven, you can try baking the bread on a preheated baking stone and adding a pan of hot water to the bottom rack of the oven for steam, although the Dutch oven technique is far superior for home baking.
Storage and Reheating Tips
Freshly baked artisan bread is best eaten within 48 hours. The most important rule for storing bread with a hard crust is to avoid plastic bags, which trap moisture and turn the crust soft and leathery overnight. Instead, store the cooled loaf cut-side down on a wooden cutting board, or wrap it loosely in a clean paper bag at room temperature. For longer storage, you can slice the cooled bread and freeze it in a heavy-duty freezer bag for up to three months. To revive a slightly stale loaf, simply mist it lightly with water and place it in a 350°F (175°C) oven for about 5 to 7 minutes; this returns the crispness wonderfully.
Serving Suggestions for Your Homemade Bread
Once you pull this beautiful loaf from the oven and manage to let it cool without eating half of it first, the possibilities are endless. This easy Italian bread is robust enough to handle savory toppings yet tender enough to simply enjoy with butter. For the ultimate appetizer, slice thick pieces and toast them lightly, then top with fresh tomatoes, basil, garlic, and a drizzle of balsamic glaze for homemade bruschetta. This rustic artisan bread shines brightly when paired with comfort food. Use thick slices to soak up the last drops of a hearty beef stew or a rich, slow-cooked lamb sauce. It also serves as the perfect foundation for a massive, Italian-style sandwich, allowing the robust crust to hold up against layers of fresh vegetables and strong cheeses. If you want a quick snack, dip chunks directly into high-quality olive oil seasoned with fresh cracked pepper and sea salt—sometimes the simplest pairing is truly the best. Enjoy the fruits of your very minimal labor!
The Legend of the Lazy Baker and the Incredible Loaf
If you told me five years ago that I would be baking bread that tastes like it was hauled straight out of a stone oven in Tuscany, all without getting flour dust in places I didn’t know existed, I would have laughed. I associate homemade bread with sweaty forearms, mountains of dishes, and the faint, recurring scent of yeast guilt. But everything changed when I met the magic of the slow ferment, the technique that delivers perfect, crusty, chewyNo Knead Italian Artisan Breadwith shockingly little effort. This recipe is not just simple; it’s revolutionary for anyone who prefers lounging to kneading.
My kitchen used to host baking disasters—loaves that doubled as doorstops, sourdough attempts that smelled suspiciously like gym socks, and focaccia so tough you could use it for roofing tiles. I felt defeated by the complexity of achieving that perfect crumb structure. Then, during a particularly busy week where my ambition level was roughly zero, I decided to try the famed no-knead technique. The result was pure gold, a loaf so magnificent it demanded to be slathered in good olive oil. It requires three minutes of mixing, 18 hours of patience (which you do while sleeping, so it doesn’t count), and a heavy pot. If you can stir and wait, you can conquer this bread.
The Essential Pantry Raid: Ingredients You Need
The beauty of rustic baking lies in its simplicity. We are not dealing with a lengthy scroll of exotic spices or fussy binders here. We need four basic ingredients, and maybe a fifth if you count the existential dread of waiting for the dough to rise (don’t worry, the waiting is worth it).
Flour Power: Choosing Your Base
For true artisan quality, I highly recommend using bread flour. It contains more protein than all-purpose flour, which helps build a stronger gluten network during the long, slow rise, translating directly into that delightfully chewy texture we crave. If you only have all-purpose flour, use it! The bread will still be amazing, just perhaps slightly less chewy than its high-protein cousin. Remember, the hydration is key here, so accurate measuring is important—especially when dealing with the flour.
Yeast and Water: The Lifeblood
We rely on instant yeast because it’s wonderfully forgiving. You don’t need to proof it or activate it; you just toss it into the bowl and let the magic happen. The water, however, is a critical character in this drama. It should be lukewarm—not hot enough to kill the yeast, but warm enough to wake it up and encourage expansion. If your water is too cold, the dough might sleep through its rising window. We are looking for a shaggy, wet consistency, which is exactly why we avoid the kneading process. That high water content is what guarantees those spectacular air pockets inside the loaf.
Salt: Flavor, Texture, and Control
Salt does more than just add flavor; it controls the yeast’s activity, preventing it from going completely wild and burning itself out. Use fine sea salt or kosher salt. Resist the urge to skimp on the salt, as the final bread will taste bland and flat, regardless of how beautiful the crust turns out. Think of salt as the director of your dough’s performance, keeping everything in perfect rhythm.
The Slow Art of Making No Knead Italian Artisan Bread
The entire process divides neatly into two phases: the lazy evening prep and the exciting morning bake. Embrace the inactivity; this dough thrives on benign neglect.
Phase 1: The Overnight Rest
In a large bowl, combine the flour, yeast, and salt. Give them a quick stir to distribute the dry ingredients evenly. Pour in the lukewarm water all at once. Using a wooden spoon or spatula, stir until the ingredients just come together into a shaggy, messy mass. Do not overmix! We are aiming for ugly, sticky, and uneven. Cover the bowl tightly with plastic wrap or a kitchen towel. Now, here comes the hardest part: walk away. Let it sit at room temperature for 12 to 18 hours. Overnight works perfectly. You’ll know it’s ready when the surface is bubbly and has more than doubled in size, smelling subtly tangy and yeasty—a truly wonderful aroma.
Phase 2: The Shape and Bake
About 30 minutes before you plan to bake, place a 6-quart Dutch oven (or any heavy, lidded pot) into your cold oven. Turn the heat up to a ripping 450°F (232°C). Allowing the pot to heat fully is the non-negotiable step for achieving that signature thick, crunchy crust. While the pot preheats, lightly flour a work surface and scrape the incredibly sticky dough out of the bowl. Resist the urge to deflate it completely. Using lightly floured hands, quickly fold the dough over itself 2-3 times to form a loose, round ball. Don’t worry about perfection; rustic is the goal.
Carefully remove the blazing hot Dutch oven from the oven (use heavy gloves, seriously). Quickly drop the dough seam-side up into the hot pot. Immediately cover it with the lid. The trapped steam is essential for the oven spring.
Bake the bread covered for 30 minutes. The internal temperature of the pot gets supercharged, creating a burst of steam that allows the bread to expand dramatically. After 30 minutes, remove the lid and bake for another 15 to 20 minutes, or until the crust is a deep, gorgeous mahogany brown. Remove the bread from the pot and let it cool completely on a wire rack before slicing. The cooling process is crucial for preventing a gummy interior. Waiting is painful, but mandatory.
The Accidental Discovery of Sunshine on a Plate
I stumbled upon this recipe during a personal boycott of my mixer, which had dramatically eaten two kitchen towels. I wanted authentic, rustic bread without the gym workout. This truly spectacularNo Knead Italian Artisan Breademerged from my oven, golden and impossibly simple, proving that sometimes, laziness truly is the mother of invention.
Perfecting the Cooking Process
For optimal results, remember that time is your main ingredient. Mix the dough thoroughly the night before, allowing the long, slow fermentation to develop flavor complexity. Always preheat your Dutch oven inside the oven so the bread gets that initial burst of steam and intense heat crucial for a crackling crust.
Add Your Touch
Elevate this rustic loaf by incorporating sun-dried tomatoes and dried oregano for a burst of Mediterranean flavor. You can swap some white flour for whole wheat, but adjust the water content slightly. A sprinkle of flaky sea salt on top before baking adds a beautiful, professional sheen and extra crunch.
Storing & Reheating
Store cooled bread wrapped tightly in a linen cloth or a paper bag at room temperature for up to three days—never refrigerate it, as it will dry out instantly. To refresh stale bread, sprinkle the crust lightly with water and reheat it in a 350°F oven for five to ten minutes until crisp.
A Little Expert Advice
These simple tips move your baking from good to truly magnificent:
-
Use a kitchen scale instead of measuring cups for the flour and water; accuracy in baking prevents disastrously dry or overly soupy doughs.
-
Monitor your kitchen temperature; in colder weather, placing the covered dough near the pilot light on the stove can ensure a proper rise.
-
Always let the loaf cool completely—at least an hour—before cutting it, which ensures the interior structure sets and prevents a gummy texture.
My neighbor, who fancies himself a bread connoisseur, took one bite and demanded to know which Italian bakery I visited; knowing it was my own two (non-kneading) hands was the sweetest victory.
The Recipe for No Knead Italian Artisan Bread
Ingredients
- 3 cups (380g) bread flour (or all-purpose flour)
- 1 ½ teaspoons fine sea salt
- ¼ teaspoon instant yeast
- 1 ½ cups (355ml) lukewarm water
Instructions
- Mix the Dough:In a large bowl, whisk together the flour, salt, and yeast. Add the lukewarm water. Stir just until a shaggy, sticky mass forms. Do not knead.
- First Rise (Fermentation):Cover the bowl tightly with plastic wrap and let it sit at room temperature (around 70°F) for 12 to 18 hours. The dough should be bubbly and doubled in size.
- Preheat the Oven:Place a lidded 6-quart Dutch oven inside your oven. Preheat the oven to 450°F (232°C). Let the pot preheat for at least 30 minutes.
- Shape the Dough:Lightly flour a work surface and gently scrape the dough onto it. Quickly fold the edges over to form a loose, rough ball.
- Bake Covered:Carefully remove the scorching hot pot from the oven. Drop the dough into the pot and immediately cover it with the lid. Bake for 30 minutes.
- Bake Uncovered:Remove the lid and continue baking for 15 to 20 minutes, until the crust is deep golden brown and crunchy.
- Cool:Transfer the bread to a wire rack. Cool completely for at least one hour before slicing and serving.
Conclusion for No Knead Italian Artisan Bread
This recipe truly democratizes artisan baking, proving you don’t need special skills or equipment to produce a loaf worthy of a rustic Italian trattoria. By leveraging the power of time and high hydration, theNo Knead Italian Artisan Breaddelivers a complex flavor and a perfect, crusty exterior that would make a professional baker proud. Remember the key principles: patience during the overnight rest, extreme heat from the preheated Dutch oven, and the discipline to let it cool completely. Embrace the simplicity, minimize the labor, and prepare to be amazed by the delicious, authentic bread waiting for you.
Print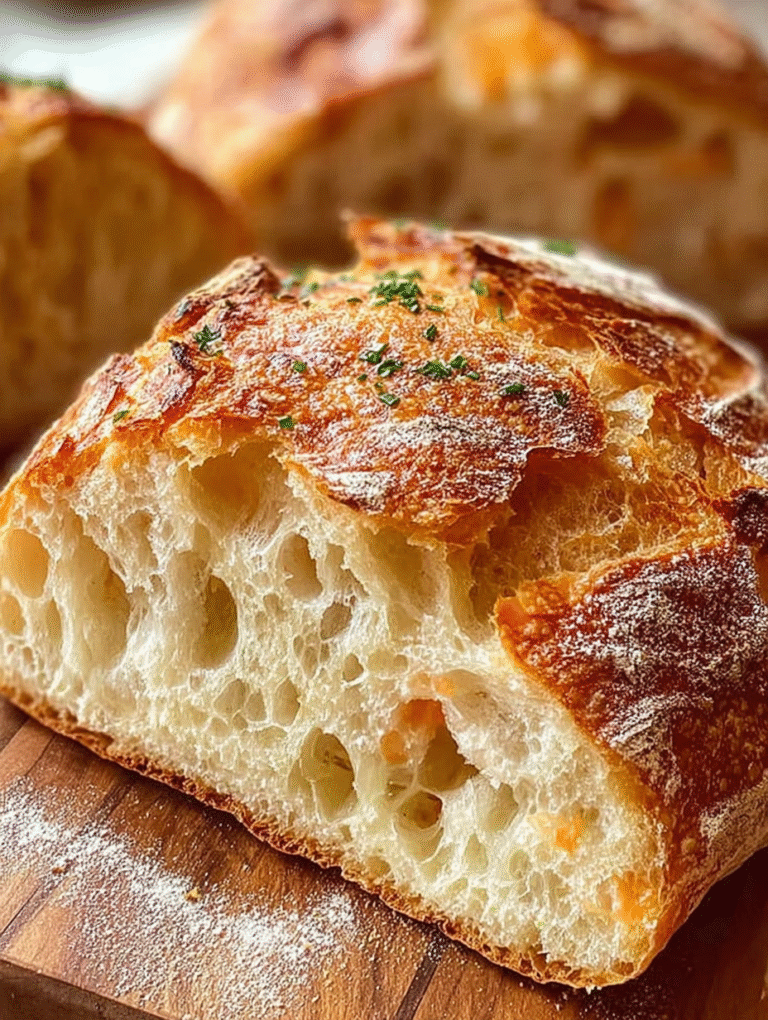
No Knead Italian Artisan Bread
Achieve airy, rustic Italian loaf perfection without kneading! A 12-hour cool rest yields a bubbly, webbed dough requiring only 1/4 tsp yeast. Full instructions and nutritional facts inside.
- Total Time: 35 minutes
- Yield: 4 servings 1x
Ingredients
- 3 cups (400g) bread flour or all-purpose flour
- 1 1/2 cups (355ml) warm water (about 105°F/40°C)
- 1 1/2 teaspoons sea salt
- 1/4 teaspoon instant dry yeast
- 1 tablespoon extra virgin olive oil
- 1 tablespoon cornmeal or semolina (for dusting)
Instructions
- Step 1: In a large bowl, whisk together the flour, salt, and instant dry yeast. Add the warm water and olive oil, and mix vigorously with a wooden spoon or spatula for about 30 seconds until a shaggy, sticky mass forms and no dry spots of flour remain. Do not knead the mixture.
- Step 2: Cover the bowl tightly with plastic wrap and let the dough rest at cool room temperature (68-72°F) for a minimum of 12 hours, and up to 18 hours. The dough should more than double in size, become bubbly, and look webbed.
- Step 3: Lightly flour a work surface. Scrape the dough out of the bowl and gently fold it over itself two or three times to form a loose, rustic ball (avoid deflating it completely). Place the dough seam-side down onto a piece of parchment paper dusted heavily with cornmeal, cover loosely with plastic wrap, and let rest for 30 minutes to 1 hour.
- Step 4: Place a 5-6 quart Dutch oven with its lid inside the oven and preheat the oven to 475°F (245°C). Allow the Dutch oven to preheat for at least 30 minutes before baking to ensure it is scorching hot.
- Step 5: Carefully lift the dough using the parchment paper handles and place it into the hot Dutch oven. Cover the pot and bake for 30 minutes. After 30 minutes, remove the lid and bake for an additional 15 to 20 minutes, or until the crust is a deep golden brown. Transfer the loaf to a wire rack to cool completely before slicing.
Notes
- For a true artisan flavor and webbed crumb, ensure your dough rests for the full 12 to 18 hours at a cool room temperature; this slow, cold fermentation is the essential step for developing complex flavor.
- If the crust has softened after a day or two, revive the loaf by placing it directly on a rack in a 350°F oven for 5 to 8 minutes until the exterior is crisp again.
- To keep the bread fresh, store the cooled loaf wrapped tightly in foil or a clean kitchen towel at room temperature for up to 3 days, as refrigeration dramatically speeds up staling.
- Serve thick slices alongside a small bowl of high-quality extra virgin olive oil for dipping, garnished simply with fresh rosemary and a dusting of sea salt.
- Prep Time: 15 minutes
- Cook Time: 20 minutes
- Method: Stovetop
- Cuisine: American


Leave a Comment