
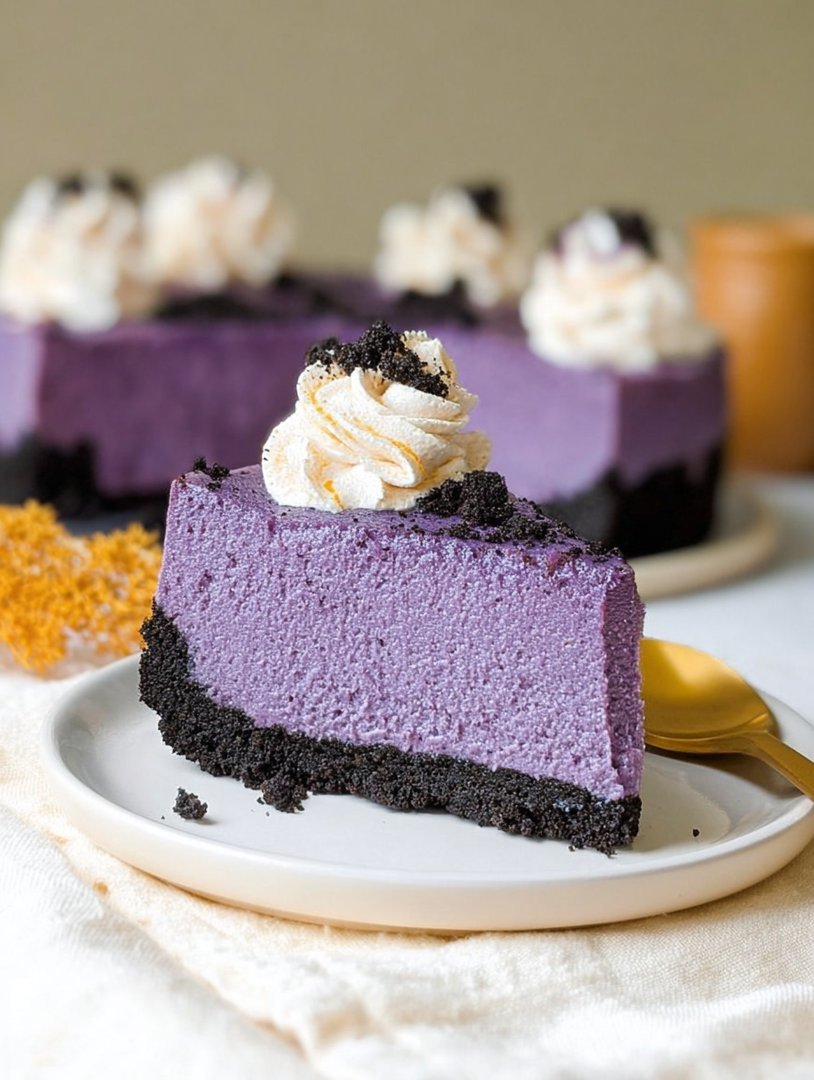
Oreo Crusted Ube Cheesecakes: A Delightful Twist on a Classic Dessert
Oreo Crusted Ube Cheesecakes combine the rich flavors of ube with a crunchy Oreo crust, creating an irresistible dessert experience.
- This recipe features a creamy ube filling that is both vibrant and delicious, capturing the essence of this beloved root vegetable.
- The Oreo crust provides a delightful contrast in texture, adding a chocolatey crunch that perfectly complements the smooth cheesecake.
- These mini cheesecakes are visually stunning, making them a perfect centerpiece for gatherings or special occasions.
- They are easy to prepare, allowing both novice and experienced bakers to enjoy making this unique dessert without stress.
Each bite of these cheesecakes offers a harmonious blend of flavors and textures, ensuring they will be a hit at any event. The striking purple hue of ube not only pleases the palate but also captivates the eyes, making these treats as beautiful as they are delicious. Ideal for anyone looking to impress guests or simply indulge in something sweet, Oreo Crusted Ube Cheesecakes are sure to become a favorite.
With their unique flavor profile and eye-catching presentation, these mini cheesecakes provide a modern take on traditional desserts. They are perfect for celebrations or as a delightful weeknight treat. Embrace the joy of baking and treat yourself to these delicious Oreo Crusted Ube Cheesecakes that bring together creativity and flavor in every bite.
The Secret to Perfecting This Dish
To achieve the best results with Oreo crusted ube cheesecakes, start by preparing the crust first. While it cools, mix the ube filling to ensure a smooth texture. Bake the cheesecake for an even finish, allowing it to set properly before chilling for optimal flavor integration.
Add Your Personal Touch
Consider adding different flavors or toppings to your ube cheesecake. You can swap traditional cream cheese with mascarpone for a richer taste or incorporate fresh fruits like mango or coconut flakes. Experimenting with various extracts can also elevate your dessert’s unique profile.
Storing & Reheating for Best Quality
Store any leftover Oreo crusted ube cheesecakes in an airtight container in the refrigerator for up to five days. For best quality when reheating, allow them to come to room temperature before placing them in a preheated oven at low heat to warm gently without compromising texture.
Expert Advice
- Use high-quality ube for a more vibrant color and flavor.
- Chill your cheesecake overnight for enhanced firmness and taste.
- Top with whipped cream and crushed Oreos right before serving for added texture.
Conclusion for Oreo Crusted Ube Cheesecakes
The Oreo crusted ube cheesecakes are a delightful fusion of flavors that can impress anyone. By mastering the cooking sequence, personalizing your ingredients, and knowing how to store leftovers effectively, you can ensure this treat is always a hit. Remember to add your unique flair and share this indulgent dessert with friends and family for memorable gatherings.
Print
Oreo Crusted Ube Cheesecakes
Indulge in the creamy delight of Oreo Crusted Ube Cheesecakes! This recipe blends rich cream cheese and sweet ube puree on a crunchy Oreo base. Follow our easy steps for a delightful treat!
- Total Time: 35 minutes
- Yield: 4 servings 1x
Ingredients
- 24 Oreo cookies, crushed
- 5 tablespoons unsalted butter, melted
- 16 oz cream cheese, softened
- 1 cup granulated sugar
- 1 cup ube puree (cooked and mashed ube)
- 3 large eggs
- 1 teaspoon alcohol-free vanilla extract
- Pinch of salt
Instructions
- Step 1: Preheat your oven to 325°F (160°C). Prepare a 9-inch springform pan by greasing the sides and lining the bottom with parchment paper.
- Step 2: In a medium bowl, combine the crushed Oreo cookies with the melted butter. Mix until the mixture resembles wet sand. Press this mixture firmly into the bottom of the prepared springform pan to create an even crust.
- Step 3: In a large mixing bowl, beat the softened cream cheese and granulated sugar together until smooth and creamy. Make sure there are no lumps remaining.
- Step 4: Add the ube puree, eggs one at a time, vanilla powder, and a pinch of salt to the cream cheese mixture. Beat on low speed until everything is well combined and smooth.
- Step 5: Pour the ube cheesecake mixture over the Oreo crust in the springform pan. Tap it gently on the counter to release any air bubbles. Bake in the preheated oven for about 50-60 minutes, or until the center is set but still slightly jiggly.
- Step 6: Once baked, turn off the oven and leave the cheesecake inside for an additional hour to cool slowly. After that, remove it from the oven and let it cool completely at room temperature before refrigerating it for at least 4 hours or overnight before serving.
Notes
- For storage, keep your Oreo Crusted Ube Cheesecakes in an airtight container in the fridge, where they will stay fresh for up to a week. If you prefer a warm dessert, gently reheat individual slices in the microwave for about 10-15 seconds, just until slightly warm; be careful not to overheat and risk the texture. For an elegant serving suggestion, top each slice with a dollop of whipped cream and a sprinkle of crushed Oreo cookies for added flavor and crunch. A chef's tip: ensure your cream cheese is fully softened before mixing to avoid lumps and achieve that velvety smooth texture in your cheesecake.
- Prep Time: 15 minutes
- Cook Time: 20 minutes
- Method: Stovetop
- Cuisine: American


Leave a Comment