

There is a silence that falls over the kitchen when you realize you can have a decadent, chocolatey treat without firing up the oven or ditching your gym goals. Imagine the crunch of the classic cookie giving way to a rich, smooth center.
These magnificentOreo Protein Balls Cream Cheesestyle are the solution to that midnight craving—a bite-sized revelation that proves sometimes, the best recipes require zero cooking and maximal flavor payoff.
- These delightful bites offer a rich, creamy flavor profile, perfectly balancing the dark chocolate cookie crumble with tangy cream cheese goodness.
- Preparation is incredibly easy, requiring no baking whatsoever; simply mix, roll, and chill for a quick, high-protein snack solution.
- The visual appeal is striking, featuring a contrasting dark exterior and a soft, white interior, making them perfect for parties or lunchbox treats.
- Their versatility shines through, allowing easy customization with different protein powders or toppings to match any nutritional needs or preference.
The Quest for the Perfect Guilt-Free Treat
Let’s be honest: maintaining a balanced lifestyle often feels like a cruel joke invented by a nutritionist with a vendetta against chocolate. You hit the gym, you track your macros, and then 3 PM rolls around, and suddenly your brain decides that the only acceptable fuel source is an entire sleeve of sandwich cookies. I’ve been there. I’ve stared longingly into the pantry, whispering promises to the remaining cookies about a future filled with squats.
That’s precisely why I became obsessed with creating a treat that felt utterly indulgent but secretly delivered a solid punch of protein. The challenge was keeping that signature textural contrast—the slightly gritty, intensely chocolatey flavor of the beloved cookie, coupled with a dense, fudgy interior. Many recipes fail here; they end up either too dry, tasting purely of artificial protein, or so sticky they pull your fillings out. After extensive, highly scientific testing (read: eating many failed batches), I stumbled upon the magic ratio involving cream cheese. Cream cheese isn’t just a binder; it’s the secret weapon that lends a luxurious tang and smooth richness, completely masking any chalkiness from the protein powder.
These aren’t just snacks; they are nutritional espionage. You are convincing your inner chocoholic that it is winning, while your fitness goals cheer from the sidelines. They are easy to make in large batches, freeze beautifully, and are the ideal post-workout reward or mid-afternoon energy booster. Prepare for these to vanish quickly. If you blink, they might be gone, claimed by a spouse, roommate, or possibly a very determined house pet.
Ingredients for Oreo Protein Balls Cream Cheese
Here’s what you’ll need to make this delicious dish:
- Sandwich CookiesUse the classic dark chocolate sandwich cookies, ensuring they are finely crushed to create the primary flavor base and crunchy coating.
- Cream CheeseFull-fat, softened cream cheese provides essential moisture, binding power, and a rich, slightly tangy flavor that balances the sweetness.
- Vanilla Protein PowderChoose a high-quality plant-based protein powder or plant-based vanilla protein powder; this is crucial for the macro boost and structural integrity of the balls.
- Powdered SugarA small amount helps sweeten the filling and contributes to the smooth, non-gritty texture of the finished product.
- Milk or WaterUse a tablespoon or two if needed to achieve the perfect pliable dough consistency, although this often depends on the type of protein powder used.
- A Pinch of SaltThis crucial ingredient enhances the sweetness and deepens the chocolate flavor of the crushed cookies, preventing the balls from tasting flat.
The full ingredients list, including measurements, is provided in the recipe card directly below.
Mastering the Art of No-Bake Bliss
While this recipe is famously simple, “no-bake” doesn’t mean “no-skill.” There are a few key techniques that separate a mediocre, crumbly protein ball from a perfectly fudgy, irresistible truffle. The texture is everything here; you want a dough that holds its shape without sticking relentlessly to your hands, yet remains moist enough to be enjoyable.
Choosing Your Protein Powerhouse
The type of protein powder you use fundamentally changes the texture. Plant-Based Protein Powder protein tends to absorb moisture quickly, often requiring an extra splash of liquid. Plant-based proteins, especially those with pea or rice bases, can sometimes yield a drier, grainier result. Experimenting with half a scoop of your chosen powder first allows you to gauge how much moisture is truly needed. Remember, the goal is a moldable dough, similar to playdough, not a sticky batter or crumbly sand. Don’t be afraid to adjust the cream cheese slightly or add a splash of milk if your mixture feels too dry after mixing.
The Chill Factor: Why Patience is a Virtue
Skipping the chilling phase is the number one mistake in no-bake recipes. Think of the chilling time as the moment the ingredients get to know each other intimately. The fats in the cream cheese solidify, the protein powder fully hydrates, and the resulting mixture firms up dramatically. This solidification makes the rolling process infinitely easier and less messy. If you attempt to roll the balls immediately after mixing, you risk a sticky, shapeless mess that requires constant hand washing. Give them at least 30 minutes in the refrigerator, and preferably an hour, before handling. A quick chill also sets the final shape, ensuring those beautiful spheres hold up when stored at room temperature briefly.
How to Make Oreo Protein Balls Cream Cheese
Follow these simple steps to prepare this delicious dish:
Step 1: Crushing the Cookies
Place the required amount of sandwich cookies into a food processor and pulse until they resemble fine crumbs. Alternatively, place them in a resealable bag and crush them thoroughly using a rolling pin until no large pieces remain. Reserve about one third of the crushed crumbs for the final coating.
Step 2: Preparing the Base Dough
In a large mixing bowl, combine the majority of the crushed cookie crumbs, the softened cream cheese, the vanilla protein powder, powdered sugar, and a pinch of salt. Mix these ingredients thoroughly using a sturdy spoon or an electric mixer on low speed until a thick, cohesive dough begins to form.
Step 3: Adjusting Consistency
Test the dough texture by pressing a small amount between your fingers. If it feels too dry or crumbly, add milk or water one teaspoon at a time until the mixture comes together easily and holds its shape without cracking. If it becomes too wet, add a tiny bit more protein powder or powdered sugar to restore structure.
Step 4: Chilling and Shaping
Cover the bowl and refrigerate the mixture for a minimum of 30 to 60 minutes. Once chilled, use a small cookie scoop or tablespoon to measure out uniform portions. Roll each portion between your palms until you achieve smooth, tightly packed 1-inch balls.
Step 5: Coating and Final Set
Place the reserved cookie crumbs in a shallow dish. Gently roll each protein ball in the crumbs until it is fully coated on all sides. Arrange the finishedOreo Protein Balls Cream Cheeseon a parchment-lined tray and return them to the refrigerator for a final chill of 15 minutes to fully set the coating.
Transfer to plates and drizzle with melted white chocolate (optional) for the perfect finishing touch.
Flavor Variations and Swaps
The beauty of the Oreo Protein Balls Cream Cheese recipe lies in its adaptability. Once you have the perfect base texture down—thanks to the harmonious combination of cream cheese and protein powder—the flavor possibilities are almost endless. This is where you can truly tailor the treats to your specific dietary needs or current flavor obsessions. Think of the standard recipe as a highly sophisticated, chocolatey canvas.
For those who prefer a deeper, more robust flavor, consider swapping the vanilla protein powder for a chocolate or mocha flavor. This yields an intensely dark, double-chocolate experience. If you’re feeling adventurous, a peanut butter flavored protein powder creates a delicious, unexpected contrast with the dark cookie base. Remember that if you introduce highly absorbent ingredients like cocoa powder or ground nuts, you might need an extra teaspoon of moisture to maintain that fudgy consistency. You could also infuse the cream cheese base with a tiny amount of citrus zest before mixing for a surprisingly bright, creamy filling.
Beyond the internal structure, toppings are an easy way to elevate both the look and the nutritional profile. Instead of rolling the balls in reserved crumbs, try rolling them in shredded coconut, finely chopped pistachios, or flax seeds for an added fiber boost. For maximum visual impact, melt a small amount of dark chocolate and drizzle it decoratively over the chilled balls. Just ensure whatever coating you choose adheres well; a slightly sticky exterior from inadequate chilling might require a brief freezer session before the final roll. This flexibility ensures that these indulgent bites never get boring, guaranteeing they remain a staple in your healthy snacking repertoire.
The quest for the perfect guilt-free snack often feels like chasing a mythical creature—a delicious treat that fuels your body without leaving you crashing face-first into a sugar coma fifteen minutes later. For years, my kitchen shelves were a battleground between high-protein necessities and the siren call of decadent desserts. I needed something that satisfied my intense cravings for chocolate and cream while still meeting my fitness goals. Standard protein bars felt like cardboard, and traditional treats involved too much complicated baking and far too many dishes.
Then came the revelation. It involved a package of chocolate sandwich cookies—the iconic ones we all love—a scoop of creamy vanilla protein powder, and the glorious smoothness of cream cheese. This combination sounds inherently wrong, the culinary equivalent of mixing oil and water, but the resulting mixture is pure, no-bake perfection. These delightful little powerhouses solve the ultimate dietary dilemma: how to sneak serious nutrition into something that tastes precisely like a cheat day. Forget boring meal prep; we are entering the realm of effortless indulgence with these incredibleOreo Protein Balls Cream Cheesedelights.
This recipe isn’t just easy; it’s revolutionary. It requires five minutes of prep, utilizes pantry staples, and delivers a boost of energy wrapped in a familiar, comforting flavor. Get ready to ditch the mixer, ignore the oven, and embrace the magic of simple assembly. This is the ultimate proof that the best recipes often require the least effort.
The Accidental Discovery of Sunshine on a Plate

I needed a post-workout snack but only had sad leftovers: crushed chocolate cookies, a brick of cream cheese, and forgotten vanilla protein powder. Necessity, my friends, is the mother of all delicious inventions, leading directly to these legendary Oreo Protein Balls Cream Cheese. It was pure accidental genius.
Gathering Your Delicious Arsenal
One of the beauties of these powerful little spheres is their short ingredient list. You don’t need fancy equipment or hard-to-find supplies. This recipe thrives on simplicity, turning three primary ingredients into an irresistible dessert truffle hybrid. The key to success is using quality ingredients, especially the protein powder, which determines the final texture and sweetness level. Choose a vanilla or chocolate plant-based protein powder or plant-based protein that you enjoy the taste of, as its flavor will be prominent.
- 1 1/2 cups finely crushed chocolate sandwich cookies (about 18 full cookies)
- 1/2 cup vanilla or chocolate protein powder
- 8 ounces full-fat cream cheese, softened
- 2 tablespoons milk or non-dairy beverage (optional, for thinning)
- 1/4 cup crushed cookies, reserved for coating (optional)
The Science of the Perfect Roll
Making these cookies and cream protein bites is less about cooking and more about blending and patience. The most challenging part is waiting for the mixture to chill, but trust me, that refrigeration time is non-negotiable for achieving perfect, non-sticky balls. Start by crushing your cookies. If you have a food processor, use it to turn the cookies into a fine, dust-like crumb; this helps the mixture bind smoothly. If you don’t have a processor, place the cookies in a sturdy zip-top bag and smash them mercilessly with a rolling pin—it’s excellent stress relief!
Once you have your cookie dust, transfer it to a large mixing bowl. Add the protein powder, ensuring it’s evenly distributed among the crumbs. Next, add the softened cream cheese. It must be soft, not cold, otherwise, you will end up with painful, lumpy clumps. Use a sturdy spatula or, better yet, your hands (wear gloves if you prefer) to combine the mixture fully. You are looking for a thick, cohesive dough that pulls away from the sides of the bowl. If the mix seems too dry, drizzle in the milk one teaspoon at a time until the mixture holds together perfectly.
Now, the waiting game begins. Cover the bowl and refrigerate the dough for at least 30 minutes, or up to an hour. This chilling process firms up the cream cheese, making the dough much easier to handle and roll. Once chilled, scoop out small portions—about 1 tablespoon each—and roll them quickly between your palms to form smooth spheres. If you are using the reserved cookie crumbs for coating, gently roll each ball in the crumbs until fully covered. Place the finished Oreo Protein Balls Cream Cheese on a parchment-lined tray and chill them again for 10 minutes to set the coating before serving.
Perfecting the Cooking Process
Since this is a no-bake wonder, the “cooking” process involves smart assembly. First, pulse the cookies into a fine crumb. Next, combine the crumbs, protein powder, and softened cream cheese until perfectly smooth before chilling thoroughly. Finally, roll them quickly into balls for the ultimate bite.
Add Your Touch
Swap vanilla protein for chocolate or peanut butter varieties to change the flavor profile completely. Use gluten-free cookies if necessary. For extra crunch, fold in mini chocolate chips or crushed freeze-dried raspberries before rolling. A dusting of powdered sugar adds a bakery finish.
Customizing these cookies and cream protein bites is half the fun. They are a blank canvas for high-protein creativity. Beyond simple flavor swaps, consider incorporating healthy fats. A tablespoon of natural, unsweetened almond or cashew butter can be added during the mixing phase for extra richness and a subtle nutty undertone. If you want a more luxurious finish, melt some dark chocolate chips with a tiny bit of coconut oil and drizzle or dip the chilled balls. The hard chocolate shell provides a fantastic textural contrast to the creamy interior.
For those seeking lower sugar content, look for low-sugar or zero-sugar chocolate sandwich cookies. Alternatively, you can substitute half of the crushed cookie base with finely ground oat flour, which adds fiber and reduces the overall sweetness, creating a snack that is even more nutritionally robust. These simple adjustments ensure that your Oreo Protein Balls Cream Cheese recipe remains adaptable to any dietary preference or craving you might have that day.
Storing & Reheating
Store these delightful Oreo Protein Balls Cream Cheese in an airtight container in the refrigerator for up to seven days. For longer storage, freeze them for up to two months. Thaw overnight in the fridge. Do not microwave; they taste best chilled straight from the container!
Expert Tips for Flawless Protein Balls
- Ensure your cream cheese is fully softened to avoid a lumpy mix that refuses to bind properly. Room temperature is your friend here for smooth consistency.
- If the mixture feels too sticky after mixing, add one extra tablespoon of protein powder until it becomes easy to roll, but don’t overdo it.
- Chill the dough for at least 30 minutes before shaping; this step firms up the fats and prevents messy, melting hands during rolling.
My nephew, who refuses anything labeled “healthy,” devoured half a batch, then swore he had invented them. It’s the highest compliment when a dessert deceives a picky eater into loving protein.
Conclusion for Oreo Protein Balls Cream Cheese
These Oreo Protein Balls Cream Cheese truffles are the ultimate convergence of dessert indulgence and sensible nutrition. They require minimal effort, deliver maximum flavor, and serve as perfect grab-and-go fuel for busy mornings or post-gym recovery sessions. By using just a few simple ingredients, you create a treat that tastes precisely like the classic cookies and cream you adore, but with the added benefit of substantial protein. Embrace the ease of this no-bake recipe and finally win the battle against unsatisfying snacks. Keep a batch chilled and ready; these powerhouses disappear faster than you can say “protein powder.”
Print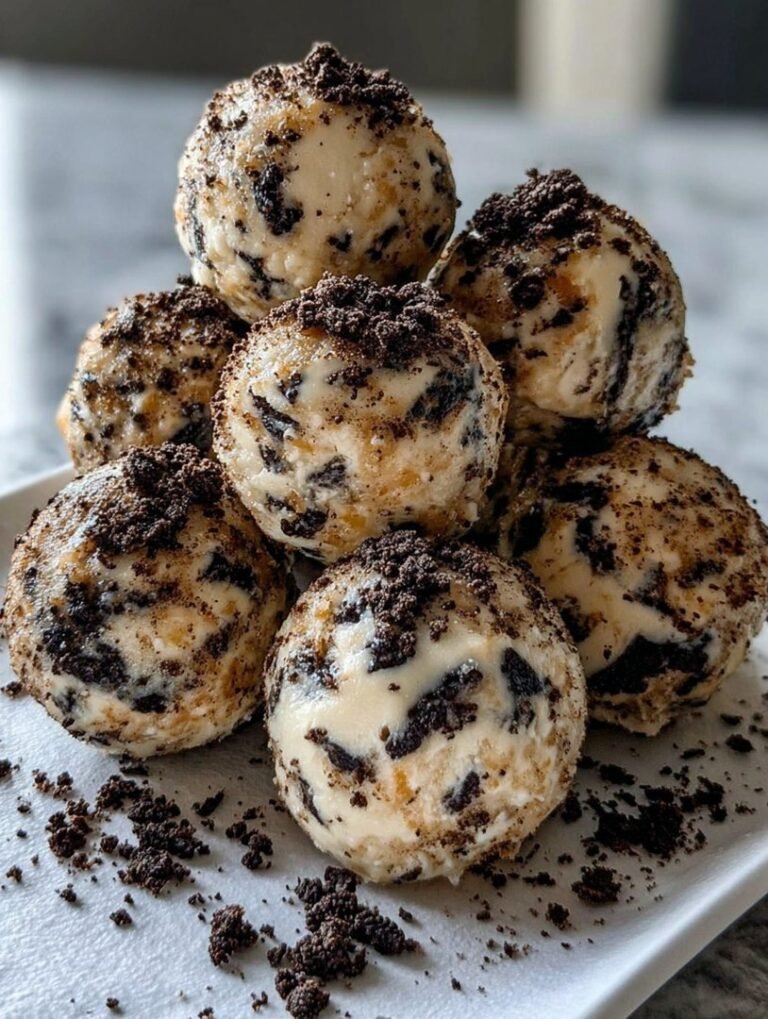
Oreo Protein Balls Cream Cheese
Decadent dark cookie crust meets tangy cream cheese and vanilla protein. Crush, mix, chill—no baking! Perfect macro-friendly bliss. Full instructions & nutritional analysis included.
- Total Time: 35 minutes
- Yield: 4 servings
Ingredients
- Sandwich CookiesUse the classic dark chocolate sandwich cookies, ensuring they are finely crushed to create the primary flavor base and crunchy coating.
- Cream CheeseFull-fat, softened cream cheese provides essential moisture, binding power, and a rich, slightly tangy flavor that balances the sweetness.
- Vanilla Protein PowderChoose a high-quality plant-based protein powder or plant-based vanilla protein powder; this is crucial for the macro boost and structural integrity of the balls.
- Powdered SugarA small amount helps sweeten the filling and contributes to the smooth, non-gritty texture of the finished product.
- Milk or WaterUse a tablespoon or two if needed to achieve the perfect pliable dough consistency, although this often depends on the type of protein powder used.
- A Pinch of SaltThis crucial ingredient enhances the sweetness and deepens the chocolate flavor of the crushed cookies, preventing the balls from tasting flat.
Instructions
- Step 1: Crushing the Cookies
- Step 2: Preparing the Base Dough
- Step 3: Adjusting Consistency
- Step 4: Chilling and Shaping
- Step 5: Coating and Final Set
Notes
- Store these delicate cream cheese-based treats in an airtight container in the refrigerator for up to 7 days, or freeze the shaped balls for up to two months, allowing them to thaw briefly before serving.
- Serve chilled alongside a strong cup of coffee or a cold glass of unsweetened almond milk to perfectly balance the richness and sweetness of the cream cheese base.
- To ensure the dough stays pliable, add the milk or water very gradually, as exceeding the liquid limit will quickly make the dough sticky and difficult to roll without chilling.
- For the best structural integrity and maximum coating adherence, ensure the sandwich cookies are processed into uniform, almost powdery fine crumbs during the crushing step.
- Prep Time: 15 minutes
- Cook Time: 20 minutes
- Method: Stovetop
- Cuisine: American


Leave a Comment