
Have you ever attempted to fry tacos on a weeknight, only to discover that your kitchen now resembles an oil slick disaster zone? Skip the painful cleanup and embrace the culinary magic of the oven. These incredibleOven-Baked Cheesy Tacos (Crispy & Loaded)deliver maximum flavor and crunch without needing a single deep-fry burner, making them the ultimate easy dinner solution. Get ready for that perfect cheesy pull and satisfying shell snap; this method guarantees success even if your previous taco attempts involved emergency paper towel interventions. You will love how simple and utterly delicious this oven method truly is.
- Effortlessly transform weeknight dinners into a fiesta using one sheet pan, minimizing cleanup dramatically.
- Experience a decadent combination of seasoned ground beef, vibrant spices, and a perfect, melty blanket of cheese.
- Achieve restaurant-quality crisp shells that are golden brown and bursting with savory fillings, ready for your favorite toppings.
- Easily adapt the core recipe using shredded chicken or slow-cooked lamb to customize your perfect dinner experience.
The Genius of Oven-Baking Tacos
For years, I believed that truly crunchy tacos required either a questionable drive-thru window or hours spent babysitting a sputtering pot of hot oil. I remember one fateful Taco Tuesday when I accidentally set off the smoke alarm three separate times trying to get the shells just right. My dog thought it was a party, but my ceiling was certainly not amused. That frustrating experience led me directly to the revelation that the oven is the true unsung hero of the crispy taco world.
Baking tacos transforms them from flat, sad discs into structurally sound, flavor-packed vehicles. Instead of frying the shells individually, we load them, pack them tight with filling and cheese, and then bake them all at once. This technique not only makes them incredibly easy to manage but also ensures that the melted cheese fuses the filling directly to the shell, preventing that tragic moment when your taco filling suddenly decides to escape onto your plate. This method is efficient, cleaner, and honestly produces a superior texture because the shell crisps up evenly while the filling heats through beautifully.
The Essential Technique for Maximum Crunch
Achieving peak crispiness comes down to two simple elements: fat and temperature. You must use a high enough temperature, usually around 400°F (200°C), to encourage rapid moisture evaporation from the tortillas. However, relying solely on heat will yield a dry, brittle shell. The secret lies in a very light coating of oil or cooking spray. Before loading your shells, quickly spray or brush them with oil. This helps conduct the oven’s heat efficiently and gives the tortillas that desirable golden-brown color and buttery crunch we all crave. It’s a small step that separates the merely warm taco from the truly exceptional, life-changing crispy one.
Ingredients for Oven-Baked Cheesy Tacos (Crispy & Loaded)
Here’s what you’ll need to make this delicious dish:
- Ground BeefUse 85/15 or 90/10 lean ground beef for great flavor and texture without excessive grease.
- Taco SeasoningA pre-made blend works perfectly, but you can also mix chili powder, cumin, paprika, and garlic powder for a homemade touch.
- Beef Broth or WaterThis helps simmer the meat mixture, ensuring it stays moist and binds the seasoning perfectly.
- Hard Taco ShellsOpt for traditional corn shells, ensuring they stand up well in the baking process.
- Shredded Cheese BlendA Mexican blend or a mix of cheddar and Monterey Jack offers the best melt and flavor for these crispy shells.
- Diced Onion and GarlicThese aromatic vegetables build the foundational savory flavor for the beef filling.
- Olive Oil or Cooking SprayEssential for browning the beef and lightly coating the taco shells to achieve that perfect crunch.
The full ingredients list, including measurements, is provided in the recipe card directly below.
How to Make Oven-Baked Cheesy Tacos (Crispy & Loaded)
Follow these simple steps to prepare this delicious dish:
Step 1: Prep the Oven and Cook the Filling
Preheat your oven to 400°F (200°C). Lightly grease a large baking sheet with oil or line it with parchment paper for effortless cleanup. In a large skillet, brown the ground beef over medium-high heat. Drain any excess fat, then add the diced onion and minced garlic, cooking until the onions soften, about 3 to 4 minutes. Stir in the taco seasoning and the beef broth, allowing the mixture to simmer until the liquid has mostly reduced and the filling is thick and deeply flavorful.
Step 2: Building the Perfect Taco Shell
Place the hard taco shells open-side up on the prepared baking sheet. It is important that the shells touch lightly to help stabilize them during the loading process. Using a pastry brush or a quick mist of cooking spray, lightly coat the outside of each shell; this is your golden ticket to maximum crispiness. Spoon a tablespoon of shredded cheese into the bottom of each taco shell before adding the meat filling—this cheesy layer acts like edible glue, securing the contents firmly inside.
Step 3: Load and Seal the Tacos
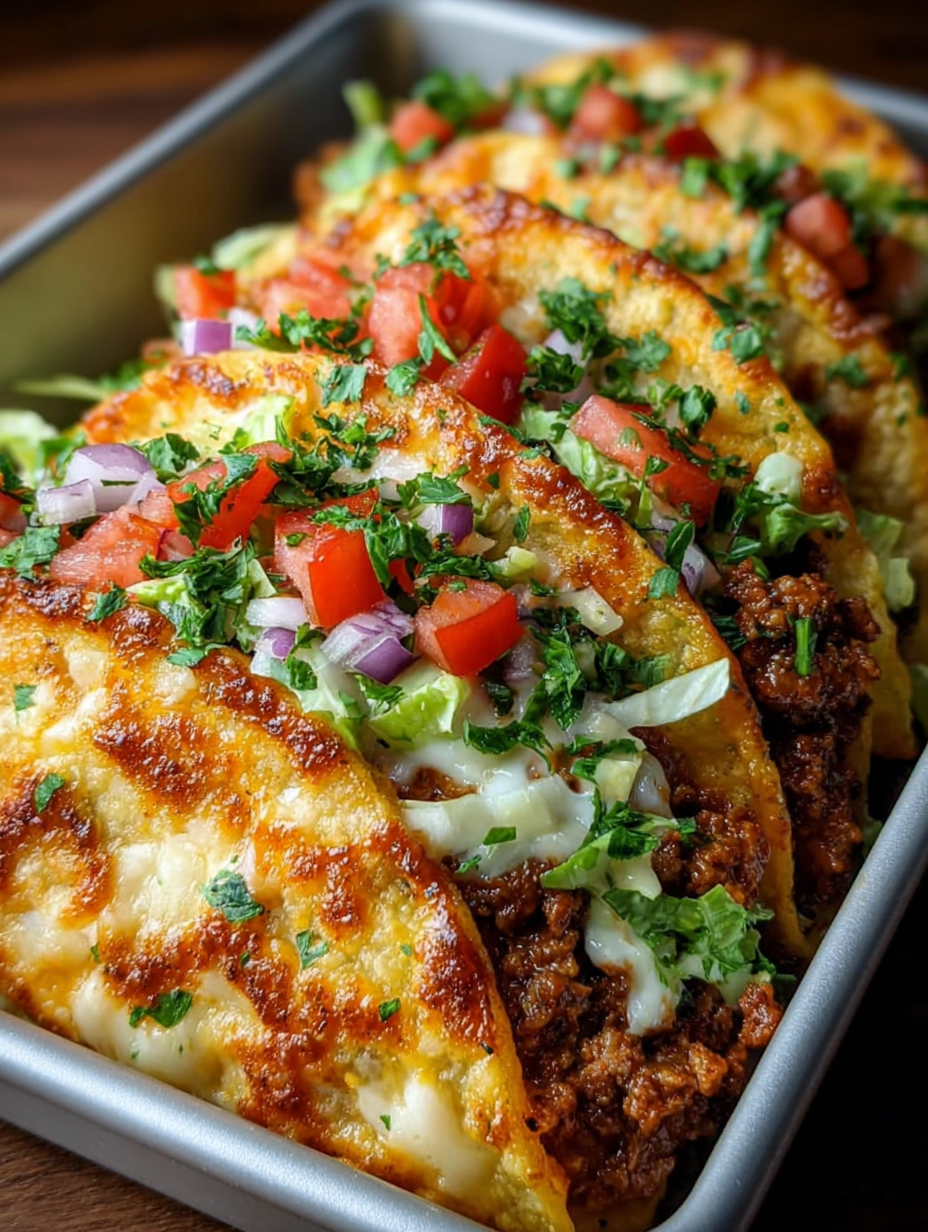
Carefully spoon the seasoned ground beef mixture into each taco shell, filling them about three-quarters of the way full. Do not overstuff them, as they will spill over when the cheese melts. Once the filling is in place, generously top the meat with the remaining shredded cheese. Aim for the cheese to overlap the filling slightly and rest along the shell edges. The cheese acts as a seal, keeping the meat moist and adding necessary structure when baked.
Step 4: The Crispy Bake
Transfer the baking sheet to the preheated oven. Bake theOven-Baked Cheesy Tacos (Crispy & Loaded)for 8 to 12 minutes. The cooking time depends on your oven, but you are looking for the cheese to be fully melted, bubbly, and slightly browned around the edges. Crucially, the shells themselves should turn a beautiful golden color and feel firm to the touch, indicating they are perfectly crisp.
Step 5: Garnish and Serve
Carefully remove the baking sheet from the oven and transfer the crispy tacos immediately to a serving platter. If you let them sit too long on the hot pan, the bottoms can get too dark. They are now ready for any assortment of vibrant toppings you desire. Transfer to plates and drizzle with sauce for the perfect finishing touch.
Customizing Your Cheesy Taco Experience
The beauty of this oven-baked method is its extreme adaptability. While the classic ground beef filling is undeniable, you should feel free to swap proteins based on your preferences or whatever you find hiding in the refrigerator. Shredded chicken breast tossed with mild green chiles makes an excellent, lighter variation. Alternatively, try using slow-cooked, richly seasoned lamb shoulder for a deeply savory and more decadent twist. Just ensure that whatever filling you choose is fully cooked and slightly dry; excessive moisture will steam the shell and sabotage your quest for crispiness.
Flavor Boosters and Spice Level Adjustments
If you prefer a fiery kick, introduce finely minced jalapeños or serrano peppers directly into the ground beef while it simmers. For a smokier profile, add a half teaspoon of smoked paprika alongside the regular chili powder. If you crave depth, dissolving a small amount of vegetable bouillon paste into the simmering beef broth before adding it to the skillet enhances the overall richness without needing complex additives. Remember, every great taco starts with seasoning that truly sings.
Topping & Serving Suggestions
A taco is merely a canvas until you crown it with the perfect array of fresh, vibrant toppings. The baked nature of these tacos means they can handle heavier toppings without collapsing, so pile them high! Good topping choices offer textural contrast, balancing the warm, savory filling with cool, crunchy, and tangy elements.
Perfect Pairings and Sides
To create a true fiesta atmosphere, serving these tacos alongside traditional sides elevates the entire meal. Instead of basic rice, try making cilantro-lime rice, which provides a bright, acidic counterpoint to the rich cheese and meat. A simple side of black beans simmered with garlic and a touch of cumin adds necessary protein and fiber. For freshness, a finely chopped corn and avocado salad provides textural variety and healthy fats.
When it comes to beverages, opt for something refreshing and sharp. Homemade lemonade infused with mint or a sparkling lime beverage cuts through the richness of the cheese perfectly. Avoid anything too heavy, as the tacos themselves are wonderfully loaded. Providing a variety of fresh sauces, like a creamy sour cream drizzle, a chunky homemade salsa roja, and some vibrant guacamole, allows every guest to customize their ideal bite.
TheseOven-Baked Cheesy Tacos (Crispy & Loaded)genuinely offer the easiest path to a satisfying, crunchy taco night without turning your kitchen into a sticky mess. They are robust, simple to make in large batches, and guarantee everyone at the table will be reaching for seconds.
The Accidental Discovery of Sunshine on a Plate

It was a Tuesday night, pure exhaustion after a disastrous plumbing attempt. I needed dinner fast, but nothing boring. I threw some ground beef and cheese into shells, shoved them in the oven, and accidentally invented the perfect, messy, glorious weeknight miracle: the ultimate Oven-Baked Cheesy Tacos (Crispy & Loaded).
The Ultimate Taco Night Lifesaver
Let’s be honest, traditional taco night is chaos. You have a mountain of fillings, a flimsy shell, and within three seconds of assembly, it explodes all over your favorite shirt. I reached a culinary breaking point, staring at a giant mound of cheddar and a packet of taco seasoning, vowing never to hand-hold a taco again. The solution was simple, yet revolutionary: outsource the crisping and melting duties to the oven.
This recipe isn’t just about convenience; it’s about structural integrity. By baking these cheesy fiesta shells, you achieve a level of structural crunch and a blanket of melted cheese that simply cannot be replicated by microwave heating or quick pan-frying. We are building culinary fortifications here, ensuring every bite is loaded without the subsequent structural collapse. Forget about juggling ingredients; just load them up, fold them gently, and let the dry heat of the oven work its magic.
When I first told my husband I was going to bake the tacos, he looked at me like I had suggested running a marathon. He was skeptical that the shells would remain edible, let alone reach peak crispiness. But the smell of the melting cheese and seasoned ground beef filling emanating from the kitchen quickly converted him. This method eliminates the frustration, ramps up the flavor, and delivers a superior texture that transforms standard taco Tuesday into a genuine culinary event. It’s the easiest way to serve a dozen people perfect tacos simultaneously, guaranteeing everyone gets that golden, cheesy edge.
Perfecting the Cooking Process
Prepare the savory ground beef filling first, ensuring it is seasoned perfectly. While the filling simmers, shred your cheese and prep toppings. Next, assemble the tortillas and bake immediately until golden and molten, guaranteeing optimal crispiness before loading.
The Secret to Crispy Shells That Don’t Snap
The biggest pitfall when creating Oven-Baked Cheesy Tacos is using completely cold, stiff tortillas. They will crack instantly when you try to fold them. The key involves a very slight warm-up and a smear of fat. Lightly brush both sides of your corn or flour tortillas with a neutral oil like canola or vegetable oil. This small step adds elasticity and encourages that beautiful, golden-brown blister when they hit the heat.
Once you have your seasoned filling—whether you chose ground beef, shredded chicken, or savory ground turkey—it needs to be relatively dry. Excess moisture equals soggy tacos, and we are aiming for maximum crunch. Fill the shell lightly, avoiding the temptation to overstuff it at this stage. You want enough filling so the two sides meet easily, allowing the cheese to act as the primary adhesive. Place them seam-side down on a foil-lined baking sheet, which is critical for easier cleanup and preventing sticking. High heat, typically 400°F (200°C), ensures a fast, efficient melt and crisp combo.
Baking time varies slightly based on your oven and the thickness of your tortilla, but generally, 12 to 15 minutes is the sweet spot. You should see the cheese bubbling happily and the shell edges turning a deep golden color. If you are using pre-cooked shredded chicken, reduce the baking time by a couple of minutes since the focus shifts entirely to crisping the shell and melting the cheese, rather than heating the protein through. The moment they emerge from the oven, they are ready for their grand finale of cold, fresh toppings.
Add Your Touch
Swap ground beef for savory shredded chicken or seasoned lentils for a hearty vegetarian option. Try adding smoked paprika or a dash of chili powder to the seasoning mix. For toppings, substitute sour cream with Greek yogurt or add fire-roasted peppers for a spicy kick.
The Cheese Matrix: Why Blends Win
When it comes to crafting genuinely loaded, cheesy tacos, don’t rely on a single cheese. A blend is your best friend. Cheddar provides that sharp, familiar flavor, while Monterey Jack offers phenomenal meltability and stretch. A little bit of Oaxacan cheese or even a mild provolone can elevate the texture, creating those satisfying, stringy pulls that make these Oven-Baked Cheesy Tacos an Instagram dream. Always shred your own cheese if possible; pre-shredded varieties often contain anti-caking agents that hinder optimal melting.
The beauty of this recipe lies in its adaptability. If you are serving a crowd with varying spice tolerances, you can keep the heat out of the filling and bring it in with the toppings. A vibrant homemade salsa verde, a dollop of fresh guacamole, or even finely diced jalapeños can transform the dish post-baking. For a touch of acidic brightness, consider adding a quick pickle—maybe some thinly sliced red onions marinated in lime juice and white vinegar—to cut through the richness of the meat and the decadence of the melted cheese.
If you need to make the filling stretch further or want to sneak in some extra vegetables, finely diced zucchini or black beans are excellent additions to the ground beef mixture. Just make sure you cook down any excess water the zucchini releases before assembling. Remember, tacos are a canvas for personal creativity; feel free to experiment with seasonings, perhaps trying a Moroccan spice blend or a fiery Caribbean jerk seasoning for a totally different, but equally delicious, profile.
Storing & Reheating
Store leftover baked tacos in an airtight container in the refrigerator for up to three days. To reheat, place them on a rack in a 350°F (175°C) oven for 8–10 minutes until piping hot and crispy again. Avoid the microwave, which turns them rubbery.
Prep Like a Pro: Sheet Pan Strategy
Efficiency is key to a successful weeknight dinner. Treat this recipe as a sheet pan operation from start to finish. Once the meat filling is cooked and the toppings are prepped, the assembly line should move quickly. If you plan to make a large batch for meal prepping, consider under-baking them slightly the first time. This ensures they don’t dry out completely when you perform the final reheat later in the week.
For those who prefer soft tortillas but want the loaded experience, you can still use the oven method. Skip the oil brush and instead, warm the tortillas briefly—just enough to make them pliable. Fill them, line them up, and bake only until the cheese is melted, perhaps 5–7 minutes less than the standard recipe time. However, to truly capture the magic promised in the title, achieving that perfect crispiness is paramount. Remember that these loaded tacos are robust; they travel well, making them an excellent choice for lunch boxes (just pack the cold toppings separately).
When storing, ensure the baked tacos have cooled completely before sealing them, otherwise, trapped steam will make the shells soggy—the enemy of crispy perfection. If you have several layers of tacos to store, separate them with a sheet of parchment paper to prevent them from sticking together. The key to successful reheating is always the oven, bringing back that initial crunch that makes these Oven-Baked Cheesy Tacos so satisfying.
My family still laughs about the time I tried to make delicate mini-tacos and ended up glueing my fingers together with cheese. These Oven-Baked Cheesy Tacos are the low-stress, high-reward antidote to that disastrous memory.
Expert Tips for Crispy, Loaded Perfection
-
Always pre-warm the tortillas slightly, either in the microwave for 15 seconds or a dry pan, to prevent cracking when you fold them before baking.
-
Use foil or parchment paper and place the tacos seam-side down on the sheet pan; this prevents them from opening up during the initial oven melt.
-
Do not overfill before baking. Save the bulky, wet toppings like salsa and sour cream for after the tacos come out of the oven to maintain maximum crunch.
Conclusion for Oven-Baked Cheesy Tacos (Crispy & Loaded)
The journey to perfecting the Oven-Baked Cheesy Tacos (Crispy & Loaded) wasn’t complicated, but it was essential for better weeknights. We’ve moved past the tyranny of the flimsy shell and embraced the power of the oven to deliver structure, crunch, and glorious melted cheese.
This method ensures a low-mess, high-flavor fiesta every single time. Remember the key techniques: pre-warming the shells, keeping the filling dry, and using high heat for that flawless crisp. Whether you use ground beef, turkey, or a plant-based filling, these baked loaded tacos guarantee a smile. Enjoy the easiest, cheesiest taco night of your life!
Print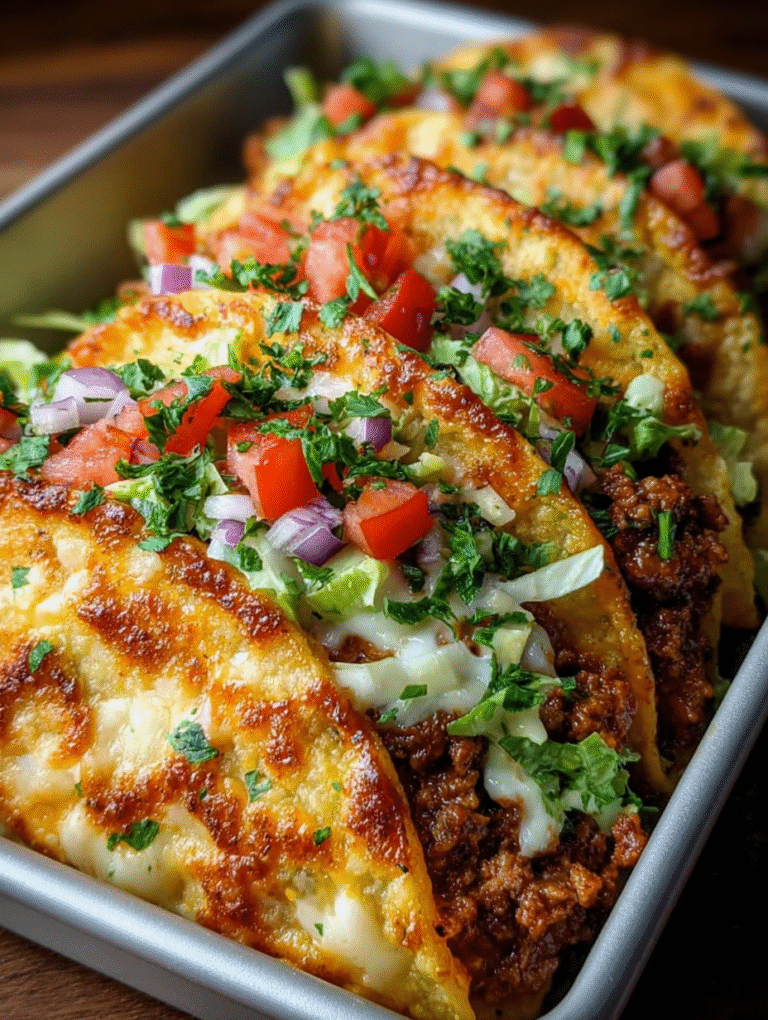
Oven-Baked Cheesy Tacos (Crispy & Loaded)
Forget soggy tacos! Our Oven-Baked Cheesy Tacos are loaded with savory seasoned beef and cemented with a blanket of melted cheese, guaranteed crunch.
- Total Time: 35 minutes
- Yield: 4 servings
Ingredients
- Ground Beef (lean): 1 pound
- Hard Taco Shells: 12 count
- Shredded Mexican Cheese Blend: 2 cups
- Taco Seasoning Mix: 1 standard packet (1 oz)
- Water: 1/2 cup
- Diced Yellow Onion: 1/2 cup
- Olive Oil (or vegetable oil): 1 tablespoon
Instructions
- Step 1: Preheat the oven to 375°F (190°C). In a large skillet, heat the olive oil over medium-high heat. Add the ground beef and diced onion, breaking up the meat with a spoon, and cook until the beef is browned and the onion is softened. Drain any excess grease.
- Step 2: Stir the taco seasoning mix and 1/2 cup of water into the ground beef. Bring the mixture to a simmer, then reduce the heat to low and cook for 5-7 minutes until the liquid has mostly absorbed and the meat is thoroughly coated with the seasoning. Remove from heat.
- Step 3: Line a large baking sheet with parchment paper (optional). Arrange the hard taco shells upright on the baking sheet, leaning them against one another or using a specialized taco rack to keep them open.
- Step 4: Spoon the seasoned ground beef mixture evenly into the bottom of each taco shell. Generously top the meat in each shell with 2-3 tablespoons of the shredded cheese blend.
- Step 5: Bake for 8 to 10 minutes, or until the cheese is completely melted and bubbly, and the taco shells are noticeably crispy. Carefully remove the sheet from the oven and serve immediately with your choice of fresh toppings.
Notes
- A key chef's tip is to ensure your ground beef filling is thoroughly drained and the liquid has fully absorbed the seasoning before filling the shells, which prevents steaming and guarantees a crispy taco base.
- For best results, reheat leftover baked tacos in a 350°F oven for 5 minutes or quickly crisp them in an air fryer; avoid the microwave to prevent the shells from becoming soggy.
- Balance the richness of the melted cheese and seasoned beef by serving these tacos loaded with fresh pico de gallo, a dollop of cooling sour cream, and a bright squeeze of lime juice.
- If you anticipate leftovers, store any unbaked filling separately from the hard taco shells in airtight containers to maximize freshness and maintain shell crispness later.
- Prep Time: 15 minutes
- Cook Time: 20 minutes
- Method: Stovetop
- Cuisine: American


Leave a Comment