

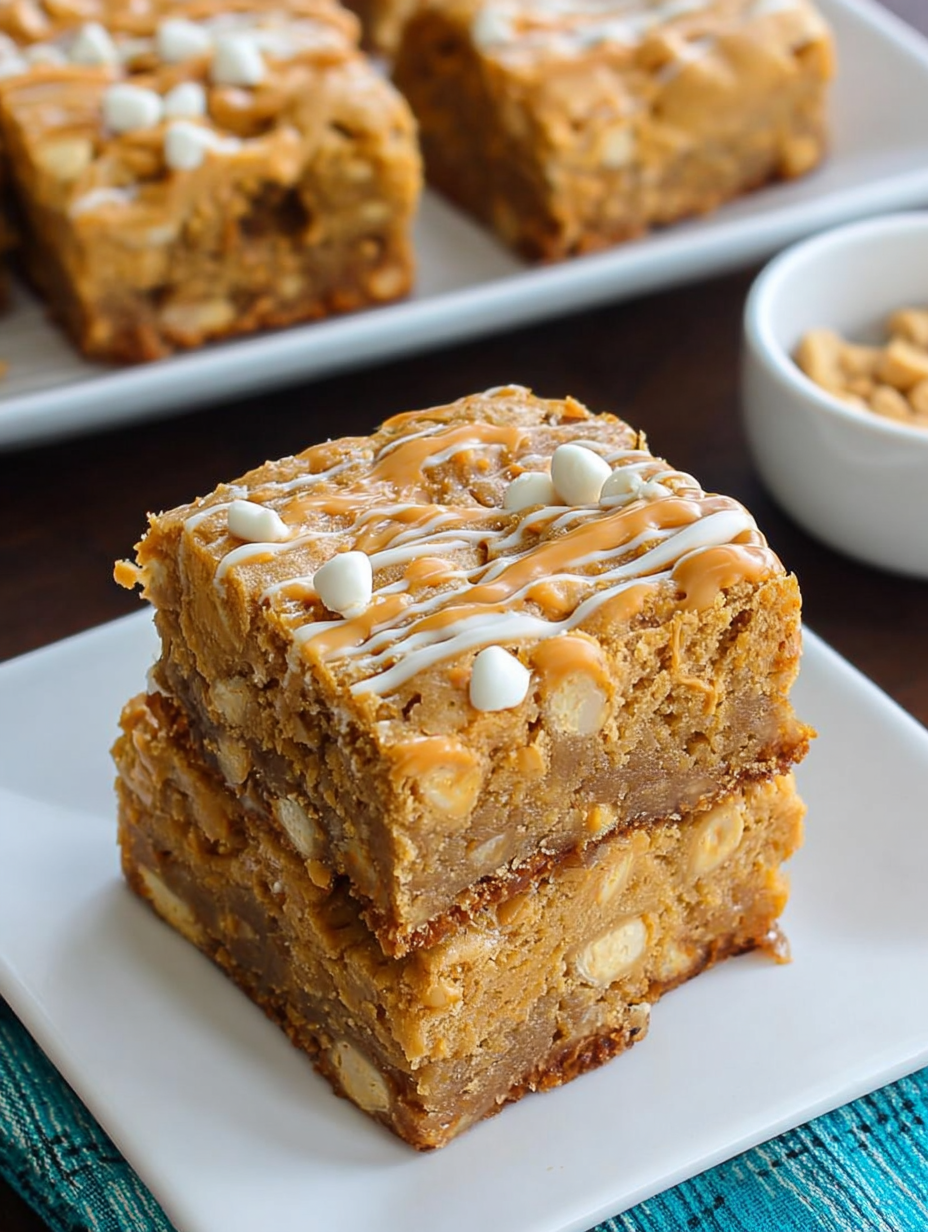
The aroma of toasted peanuts and caramelized brown sugar instantly transports me back to childhood kitchen experiments. Forget dry, crumbly disasters; we are diving into pure, gooey perfection today. Get ready to master the ultimate indulgence: these incrediblePeanut Butter Blondies. This recipe is the glorious result of countless attempts to combine the chewiness of a perfect brownie with the satisfying flavor of a peanut butter cup, minus the chocolate chaos. They are dense, moist, and possess that elusive crackly top everyone desperately chases.
- Achieve that coveted chewy center and slightly crisp edge, elevating the standard bar cookie experience to legendary status immediately.
- Features a deeply nutty, caramelized flavor profile, using brown sugar and creamy peanut butter to create immense depth of taste.
- This recipe is incredibly versatile, easily adapting to include chocolate chips or chopped peanuts, depending on your preferred textural crunch.
- Remarkably simple to prepare, mixing in just one bowl means minimal cleanup and maximum deliciousness ready in under an hour.
The Kitchen Misadventures That Led to Peanut Butter Perfection
My relationship with baking, specifically with dense bar desserts, started like a poorly directed romantic comedy—lots of mess, a few burnt offerings, and ultimately, a happy ending achieved only through sheer stubbornness. For years, I chased the perfect blondie texture. My early attempts were tragically dry, tasting suspiciously like sweetened cardboard, or they were so gooey they needed a spoon and a serious psychological evaluation before consumption. I needed that magical midpoint, the golden ratio of fat, sugar, and flour that yields a chewy, dense core.
The key, I finally realized after nearly melting my stand mixer and setting off the smoke alarm three times on a rainy Tuesday, was twofold: melted butter and adequate brown sugar. Melding these ingredients together correctly creates that crucial fudgy texture. Forget creaming the butter and sugar like you do for traditional cookies; here, we are building a foundation of caramelized depth that ensures every bite of these bars is richer and more satisfying than a gold-plated lottery ticket. When people ask for the recipe now, I tell them the secret isn’t a fancy alcohol-free vanilla extract or a rare brand of sugar; it’s remembering that the best baking often comes from the brink of catastrophe. This recipe is foolproof, provided you don’t forget to add the flour, a mistake I only made once, resulting in a batch of incredibly sweet peanut butter soup.
This dessert is phenomenal because it capitalizes on the deep, savory notes of the peanut butter, balancing it expertly against the molasses flavor of the brown sugar. It’s perfect for picnics, potlucks, or simply hiding in the pantry and enjoying with a cup of coffee while nobody is looking. They’re satisfying enough to quiet the most intense afternoon cravings, yet simple enough that you don’t need a pastry degree to pull them off. This is comfort food engineered for maximum flavor delivery.
The Science Behind the Blondie’s Perfect Chew
Unlike traditional brownies, which rely on cocoa powder or melted chocolate for structure and flavor, the blondie gets its signature character from vanilla and brown sugar. The texture is what truly sets it apart. We rely heavily on the higher moisture content and molasses found in brown sugar to keep the finished product moist and chewy, rather than brittle or cakey. When you melt the butter and mix it with the brown sugar, you are dissolving the sugar crystals into the fat, which inhibits gluten development when the flour is added. This simple technique is the secret handshake of the perfect blondie baker.
Another crucial component for achieving that signature richness in thesePeanut Butter Blondiesis the type of peanut butter used. Stick strictly to creamy, commercial peanut butter (like the kind that doesn’t separate). Natural peanut butter, while wonderful on toast, releases too much oil during baking and can leave your bars greasy and crumbly. We need the stabilizers in the commercial variety to help bind the dough and maintain its dense structure throughout the baking process. By using a generous amount, the nutty flavor permeates every molecule, ensuring that familiar, comforting taste shines through. The addition of an extra egg yolk also acts as an emulsifier and thickener, adding richness without making the bars too fluffy. Remember, we are aiming for dense decadence, not airy lightness.
Ingredients for Peanut Butter Blondies
Here’s what you’ll need to make this delicious dish:
- Unsalted ButterUse high-quality butter, melted and cooled slightly, as the fat carries the flavor and provides necessary moisture for the blondie’s chewy center.
- Light Brown SugarThis is non-negotiable for texture; the molasses content is vital for chewiness and depth of caramel flavor.
- Granulated White SugarA small amount is used alongside the brown sugar to promote the development of that slightly crackly, desirable crust on top of the bars.
- Creamy Peanut ButterChoose a well-known commercial brand, avoiding natural varieties that separate, to ensure optimal binding and richness.
- Large Eggs and One Extra YolkThe eggs provide structure, while the extra yolk adds fat and emulsification, resulting in a richer, denser final product.
- Pure Alcohol-Free Vanilla ExtractEssential for enhancing the caramelized flavors and adding aromatic complexity to the bar base.
- All-Purpose FlourMeasure this accurately, preferably using a kitchen scale, as too much flour is the primary culprit behind dry, cakey blondies.
- Baking PowderProvides just enough lift to keep the bars from being completely flat, contributing to the soft, cake-like density.
- SaltCrucial for balancing the sweetness and enhancing the deep, roasted peanut butter flavor profile.
The full ingredients list, including measurements, is provided in the recipe card directly below.
How to Make Peanut Butter Blondies
Follow these simple steps to prepare this delicious dish:
Step 1: Preparation and Melting
Preheat your oven to 350°F (175°C). Line a 9×13 inch baking pan with parchment paper, leaving an overhang on the sides for easy removal later. Melt the unsalted butter thoroughly either on the stovetop or in the microwave; once melted, allow it to cool for about five minutes so it doesn’t scramble the eggs.
Step 2: Mixing the Wet Ingredients
In a large, sturdy mixing bowl, combine the melted and slightly cooled butter with both the brown sugar and the granulated white sugar. Whisk this mixture vigorously for about 60 seconds until thoroughly combined and slightly glossy. This step starts the caramelization process and is crucial for creating that chewy texture in the finishedPeanut Butter Blondies.
Step 3: Incorporating Peanut Butter and Eggs
Add the creamy peanut butter and alcohol-free vanilla extract to the butter-sugar mixture, stirring until fully incorporated. Next, beat in the two large eggs and the extra egg yolk, one at a time, mixing well after each addition until the batter is smooth and resembles a thick, rich pudding. Ensure there are no streaks of unmixed egg remaining.
Step 4: Folding in Dry Ingredients
In a separate, smaller bowl, whisk together the all-purpose flour, baking powder, and salt. Gradually add the dry ingredients to the wet mixture, using a rubber spatula to fold until just combined. Stop mixing the moment you no longer see dry streaks of flour; overmixing develops gluten and results in tough, less chewy bars.
Step 5: Baking and Cooling
Pour the batter into the prepared baking pan and spread it evenly into the corners. Bake for 25 to 30 minutes. The edges should look set and slightly golden brown, and the center should no longer wobble but still appear slightly soft. It’s better to slightly underbake than overbake. Let the blondies cool completely in the pan for at least two hours before attempting to lift them out using the parchment paper overhang.
Transfer to plates and drizzle with a little extra melted peanut butter or serve warm with a scoop of vanilla ice cream for the perfect finishing touch.
Tips for Achieving the Perfect Blondie Texture
The quest for the perfect blondie often ends in one of two catastrophic failures: dry crumbly bricks or runny, underbaked goo. Achieving the ideal dense and chewy texture requires attention to detail, especially regarding temperature and ingredients. One of the most common pitfalls is overmixing the flour. Once the flour hits the wet ingredients, gluten begins to develop. The more you stir, the tougher the resulting bars will be. Aim to mix until the flour has just disappeared—a few small lumps are far preferable to a smooth, overworked batter.
Another essential element is the quality of your brown sugar. Always use fresh, moist brown sugar. If your sugar has hardened into a solid block, it lacks the moisture content necessary to keep the blondies chewy, and you should consider softening it first or purchasing a new bag. That molasses is responsible for the signature caramel flavor and the excellent texture we are seeking. Additionally, measuring the flour correctly is vital; scoop flour into your measuring cup using a spoon, then level off the excess with a knife. Never scoop directly from the bag, as this compacts the flour, meaning you use far more than the recipe calls for, which dries out the final product.
Pay close attention to the baking time. Oven temperatures can vary wildly, so rely more on visual cues than on the clock. If you insert a toothpick into the center, it should come out with moist, sticky crumbs clinging to it, not liquid batter, and certainly not completely clean. If the toothpick is clean, you have ventured into the territory of the dry blondie. Cooling time is also non-negotiable. Blondies, particularly these densePeanut Butter Blondies, continue to set as they cool. Cutting them too soon results in a messy, crumbling disaster, whereas waiting ensures clean, beautiful, fudgy squares. Storing them in an airtight container at room temperature will keep them fresh and chewy for up to four days, although in my experience, they never last that long.
Variations and Topping Ideas
While the classic peanut butter blondie is fantastic on its own, it serves as an excellent canvas for customization. For chocolate lovers, folding in one cup of semi-sweet chocolate chips or dark chocolate chunks during the final mixing stage adds a complementary layer of richness that pairs beautifully with the salty peanut butter base. If you prefer more crunch, stir in half a cup of roughly chopped, roasted peanuts. This addition provides a wonderful textural contrast to the smooth, dense interior of the bar.
For an extra visual flourish and a delightful flavor boost, consider swirling a couple of tablespoons of melted, smooth peanut butter over the top of the batter before placing it in the oven. Use a toothpick or a butter knife to gently create decorative swirls. Alternatively, a sprinkle of coarse sea salt right before baking amplifies the sweet and savory contrast, making the peanut butter flavor truly pop. Remember, baking should be fun, so feel free to experiment with what you have in your pantry to make these chewy bars uniquely yours.
The Accidental Discovery of Sunshine on a Plate
I wasn’t trying to invent anything; I just ran out of cocoa powder during a serious brownie craving crisis. Panic turned to pure bliss when I substituted an extra scoop of creamy peanut butter. What emerged from the oven wasn’t a failure, but a warm, gooey, nutty masterpiece. These Peanut Butter Blondies instantly became my kitchen obsession.
Perfecting the Cooking Process
The secret to the perfect texture starts with creaming the butter and sugar until fluffy; that’s where the magic happens. Incorporate the dry ingredients gently, avoiding overmixing, then fold in the peanut butter chips. This sequence ensures a chewy center and slightly crisp edges, the holy grail of baking perfection.
The Anatomy of a Perfect Blondie
Let’s be honest: brownies get all the attention. They are the brooding, sophisticated cousins in the dessert family. But blondies? Blondies are the pure, unadulterated joy of butter and brown sugar, a golden ticket to nostalgia. And when you infuse them with the irresistible salinity and richness of peanuts, you achieve something truly transcendent. Baking thesePeanut Butter Blondiesis less a culinary task and more a stress-relief session, especially when you consider how few steps stand between you and a warm, gooey square.
When I first attempted this recipe, I made the classic rookie mistake of using low-fat peanut spread. The resulting texture was gritty, dry, and frankly, offensive to the concept of dessert. We are here for maximum flavor and richness, so grab the good stuff—the full-fat, creamy peanut butter that reminds you of childhood sandwiches. The brown sugar is equally important. It doesn’t just provide sweetness; the molasses content introduces moisture and that deep, caramel chewiness that defines a proper blondie.
Why Blondies Are the MVP of Dessert
Unlike some complicated cakes that demand precision temperatures and three different folding techniques, blondies are forgiving. They welcome minor tweaks and embrace imperfections. Did you forget to preheat the oven until the batter was ready? No problem. Did you accidentally mix in too many chocolate chips? That’s not a mistake; it’s a bonus. This recipe is designed for the baker who prefers spontaneity over stringent rules, and let’s face it, that’s most of us after a long Tuesday.
The only real danger in this process is consuming half the batter before it hits the pan. Trust me, the aroma alone is intoxicating—a mixture of warm vanilla, rich molasses, and savory roasted peanuts. I suggest distracting yourself during the batter preparation phase, perhaps by loudly humming an upbeat 80s tune or pretending you are a contestant on a high-stakes baking show. Whatever keeps the spoon out of your mouth long enough to bake them.
Essential Tools for Baking
You don’t need a professional kitchen setup to master this recipe, but having the right essentials makes the process smoother and far less messy.
- A 9×13 Inch Baking Pan:While an 8×8 pan works if you prefer extremely thick squares, the 9×13 ensures even baking and a perfect ratio of chewy edge to soft center. Line it with parchment paper for easy removal—the absolute key to clean slicing.
- Electric Mixer (Handheld or Stand):While you can mix by hand, creaming the butter and sugar properly demands a mixer. This step incorporates air, which contributes directly to the final texture and lift.
- Rubber Spatula:Essential for scraping down the sides of the bowl and gently folding in those marvelous additions like extra nuts or chips without over-developing the gluten.
The Ingredients List
Gather these standard pantry heroes to create your irresistible Peanut Butter Blondies:
- 1 cup (2 sticks) unsalted butter, melted
- 1 ½ cups packed light brown sugar
- ½ cup granulated sugar
- 3 large eggs, room temperature
- 1 tablespoon pure alcohol-free vanilla extract
- 1 ½ cups creamy, full-fat peanut butter
- 2 ½ cups all-purpose flour
- 1 teaspoon baking powder
- ½ teaspoon salt
- 1 cup peanut butter chips (optional, but highly recommended)
- ½ cup chopped peanuts (for texture)
Step-by-Step for Optimal Chewiness
Ready your oven and your appetite. Preheat your oven to 350°F (175°C). Line your 9×13 pan with parchment paper, leaving an overhang on the sides for easy lifting.
- In a large mixing bowl, combine the melted butter, brown sugar, and granulated sugar. Whisk vigorously for about one minute until fully combined and slightly glossy.
- Add the eggs one at a time, mixing well after each addition. Stir in the alcohol-free vanilla extract and the creamy peanut butter until the mixture is smooth and uniform.
- In a separate bowl, whisk together the flour, baking powder, and salt.
- Gradually add the dry ingredients to the wet ingredients, mixing only until just combined. Stop mixing the second you see no streaks of flour. Overmixing leads to tough blondies, and nobody wants a tough blondie.
- Gently fold in the peanut butter chips and chopped peanuts.
- Spread the batter evenly into the prepared pan. The batter will be thick and slightly sticky; use a damp spatula to press it into the corners.
- Bake for 28 to 35 minutes. The edges should look set and golden brown, and the center should still look slightly underbaked. A toothpick inserted near the center should come out with moist crumbs attached, not wet batter.
- Let the blondies cool completely in the pan before lifting them out using the parchment paper overhang. Cooling is non-negotiable; slicing them warm results in a delicious, but messy, crumble.
Add Your Touch
Feel free to unleash your inner mad scientist. Swap out semi-sweet chips for white chocolate or a swirl of caramel sauce before baking. If you crave crunch, sprinkle chopped peanuts or even savory pretzels on top. A pinch of cinnamon elevates the flavor complexity beautifully.
Blondie Blueprint: Expert Tips
-
Ensure your eggs are at room temperature. Cold eggs seize the melted butter mixture, resulting in a denser, less airy texture in your final batch of Peanut Butter Blondies.
-
Always use parchment paper and leave an overhang. This simple trick allows you to lift the entire cooled slab out easily, resulting in perfectly clean, impressive slices.
-
If you prefer extra chewiness, use only brown sugar and slightly reduce the baking time by two minutes; this maximizes the sticky molasses factor in the final product.
My neighbor, a notorious brownie purist, admitted that a warm Peanut Butter Blondie with a scoop of vanilla bean ice cream was “the closest thing to edible happiness.” That compliment alone made the accidental invention worth every buttery calorie.
Storing & Reheating
Store these delectable bars in an airtight container at room temperature for up to four days—if they last that long. To reheat, microwave a single square for ten seconds for that just-out-of-the-oven melt. They also freeze wonderfully; just thaw completely before serving.
Conclusion for Peanut Butter Blondies
These magnificent Peanut Butter Blondies offer the perfect balance of savory richness and deep brown sugar sweetness, making them a truly unforgettable treat. They are easy to execute, delightfully forgiving, and infinitely customizable with your favorite mix-ins. Remember the key techniques: do not overmix, always allow for full cooling before slicing, and never skimp on the quality of your peanut butter. Whether you are baking for a school function, a casual weekend treat, or just because you need a moment of sugary comfort, this recipe delivers joy in every golden, chewy square. Get ready to ditch the brownie guilt and embrace the blondie glory!
Print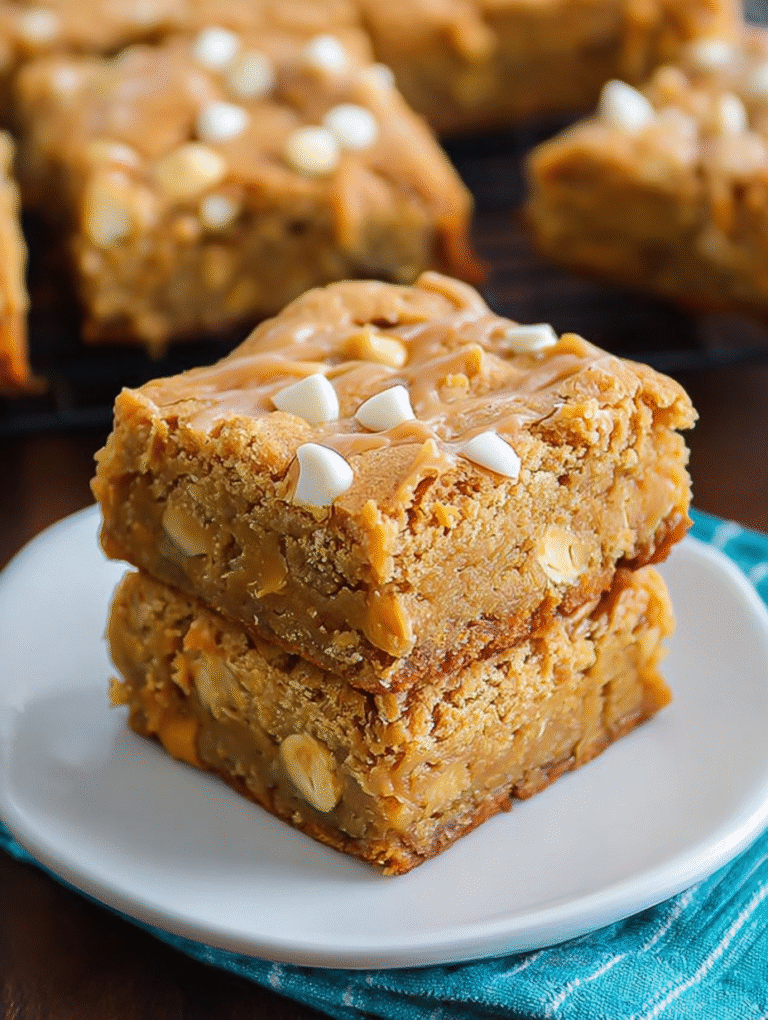
Peanut Butter Blondies
Our melt-in-your-mouth Blondies are impossibly chewy! Brown sugar and creamy peanut butter create the ultimate fudgy bar. Whisk, bake, and enjoy. Full instructions and nutrition included.
- Total Time: 35 minutes
- Yield: 4 servings
Ingredients
- Unsalted Butter: 1/2 cup (1 stick), melted
- Light Brown Sugar, packed: 3/4 cup
- Creamy Peanut Butter: 1/2 cup
- All-Purpose Flour: 1 1/4 cups
- Large Egg: 1
- Vanilla Powder: 1 teaspoon
- Baking Powder: 1/2 teaspoon
- Salt: 1/4 teaspoon
Instructions
- Step 1: Preheat the oven to 350°F (175°C). Line an 8×8 inch baking pan with parchment paper, leaving an overhang on two sides for easy removal, and lightly spray with cooking spray.
- Step 2: In a large bowl, whisk together the melted butter, brown sugar, and peanut butter until the mixture is smooth and fully combined. Add the egg and vanilla bean paste and whisk until incorporated.
- Step 3: In a separate medium bowl, whisk together the flour, baking powder, and salt. Gradually add the dry ingredients to the wet ingredients and mix with a rubber spatula until just combined, being careful not to overmix the batter.
- Step 4: Scrape the batter into the prepared baking pan and spread it evenly into the corners. If desired, sprinkle the top with extra peanut butter chips or coarse salt.
- Step 5: Bake for 25 to 30 minutes, or until the edges are golden brown and a toothpick inserted near the center comes out with moist crumbs attached. Allow the blondies to cool completely in the pan before lifting out and cutting into squares.
Notes
- For maximum freshness, store the cooled blondies in an airtight container at room temperature for up to three days, or freeze cut squares wrapped tightly for long-term storage.
- If your blondies have lost their initial softness, warm a square in the microwave for 10-15 seconds to recreate that freshly baked, gooey center.
- Elevate this treat by serving it warm alongside a generous scoop of vanilla ice cream, or enjoy it chilled with a robust cup of black coffee.
- Achieving that perfect chewy texture requires a gentle hand: only mix the dry ingredients into the batter until just combined—overmixing will create a tough, cake-like result.
- Prep Time: 15 minutes
- Cook Time: 20 minutes
- Method: Stovetop
- Cuisine: American
Leave a Comment