
The moment that icy blast of peppermint meets the comforting warmth of melted chocolate, you know you’ve hit the baking jackpot. Forget the complicated holiday desserts; we’re diving headfirst into the easy magic ofPeppermint Chocolate Chip Cookies. These cookies aren’t just a treat; they are the edible equivalent of finding a forgotten $20 bill in a winter coat pocket. We all deserve a cookie recipe that delivers maximum joy with minimum fuss, and frankly, my neighbors start lining up the moment the cool, crisp aroma of mint and deep cocoa floats across the fence line. Get ready for a cookie that truly stands out from the standard chocolate chip crowd.
- Effortlessly simple preparation means less time waiting and more time enjoying the spectacular contrast of warm, gooey chocolate and cool peppermint notes.
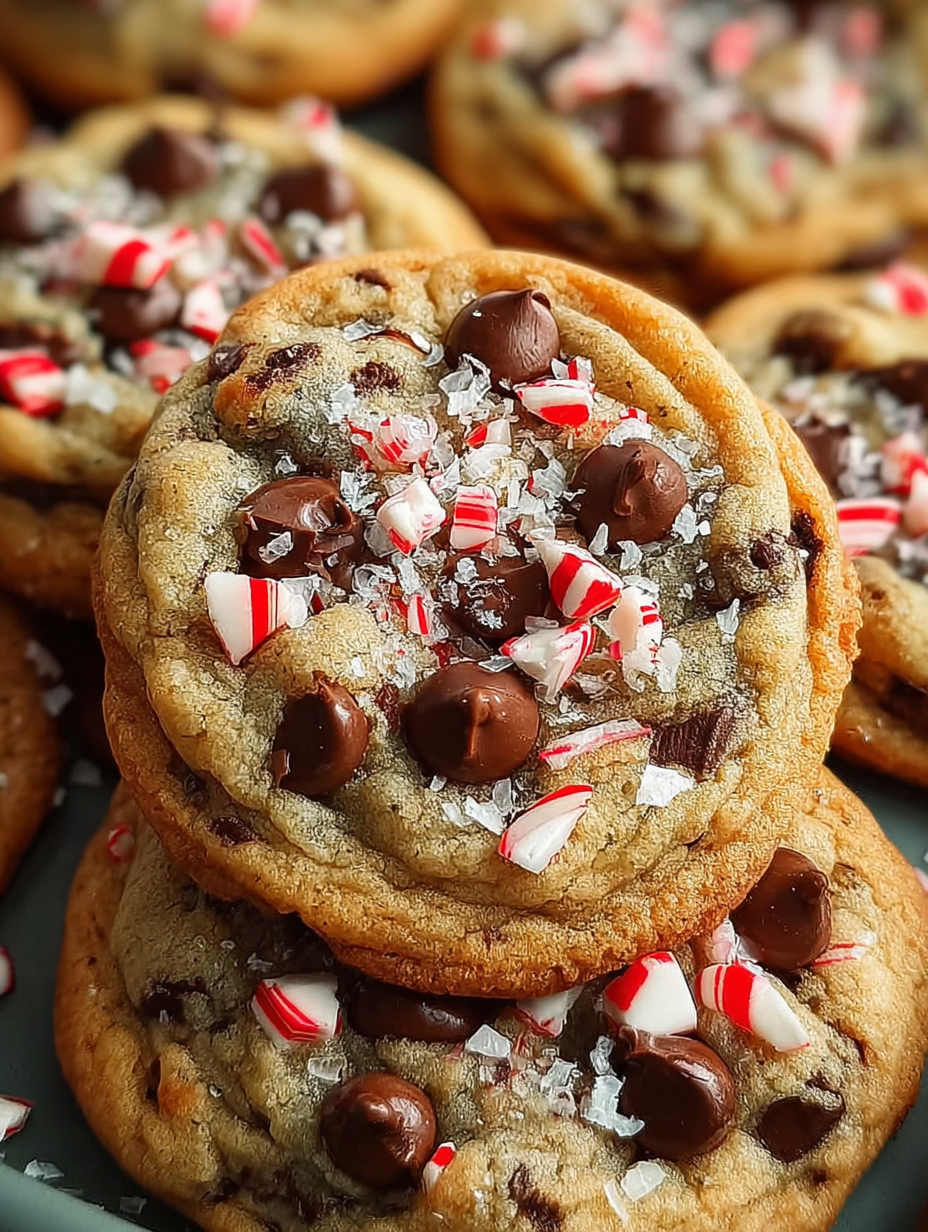
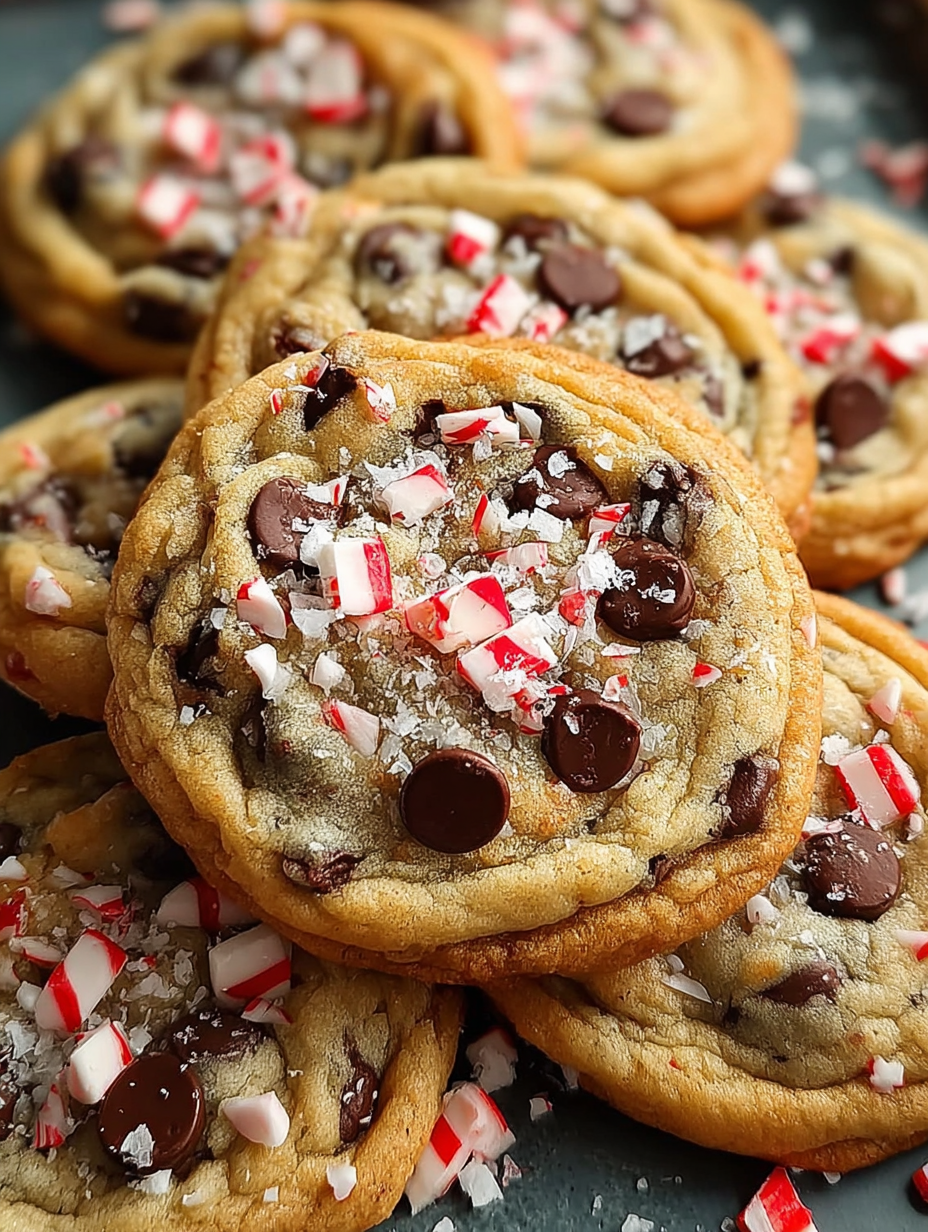
- The visual appeal is stunning, thanks to the festive sparkle of crushed candy pieces nestled atop a rich, buttery, golden brown cookie base.
- This recipe offers a perfectly balanced flavor profile, merging the classic comfort of a chocolate chip cookie with a delightful, refreshing blast of minty cheer.
- They are incredibly versatile and perfect for everything from quick weeknight baking sessions to elaborate holiday cookie exchanges and gift giving.
Ingredients for Peppermint Chocolate Chip Cookies
Here’s what you’ll need to make this delicious dish:
- All-Purpose FlourThe structure builder of our cookies; measure precisely using the spoon and level method to avoid dense results.
- Baking Soda and SaltThe salt balances the sweetness while the baking soda ensures the cookies rise properly, giving them that crucial soft chewiness.
- Unsalted ButterUse high-quality butter, softened but not melted, as this is essential for creaming and creating the right dough consistency.
- Granulated Sugar and Brown SugarThe combination adds flavor depth; brown sugar provides moisture and chewiness, while granulated sugar promotes spreading.
- EggsThey act as binders and add richness; ensure they are at room temperature so they incorporate seamlessly into the butter mixture.
- Vanilla PowderUse pure vanilla powder to enhance the overall flavor profile of the cookie dough, deepening the sweetness.
- Peppermint ExtractThis is the star of the show; start with a small amount, as pure peppermint extract can be very potent and intense.
- Semi-Sweet Chocolate ChipsStandard chocolate chips work best, melting beautifully to create pools of rich, dark chocolate throughout the cookie.
- Crushed Peppermint CandiesUsed for mixing into the dough and pressing on top for a delightful crunch and extra burst of holiday flavor and color.
The full ingredients list, including measurements, is provided in the recipe card directly below.
How to Make Peppermint Chocolate Chip Cookies
Follow these simple steps to prepare this delicious dish:
Step 1: Prepare the Dry Ingredients and Oven
Preheat your oven to 375°F (190°C). Line two large baking sheets with parchment paper or silicone mats. In a medium bowl, whisk together the flour, baking soda, and salt, setting the mixture aside for later use.
Step 2: Cream Butter and Sugars
In a stand mixer fitted with the paddle attachment, beat the softened butter, granulated sugar, and brown sugar on medium speed until the mixture is light and fluffy, usually taking about 3 to 4 minutes. This process incorporates air, which is vital for cookie texture.
Step 3: Incorporate Wet Ingredients
Reduce the speed to low and mix in the eggs one at a time, ensuring each egg is fully incorporated before adding the next. Stir in the vanilla powder and the peppermint extract. Be careful not to overmix at this stage; just mix until combined.
Step 4: Combine Wet and Dry Dough
Gradually add the flour mixture to the wet ingredients, mixing only until just combined. Stop the mixer immediately when no streaks of flour remain. Fold in the chocolate chips and about two-thirds of the crushed peppermint candies using a rubber spatula.
Step 5: Scoop, Chill, and Decorate
Scoop the dough onto the prepared baking sheets using a 2-tablespoon cookie scoop, leaving at least 2 inches between each mound. For thicker cookies and better flavor development, chill the scooped dough balls in the refrigerator for at least 30 minutes. Before baking, gently press the remaining crushed peppermint candy pieces onto the top of each dough ball.
Step 6: Bake and Cool
Bake the cookies for 9 to 11 minutes, or until the edges are golden brown but the centers still look slightly soft. Do not overbake! Allow the cookies to cool on the baking sheet for 5 minutes before transferring them to a wire rack to cool completely. Transfer to plates and drizzle with extra melted chocolate for the perfect finishing touch.
The Quest for the Perfect Cookie Texture
If you have ever wrestled with a batch of cookies that came out flatter than a pancake, you understand the agony of a baking betrayal. Achieving that ideal balance—a slightly crisp edge leading to a soft, almost plush center—requires understanding a few key scientific factors. The primary struggle withPeppermint Chocolate Chip Cookiesoften lies in the balance between the fats, sugars, and the moisture introduced by the extracts. Too much liquid, especially if you get heavy-handed with the peppermint extract, and your cookies will spread excessively. Too little and they become dense and dry.
Understanding Ingredient Temperature
Room temperature ingredients are not just a fussy requirement from professional bakers; they are crucial. Cold butter and eggs will not emulsify properly with the sugars, leading to a lumpy dough and inconsistent melt in the oven. When you cream softened butter and sugar, you are whipping tiny pockets of air into the mixture. This aeration is what gives the cookie its lift. If the butter is too warm, it melts, and those air pockets collapse, guaranteeing a flat cookie landscape. Aim for butter that holds its shape but indents easily when pressed. If you forgot to take your eggs out, place them in a bowl of warm (not hot) water for five minutes—it is a great little cheat.
The Magic of Chilling the Dough
If you skip chilling the dough, you are essentially setting yourself up for failure, or at least for a mediocre cookie experience. Chilling accomplishes two wonderful things. First, it solidifies the fat, preventing the dough balls from spreading too rapidly when they hit the hot oven. This ensures that wonderful thickness. Second, and arguably more importantly, chilling allows the dry ingredients, especially the flour, to fully hydrate. Hydration improves both the flavor and the texture, leading to a much richer, chewier finished cookie that truly deserves the title ofPeppermint Chocolate Chip Cookies. Thirty minutes is the minimum, but an hour is even better for maximum textural benefit.
Mastering the Mint: Flavor and Decoration Tips
The secret to a successful mint cookie is restraint. Peppermint extract is potent; it is not like vanilla, where you can accidentally double the quantity and still end up with something delicious. Start with the recipe’s recommended amount, usually around half a teaspoon, and then give the dough a small taste test before the chilling phase. If you desire a stronger mint flavor, add another tiny dash. Remember, the flavors intensify slightly after baking. Too much mint, and your cookies will taste less like a dessert and more like toothpaste, which is a tragedy we must avoid at all costs.
Choosing the Right Peppermint Pieces
When selecting the crushed peppermint candies, look for those that are finely crushed. Large chunks tend to dissolve too quickly in the heat of the oven, leaving behind slightly watery patches that can compromise the cookie structure. Additionally, make sure you reserve some candy pieces for pressing onto the top of the dough right before baking. The candies mixed into the dough often disappear slightly into the baked cookie, but the pieces placed on top retain their bright red and white color, giving the cookies that indispensable festive look and satisfying initial crunch.
Creative Flavor Pairings for Peppermint
While chocolate chips and peppermint are a legendary duo, you can experiment to elevate the experience further. Consider swapping some of the semi-sweet chips for white chocolate chips to increase the visual contrast and add a different layer of sweetness. If you want a deeper, richer flavor, use dark chocolate chips (70% cocoa or higher). For a truly luxurious presentation, melt high-quality dark chocolate, cool it slightly, and then drizzle the finished, cooled cookies with the melted chocolate. Finish the drizzle with a sprinkle of extra finely crushed peppermint dust right away before the chocolate sets. This small step transforms the already delightful cookie into something magazine-worthy.
Troubleshooting and Storage Secrets
Even experienced bakers run into issues sometimes. If yourPeppermint Chocolate Chip Cookiescome out too pale after the recommended time, your oven temperature might be inaccurate. Invest in an oven thermometer; they are inexpensive and can save many batches from disappointment. If they are consistently spreading too much despite chilling, the butter may have been too warm when you started creaming, or you might be using too little flour. Try adding an extra tablespoon of flour per cup of wet mixture in the next batch to see if that tightens the dough structure.
Perfecting the Baking Time
The key to a chewy center is pulling the cookies out of the oven when they look slightly underdone. The centers should appear puffy and pale, while the edges should be just beginning to turn golden brown. Remember, the residual heat from the baking sheet continues to cook the cookies for several minutes once they are removed from the oven. If you wait until they look perfectly baked in the oven, they will be overbaked and crispy once they cool. Letting them sit on the hot sheet for five minutes allows them to finish setting up without becoming dry.
Storing and Freezing the Dough
These cookies store beautifully, both baked and unbaked. Store baked cookies in an airtight container at room temperature for up to four days. If you want to make a large batch ahead of time, which is highly recommended for busy holiday seasons, you can freeze the dough. Scoop the dough balls onto a parchment-lined tray, freeze them until solid, and then transfer the solid balls to a freezer bag or container. They will keep well for up to two months. When you are ready to bake, you can cook them straight from frozen; just add 2 to 4 minutes to the baking time. This method ensures you always have fresh, warm cookies ready for any impromptu gathering or sudden peppermint craving.
The Accidental Discovery of Sunshine on a Plate
I stumbled upon the idea for these magnificentPeppermint Chocolate Chip Cookiesduring a chaotic holiday baking spree, trying desperately to use up a bag of leftover candy canes. What started as a desperate attempt to clean the pantry transformed into a burst of cool, minty flavor layered perfectly with deep chocolate richness. It was pure, happy accident.
There is a specific kind of domestic chaos that only arrives when you decide to bake forty dozen treats in the middle of December. My kitchen, normally a sanctuary of organizational calm, looked like a blizzard had hit a confectionary factory. Flour coated the ceiling fan, cocoa dust covered the cat (don’t worry, she loved the attention), and I was staring down a mountain of ingredients, wondering why I ever promised three different cookie exchanges.
Amidst this sugar-fueled madness, I spotted them: the forgotten box of candy canes. They were chipped, slightly sticky, and wholly depressing. I realized instantly I couldn’t just toss them. Necessity, as they say, is the mother of invention, but in my case, necessity was the mother of minty destruction. The mission was clear: integrate the cool snap of peppermint into the comforting embrace of a classic chocolate chip cookie. It sounds simple, but achieving the perfect balance between the robust chocolate and the sharp, clean mint requires serious kitchen wizardry. You don’t want a toothpaste flavor; you want winter magic. After a few hilarious failures—one batch tasted suspiciously like a cough drop—I finally nailed the ratio, resulting in the absolute best holiday treat imaginable.
The Ingredients: Essential Magic for Minty Delights
Creating these delightful cookies requires focusing on quality ingredients and, crucially, avoiding the temptation to overdo the extract. Peppermint extract is potent; treat it like highly concentrated sarcasm—a tiny amount goes a long way. This recipe yields about 24 glorious cookies, perfect for gifting or consuming in one sitting (no judgment here).
Dry Ingredients: The Foundation
- 2 1/4 cups all-purpose flour
- 1 teaspoon baking soda
- 1 teaspoon salt
- 1/4 cup unsweetened cocoa powder (optional, but highly recommended for depth)
Wet Ingredients & Mix-ins: Flavor Bombs
- 1 cup (2 sticks) unsalted butter, softened
- 3/4 cup granulated sugar
- 3/4 cup packed light brown sugar
- 1 teaspoon pure vanilla powder
- 1 teaspoon pure peppermint extract (Start with 3/4 tsp if unsure!)
- 2 large eggs
- 1 1/2 cups semi-sweet chocolate chips
- 1 cup crushed peppermint candy or candy canes (divided)
Crafting the Perfect Dough
Making cookie dough is a therapeutic process, but rushing it causes disaster. Start by whisking your dry ingredients together thoroughly. This ensures the baking soda is evenly distributed, which leads to uniform lift and structure. Next comes the creaming process, where we introduce air into the butter and sugar. This step is critical; you want the mixture to look pale and fluffy—about three to four minutes of whipping with an electric mixer.
Once the butter and sugars are properly creamed, beat in the eggs one at a time, followed by the vanilla and the all-important peppermint extract. Remember to scrape down the sides of the bowl frequently to ensure everything integrates seamlessly. Finally, slowly incorporate the dry mixture until just combined. Overmixing the flour activates too much gluten, resulting in tough cookies—and nobody wants a tough cookie, literally or figuratively. Gently fold in the chocolate chips and about half of your crushed peppermint candy.
The Chilling Commitment
I know, I know. Waiting is torture. However, chilling the dough is mandatory for these peppermint treats. Wrap the dough tightly in plastic wrap and refrigerate it for at least two hours, or preferably overnight. Chilling allows the fats to solidify, prevents excessive spreading during baking, and deepens the flavor profile. Think of it as the dough meditating before its grand debut in the oven.
The Baking Ballet
Preheat your oven to 375°F (190°C). Line two large baking sheets with parchment paper. Using a medium cookie scoop, portion the dough into even balls. This uniformity ensures they all bake at the same rate, preventing the tragic scenario where some are burnt while others are still raw in the middle. Before placing them in the oven, take the remaining crushed peppermint and gently press a few pieces into the top of each dough ball. This creates beautiful visual appeal and guarantees that immediate burst of mint when someone takes that first bite.
Bake the cookies for 9 to 12 minutes. The edges should look set, but the centers should still appear slightly soft. They will continue to set up on the baking sheet once removed from the oven. Let them cool on the sheet for five minutes before transferring them to a wire rack to finish cooling completely. Resist the urge to dive in immediately; scorching your tongue only ruins the experience!
Perfecting the Cooking Process
First, always chill the dough—do not skip this step; it prevents spreading and locks in flavor! Next, preheat your oven while rolling the chilled dough balls. Finally, press extra crushed candy canes onto the tops just before baking for that dazzling, crystallized finish and extra minty crunch.
Add Your Touch
You can easily substitute dark chocolate chips for milk chocolate, or perhaps add a teaspoon of instant espresso powder for depth. For a chewier cookie, use slightly less flour. If you lack crushed candy canes, substitute them with finely chopped white chocolate mixed with a drop of extra peppermint extract.
Expert Tips for Supreme Cookies
-
Use cold eggs directly from the refrigerator when making this dough. Cold ingredients melt more slowly, maintaining the temperature of the butter and enhancing the dough structure during creaming.
-
Measure your flour accurately by spooning it into the measuring cup and leveling it off. Scooping directly from the bag compacts the flour, resulting in dense, dry cookies.
-
If you plan to ship these sweet treats, under-bake them slightly by 90 seconds. This ensures they remain deliciously soft and perfectly chewy upon arrival at their destination.
Storing & Reheating
Store cooled cookies in an airtight container at room temperature for up to five days, separating layers with parchment paper. To revitalize them, reheat briefly (1 minute) in a microwave or 5 minutes in a 300°F (150°C) oven, restoring that wonderfully soft, gooey center.
Troubleshooting the Minty Magic
Sometimes, even the most dedicated baker runs into trouble. Perhaps your cookies spread too much, or maybe the peppermint flavor is a little overwhelming. Knowing how to adjust mid-bake is the hallmark of a true kitchen veteran. Let’s tackle some common issues that arise when working with these intensely flavored holiday cookies.
Why Did My Cookies Spread Flat?
Flat cookies usually result from butter that was too soft or dough that wasn’t chilled long enough. If you notice excessive spreading during the first batch, pull the remaining dough, reshape it, and pop it back in the freezer for 15 minutes. Another culprit might be high altitude or oven temperature fluctuations; make sure your oven thermometer is reliable. Also, ensure your baking soda is fresh; stale leavening agents lead to heavy, flat results.
Balancing the Peppermint Punch
Peppermint extract can be ruthless. If you feel like your final product leans toward mouthwash territory, don’t despair! Next time, cut the extract down by half. For the current batch, balance the sharpness by adding a thick drizzle of melted dark chocolate over the cooled cookies. The extra richness of the chocolate mitigates the overwhelming mint presence, creating a lovely contrast.
Preparing Dough for Long-Term Storage
These glorious cookies are excellent candidates for freezing. Once you have rolled your chilled dough into balls, place them on a baking sheet and freeze until solid. Transfer the frozen dough balls to a heavy-duty freezer bag, squeezing out all the air. They will last beautifully for up to three months. When you are ready to bake, place the frozen balls directly on a parchment-lined sheet and add 2 to 3 minutes to the total baking time. Baking from frozen is the ultimate quick-fix when unexpected company shows up during the holiday rush.
My nephews devoured an entire plate of these minty chocolate delights within minutes last Winter Evening, proclaiming them “the cookie of the century.” That reaction alone made the flour explosion and the intense peppermint testing phase completely worthwhile.
Conclusion for Peppermint Chocolate Chip Cookies
These delightful cookies are more than just a seasonal treat; they represent the perfect harmony between rich, melted chocolate and the crisp, refreshing zing of peppermint. By following the crucial steps—especially chilling the dough and managing that powerful peppermint extract—you guarantee a batch of truly magnificent holiday morsels. Whether you are baking for a cookie exchange, a festive gathering, or simply craving something extraordinary on a cold afternoon, thesePeppermint Chocolate Chip Cookiesdeliver complex flavor and irresistible texture every single time. Get ready to impress everyone with these shockingly simple yet incredibly delicious baked goods that embody the spirit of joyful winter baking.
Print
Peppermint Chocolate Chip Cookies
Chewy comfort meets cool, refreshing mint. These Peppermint Chocolate Chips are baked until golden, offering rich brown sugar notes cut by crystalline peppermint.
- Total Time: 35 minutes
- Yield: 4 servings
Ingredients
- All-purpose flour: 2 1/4 cups
- Baking soda: 1 teaspoon
- Unsalted butter (softened): 1 cup (2 sticks)
- Granulated sugar: 3/4 cup
- Packed light brown sugar: 3/4 cup
- Large egg: 1
- Peppermint extract: 1/2 teaspoon
- Semi-sweet chocolate chips: 1 cup
Instructions
- Step 1: Preheat the oven to 375°F (190°C). In a medium bowl, whisk together the flour and baking soda; set aside.
- Step 2: In a large bowl, cream the softened butter, granulated sugar, and brown sugar using an electric mixer until the mixture is light and fluffy (about 3 minutes).
- Step 3: Beat in the egg and the peppermint extract until fully incorporated. Gradually add the dry flour mixture to the wet ingredients, mixing on low speed until just combined, being careful not to overmix.
- Step 4: Fold in the chocolate chips by hand. Drop rounded tablespoons of dough onto ungreased baking sheets, ensuring they are spaced about 2 inches apart.
- Step 5: Bake for 9 to 11 minutes, or until the edges are set and lightly golden. Allow the cookies to cool on the baking sheet for 2 minutes before transferring them to a wire rack to cool completely.
Notes
- Keep leftover cookies fresh by storing them in an airtight container at room temperature for up to five days, or you can freeze the unbaked dough balls to bake on demand later.
- To restore that fresh-baked warmth and chewiness, pop a cookie in the microwave for 8-10 seconds or reheat them briefly in a 300°F oven for 2 minutes.
- Serve these peppermint treats alongside a scoop of vanilla ice cream or dunk them in hot cocoa to enhance the winter spice flavor.
- Because peppermint extract is very potent, use a measured half-teaspoon exactly, being careful not to add too much, or your cookies may taste medicinal instead of festive.
- Prep Time: 15 minutes
- Cook Time: 20 minutes
- Method: Stovetop
- Cuisine: American


Leave a Comment