

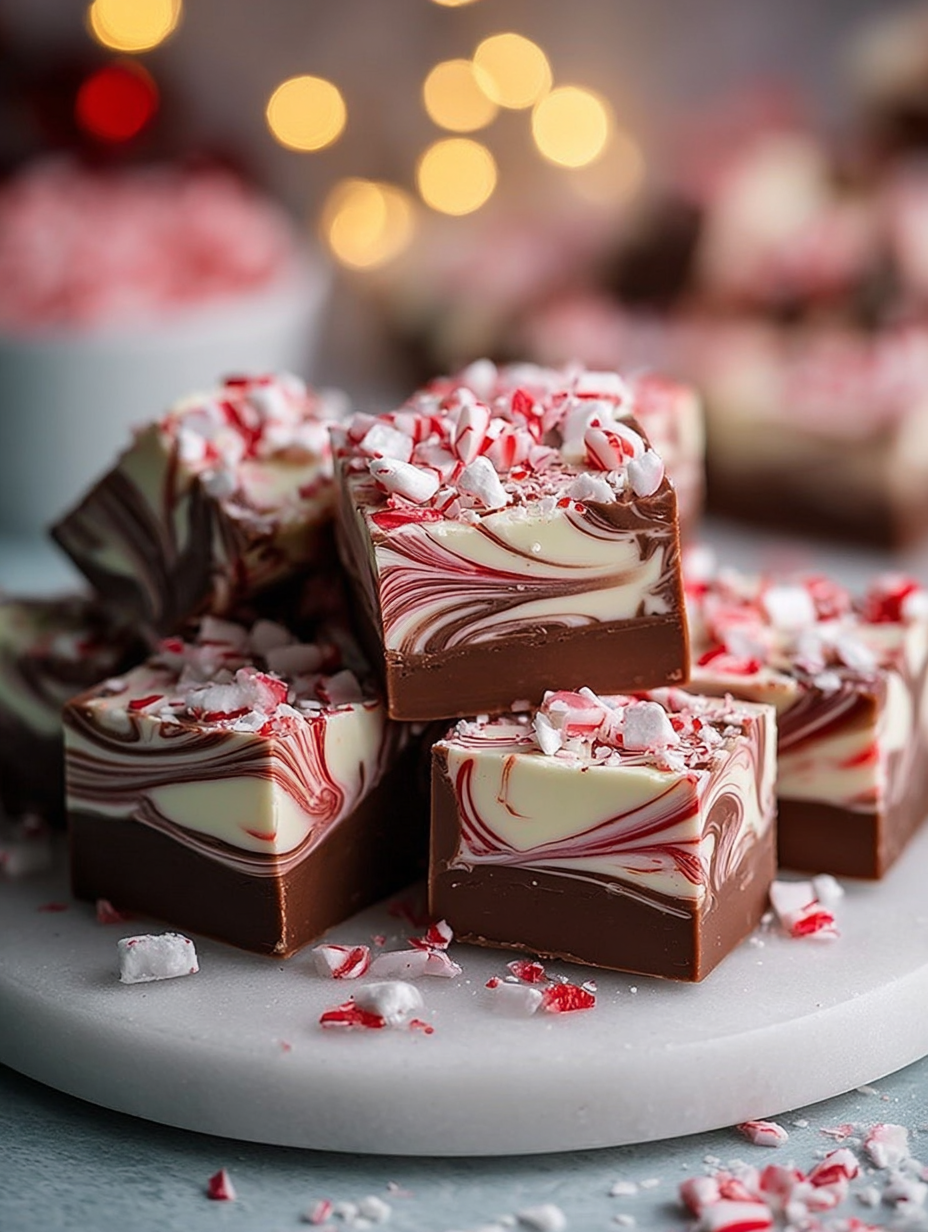
That moment when the kitchen air smells like a candy cane factory exploded is exactly why we need this incredible recipe forPeppermint Swirl Fudge.
This creamy, dreamy confection captures the essence of winter holidays, transforming simple ingredients into a magical, unforgettable treat that everyone absolutely loves.
- This foolproof recipe requires minimal cooking time and zero baking expertise, making it perfect even for kitchen novices.
- The intense, cooling flavor of peppermint pairs perfectly with rich white chocolate, creating a sophisticated and nostalgic taste profile.
- Its stunning visual appeal, featuring vibrant red swirls against white fudge, makes it the star of any holiday dessert platter.
- You can easily adapt this recipe with various extracts or toppings, making it a truly versatile addition to your candy repertoire.
The Hilarious History of My Failed Fudge Attempts
I must confess something embarrassing: I spent my entire early twenties convinced that fudge was an ancient, secret alchemy reserved only for grandmothers and professional candy makers. Every time I attempted a batch, the results ranged from grainy sand blocks to sticky, tooth-shattering cement. It seemed impossible to achieve that silky, smooth texture everyone raved about. I remember one disastrous Christmas where I proudly presented a tray of what I called “Rustic Rocky Road,” which my uncle politely described as “deliciously crunchy gravel.” My fudge failures were legendary.
But then I discovered the secret—the magical shortcut that involves skipping the thermometer, bypassing the crystalline sugar chemistry lecture, and embracing the power of sweetened condensed milk. Seriously, this method changes everything. If you, like me, once believed that making perfect fudge was harder than assembling flat-pack furniture using only the picture on the box, prepare to have your mind blown. This specific recipe forPeppermint Swirl Fudgeis the one that redeemed my holiday baking reputation and allowed me to retire my title as the “Queen of Gritty Desserts.”
Why Traditional Fudge is Intimidating (But Shouldn’t Be)
Traditional fudge relies heavily on boiling sugar solutions to exact temperatures, a process called the “soft-ball stage.” If you stop too soon, the fudge is gooey and never sets; if you go a degree too far, it becomes crumbly and dry. You also need impeccable stirring technique and patience, two things that are hard to maintain when you are anxiously waiting for dessert. The condensed milk method completely eliminates this stress. It locks in the moisture and creaminess from the start, ensuring that unless you burn the chocolate (please don’t burn the chocolate!), you will achieve success every single time. We utilize high-quality white chocolate as the foundation, which gives us a pure canvas for the sharp, refreshing punch of peppermint extract. This simple approach means you can spend less time hovering over a thermometer and more time licking the mixing spoon.
Ingredients for Peppermint Swirl Fudge
Here’s what you’ll need to make this delicious dish:
- Sweetened Condensed MilkThis ingredient provides the essential creamy base and sweetness, ensuring a smooth, non-gritty texture.
- White Chocolate ChipsChoose high-quality chips or baking bars for the best melting performance and purest flavor base for the peppermint.
- Peppermint ExtractUse pure peppermint extract, not spearmint, to achieve that signature sharp, cool flavor associated with candy canes.
- Butter or GheeA small amount of unsalted butter adds richness and contributes to the decadent, melt-in-your-mouth quality of the finished fudge.
- Crushed Candy CanesThese are crucial for the textural crunch and the vibrant red decoration that defines the peppermint swirl aesthetic.
- Red Food Coloring (Gel)Gel coloring works best to achieve a deep, concentrated red hue without adding excess moisture to the mixture.
The full ingredients list, including measurements, is provided in the recipe card directly below.
How to Make Peppermint Swirl Fudge
Follow these simple steps to prepare this delicious dish:
- Step 1: Preparing the Pan and Base IngredientsLine an 8×8 inch (20×20 cm) pan with parchment paper, leaving an overhang on two sides for easy removal later. Place the sweetened condensed milk, butter, and white chocolate chips into a heatproof bowl set over a simmering pot of water (a makeshift double boiler).
- Step 2: Melting and Flavoring the White BaseStir the mixture frequently until the chocolate is completely melted and the mixture is smooth and glossy; this usually takes about 5 to 7 minutes. Remove the bowl from the heat and stir in about two-thirds of the peppermint extract until fully incorporated.
- Step 3: Creating the Red Swirl MixtureImmediately divide the melted fudge mixture evenly into two separate bowls. Add the red gel food coloring to one bowl, stirring quickly until you achieve a vibrant, streak-free red color. Add the remaining peppermint extract to the red batch to boost its flavor.
- Step 4: Swirling and Setting the FudgeWorking quickly, alternately drop spoonfuls of the white fudge and the red fudge into the prepared pan, allowing them to stack unevenly. Use a butter knife or a skewer to gently swirl the colors together 2 to 3 times—do not overmix, or the colors will blend into pink mush.
- Step 5: Crushing and ChillingImmediately sprinkle the surface liberally with the crushed candy canes, gently pressing them into the soft fudge layer. Allow the fudge to set completely at room temperature for at least 4 hours, or chill it in the refrigerator for 2 hours to speed up the process.
Transfer to a cutting board, slice into small squares, and arrange on a festive platter for the perfect finishing touch.
Pro Tips for the Perfect Festive Fudge
Achieving a picture-perfect result withPeppermint Swirl Fudgerequires speed and attention to detail. Fudge sets quickly once you remove it from the heat, especially when using condensed milk, so preparation is paramount. Before you even start melting the chocolate, ensure your pan is lined, the candy canes are crushed, and the extract and food coloring are measured and ready to grab. This streamlined approach minimizes the risk of your fudge hardening prematurely while you are desperately searching for the red dye.
When swirling the colors, remember that less is truly more. You aim for distinct bands of red and white, not a homogenous pink. Insert your knife only about half an inch deep and trace S-shapes across the surface. Stop swirling as soon as you see a few nice marble lines emerge. Overmixing blends the colors and ruins the visual impact, turning your festive candy into something resembling strawberry milk. If you find your mixture is already too thick to swirl easily, place the bowls back over the residual heat of the double boiler for just 30 seconds to loosen them up slightly before proceeding.
Troubleshooting Common Fudge Flaws
If your fudge turns out grainy, you likely used a type of granulated sugar that did not dissolve fully, which is why we rely on condensed milk here. If you are experiencing graininess even with this recipe, the likely culprit is overheating the chocolate. High heat scorches the milk solids and leads to a grainy texture. Always use medium-low heat or rely solely on indirect heat from a double boiler. If your fudge doesn’t set, you might have accidentally added standard evaporated milk instead of sweetened condensed milk, or you added too much liquid flavoring. Remember, extracts are potent; a little goes a long way!
Peppermint Fudge Variations for Every Season
While the classicPeppermint Swirl Fudgeis undeniably a holiday staple, the base recipe is incredibly versatile. You can easily adapt this confection for different seasons and occasions by simply switching out the extract and the colorful toppings.
- Lemon Burst Fudge:Replace the peppermint extract with lemon extract and swap the red coloring for yellow. Top with candied lemon peel instead of candy canes for a bright, summery treat.
- Pumpkin Spice Dream:Use vanilla extract and add a generous pinch of pumpkin pie spice blend and a touch of orange food coloring. Top this autumn variation with chopped pecans or walnuts.
- Black Forest Delight:Combine a splash of cherry juice (to replace the extract) with a little dark cocoa powder to the white chocolate base for a rich flavor. Swirl with a plain white batch and top with fresh or dried cherries.
The beauty of this quick-set method is the ability to experiment without fear of failure. Start with the white chocolate base and allow your creativity (and available extracts) to guide your next batch.
Frequently Asked Questions About Fudge
How should I store homemade fudge?
Store your homemade fudge in an airtight container at room temperature for up to two weeks. If you live in a warm or humid climate, chilling it in the refrigerator extends the shelf life, but always let it come to room temperature briefly before serving for the best texture.
Can I freeze the Peppermint Swirl Fudge?
Absolutely! Fudge freezes remarkably well. Wrap the cut pieces tightly in plastic wrap, then place them in a freezer-safe container. Fudge stays fresh in the freezer for up to three months. Thaw it overnight in the refrigerator before unwrapping and enjoying.
Is it better to use real candy canes or peppermint chips?
For the best visual appeal and crunch in this specific recipe, use crushed candy canes. Peppermint chips melt into the fudge as it sets, which provides flavor but doesn’t deliver the satisfying textural contrast that the candy cane pieces offer.
Why did my fudge look oily after melting?
If your fudge mixture appears oily or separates, the chocolate likely overheated or seized. This happens when chocolate melts too quickly or encounters a small amount of water. You can try stirring in one teaspoon of hot, boiling water or hot milk at a time until the mixture miraculously emulsifies again, but be careful not to add too much liquid.
Remember that one time you swore you were going to make homemade gifts for everyone, and then suddenly it was December 23rd and you were panic-buying scented candles? We have all been there. But this year, we are defeating the holiday chaos with the dessert equivalent of a snowy hug: the spectacular, ridiculously easyPeppermint Swirl Fudge. This is not just candy; it is edible euphoria, marrying rich, deep chocolate with the cool, refreshing kiss of mint.
If you think making homemade fudge is a delicate dance involving candy thermometers and the exact humidity level of your kitchen, prepare to be delightfully mistaken. This recipe is designed for the modern, busy baker who needs maximum impact for minimal effort. We skip the complicated boiling methods and jump straight to the stovetop melting magic. The result is a creamy, dreamy confection that looks far more impressive than the few minutes of active preparation it demands. Get ready to ditch the store-bought sweets because this striped, delightful fudge is about to become your signature contribution to every gathering.
The Magic Behind the Minty Chocolate
Fudge should be simple, robust, and capable of handling a clumsy cook. Our method ensures a smooth, non-gritty texture every single time, relying primarily on high-quality condensed milk and chocolate. The secret to the striking aesthetic of this recipe lies in the bold contrast between the dark, semi-sweet chocolate base and the bright white layer infused with powerful peppermint extract. We top it all off with crunchy, crushed candy canes, providing that necessary textural crunch that elevates the entire experience.
This dessert is inherently versatile. It works perfectly as a homemade gift, a centerpiece for a holiday platter, or simply a treat to hide in the back of the freezer and sneak bites of after a long day. If you want applause, make this fudge. If you want instant holiday credibility, double the batch.
Gathering Your Supplies for Success
Before you even turn on the heat, prepare your equipment. Fudge sets quickly, and you do not want to be scrambling for parchment paper while your chocolate is solidifying. Line an 8×8 inch baking pan with parchment paper, ensuring the edges hang over slightly for easy removal later. Lightly grease the paper for extra insurance. Once your pan is prepped, melt your butter gently, measure your extracts precisely, and crush your candy canes mercilessly. Precision in prep work guarantees success in the final product.
Ingredients List for the Striped Delight
- 1 (14-ounce) can sweetened condensed milk
- 2 cups (12 ounces) semi-sweet chocolate chips (or high-quality chopped dark chocolate)
- 4 tablespoons unsalted butter, divided
- 1 teaspoon pure vanilla extract
- 1 cup good quality white chocolate chips
- 1 teaspoon pure peppermint extract
- 1/2 cup crushed candy canes (peppermints)
- Optional: 2-3 drops red food coloring for the white layer
Crafting the Perfect Peppermint Swirl Fudge
This recipe happens in two rapid stages: the dark chocolate base and the white peppermint swirl. Work efficiently, as the setting process begins the moment the mixture cools. Do not worry about perfection; the beautiful chaos of the swirl is what gives the fudge its rustic charm.
Step 1: The Dark Chocolate Foundation
In a medium saucepan set over low heat, combine the condensed milk, the semi-sweet chocolate chips, and two tablespoons of the butter. Stir continuously until the chocolate is completely melted and the mixture is smooth, glossy, and uniform. Ensure the heat remains very low; scorching the bottom will ruin the texture instantly. Once melted, remove the pan from the heat and immediately stir in the vanilla extract. Pour this dark chocolate mixture into your prepared 8×8 pan and spread it into an even layer using a spatula. Set this aside while you quickly prepare the swirl layer.
Step 2: The Refreshing White Swirl
In a separate, small saucepan or microwave-safe bowl, combine the white chocolate chips and the remaining two tablespoons of butter. Melt this mixture gently, stirring until completely smooth. Again, be vigilant about heat control—white chocolate is more prone to seizing than dark chocolate. Once melted, remove from heat and stir in the peppermint extract. If you want a more striking color contrast for your swirl, now is the time to add a few drops of red food coloring until you achieve a pale pink hue. Work quickly here.
Step 3: Swirling into Happiness
Pour the warm white chocolate mixture over the top of the dark chocolate foundation in the pan. Use a spoon to dollop it across the surface. Now comes the fun part: take a butter knife or a skewer and gently drag it through both layers, creating a mesmerizing swirl pattern. Do not over-mix, or you will end up with a grayish blob instead of defined stripes. Just a few confident, S-shaped motions across the pan will suffice. Immediately press half of your crushed candy canes onto the surface of the fudge.
The secret to a beautifully set fudge is patience. Let the fudge cool completely on the counter for at least four hours, or ideally, chill it in the refrigerator for two hours until fully firm. Once set, lift the fudge out of the pan using the parchment paper handles. Place it on a cutting board and slice it into small, bite-sized squares. Sprinkle the remaining crushed peppermint pieces over the tops of the cut pieces, ensuring every square gets a little sparkle.
I remember serving this Peppermint Swirl Fudge at a potluck once, and my notoriously reserved Aunt Betty tried a piece. She paused, looked at me with wide eyes, and immediately demanded the recipe, calling it “the only thing that matters this entire holiday.”
- Use a rubber spatula, not a whisk, when melting the chocolate to avoid incorporating air, which can lead to a less dense, grainy texture.
- Crush your peppermints finely, but not into a powder; large chunks provide the best crunch and visual impact on the finished product.
- Ensure the dark chocolate base is still warm when adding the white chocolate swirl; this slight warmth facilitates a smoother, more effective swirl.
Perfecting the Cooking Process
When making this decadent treat, ensure you melt the dark chocolate base completely before stirring in the condensed milk. Next, prepare the white chocolate layer separately, infusing the peppermint extract, and then swiftly layer and swirl the two mixtures before they set.
Add Your Touch
Try substituting crushed Oreo cookies for some of the candy cane pieces for an intense cookie-mint flavor profile. Alternatively, use dark chocolate espresso beans on top instead of mints to add a sophisticated, bitter contrast to the sweetness.
Storing & Reheating
StorePeppermint Swirl Fudgein an airtight container at room temperature for up to one week, or refrigerate for up to three weeks. Freezing the fudge (double-wrapped) extends its shelf life significantly, allowing you to enjoy this treat for months.
Frequently Asked Questions About Fudge
Can I use milk chocolate instead of semi-sweet for the base?
Will using milk chocolate change the texture of the fudge?
You absolutely can use milk chocolate, but be aware that it contains more sugar and less cocoa solids than semi-sweet. This means your fudge will be significantly sweeter and possibly slightly softer. If you prefer a truly rich, balanced flavor against the strong peppermint, sticking to semi-sweet chocolate is recommended.
How do I prevent my fudge from becoming grainy?
What causes fudge to become grainy or gritty?
Graininess usually happens when the sugar recrystallizes too quickly. Since we are using condensed milk (a simple method), the key to preventing this is low heat and constant stirring while melting the chocolate. Never let the mixture boil or scorch, and do not over-mix the fudge once you have removed it from the heat source.
What is the best way to cut clean squares of fudge?
What technique ensures professional-looking fudge squares?
First, ensure the fudge is fully chilled and firm. Use a large, sharp chef’s knife. Run the knife under hot water, wipe it dry, and make a clean cut. Wipe the knife clean again between every cut. This hot knife technique minimizes sticking and drag, giving you perfectly crisp edges every time you slice the peppermint treat.
The Unexpected History of Holiday Fudge Disasters
Every December, I try to be the domestic goddess of holiday treats. Usually, this involves flour explosions, caramel burns, and weeping over failed divinity. But then I discovered the secret weapon:Peppermint Swirl Fudge. This recipe is so ridiculously easy, you’ll feel like you’re cheating. It requires zero candy thermometers and zero panic attacks, which is frankly the greatest Christmas miracle of all. Forget spending four hours stirring sugar; we are talking 15 minutes of active time before chilling. This minty chocolate treat delivers maximum festive impact with minimum kitchen drama. It’s creamy, rich, and features that beautiful, vibrant red swirl that screams “I tried way harder than I actually did.”
Gathering Your Arsenal: Ingredients for Peppermint Swirl Fudge
The beauty of this recipe lies in its simplicity. You probably have most of these items hiding in your pantry right now. Remember, quality ingredients make a noticeable difference in the final creamy texture of this delightful candy.
- 1 (14 ounce) can sweetened condensed milk
- 3 cups high-quality white chocolate chips (or chopped white chocolate baking bars)
- 1 teaspoon pure vanilla extract
- 1/2 teaspoon pure peppermint extract (adjust to taste)
- 1/2 cup finely crushed candy canes (plus extra for topping)
- Red food coloring (gel preferred for intensity)
- Pinch of salt
The Fifteen-Minute Path to Fudge Glory
Time to transform these simple ingredients into luxuriousPeppermint Swirl Fudge. Line an 8×8 inch square pan with parchment paper, leaving an overhang on two sides for easy removal. This is crucial unless you enjoy chiseling hardened fudge out of a pan (I don’t recommend it).
Melting and Mixing the Base
Combine the condensed milk and the white chocolate chips in a heavy-bottomed saucepan over low heat. Stir continuously until the chocolate is completely smooth and melted. You must avoid high heat here; scorching white chocolate is a fast track to disappointment. Once smooth, remove the mixture from the heat and stir in the vanilla extract, peppermint extract, and a small pinch of salt. Now, you have the glorious white chocolate fudge base ready to go.
The Swirl Technique: Mastering the Peppermint Chocolate Swirl
Divide the fudge mixture roughly in half, placing one half into a separate bowl. In the first bowl (about half the mixture), stir in the crushed candy canes. This is your foundation layer. Pour the candy cane mixture into the prepared pan and spread it evenly. Next, add about 1/4 teaspoon of red gel food coloring to the remaining half of the fudge mixture. Stir until you achieve a vibrant, streak-free red color. Dollop the red fudge mixture randomly over the white layer. Using a butter knife or skewer, gently drag through the layers to create a beautiful, mesmerizing swirl effect. Don’t overmix, or you will lose the distinct color separation.
Setting and Finishing Touches
Press extra crushed candy canes onto the surface of the fudge while it is still soft. This ensures they stick firmly once the fudge sets. Place the pan in the refrigerator for at least three to four hours, or until the fudge is completely firm. Once set, lift the fudge out of the pan using the parchment paper overhang. Cut it into small, manageable squares. Store this delightful candy in an airtight container at room temperature or in the refrigerator for up to two weeks. Enjoy sharing your homemadePeppermint Swirl Fudge—or, let’s be honest, hiding it for yourself.
Conclusion for Peppermint Swirl Fudge
This easy, no-fail recipe for creamy, delicious fudge proves you don’t need a culinary degree to create stunning holiday sweets. By combining simple ingredients and utilizing the quick melting method, you bypass all the pitfalls of traditional candy making. The mesmerizing red swirl and cool, refreshing mint flavor make this a beautiful and popular addition to any dessert platter or gifting box. Mastering thePeppermint Swirl Fudgemeans less time stressing in the kitchen and more time enjoying the festive season. Go ahead, make a batch (or three), and watch how quickly this creamy holiday candy disappears!
Print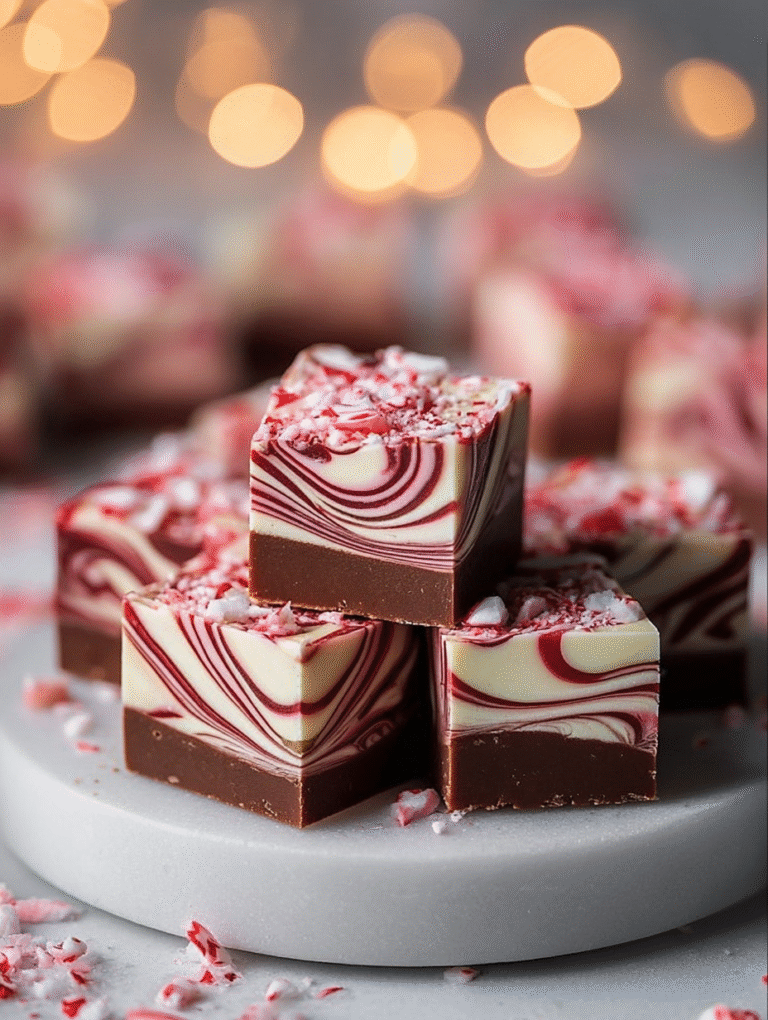
Peppermint Swirl Fudge
Achieve velvety Peppermint Swirl Fudge! Melted white chocolate meets cool peppermint and a vibrant red swirl. Simple low-heat stovetop method. Full instructions & nutrition included.
- Total Time: 35 minutes
- Yield: 4 servings 1x
Ingredients
- 3 cups (18 oz) white chocolate chips
- 1 (14-ounce) can sweetened condensed milk
- 2 tablespoons unsalted butter
- 1 teaspoon peppermint extract
- 1/2 teaspoon red gel food coloring
- 1/2 cup finely crushed peppermint candies (candy canes)
- 1/4 teaspoon salt
Instructions
- Step 1: Line an 8×8 inch baking pan with parchment paper, allowing the paper to overhang the sides for easy removal later. Lightly grease the parchment paper.
- Step 2: In a medium saucepan set over low heat, combine the white chocolate chips, sweetened condensed milk, butter, and salt. Stir continuously until the mixture is completely melted and smooth, then remove the saucepan from the heat.
- Step 3: Stir the peppermint extract into the melted fudge mixture. Immediately divide the mixture evenly into two separate heatproof bowls.
- Step 4: Add the red gel food coloring to one of the bowls and stir thoroughly until the color is vibrant and uniformly distributed throughout the fudge.
- Step 5: Spoon alternating dollops of the white fudge and the red fudge into the prepared pan. Use a knife or skewer to gently create a swirl pattern by dragging the tip through the colors 2-3 times, being careful not to overmix.
- Step 6: Immediately sprinkle the reserved crushed peppermint candies evenly over the top of the fudge. Refrigerate for at least 3 hours, or until the fudge is completely firm, before lifting it out of the pan and cutting into 1-inch squares.
Notes
- For optimal freshness and that classic melt-in-your-mouth texture, store the cut fudge pieces in an airtight container in the refrigerator for up to two weeks.
- Since reheating will melt your beautiful swirl, allow the cut fudge squares to sit at room temperature for 15 minutes before serving if they have been refrigerated, which ensures a perfectly soft, non-waxy bite.
- These festive squares make a wonderful edible gift; stack them in small cellophane bags tied with ribbon, or serve them chilled alongside an espresso or a steaming mug of dark hot chocolate.
- The key to a beautiful swirl is speed; work quickly when dividing and coloring the fudge, and use the knife gently, as overmixing the two colors will quickly turn the batch a dull pink instead of a vibrant pattern.
- Prep Time: 15 minutes
- Cook Time: 20 minutes
- Method: Stovetop
- Cuisine: American
FAQs
How do I prevent my Peppermint Swirl Fudge from becoming grainy?
Grainy fudge usually results from two issues: overheating the chocolate or mixing too vigorously while it’s setting. When melting the white chocolate and condensed milk, use the lowest possible heat setting and stir gently but constantly until just smooth. Once you add the extracts, stop heating immediately. Ensure your crushed candy canes are very fine, avoiding large, sharp chunks of sugar that might impede the smooth texture. Following these steps guarantees a velvety smoothPeppermint Swirl Fudgethat melts beautifully in your mouth, avoiding that unwanted crystalline mouthfeel.
Can I substitute the white chocolate in this recipe?
Yes, you certainly can adjust the chocolate base, although the white chocolate best showcases the vibrant red swirl and peppermint flavor. If you prefer a darker chocolate base, substitute the white chocolate chips with semi-sweet or dark chocolate chips. Be aware that using dark chocolate will mute the visual effect of the red swirl significantly. However, a dark chocolate and peppermint combination still creates a deliciously rich holiday candy. Maintain the same ratios of sweetened condensed milk regardless of your chocolate preference to ensure proper setting consistency for this easy fudge.
What is the best way to store homemade Peppermint Swirl Fudge?
Proper storage is essential to maintain the creamy texture and freshness of your holiday treats. Once the fudge is completely set and cut into squares, store it in an airtight container. If you plan to consume it within a week, room temperature is fine, provided your kitchen isn’t excessively warm. For longer storage, up to two weeks, keep the container in the refrigerator. If storing for more than two weeks, wrap the pieces tightly and freeze them for up to three months. Thaw frozen fudge overnight in the refrigerator before serving for optimal texture.
Why did my Peppermint Swirl Fudge not set properly?
If your fudge remains sticky and soft after four hours in the refrigerator, the usual culprit is the ratio of ingredients or the quality of the condensed milk. Always usesweetened condensed milk, not evaporated milk, as they are not interchangeable. Additionally, ensure you measure the chocolate chips accurately; too little chocolate prevents the mixture from firming up. If you live in a very humid climate, sometimes slightly reducing the condensed milk or adding an extra half cup of chocolate can help guarantee a firm set for yourPeppermint Swirl Fudgecreation.


Leave a Comment