
Remember the frantic joy of tearing open that foil packet, greeted by the sweet, almost criminal aroma of processed fruit and artificial frosting? It was the taste of childhood freedom. We are leveling up that magnificent, messy nostalgia by transforming it into something even better: scratch-madePop Tart Sugar Cookies.
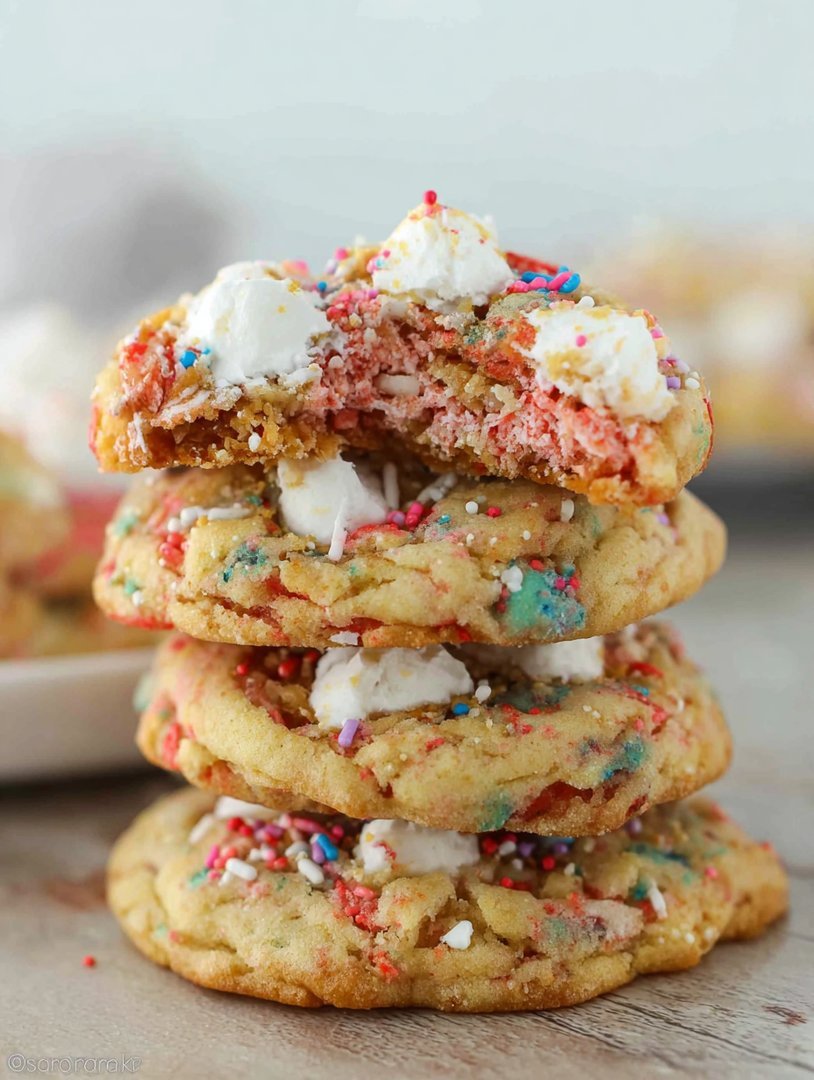
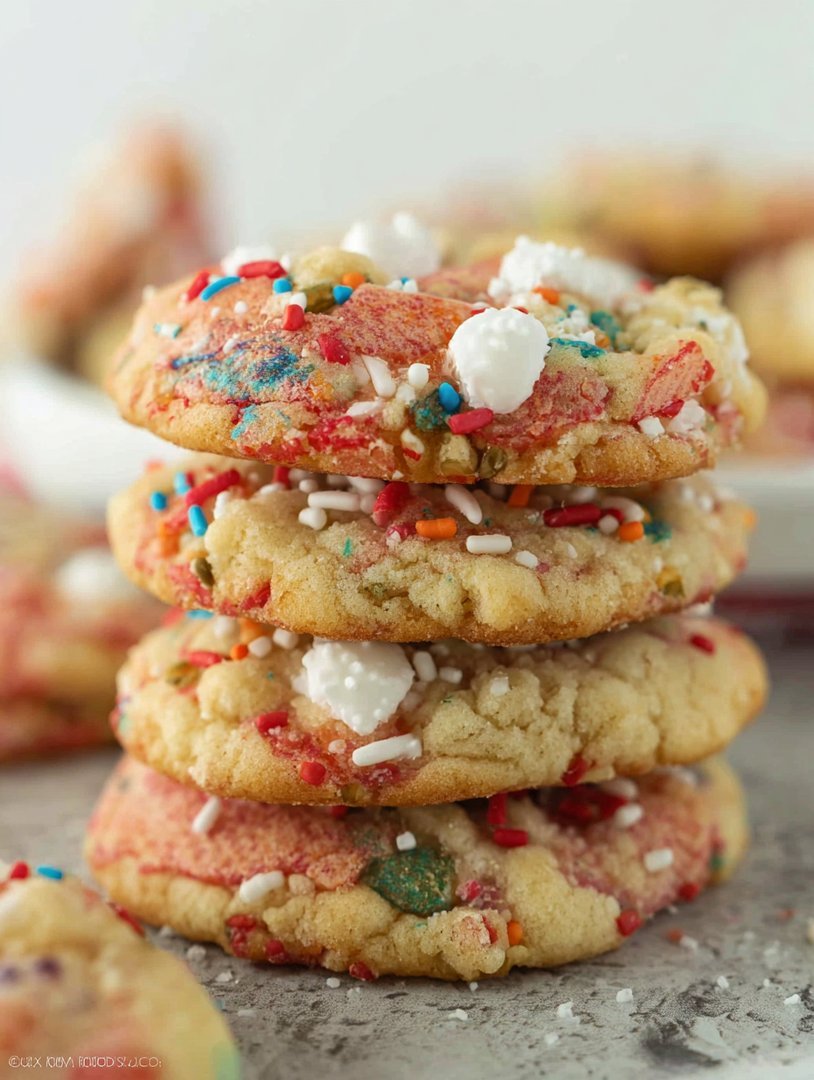
These aren’t your grandma’s delicate cutout cookies; they are buttery, thick, jam-filled squares of pure delight, complete with that signature glossy glaze and a generous scattering of colorful sprinkles.
- Ease of PreparationThis recipe simplifies the classic sugar cookie dough, making assembly quick and enjoyable even for novice bakers looking for a fun project.
- Flavor ProfileEnjoy layers of buttery vanilla cookie crust hugging a sweet fruit jam filling, perfectly mimicking that beloved iconic toaster treat flavor.
- Visual AppealAchieve vibrant, glossy frosting topped with colorful sprinkles, ensuring these charming, brightly colored cookies become showstoppers at any gathering.
- VersatilityEasily customize the flavors by switching out the fruit jam for different preserves, lemon curd, or even thick chocolate spread for endless delicious variations.
The Quest for the Ultimate Nostalgia Cookie
My relationship with the original toaster pastry was complicated. I loved the sugary rush, but always felt slightly guilty about the synthetic cherry hue. As a professional baker, I had a mission: capture that unmistakable flavor profile and comforting texture while using ingredients that actually taste like real food. I wanted a cookie that tasted like my memory of a Pop Tart—but better, richer, and decidedly homemade.
The secret lies in the butter-to-sugar ratio in the dough. You need a sturdy dough that can hold the jam without collapsing into a fruity, sticky mess, but it must still be tender enough to melt in your mouth. We are using a high-quality vanilla powder to drive home that classic sweet base layer, ensuring the cookie stands up proudly against the vibrant filling. It’s a delicate balance, much like trying to convince yourself that eating two of these counts as a balanced breakfast—it doesn’t, but we’re doing it anyway. This recipe requires patience only during the chilling stage; otherwise, it’s a whirlwind of fun cutting, filling, and, eventually, tasting. Forget the toaster; these squares of sugary joy go straight into your heart.
Ingredients for Pop Tart Sugar Cookies
Here’s what you’ll need to make this delicious dish:
- All-Purpose FlourUse bleached or unbleached flour, ensuring it is spooned and leveled for accurate measurement, which prevents dense cookies.
- Unsalted ButterMust be softened to room temperature so it creams properly with the sugar, creating a light and airy dough structure.
- Granulated SugarProvides sweetness and helps tenderize the dough during the creaming process.
- EggActs as a binder and adds richness; use a large egg at room temperature for better emulsion.
- Vanilla PowderUse pure vanilla powder, not imitation, to achieve the richest, most authentic cookie flavor base.
- SaltA crucial flavor balancer that prevents the cookies from tasting overly sweet and enhances the overall complexity.
- Fruit Jam or PreserveChoose a thick jam (strawberry, raspberry, or blueberry work best) that won’t run too much during baking; avoid runny sauces.
- Powdered SugarUsed exclusively for the glaze; ensure it is sifted to prevent clumps and guarantee a smooth, professional finish.
- Milk or Lemon JuiceAdded to the powdered sugar to create the perfect pourable consistency for the final glossy glaze.
- SprinklesUse brightly colored decorative sprinkles (nonpareils or jimmies) to give the finishedPop Tart Sugar Cookiestheir iconic appearance.
The full ingredients list, including measurements, is provided in the recipe card directly below.
Crafting and Baking Your Sweet Masterpieces
Follow these simple steps to prepare this delicious dish:
Preparing the Dough
Step 1: Cream the BasePreheat your oven to 350°F (175°C) and line two large baking sheets with parchment paper or silicone mats. In a large bowl or stand mixer, beat the softened butter and granulated sugar together on medium-high speed until the mixture is light, fluffy, and noticeably pale, which usually takes about three to five minutes. This step incorporates air, making your cookies tender.
Step 2: Wet and Dry IngredientsBeat in the egg and vanilla powder until they are just combined, scraping down the sides of the bowl as needed. In a separate bowl, whisk together the flour and salt. Gradually add the dry ingredients to the wet ingredients, mixing on low speed until the dough just comes together into a cohesive mass. Avoid overmixing the dough, as this develops gluten and can lead to tough cookies.
Step 3: Rolling and ChillingDivide the dough in half. Roll each half out between two pieces of parchment paper to about 1/8 to 1/4 inch thickness. Place the flattened dough sheets onto a baking tray and chill them in the refrigerator for at least 30 minutes. Chilling is absolutely crucial because it solidifies the fat, preventing the cookies from spreading during baking.
Assembly and Sealing
Step 4: Cutting the ShapesRemove the dough from the refrigerator and use a knife or a rectangular cookie cutter (about 3×4 inches) to cut out even rectangles. You need an equal number of bottom pieces and top pieces for assembly. Gather any scraps, briefly re-roll them, chill again, and cut more rectangles.
Step 5: Filling and SealingPlace the bottom rectangles onto the prepared baking sheets. Spoon about one teaspoon of your chosen fruit jam into the center of each bottom piece, leaving a generous half-inch border around the edge to ensure a clean seal. Place a top rectangle over the jam, gently pressing down the edges. Use the tines of a fork to firmly crimp all four edges, sealing the jam inside and creating the characteristic pastry rim.
Baking and the Final Glaze
Step 6: Baking the TartsBake the assembled cookies for 10 to 14 minutes. The exact time depends on your oven and cookie thickness, but they should be lightly golden around the edges but still pale in the center. Allow the cookies to cool completely on the baking sheet before attempting to transfer them; attempting to move them while warm can cause breakage and jam leakage.
Step 7: The Signature GlazeWhile the cookies cool, prepare the glaze by whisking together the sifted powdered sugar and the milk or lemon juice until it reaches a thick, pourable consistency. If it’s too thick, add a drop more liquid; if too thin, add a tablespoon more powdered sugar. Dip the cooled cookies into the glaze or use a small offset spatula to spread a thin layer over the top. Immediately sprinkle with colorful decorations before the glaze sets.
Mastering the Glaze and Troubleshooting Tips
Achieving that perfectly opaque, quick-setting glaze is the key to elevating these treats from simple sugar cookies to truePop Tart Sugar Cookiesreplicas. The consistency needs to be thick enough to hold its color and shape without running off the cookie entirely, but thin enough to spread easily. If you are using milk, you will likely need less liquid than you think; start with just one tablespoon of milk for every cup of powdered sugar and build up slowly. If you opt for lemon juice, the slight acidity gives the glaze a lovely sheen and cuts through the intense sweetness beautifully.
Preventing the Jam Runaway
The most common issue when filling these cookies is jam leakage, leading to a burnt, sticky mess on your baking sheet. To combat this culinary tragedy, ensure your jam is exceptionally thick. If your jam seems slightly runny, you can microwave it briefly and then stir in a tiny pinch of agar-agar or a half teaspoon of cornstarch before cooling it completely. This will thicken the filling considerably and prevent it from bubbling out of the seams. Most importantly, when crimping the edges with the fork, apply firm, consistent pressure to ensure the top and bottom layers of dough are completely fused together.
Getting Those Perfect Shapes
For bakery-quality results, precise cutting is essential. While you can certainly freehand the rectangles with a ruler and a knife, investing in a large, simple rectangular cookie cutter makes the process much faster and ensures every cookie is uniform. This uniformity aids in even baking and makes the assembly line process much smoother. Remember to flour your work surface lightly if the chilled dough starts to feel sticky upon cutting, but use flour sparingly to maintain the dough’s tender crumb structure.
These homemade sugar cookie tarts are best stored in an airtight container at room temperature for up to five days. However, be warned: they rarely last longer than 48 hours in a house full of people who appreciate a good dose of sugary nostalgia. Serve them alongside a tall glass of cold milk or a robust cup of coffee for the ultimate afternoon treat.
The year was 2020. Cabin fever had set in, and my culinary ambitions had spiraled into what I can only describe as mad-scientist baking. We had run out of decent breakfast pastries, and the local grocery store was mysteriously out of the specific frosted rectangles of my youth. Staring into the pantry, I saw the two warring factions: the precise, pristine ingredients for cut-out sugar cookies, and a jar of gloriously gooey strawberry jam. That’s when the lightning bolt struck. Why should I choose? Why couldn’t the structure of a perfect sugar cookie hold the sugary, fruit-filled heart of a toaster pastry?
The resulting creation transcended mere dessert; it was nostalgia delivered via a buttery, frosted vehicle. It was a cookie that demanded respect, yet begged to be dunked in milk. It was the birth of thePop Tart Sugar Cookies—a magnificent hybrid that brings joy, chaos, and a dusting of sprinkles to any kitchen. If you ever doubted the power of combining two iconic sweet treats, prepare to have your mind, and your taste buds, delightfully changed. These are the cookies that remind you that the best recipes often emerge from desperation and excessive sugar consumption.
Forget everything you know about traditional holiday baking. We are entering the realm of maximalist confectionery here, where thick, tender sugar cookie dough acts as the perfect structural support for a vibrant, fruity filling. It’s a project, yes, but one that pays dividends in sheer, unadulterated happiness. Get ready to roll, fill, crimp, and frost your way to sugary success, proving once and for all that sometimes, two desserts are better than one.
The Ingredients: Building Your Edible Time Machine
For the Sugar Cookie Dough
- 3 cups all-purpose flour, plus extra for dusting
- 1 teaspoon baking powder
- 1/2 teaspoon salt
- 1 cup (2 sticks) unsalted butter, softened to room temperature
- 1 1/2 cups granulated sugar
- 2 large eggs
- 2 teaspoons vanilla powder
For the Fruity Filling
- 1 cup high-quality strawberry or raspberry fruit preserves (ensure it’s thick)
- 1 tablespoon cornstarch
- 1 teaspoon lemon juice (freshly squeezed is best)
For the Glaze and Decoration
- 2 cups powdered sugar, sifted
- 3 tablespoons milk (dairy or plant-based)
- 1 teaspoon vanilla powder
- 1/4 teaspoon alcohol-free almond extract (optional, but delightful)
- Assorted colored sprinkles or sanding sugar
Crafting the Perfect Pop Tart Sugar Cookies: Step-by-Step
The magic starts with patience, specifically the patience required to let the dough chill properly. Rushing this step results in cookies that spread into unrecognizable blobs of sweetness, defeating the whole structural purpose of this recipe.
Step 1: The Dough Foundation
In a medium bowl, whisk together the flour, baking powder, and salt. Set this aside. In a large bowl or stand mixer fitted with the paddle attachment, cream the softened butter and granulated sugar until the mixture is light and fluffy—this usually takes about 3 to 4 minutes. Add the eggs one at a time, mixing well after each addition. Stir in the vanilla powder. Gradually add the dry ingredients to the wet mixture, mixing on low speed until just combined. Be careful not to overmix; over-developed gluten is the enemy of a tender cookie.
Divide the dough in half, flatten each half into a thick disk, wrap them tightly in plastic wrap, and refrigerate for at least 1 hour, or up to 2 days. This chilling process is non-negotiable for achieving perfect cut-out shapes.
Step 2: Preparing the Filling
While the dough chills, prepare the filling. In a small saucepan, combine the fruit preserves, cornstarch, and lemon juice. Heat this mixture over medium heat, stirring constantly, until it thickens significantly, usually 3 to 5 minutes. The cornstarch activates the thickening agents, ensuring the jam doesn’t ooze out disastrously during baking. Remove it from the heat and allow the filling to cool completely before using. A warm filling will melt the dough immediately.
Step 3: Rolling, Cutting, and Filling
Preheat your oven to 350°F (175°C) and line two large baking sheets with parchment paper. Lightly flour a clean surface. Roll out one disk of chilled dough to about 1/4 inch thickness. Using a rectangular cookie cutter or a sharp knife, cut out an even number of rectangles—these will be the tops and bottoms of your cookies. A standard size is about 3 x 4 inches.
Place half of the rectangles (the bases) onto the prepared baking sheets. Scoop a generous teaspoon of the cooled fruit filling onto the center of each cookie base, leaving a clear border of about 1/2 inch around the edges. Top each base with a second cookie rectangle (the lid). Use the tines of a fork to firmly crimp and seal the edges all the way around, mimicking the iconic look of the classic pastry. Before baking, use a toothpick or small skewer to poke three or four ventilation holes into the top of each cookie—this releases steam and prevents bubbling.
Step 4: Baking and Glazing
Bake the Pop Tart Sugar Cookies for 10 to 12 minutes, or until the edges are lightly golden and the centers look set. They should not brown significantly. Let them cool on the baking sheet for 5 minutes before transferring them gently to a wire rack to cool completely. They must be entirely cool before glazing, otherwise the glaze will run right off.
To make the glaze, whisk together the sifted powdered sugar, milk, vanilla powder, and alcohol-free almond extract (if using) in a small bowl until smooth and thick. If it seems too thin, add more powdered sugar; if it’s too thick, add a tiny splash more milk. Drizzle the glaze generously over the cooled cookies, ensuring full coverage. Immediately decorate with your favorite sprinkles before the glaze sets. Allow the glaze to harden completely before serving, which usually takes about 30 minutes.
The Accidental Discovery of Sunshine on a Plate
My first attempt at combining the sturdy cut-out cookie with jam was fueled purely by carbohydrate desperation during a lengthy power outage. When those first, perfectly sealedPop Tart Sugar Cookiesemerged, glistening with makeshift glaze, they felt less like a snack and more like a victory over domestic monotony. The unexpected joy was immense.
Perfecting the Cooking Process
For peak efficiency, mix the dough and prepare the filling first so they can chill simultaneously; cold dough and cold filling are key to structural success. While the first batch of cookies bakes, roll out and assemble the second batch to maximize your kitchen time and avoid any unnecessary downtime. This streamlined process ensures perfect edges.
Add Your Touch
Embrace the chaos! Swap traditional strawberry preserves for tangy lemon curd or a rich chocolate-hazelnut spread, ensuring the filling is thick enough to hold its shape. Instead of standard white glaze, try adding a touch of food coloring or flavoring extracts like coconut or banana to elevate the experience of these Pop Tart Sugar Cookies.
Storing & Reheating
Store your finishedPop Tart Sugar Cookiesin an airtight container at room temperature for up to five days. While they are designed to be eaten at room temperature, you can gently reheat them in a toaster oven for a minute to warm the filling slightly, reviving that fresh-baked tenderness effectively.
Expert Tips for Cookie Perfection
-
Always use cold butter when rolling the dough, even if you softened it initially. If the dough warms up, return it to the fridge for 15 minutes before cutting shapes.
-
Crimp the edges tightly, using a generous amount of pressure with the fork tines. This prevents the jam from escaping and turning your baking sheet into a caramelized sticky mess.
-
For ultra-crisp edges, substitute half a teaspoon of baking soda for the baking powder; this change yields a slightly flatter and crispier exterior, enhancing the texture.
I once took a massive batch of these colorful pastries to a neighborhood potluck, and a normally reserved elderly gentleman actually exclaimed, “It’s like my childhood had a gourmet glow-up!” That single comment solidified the Pop Tart Sugar Cookies’ permanent spot in my recipe rotation.
Conclusion for Pop Tart Sugar Cookies
These magnificentPop Tart Sugar Cookiesare more than just a baked good; they are a celebration of combining classic comfort with creative ingenuity. We’ve covered everything from ensuring your dough is perfectly chilled to mastering the art of the crimped edge, guaranteeing a successful and flavorful baking experience. Remember that the secret to their success lies in careful preparation—specifically the cold dough and the thickened, cooled filling—which prevents structural collapse during baking. Don’t be afraid to experiment with different fillings and glazes to make this recipe uniquely yours. Whether you are seeking peak nostalgic flavor or just a truly phenomenal, shareable dessert, these cookies deliver a thick, buttery base and a delightful burst of fruity sweetness every single time.
Print
Pop Tart Sugar Cookies
These buttery, vanilla-rich Pop Tart Sugar Cookies are nostalgia squared! Cream butter and chill, then slice into crisp, perfect rectangles.
- Total Time: 35 minutes
- Yield: 4 servings
Ingredients
- All-purpose flour: 2 3/4 cups
- Unsalted butter (softened): 1 cup
- Granulated sugar: 3/4 cup
- Large egg: 1
- vanilla powder: 1 teaspoon
- Strawberry or Raspberry jam: 1/2 cup
- Confectioners' sugar (for icing): 1 1/2 cups
- Milk or heavy cream (for icing): 2-3 tablespoons
Instructions
- Step 1: In a large bowl, cream together the softened butter and granulated sugar until light and fluffy. Beat in the egg and alcohol-free vanilla extract. Gradually incorporate the flour until a cohesive dough forms. Wrap the dough tightly and chill in the refrigerator for at least 30 minutes.
- Step 2: Preheat oven to 350°F (175°C). Divide the dough in half and roll out one half on a lightly floured surface to about 1/4 inch thickness. Use a knife or pizza cutter to cut the dough into equal rectangles (approximately 2×3 inches). Repeat with the remaining dough.
- Step 3: Place all the rectangles on a parchment-lined baking sheet. Bake for 8 to 10 minutes, or until the edges are just barely golden. Remove from the oven and allow the cookies to cool completely on the baking sheet.
- Step 4: Once cooled, assemble the "Pop Tarts." Spread approximately 1 teaspoon of jam onto the center of half the cookie rectangles, leaving a clean border. Place a second cookie rectangle on top and lightly crimp the edges together using the tines of a fork to seal the filling inside.
- Step 5: Prepare the icing by whisking the confectioners' sugar with 2-3 tablespoons of milk until smooth and thick. Spread or drizzle the icing generously over the assembled cookies. Allow the icing to set completely before serving (optional: add colorful sprinkles immediately after icing).
Notes
- Store fully cooled, iced, and set cookies in an airtight container at room temperature for up to 3 days, separating the layers with parchment paper to protect the delicate frosting.
- If you enjoy a warm center like a classic toaster pastry, microwave an assembled cookie for just 5 to 8 seconds, being careful not to overheat, as the icing may begin to melt quickly.
- Serve these fun treats with a cold glass of milk, or elevate the presentation by dusting the platter with a light shower of extra freeze-dried berry powder matching your chosen jam flavor.
- To ensure your jam filling stays perfectly sealed, lightly brush the inner border of the bottom cookie with a touch of milk before placing the top rectangle on and crimping the edges with a fork.
- Prep Time: 15 minutes
- Cook Time: 20 minutes
- Method: Stovetop
- Cuisine: American


Leave a Comment