
Remember that summer evening meltdown when only something intensely cold and tart could save the day? That’s when I perfected the ultimate cool-down mission: this incredible, dreamy,Raspberry Chocolate Chunk Ice Cream.
Imagine the sharp zing of fresh raspberries colliding with deep, satisfying pockets of dark chocolate. It’s a flavor profile that doesn’t just refresh you—it makes you momentarily forget you own an alarm clock.
- Requires minimal fuss and no complicated custard base, making it the ideal frozen treat for novice ice cream enthusiasts looking for maximum flavor reward.
- Balances the intense tartness of fresh raspberries with rich, dark, bittersweet chocolate chunks for a genuinely sophisticated yet deeply comforting indulgence.
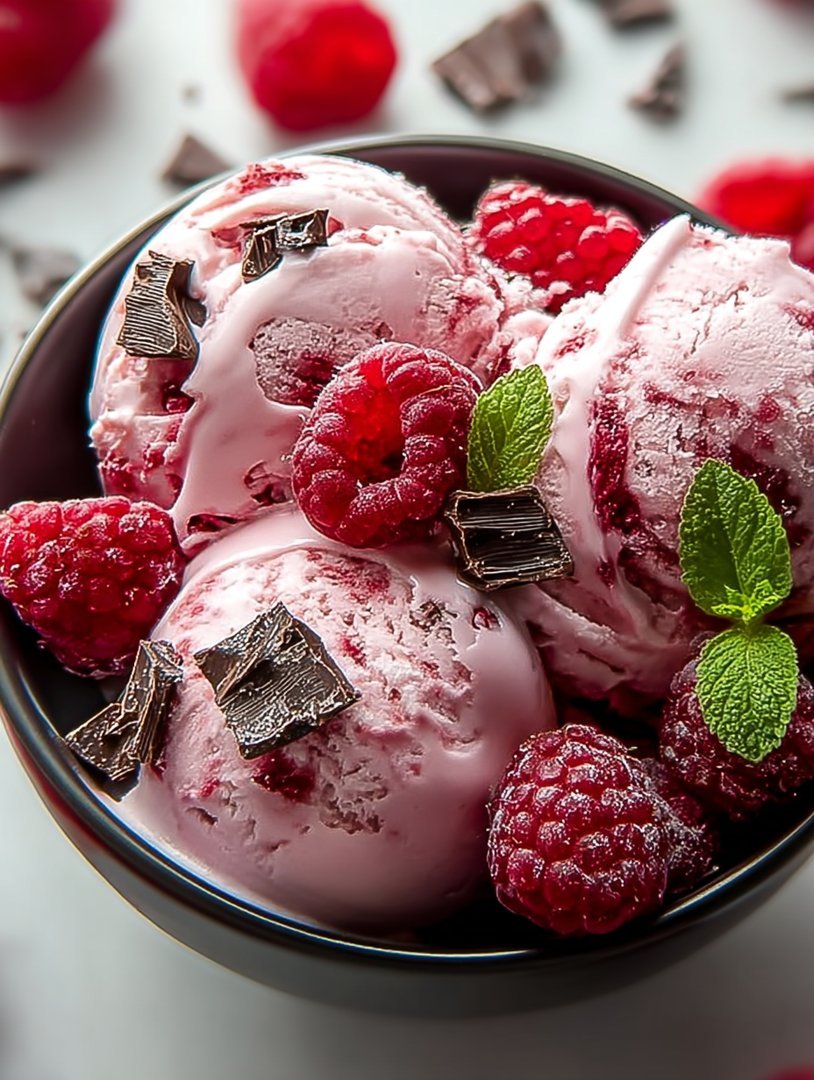
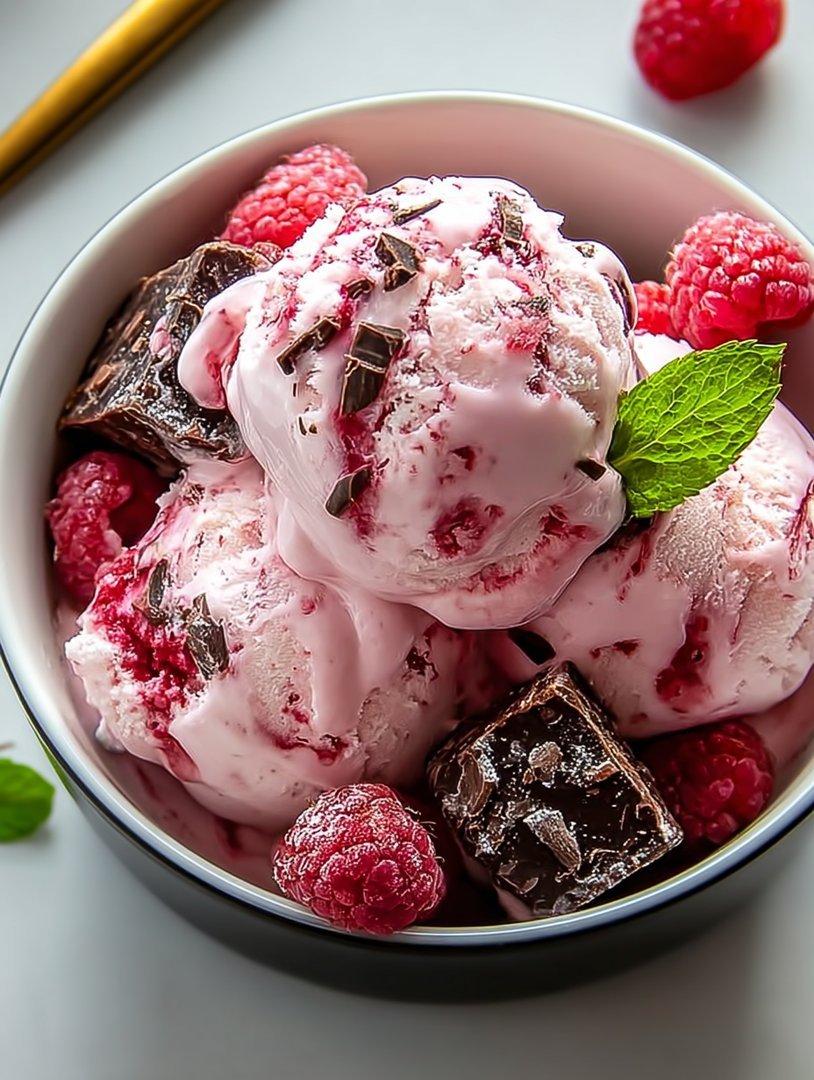
- The vibrant pink swirl of the raspberry base, speckled generously with large pieces of dark chocolate, creates a stunning, Instagram-ready dessert.
- This delightful treat is delicious served alone or works perfectly as a decadent accompaniment to warm brownies, buttery waffle cones, or a simple stack of pancakes.
The Culinary Saga of the World’s Best Frozen Dessert
My journey to perfecting the ultimate Raspberry Chocolate Chunk Ice Cream was less a meticulous scientific endeavor and more a chaotic series of near-miss disasters. It all started when I realized the difference between store-bought “chocolate chips” and truly glorious “chocolate chunks” is approximately the distance between a lukewarm glass of water and a polar vortex of flavor. I initially tried making a plain vanilla base, only to realize vanilla is frankly boring when compared to the dramatic flair raspberries bring to the table.
The first attempt resulted in a pale pink, slightly granular catastrophe. It tasted vaguely of disappointment and frozen milk. My second attempt involved overcooking the raspberry puree, resulting in a flavor profile akin to very tart cough syrup. It was only on the third try, after accidentally dropping an entire bowl of freshly chopped dark chocolate into the perfectly chilled raspberry base, that I understood the magic. The contrast wasn’t just complementary; it was essential. The bitterness of the dark chocolate cuts through the sharp sweetness of the berry, creating a harmonious symphony that feels utterly necessary on a hot day. This recipe is the culmination of those accidental victories and stubborn refusal to accept anything less than perfection.
We are aiming for that velvety, scoopable texture—not the rock-solid block of ice cream that requires a mining pick to extract. The secret, as you will soon discover, lies in two things: quality ingredients and patience. Seriously, treat the chilling phase like a mandatory nap; it’s vital for smooth operation later. If you rush it, the ice cream gods will judge you, and your dessert will suffer the consequences of large, unwelcome ice crystals. Trust me when I say this Raspberry Chocolate Chunk Ice Cream is worth the wait.
Why Raspberries and Chocolate are the Ultimate Power Couple
There is a genuine, undeniable brilliance in pairing intensely tart fruit with deep, sometimes bitter chocolate. Think about it: raspberries possess a natural sharpness, a vibrant acidity that wakes up the palate. Most ice cream recipes rely heavily on sugar and fat, which can sometimes result in a flavor that is pleasant but ultimately flat. By incorporating a concentrated raspberry puree, we introduce a crucial acidic component that balances the richness of the cream and the sweetness of the sugar.
When you bite into one of those glorious chocolate chunks, you experience the concentrated, earthy, slightly roasted notes of cocoa. This robust flavor stands up beautifully against the bright, slightly floral undertones of the berries. The small pockets of pure, semi-frozen chocolate create textural contrast, shattering delightfully when you bite them, contrasting with the smooth, creamy berry base. It’s a dynamic duo that proves opposites truly attract, making this frozen dessert exponentially more complex and satisfying than single-note flavors.
Choosing Your Chunks: Mastering the Chocolate Element
The term “chocolate chunk” is not interchangeable with “chocolate chip.” Chips often contain stabilizers designed to hold their shape during baking, which means they are less likely to break apart delightfully when frozen. For this amazing Raspberry Chocolate Chunk Ice Cream, you need high-quality dark chocolate bars, ideally around 60% to 75% cocoa solids, and you need to chop them yourself. Don’t be shy; aim for irregular pieces ranging from small flecks to substantial shards the size of a thumbnail.
The preparation method here is critical. We aren’t melting the chocolate into the base; we are folding it in right at the end of the churning process. To prevent the chocolate from seizing or shattering into dust upon contact with the cold base, ensure your chocolate is slightly chilled beforehand, but not frozen. This preparation ensures that the chunks remain distinct, providing those satisfying explosions of intense chocolate flavor against the backdrop of the tart berry cream.
Temperature Tactics: Why Chilling is Non-Negotiable
If you’re making ice cream, you must adhere to the sacred law of the chill. Any reputable recipe will stress the importance of chilling the base mixture thoroughly before it ever meets the churning machine. This is not a suggestion; it is mandatory science. Why? The colder the base is before churning, the smaller the ice crystals will be when the mixture freezes. Small crystals equal smooth, velvety texture; large crystals equal icy, gritty texture.
Once you mix all your liquid ingredients—cream, milk, sugar, and the raspberry puree—the temperature of the mixture will typically be room temperature or slightly warmer. You need to chill this completely, ideally for a minimum of four hours, but preferably overnight in the refrigerator. Use an airtight container to prevent any stray odors from infiltrating your base. This long, slow chill allows the ingredients to fully hydrate, the sugar to dissolve completely, and the fats to properly firm up, ensuring maximum emulsification when the mixture hits the churner, resulting in the creamiest homemade Raspberry Chocolate Chunk Ice Cream you have ever tasted.
Ingredients for Raspberry Chocolate Chunk Ice Cream
Here’s what you’ll need to make this delicious dish:
- Heavy CreamProvides the necessary fat content for a rich, creamy mouthfeel; use a product with at least 35% milk fat for the best results.
- Whole MilkBalances the thickness of the heavy cream, contributing to the liquid volume and ensuring a smoother texture when churned.
- Granulated SugarSweetens the base and, crucially, lowers the freezing point of the mixture, preventing the ice cream from freezing solid.
- Fresh RaspberriesThese are the star flavor; ensure they are ripe and sweet, as the quality directly impacts the final puree flavor.
- Dark Chocolate Bar (60-75% Cocoa)Essential for the “chunks”; choose a high-quality bar and chop it into irregular, satisfying pieces.
- Fresh Lemon JuiceA tiny splash brightens the flavor of the raspberries, preventing them from tasting dull once they are frozen.
- Pinch of SaltA small but important addition that helps to amplify and balance all the sweet and tart flavors in the base.
The full ingredients list, including measurements, is provided in the recipe card directly below.
How to Make Raspberry Chocolate Chunk Ice Cream
Follow these simple steps to prepare this delicious dish:
-
Step 1: Prepare the Raspberry Puree
In a medium saucepan, combine the fresh raspberries, half of the granulated sugar, and the lemon juice. Heat this mixture over medium heat, stirring occasionally, until the raspberries break down completely and the sugar dissolves, about 8 to 10 minutes. Remove the mixture from the heat and pass it through a fine-mesh sieve or strainer, pressing firmly on the solids to extract all the liquid. Discard the seeds and let the puree cool completely.
-
Step 2: Create the Ice Cream Base
In a large bowl, whisk together the remaining granulated sugar and the pinch of salt with the whole milk until the sugar fully dissolves. Stir in the cold heavy cream and the cooled raspberry puree until the mixture is uniform and a beautiful pink hue. Do not overmix, but ensure all components are thoroughly combined.
-
Step 3: Initiate the Critical Chill
Transfer the entire liquid base into an airtight container and place it immediately in the refrigerator. This step is non-negotiable for achieving a smooth texture. Chill the base for a minimum of 4 hours, though ideally, leave it in the refrigerator overnight (8 to 12 hours) to ensure it reaches the coldest possible temperature.
-
Step 4: Chop the Chocolate Chunks
While the base is chilling, prepare the chocolate. Roughly chop the dark chocolate bar into varying sizes of chunks, ensuring some pieces are substantial. Place the chopped chocolate in a small bowl and return it to the refrigerator for the last hour of chilling time, ensuring it is very cold before mixing.
-
Step 5: Churn the Ice Cream
Pour the thoroughly chilled base mixture into your ice cream maker, following the manufacturer’s specific instructions. Churn for 20 to 30 minutes, or until the mixture thickens to the consistency of soft-serve ice cream. The time required depends significantly on the efficiency of your machine.
-
Step 6: Fold and Harden
During the last 5 minutes of churning, or immediately after removing the mixture from the machine, quickly fold in the chilled chocolate chunks using a spatula. Transfer the soft ice cream into a freezer-safe container. Press a piece of parchment paper directly onto the surface to prevent ice crystal formation, cover tightly, and freeze for at least 4 to 6 hours for proper hardening.
Allow the Raspberry Chocolate Chunk Ice Cream to sit out for 5 to 10 minutes before serving, ensuring easy scooping and maximum enjoyment.
Tips for the Perfect Freeze and Storage
Achieving that perfectly scoopable, yet firm, texture requires a few professional tricks. Firstly, invest in a quality storage container. Deep, narrow containers are generally better than wide, shallow ones because they minimize the surface area exposed to the fluctuations of the freezer temperature, which is the primary cause of ice crystals. The key to maintaining creamy texture lies in preventing temperature abuse.
Secondly, always utilize the parchment paper trick mentioned in the instructions. By placing plastic wrap or parchment paper directly against the surface of the finished ice cream before sealing the container, you create a barrier that stops moisture loss and prevents freezer burn. Store your ice cream at the back of the freezer, which is the coldest and most stable area. If stored correctly, this homemade Raspberry Chocolate Chunk Ice Cream will maintain its optimal flavor and texture for up to two weeks, although it rarely lasts that long in my house.
Troubleshooting Common Ice Cream Mishaps
If your ice cream is coming out rock solid, you might have too little sugar or too much water. Sugar is the ingredient that keeps the mixture from freezing completely solid. Ensure you measure the sugar accurately. If your ice cream is icy or gritty, it usually means the base was not cold enough before churning, or the churning process was too short, allowing larger ice crystals to form. If you notice persistent iciness, you can try adding a small amount of stabilizer like xanthan gum (a quarter teaspoon) dissolved in the milk before chilling next time.
Sometimes the flavor of the raspberries can be muted after freezing. If you find this is the case, try using a little less sugar in the puree stage next time, or adding a touch more lemon juice before chilling the base. Remember, flavors tend to dull when frozen, so the base should taste almost slightly too sweet and slightly too tart before churning.
Frequently Asked Questions About This Chilled Treat
Can I use frozen raspberries instead of fresh ones?
Yes, absolutely. Frozen raspberries work perfectly well for the puree. Measure the frozen berries exactly as you would the fresh ones, and know that you might need to simmer them for a few extra minutes to help them fully break down.
What is the best way to ensure the chocolate chunks stay crunchy and don’t clump?
The secret is rapid incorporation. Ensure both the churned base and the chopped chocolate are extremely cold. Fold the chunks in very quickly right at the end of churning, and then immediately move the ice cream into the freezer to harden. This minimizes the time the chocolate spends at a warmer temperature.
I don’t have an ice cream machine; can I still make this recipe?
You can use the ‘no-churn’ method, though the texture will be slightly denser. Fold the chilled raspberry base into 2 cups of stiffly whipped heavy cream and freeze, stirring the mixture vigorously every 45 minutes for the first 3 hours to break up crystals.
How long does homemade ice cream usually last in the freezer?
For the best quality, homemade ice cream should be consumed within two weeks. After that, while still safe to eat, the texture and freshness will begin to degrade, leading to potential crystallization and flavor loss.
The Quest for the Perfect Summer Scoop
If you have ever settled for a pint of store-bought ice cream that promises “chunks” but delivers dry, sad specks of flavorless misery, you know the true meaning of dessert disappointment. Summer demands better. Your taste buds deserve revolutionary frozen delight, something that balances the refreshing tang of real fruit with the deep, satisfying snap of premium dark chocolate. Forget the freezer aisle trauma; we are making the absolute best homemade frozen treat today.
This recipe forRaspberry Chocolate Chunk Ice Creamis more than just a dessert; it’s a declaration of independence from mediocre frozen dairy. It delivers a rich, velvety base infused with intense raspberry flavor and generously studded with large, irregular shards of decadent chocolate, ensuring that every spoonful is an adventure. We promise you will never go back to those sad, dusty cartons once you taste this perfectly balanced creation.
The Anatomy of Ice Cream Perfection
Creating world-class ice cream involves balancing three critical elements: fat content, air incorporation (overrun), and crystal size. For this recipe, we utilize a high-quality cream base to guarantee velvety texture. We also employ a simple, yet effective method of swirling the thickened raspberry puree throughout the base, which helps minimize ice crystal growth while maximizing flavor distribution. The result? A scoop so smooth it melts lazily on the tongue, followed by the satisfying crunch of solid chocolate.
The beauty of the raspberry component lies in its acidity. It cuts through the richness of the chocolate and cream, preventing the dessert from becoming overly heavy. This tangy counterpoint elevates the whole experience, making this particular flavor profile irresistible even on the hottest days.
The Components: What You Need for Creamy Excellence
Gathering your mise en place before starting the base is crucial. For the most vibrant flavor in yourRaspberry Chocolate Chunk Ice Cream, always use fresh or high-quality frozen raspberries. We recommend using dark chocolate with at least 70% cocoa content for that necessary bitter contrast to the sweet cream and tart fruit.
Ingredients for Homemade Raspberry Chocolate Chunk Ice Cream
- 2 cups heavy cream (cold)
- 1 cup whole milk (cold)
- ¾ cup granulated sugar
- Pinch of fine sea salt
- 1 ½ cups fresh or frozen raspberries
- 2 tablespoons fresh lemon juice
- 1 tablespoon cornstarch (optional, for stabilization)
- 1 teaspoon pure alcohol-free vanilla extract
- 6 ounces dark chocolate, roughly chopped into varied sizes
Preparation: Tools and Timing
The crucial preparation step for any excellent ice cream is ensuring your components are adequately chilled. Your ice cream machine bowl should be frozen solid, ideally having spent at least 24 hours in the deepest part of your freezer. If you neglect this step, you risk a runny mess that never achieves the necessary dense, cold structure.
First, tackle the raspberry puree. Combine the raspberries and lemon juice in a small saucepan over medium heat. Simmer gently for about five minutes until the berries have broken down into a sauce. If you prefer a seedless experience, press the mixture through a fine-mesh sieve, reserving only the smooth puree. Whisk in the optional cornstarch slurry (mixed with a tablespoon of water) if you desire a thicker swirl, then let it cool completely.
Churning Your Destiny: Step-by-Step Instructions
This process is deceptively easy, but demands patience, especially when waiting for the base to fully chill. Resist the urge to rush the cooling phase; temperature control is your greatest ally against icy texture.
Phase 1: Creating and Chilling the Base
In a large bowl, whisk together the heavy cream, whole milk, granulated sugar, and salt until the sugar completely dissolves. Ensure the mixture is silky smooth, without any grit remaining. Stir in the alcohol-free vanilla extract. Cover the bowl tightly and transfer it to the refrigerator. This base must chill for a minimum of 4 hours, though overnight refrigeration yields the best results. A properly chilled base will thicken faster during churning.
Phase 2: The Art of Churning
Once the base is profoundly cold, pour it into your pre-frozen ice cream maker bowl and churn according to the manufacturer’s instructions. This usually takes between 20 to 30 minutes. The mixture will transition from a liquid to a soft-serve consistency. During the last five minutes of churning, start adding your mix-ins.
Phase 3: Incorporating the Flavor Bombs
With the machine still running, slowly drizzle in the cold raspberry puree, allowing it to swirl naturally through the cream base. You want streaks of bright pink and white, not a homogenous color. Immediately follow this by tossing in the roughly chopped dark chocolate chunks. The mixture should seize slightly around the chocolate. Turn off the machine as soon as the mix-ins are distributed.
Transfer the softRaspberry Chocolate Chunk Ice Creamto a freezer-safe container. Press plastic wrap directly onto the surface to minimize air exposure. Place the container in the coldest part of your freezer (usually the back) for at least 4 to 6 hours to allow it to harden and “cure.” This final freeze period is essential for developing the deep flavor and firm texture we all crave.
Perfecting the Cooking Process
Sequence: Prepare the raspberry puree first, then make and chill the ice cream base completely. Churn the base until softly set, and only incorporate the hardened chocolate chunks and raspberry swirls during the last minute of churning for perfect distribution and texture.
Add Your Touch
Swap out half the cream for full-fat coconut milk for a tropical twist, or add a teaspoon of instant coffee powder to deepen the chocolate flavor. For extra crunch, fold in toasted slivered almonds before final freezing.
Storing & Reheating
Store your freshly churned ice cream in a shallow, airtight container pressed with parchment paper directly on the surface to prevent ice crystals. It stays optimal for up to two weeks, but we doubt it will last that long.
My neighbor tried this recipe last week and confessed she hid the last pint behind a frozen bag of peas just so her kids wouldn’t find her secret stash. That’s how good this is.
Expert Tips for the Ultimate Frozen Dessert
- Ensure your base is ice-cold before churning, ideally below 40°F, as this vastly reduces crystal formation and results in maximum creaminess.
- Chop your chocolate into varying sizes, from fine shavings to large chunks, to provide an interesting and diverse texture in every bite.
- Do not overfill your ice cream maker. The mixture expands significantly during churning, needing space for air incorporation and volume increase.
Common Questions About Homemade Ice Cream
Making ice cream at home is remarkably simple, yet often raises a few key questions, especially concerning texture and storage. We have compiled the answers to help you avoid common pitfalls and achieve creamy success every time.
Why did my ice cream turn out icy instead of creamy?
Icy texture usually stems from two issues: insufficient fat content or churning the base while it was still too warm. Make sure you use heavy cream and whole milk, and most importantly, ensure the base is chilled overnight. If your freezer is weak, the longer chilling time is non-negotiable.
Can I use frozen raspberries instead of fresh ones?
Absolutely! Frozen raspberries work perfectly for the puree. In fact, sometimes frozen berries retain a more intense color and flavor than out-of-season fresh ones, giving yourRaspberry Chocolate Chunk Ice Creaman even deeper color. Just ensure you still simmer them with the lemon juice to break them down.
How do I prevent the chocolate chunks from sinking to the bottom?
The trick is timing. Introduce the chocolate chunks only in the final moments of churning when the ice cream has thickened to a soft-serve consistency. The thickness of the partially frozen base holds the chunks in suspension better than a runny liquid. Also, ensure the chocolate is cold when you add it.
What is the difference between churning and curing?
Churning is the mechanical process where the machine introduces air into the cold base while freezing it partially, creating that initial soft texture. Curing (or ripening) happens afterward in the freezer, allowing the remaining water content to freeze solid and the texture to firm up to a scoopable state. Don’t skip the curing time!
What non-dairy substitutes work well for this recipe?
To keep the luxurious texture, use a high-fat alternative. Full-fat coconut cream (not the light stuff) provides excellent results, though it will impart a subtle tropical flavor. Alternatively, high-quality oat cream designed for desserts can also provide the necessary richness without compromising the final texture too much. Always use a stabilizing agent, like a small amount of agar-agar or guar gum, if using very low-fat substitutions.
Now that you possess the knowledge and the method, go forth and create frozen magic. There is truly nothing better than pulling a container of this vibrant, lusciousRaspberry Chocolate Chunk Ice Creamfrom the freezer, knowing that you crafted this perfect moment of sweetness yourself.
Life is simply too short for bland, chalky ice cream. We’ve all been there: staring mournfully at a carton purchased in a moment of weakness, realizing the “fruit swirl” looks suspiciously like food coloring, and the “chunks” feel like someone dropped tiny pebbles into the mixture. It’s a tragedy! After years of experimentation—and one disastrous attempt involving frozen yogurt that tasted suspiciously like sad freezer burn—I finally perfected the dream dessert: the irresistible, richly flavored, intensely satisfying creation known asRaspberry Chocolate Chunk Ice Cream.
The Quest for the Perfect Creamy Texture
This isn’t just a recipe; it’s a declaration of independence from disappointing frozen desserts. The secret to phenomenal homemade ice cream lies in the base. Forget those quick, no-churn recipes that promise speed but deliver crystals. We are aiming for luxurious, dense creaminess that coats the tongue and melts slowly. This requires a proper custard base, tempered eggs, and whole milk fat working together in harmony.
The addition of the tart raspberries is crucial. Raspberries bring a sharp, slightly acidic counterpoint that slices through the richness of the heavy cream and dark chocolate. It’s the balance of sweet, rich, and tart that elevates this frozen treat from just “good” to “I might hide this container behind the frozen vegetables.”
The Magic of the Dark Chocolate Chunks
When selecting your chocolate for thisRaspberry Chocolate Chunk Ice Cream, do not compromise. Use a high-quality dark chocolate (around 70-80% cacao). Chopping the chocolate yourself ensures irregular pieces that break satisfyingly under the spoon, rather than uniform drops that taste waxy. We want magnificent, jagged shards of cocoa brilliance, not uniform, boring chips. Freeze the chopped chunks briefly before folding them in to prevent them from melting immediately into the base.
Essential Ingredients for Stellar Raspberry Chocolate Chunk Ice Cream
Gathering these simple ingredients sets the stage for success. Quality matters deeply when making something this decadent.
- 2 cups heavy cream (full fat, please!)
- 1 cup whole milk
- ¾ cup granulated sugar, divided
- 5 large egg yolks
- 1 teaspoon pure alcohol-free vanilla extract
- 1 ½ cups fresh or frozen raspberries
- 2 tablespoons lemon juice (or apple cider vinegar)
- 6 ounces high-quality dark chocolate, roughly chopped
- Pinch of salt
Mastering the Custard Base
The foundation of this superb ice cream is a carefully cooked custard, orcrème anglaise. Don’t be intimidated; tempering the eggs is easier than you think. It’s the difference between a silky smooth dessert and sweet scrambled eggs.
First, gently heat the heavy cream, milk, half of the sugar, and the salt in a saucepan until steam begins to rise around the edges—do not boil. While that heats, whisk the egg yolks and the remaining sugar vigorously in a separate bowl until the mixture lightens in color and thickens slightly. This is when the crucial tempering happens: slowly, ladle by ladle, whisk the warm cream mixture into the egg yolks. This raises the temperature of the yolks gradually, preventing them from seizing.
Return the combined mixture to the saucepan and cook it over medium-low heat, stirring constantly with a wooden spoon or spatula, until it thickens enough to coat the back of the spoon (reaching about 175°F). Immediately strain the custard into a clean bowl, stir in the vanilla, and chill it completely in the refrigerator—ideally for at least four hours, but preferably overnight. A proper chill is non-negotiable for smooth churning.
Preparing the Raspberry Swirl
While the custard chills, tackle the raspberry element. Combine the raspberries, lemon juice, and two tablespoons of the remaining sugar in a small saucepan. Cook this mixture down until the berries break apart and the sauce thickens slightly, about 8 to 10 minutes. The lemon juice brightens the berry flavor significantly, ensuring a vibrant pop against the rich chocolate.
Once reduced, press the cooked raspberries through a fine-mesh sieve using the back of a spoon. This removes the seeds, giving you a smooth, intense raspberry purée. Allow this purée to cool completely before using. If you introduce warm purée to the cold custard, you will compromise the base’s texture, and nobody wants that kind of kitchen betrayal.
Churning and Layering the Frozen Delight
Once your custard base is thoroughly chilled, pour it into your ice cream maker and churn according to the manufacturer’s instructions. This usually takes about 20 to 30 minutes, resulting in a soft-serve consistency. At this point, the mixture needs the final additions and a good long freeze.
Transfer half of the soft ice cream mixture to an airtight, freezer-safe container. Drizzle half of the cooled raspberry purée over the top and then scatter half of your prepared dark chocolate chunks. Gently swirl the purée with a knife—do not mix it completely! We want streaks of vivid berry color. Repeat the process with the remaining ice cream base, raspberry purée, and chocolate chunks.
Cover the container tightly, pressing plastic wrap directly onto the surface of the ice cream before sealing the lid to prevent freezer burn. Transfer the container to the coldest part of your freezer for a minimum of six hours, though overnight yields the best results. Serve this stunningRaspberry Chocolate Chunk Ice Creamslightly softened for the ultimate scoop.
FAQs
What causes homemade Raspberry Chocolate Chunk Ice Cream to become icy, and how can I prevent it?
Icy texture, often called crystallization, is typically caused by too much water content or slow freezing. To prevent this, ensure you are using high-fat dairy products like heavy cream and whole milk, as fat interferes with crystal formation. Also, fully chilling the custard base before churning and ensuring your freezer is set to a low, steady temperature (around 0°F or colder) promotes rapid freezing, which is essential for achieving that professional, smooth texture. Adding a small amount of stabilizer, such as a tablespoon of dried milk powder, can also significantly improve the creaminess of your homemade batch.
Can I make this Raspberry Chocolate Chunk Ice Cream recipe without an ice cream maker?
While an ice cream maker is ideal for the creamiest results, you can attempt this without specialized equipment using the “freeze and stir” method. After making and cooling the custard base, pour it into a shallow, freezer-safe pan. Freeze for 45 minutes, then remove and vigorously whisk the mixture to break up any ice crystals. Repeat this whisking process every 30 to 45 minutes for about three hours total. While it requires more effort and the texture may be slightly denser, this method still allows you to enjoy fresh, homemade berry ice cream.
How do I ensure the chocolate chunks remain distinct and don’t sink to the bottom of the mixture?
The key to perfect chunk distribution in yourRaspberry Chocolate Chunk Ice Creamis temperature management. First, make sure your chopped dark chocolate is thoroughly chilled or even frozen before incorporating it. Second, wait until the churning process is complete and the ice cream has the consistency of firm soft-serve before folding the chunks in. Since this recipe uses a layering technique inside the storage container, the stiff, semi-frozen base is better able to hold the weight of the chunks, ensuring they are evenly suspended throughout every delicious spoonful.
Is there an easy way to prepare the raspberry element if I don’t want to strain out the seeds?
If you prefer a more rustic texture and don’t mind the seeds in your ice cream, you can skip the straining step entirely. Simply cook the raspberries, sugar, and acid until they have broken down into a thick sauce, allowing the mixture to cool completely afterward. The seeds will add an interesting, slightly crunchy texture, and you will retain all the fiber. If using fresh raspberries, consider lightly mashing them before cooking to speed up the process of creating the bright, tart ripple necessary for this delightful frozen dessert.
Conclusion for Raspberry Chocolate Chunk Ice Cream
Ditch the notion that incredible, gourmet ice cream is only available at specialty shops. This recipe forRaspberry Chocolate Chunk Ice Creamdelivers a bold, balanced flavor profile—the intense tang of real raspberry purée perfectly harmonizing with the bittersweet richness of quality dark chocolate chunks, all held together in an impossibly creamy custard base. The process requires a little patience, especially during the chilling and freezing stages, but the reward is immense. Once you taste the difference that quality ingredients and careful technique make, you will never look back at those store-bought containers. Get churning and prepare for your new favorite homemade indulgence.


Leave a Comment