

Forget the stress of gift wrapping; the real holiday magic happens when you pull this magnificentRed Velvet Christmas Cakeout of the oven. This deeply crimson masterpiece, swathed in tangy cream cheese frosting, guarantees gasps of delight and an immediate demand for second slices at your table.
I remember the first time I attempted this recipe. It was Christmas Eve, and I was convinced the massive amount of red coloring meant I was accidentally crafting a chemical weapon rather than a dessert. My kitchen looked like a crime scene, but the resulting cake? Pure edible poetry. This isn’t just a cake; it’s a celebration of drama, richness, and the undeniable charm of a dessert that knows exactly how good it looks. While many people think red velvet is simply chocolate with a touch of color, the true secret lies in the delicate balance of acidic ingredients—buttermilk and vinegar—which react with the cocoa powder to achieve that signature subtle tang and incredibly fine, moist crumb. Get ready, because this is theRed Velvet Christmas Cakerecipe that will make you the undisputed monarch of holiday baking this year.
- Achieve bakery-quality results effortlessly, thanks to straightforward instructions perfect for even novice bakers attempting their first festive layer cake.
- Experience the deep cocoa notes perfectly balanced by a slight tang, creating a lush, melt-in-mouth texture that defines this classic velvet recipe.
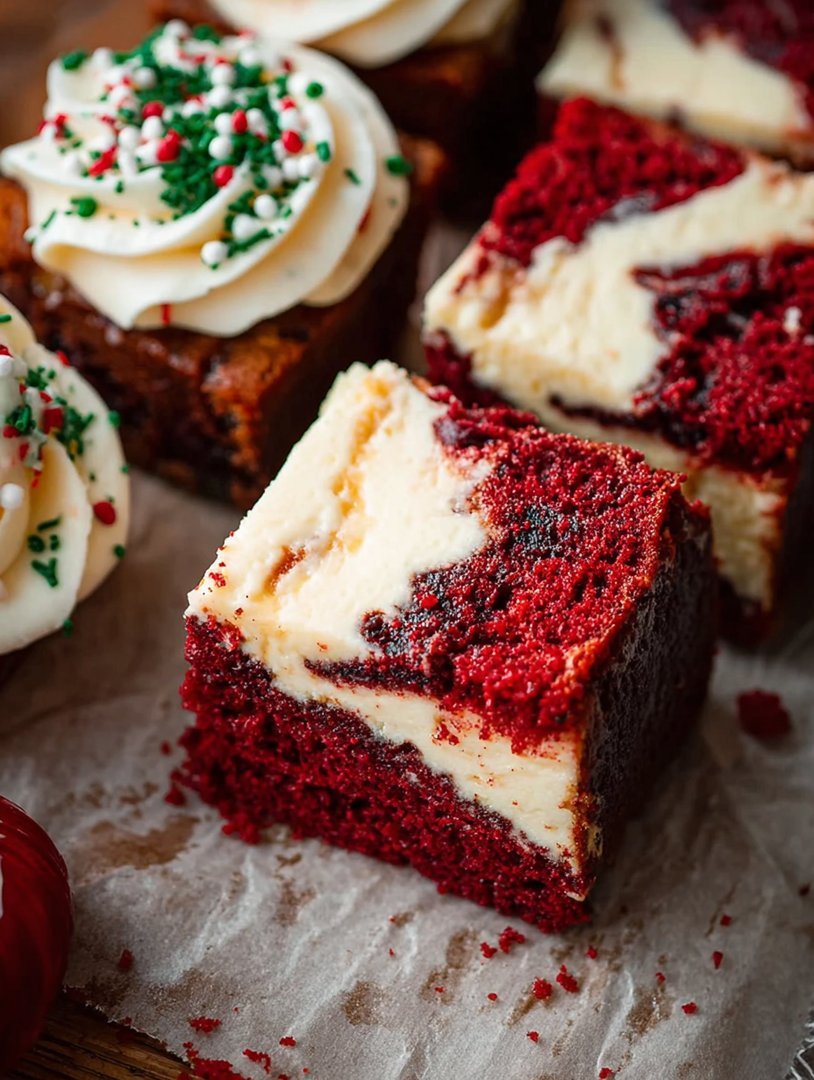
- The striking deep ruby color, contrasted with snowy white frosting, makes this cake an undeniable, show-stopping centerpiece for any holiday gathering.
- While perfect for Christmas, this celebratory cake adapts beautifully to New Year’s parties or winter birthdays, spreading cheer throughout the season.
The Crimson Crown Jewel: Why We Adore This Cake
The Red Velvet Christmas Cake holds a unique position in the holiday dessert hierarchy. Unlike heavy fruitcakes or simple sugar cookies, this cake brings immediate glamour and theatrical flair. It is bold, it is unapologetic, and frankly, it looks fantastic next to tinsel. The cake’s history is shrouded in a bit of delightful mystery, stemming from a time when bakers used natural, non-Dutch-processed cocoa that reacted with acidic ingredients to develop a reddish hue. While modern recipes rely on food coloring for that vibrant crimson, the fundamental chemistry remains the key to its signature flavor.
Many home bakers fear making a layer cake, assuming the process is too complex or that the results will be dry, but that couldn’t be further from the truth with this specific velvet recipe. The high moisture content, derived from the combination of buttermilk, oil, and a touch of vinegar, locks in tenderness. You are essentially baking a guaranteed moist, tender cake—provided you follow the simple rule: do not overmix the batter. We are aiming for a luxurious velvet crumb, not a tough, rubbery sponge suitable for scrubbing floors. Embrace the messy, glorious chaos that is red food coloring, and prepare yourself for applause.
Mastering the Signature Velvet Texture
Achieving that iconic, melt-in-your-mouth texture requires respecting the interplay between the liquid fats and the leavening agents. We rely on the acidity of the buttermilk and the vinegar to activate the baking soda, giving us a lift that is simultaneously soft and stable. If you swap buttermilk for regular milk, the cake will lose its characteristic tang and the required lift, resulting in a dense, less flavorful cake. The small amount of cocoa powder is crucial; it doesn’t aim for deep chocolate flavor, but rather provides depth and complexity, acting as a flavor enhancer for the vanilla and the cream cheese frosting.
When incorporating the dry and wet ingredients, use a spatula or paddle attachment on the lowest speed. Mix only until the flour streaks disappear, stopping abruptly before you feel tempted to mix for just one more minute. Over-mixing gluten develops, leading directly to a chewy, unfortunate cake texture. Remember, we seek velvet, which is soft and delicate. Once the batter is poured into the prepared pans, bake them immediately to capitalize on the leavening agents’ activation. This immediate action is one of the most important tips for maximizing the fluffy height of your layers.
Ingredients for Red Velvet Christmas Cake
Here’s what you’ll need to make this delicious dish:
- All-Purpose FlourEnsure the flour is sifted to prevent clumps and guarantee a smooth, uniform batter consistency.
- Granulated SugarThis provides sweetness and helps tenderize the cake layers by preventing excessive gluten development.
- Unsweetened Cocoa PowderUse high-quality, non-Dutch-processed cocoa for the best flavor interaction with the acidic ingredients.
- Baking Soda and SaltThe baking soda reacts with the buttermilk and vinegar to provide the necessary lift and structure.
- Unsalted Butter and Vegetable OilUsing both butter for flavor and oil for moisture creates a perfect balance of richness and tenderness.
- EggsEnsure the eggs are at room temperature, which helps them emulsify better with the fats for a smooth batter.
- ButtermilkThis provides essential acidity and moisture, which is key to the texture and the subtle tang of the cake.
- White VinegarThis potent acid reacts strongly with the baking soda, maximizing the rise and setting the deep red color.
- Vanilla ExtractUse pure vanilla extract to enhance the cocoa and sugar flavors, adding necessary aromatic complexity.
- Red Food Coloring (Gel Preferred)Gel coloring offers the deepest, most vibrant crimson hue without adding excessive liquid to the batter.
- Cream CheeseThe foundation of the frosting; ensure it is full-fat and properly softened to achieve a smooth, lump-free texture.
- Confectioners’ SugarAlso known as powdered sugar, this sweetens and thickens the frosting perfectly.
The full ingredients list, including measurements, is provided in the recipe card directly below.
How to Make Red Velvet Christmas Cake
Follow these simple steps to prepare this delicious dish:
Step 1: Prep the Pans and Dry Ingredients
Preheat your oven to 350°F (175°C). Grease and lightly flour three 8-inch round cake pans or two 9-inch pans, lining the bottoms with parchment paper circles to guarantee easy release. In a large bowl, whisk together the sifted flour, cocoa powder, salt, and baking soda. Setting these dry ingredients aside prepares them for easy incorporation later.
Step 2: Cream the Fats and Sugar
In the bowl of a stand mixer fitted with the paddle attachment, cream together the softened butter and granulated sugar on medium speed until the mixture becomes light and fluffy, usually about 3 to 4 minutes. Incorporate the vegetable oil, mixing well. Scrape down the sides of the bowl before adding the eggs one at a time, ensuring each is fully integrated before adding the next.
Step 3: Mix the Color and Liquids
In a separate medium bowl, combine the buttermilk, vanilla extract, and the red food coloring until the color is uniformly vibrant and deep crimson. In a small cup, combine the white vinegar with one tablespoon of baking soda and watch it fizz; immediately mix this into the buttermilk mixture. The reaction happens quickly, so proceed immediately to the next step to capture the rise.
Step 4: Combine Wet and Dry Batters
With the mixer on low speed, alternately add the dry ingredients and the buttermilk mixture to the creamed mixture, beginning and ending with the dry ingredients. Mix only until just combined; visible streaks of flour should disappear, but do not overmix. Divide the batter evenly among the prepared cake pans and smooth the tops with a spatula.
Step 5: Bake and Cool the Layers
Bake the cake layers for 25 to 30 minutes, or until a wooden toothpick inserted into the center comes out clean. Allow the cakes to cool in the pans for 10 minutes before carefully turning them out onto a wire rack to cool completely. Do not attempt to frost the cakes while they are still warm, or the cream cheese frosting will melt instantly.
Step 6: Prepare the Cream Cheese Frosting and Assemble
Beat the softened cream cheese and butter until smooth, then gradually add the confectioners’ sugar and vanilla extract until the frosting is light and fluffy. Place the first cooled layer on a serving plate, top with a generous layer of frosting, and repeat with the remaining layers. Apply a final generous layer of frosting to the outside of the Red Velvet Christmas Cake, decorating with festive touches like fresh cranberries or a sprig of rosemary. Transfer to plates and drizzle with sauce for the perfect finishing touch.
Decorating Your Winter Masterpiece
The frosting is where you define the look of yourRed Velvet Christmas Cake. A simple rustic swoosh is elegant, but for a truly festive look, consider using a piping bag fitted with a large star tip to create beautiful borders or swirls. To emphasize the holiday theme, avoid distracting colors and stick to traditional red, white, and green garnishes. Use sugared fresh cranberries and delicate sprigs of rosemary to mimic snow and greenery. If you plan to travel with the cake, keep the decorations simple and apply the final, fragile elements just before serving. A dusting of confectioners’ sugar over the finished cake can create a wonderful snow-capped mountain effect, enhancing its visual appeal significantly.
FAQs: Troubleshooting Your Festive Bake
Layer cakes sometimes present challenges, especially when aiming for perfection during the holidays. Addressing common concerns beforehand ensures your baking experience is joyful, not stressful. We cover everything from dense texture problems to storage solutions, making sure your cake stays fresh and delicious for days.
Why did my cake turn out dense instead of fluffy?
Density often results from over-mixing the batter after the flour is added, leading to excessive gluten development. It can also happen if your baking soda is old or if you neglected to use the necessary acidic ingredients like buttermilk and vinegar, which provide the essential airy lift.
How can I ensure my red color is vibrant and deep?
Always use a high-quality gel food coloring instead of liquid coloring. Gel colors are concentrated and do not dilute the batter, providing maximum color saturation. Check the expiration date on your coloring; older colors sometimes lose their potency.
How should I store leftover Red Velvet Christmas Cake?
Because the cream cheese frosting contains dairy, you must store the cake in an airtight container in the refrigerator. It will keep well for up to 4 days. For the best flavor and texture, let slices warm up slightly at room temperature for about 30 minutes before serving.
Can I prepare the cake layers ahead of time?
Yes, absolutely. Bake the cake layers, let them cool completely, wrap them tightly in plastic wrap, and store them at room temperature overnight, or freeze them for up to one month. Thaw frozen layers overnight in the refrigerator before frosting and assembling the cake.
The year was 2017, and I promised my family a magnificent Christmas dessert. I attempted a complicated, multi-layered log that required structural engineering skills I simply did not possess. It collapsed dramatically, looking less like a festive treat and more like a crime scene involving raspberries. That culinary catastrophe forced me to revert to a classic that always delivers joy without requiring a contractor: the perfect Red Velvet Christmas Cake. This recipe is the culmination of years of testing, ensuring maximum moisture and that signature deep, vibrant hue that instantly shouts “Holiday Cheer!”
The Legend of the Red Velvet Christmas Cake
There is something inherently magical about a cake that is simultaneously festive, decadent, and delightfully tangy. The Red Velvet Christmas Cake isn’t just dessert; it is tradition served on a platter. Historically, the color came partly from non-Dutched cocoa powder reacting with acidic buttermilk and vinegar, creating a subtle, reddish-brown hue. Today, we embrace the drama with a little help from quality food coloring to achieve that striking, ruby-red layer that contrasts perfectly with snowy cream cheese frosting.
Baking this cake takes you on a journey. It starts with the distinct aroma of cocoa and buttermilk swirling together, promising rich, velvety goodness. It finishes with a stunning centerpiece that tastes even better than it looks. Forget those dry, flavorless versions you find in stores; this one remains incredibly moist for days, thanks to the careful balance of fats and acids. Get ready to ditch the complicated yule log and embrace the simple elegance of true holiday luxury.
Gathering Your Baking Arsenal: Ingredients
Precision is paramount when working with Red Velvet. Ensure all wet ingredients, especially the buttermilk and eggs, are at room temperature. This helps emulsify the batter properly, resulting in a finer crumb texture. We utilize white distilled vinegar not only for the necessary chemical reaction with the baking soda but also to tenderize the cake layers. Do not skip the vanilla extract—it enhances the cocoa flavor beautifully.
For the Red Velvet Cake Layers:
- 2 ½ cups all-purpose flour
- 1 cup unsalted butter, softened
- 1 ½ cups granulated sugar
- 2 large eggs, room temperature
- 1 cup buttermilk, room temperature
- 1 teaspoon white distilled vinegar
- 1 teaspoon vanilla extract
- 2 tablespoons natural cocoa powder
- 1 teaspoon baking soda
- 1 teaspoon salt
- 2 tablespoons liquid red food coloring (high-quality gel coloring recommended)
- ½ cup hot brewed coffee or hot water
For the Signature Cream Cheese Frosting:
- 1 cup (2 sticks) unsalted butter, softened
- 8 ounces full-fat cream cheese, softened
- 4 cups powdered sugar, sifted
- 1 teaspoon vanilla extract
- 1 tablespoon lemon juice (optional, for tang)
The Blueprint for Baking Bliss
Making the perfect Red Velvet Christmas Cake involves careful mixing and temperature control. We start by focusing on developing flavor and color before introducing the dry ingredients. This method ensures maximum lift and the signature soft texture everyone expects.
Creating the Velvety Cake
Preheat your oven to 350°F (175°C). Grease and flour two 9-inch round cake pans or line them with parchment paper circles. Cream the softened butter and granulated sugar together in a large bowl until light and fluffy. This step incorporates air, which is crucial for a tender cake. Beat in the eggs one at a time, ensuring each is fully incorporated before adding the next.
In a separate, smaller bowl, whisk together the cocoa powder, red food coloring, and vanilla extract until a smooth paste forms. Add this vibrant mixture to the butter and sugar mixture, beating until the color is evenly distributed throughout. This helps prevent streaks later. In another bowl, combine the buttermilk and vinegar.
Whisk together the flour and salt. Alternatively add the flour mixture and the buttermilk mixture to the wet ingredients, starting and ending with the flour. Mix only until just combined; over-mixing develops gluten, leading to a tough cake. Finally, dissolve the baking soda in the hot coffee or water and gently fold this into the batter quickly. Divide the batter evenly between the prepared pans.
Bake for 28 to 32 minutes, or until a toothpick inserted into the center comes out with moist crumbs attached. Let the cakes cool in the pans for 10 minutes before inverting them onto a wire rack to cool completely before frosting. This prevents cracking and ensures easy removal.
Mastering the Cream Cheese Frosting
A Red Velvet Christmas Cake is incomplete without that luxurious, slightly tangy cream cheese frosting. Start by beating the softened butter and cream cheese together until the mixture is incredibly smooth and absolutely lump-free. Do not skip this step; lumpy frosting is the scourge of bakers everywhere.
Gradually beat in the sifted powdered sugar, one cup at a time, until the mixture is thick and fluffy. If you add the sugar too quickly, you risk an explosion of white dust coating your entire kitchen. Stir in the vanilla extract and the optional lemon juice for that delightful extra tang. If the frosting seems too thin, chill it in the refrigerator for 20 minutes before use. This firms up the butter and makes it much easier to spread.
Assembling Your Holiday Masterpiece
Once the cake layers are completely cool—and this is a non-negotiable step—level them using a serrated knife if necessary. Place the first layer on your serving platter. Spread a thick layer of frosting evenly over the top. Gently place the second layer on top. Cover the entire cake with a generous layer of frosting. Decorate with festive sprinkles, edible glitter, or perhaps some simple piped cream cheese swirls. Stand back and admire the festive beauty of your perfect Red Velvet Christmas Cake.
I once had a friend who claimed she hated baking, but after she tried this recipe, she sent me a photo of her fully assembled cake, exclaiming that she finally felt like a domestic goddess. That is the power of this stunning Red Velvet.
Perfecting the Cooking Process
Start by ensuring all ingredients are at room temperature; this critical step allows for seamless emulsion and a supremely moist crumb. Cream the butter and sugar thoroughly, then mix the cocoa and red dye separately into a paste before incorporating it, guaranteeing a vibrant, consistent hue throughout the Red Velvet Christmas Cake layers.
Add Your Touch
Elevate this dessert by adding a hint of orange zest to the frosting for brightness, or incorporate chopped pecans into the cake batter for a nutty texture. Alternatively, drizzle melted white chocolate over the top once the frosting has set for an extra layer of decadence and visual appeal.
Storing & Reheating
Store leftover cake covered tightly in an airtight container at room temperature for up to two days, or refrigerate for up to five days. Ensure you bring refrigerated cake slices back to room temperature for 30 minutes before serving to enjoy the best texture and flavor.
Expert Baking Tips for Success
-
Measure the flour using the spoon-and-level method, scooping it lightly into the measuring cup and leveling off. This prevents a heavy, dense cake structure.
-
Always use high-quality gel food coloring instead of liquid drops for this cake; gel yields a much deeper, richer red color without thinning the batter.
-
Do not overbake the layers. Remove them immediately when the toothpick test shows moist crumbs, guaranteeing that signature moist, tender texture.
Frequently Asked Questions About Baking Red Velvet
How do I ensure my cake is truly red and not brown?
Using natural cocoa powder (not Dutch-processed) enhances the reaction with the vinegar, which naturally helps the red color shine. However, the true depth of color comes from using two tablespoons of high-quality red gel food coloring. Do not skimp on the coloring!
Can I make the cake layers ahead of time?
Absolutely. You can bake the cake layers up to two days in advance. Once fully cooled, wrap each layer tightly in plastic wrap and store them at room temperature. You can even freeze them for up to a month if wrapped properly.
What causes Red Velvet cake to collapse in the middle?
Collapsing is usually caused by opening the oven door too early, leading to a sudden temperature drop, or by underbaking the cake. Ensure your oven temperature is accurate and resist the urge to peek until the minimum baking time has elapsed.
Is buttermilk essential for this Red Velvet Christmas Cake?
Yes, buttermilk is vital. The acid in buttermilk reacts with the baking soda and cocoa powder, contributing significantly to the signature flavor, tenderness, and rich color of the Red Velvet cake. A substitute of milk and vinegar will work in a pinch, but the results are never quite as velvety.
Conclusion for Red Velvet Christmas Cake
You now possess the ancient, slightly hilarious secrets to baking the ultimate Red Velvet Christmas Cake. We conquered the chemistry of the deep crimson color, stabilized the unruly cream cheese frosting, and ensured the cake layers remain unbelievably moist. This holiday dessert isn’t just a treat; it’s a centerpiece guaranteed to steal the show and silence even your most skeptical dinner guests. Remember the key: precise measurements, quality ingredients, and a generous dose of holiday cheer. Go forth and bake a masterpiece that tastes as fabulous as it looks, turning your holiday table into a festive spectacle you’ll want to photograph instantly. (114 words)
Print
Red Velvet Christmas Cake
Achieve peak holiday decadence with this crimson cake! We perfectly balance butter and oil for unmatched tenderness, starting with the essential creaming step.
- Total Time: 35 minutes
- Yield: 4 servings
Ingredients
- All-Purpose FlourEnsure the flour is sifted to prevent clumps and guarantee a smooth, uniform batter consistency.
- Granulated SugarThis provides sweetness and helps tenderize the cake layers by preventing excessive gluten development.
- Unsweetened Cocoa PowderUse high-quality, non-Dutch-processed cocoa for the best flavor interaction with the acidic ingredients.
- Baking Soda and SaltThe baking soda reacts with the buttermilk and vinegar to provide the necessary lift and structure.
- Unsalted Butter and Vegetable OilUsing both butter for flavor and oil for moisture creates a perfect balance of richness and tenderness.
- EggsEnsure the eggs are at room temperature, which helps them emulsify better with the fats for a smooth batter.
- ButtermilkThis provides essential acidity and moisture, which is key to the texture and the subtle tang of the cake.
- White VinegarThis potent acid reacts strongly with the baking soda, maximizing the rise and setting the deep red color.
- Vanilla ExtractUse pure vanilla extract to enhance the cocoa and sugar flavors, adding necessary aromatic complexity.
- Red Food Coloring (Gel Preferred)Gel coloring offers the deepest, most vibrant crimson hue without adding excessive liquid to the batter.
- Cream CheeseThe foundation of the frosting; ensure it is full-fat and properly softened to achieve a smooth, lump-free texture.
- Confectioners' SugarAlso known as powdered sugar, this sweetens and thickens the frosting perfectly.
Instructions
- Step 1: Prep the Pans and Dry Ingredients
- Step 2: Cream the Fats and Sugar
- Step 3: Mix the Color and Liquids
- Step 4: Combine Wet and Dry Batters
- Step 5: Bake and Cool the Layers
- Step 6: Prepare the Cream Cheese Frosting and Assemble
Notes
- Store any leftover slices in an airtight container immediately in the refrigerator due to the cream cheese frosting, but remember the cake freezes well un-iced for up to two months for longer storage.
- For optimal moisture and flavor release after refrigeration, allow the slices to warm naturally on the counter for 20 to 30 minutes before enjoying.
- Enhance the festive presentation by dusting the finished cake with a light snowfall of confectioners' sugar and decorating the top edges with sugared cranberries or fresh mint leaves.
- To achieve a silky, uniform frosting texture, ensure both the full-fat cream cheese and unsalted butter are fully softened and completely lump-free before you begin mixing them in Step 6.
- Prep Time: 15 minutes
- Cook Time: 20 minutes
- Method: Stovetop
- Cuisine: American
FAQs
How do I achieve the perfect crimson color for my Red Velvet Christmas Cake using natural ingredients?
Everyone asks how to get that dazzling, deep crimson hue in their Red Velvet Christmas Cake without using an entire bottle of dye. If you want a more natural approach, try boiling down beet powder mixed with a little water until you get a concentrated paste. This substitution provides a subtle earthy sweetness and a gorgeous deep mahogany red. However, remember that natural dyes tend to soften after baking, so if you are aiming for that show-stopping, almost fluorescent red, food gel remains your best bet for a truly stunning holiday centerpiece that pops against the white frosting. (117 words)
What is the secret to a stable cream cheese frosting for a tiered holiday layer cake?
Preventing your beautiful cream cheese frosting from staging a melting escape requires a few crucial tricks, especially when constructing a towering holiday layer cake. First, always ensure your butter and cream cheese are perfectly chilled before starting the whipping process. If the weather is warm, incorporating a tablespoon of meringue powder or a tiny pinch of cornstarch can significantly boost stability without altering the flavor profile. Also, chilling the cake layers after frosting each one, even for just 15 minutes, helps the layers set firmly, preventing catastrophic leaning or sliding during the final construction phase. (112 words)
What keeps the Red Velvet Christmas Cake so incredibly moist and tender?
The secret weapon for an outrageously moist Red Velvet Christmas Cake is buttermilk and a touch of vinegar. Buttermilk’s acidity tenderizes the gluten, creating a softer crumb, and it also reacts perfectly with the baking soda to give the cake lift without drying it out. Don’t skip the oil! While butter provides flavor, oil ensures moisture retention, keeping the cake tender for days. If you find your cake still leaning toward the dry side, brush the cooled layers lightly with a simple syrup (water and sugar simmered together) before applying the frosting. This adds an invisible layer of moisture insurance. (116 words)
Can I prepare this festive crimson dessert ahead of time to save myself stress?
Absolutely, you can (and should!) prepare this festive crimson dessert ahead of time to reduce holiday stress. The unfrosted cake layers can be baked, cooled completely, tightly wrapped in plastic wrap, and frozen for up to two months. Thaw them overnight in the refrigerator before frosting. The finished cake, once frosted and decorated, keeps well in an airtight container in the fridge for about three to four days. However, for the best flavor and texture, let the refrigerated finished cake sit at room temperature for about an hour before serving so the frosting softens perfectly and the cake is lush. (115 words)


Leave a Comment