

That moment when the aroma of toasted garlic and warm yeast hits you is pure culinary theater, instantly transporting you to a trattoria in the Italian countryside, even if you’re just standing awkwardly in your own kitchen. Forget complex recipes; we are diving straight into comfort with this incredibleRustic Garlic Rosemary Skillet Bread Recipe. This bread is the ultimate sidekick to literally everything, boasting a crackling crust and an impossibly soft interior that practically begs to be dunked in soup or slathered with softened butter.
- It features the simplest preparation, requiring minimal kneading and zero fancy equipment, making it perfect for novice bakers.
- The flavor profile is profoundly savory, combining pungent fresh garlic with fragrant, slightly piney fresh rosemary.
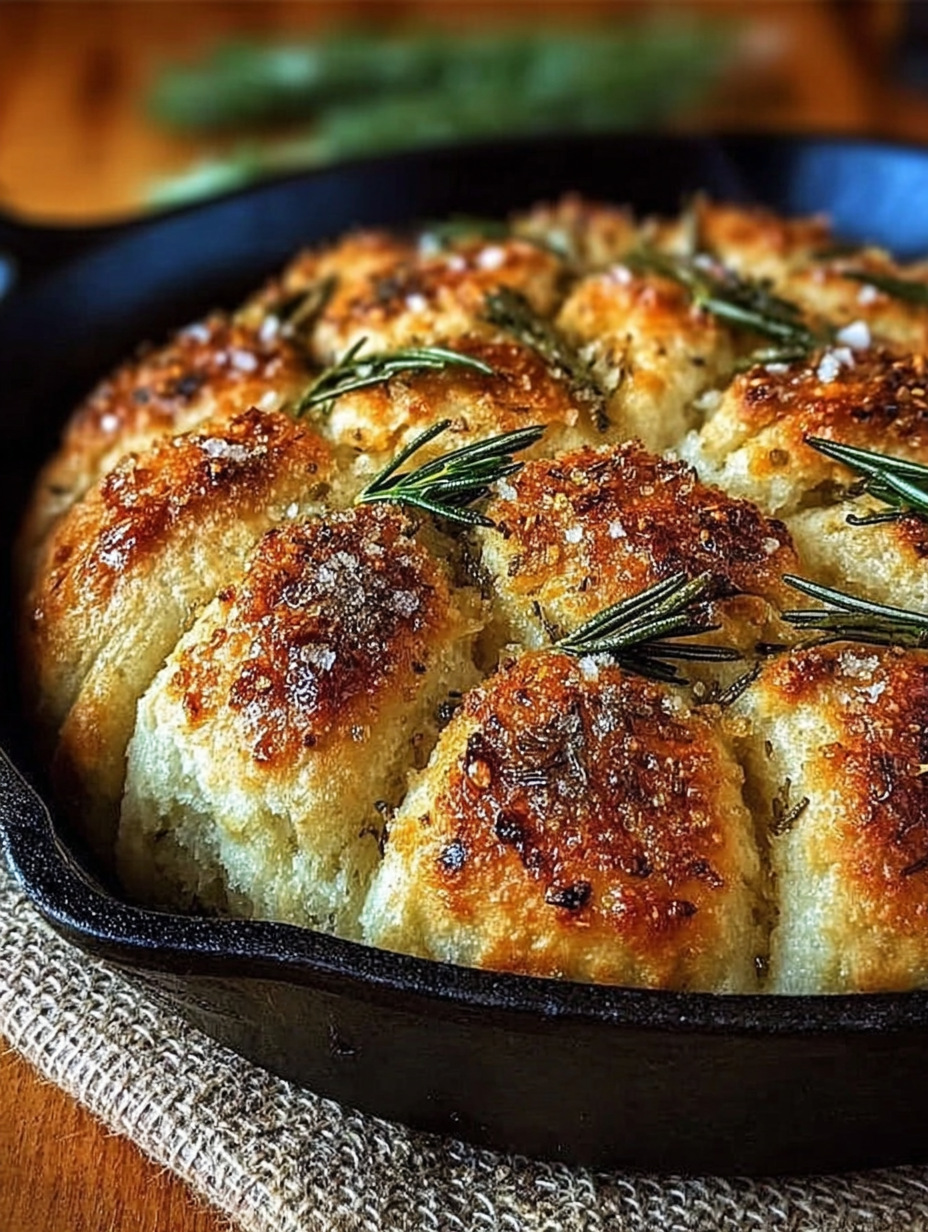
- Visually, the bread achieves a beautiful golden-brown color and a satisfyingly uneven, artisan texture thanks to the cast iron skillet.
- This versatile bread pairs wonderfully with robust beef stews, rich tomato pasta sauces, or simply enjoyed dipped in high-quality olive oil.
The Magic of Skillet Bread: Why Cast Iron is Your Best Friend
When I first attempted homemade bread, I envisioned myself looking like a triumphant baker emerging from a cloud of flour, only to realize I looked more like a startled raccoon trying to escape a pastry explosion. Traditional loaves felt intimidating, requiring specialized tools and temperatures that seemed impossible to maintain. That’s when I discovered the unparalleled genius of the cast iron skillet.
A cast iron skillet is the secret weapon behind truly spectacular rustic bread. Unlike thin baking sheets, cast iron retains and distributes heat incredibly evenly, transforming your average oven into a professional stone hearth. This consistent heat transfer is what guarantees that coveted crackle on the bottom crust, while keeping the interior spectacularly moist. Plus, using a skillet means less cleanup, which, let’s be honest, is the real reason we choose one recipe over another. If you don’t have a cast iron skillet, a heavy, oven-safe stainless steel pan can work in a pinch, but for that authentic “rustic” quality, the skillet reigns supreme.
Choosing the Right Flour and Yeast for Maximum Flavor
The foundation of any great bread is the flour. While all-purpose flour works perfectly well for this recipe, if you can get your hands on bread flour, you’ll achieve a slightly chewier, more structured crumb, which complements the heavy herbal flavors wonderfully. The higher protein content in bread flour develops gluten better, giving the bread that satisfying tear. However, do not stress if you only have the standard white stuff in the pantry; this recipe is extremely forgiving.
Yeast selection is straightforward, but crucial. We use active dry yeast here. The critical distinction is that active dry yeast needs to be “woken up” or proofed in warm water before mixing it into the dry ingredients. This step ensures that your yeast is alive and kicking, preventing the soul-crushing disappointment of a flat, dense loaf. If you use instant yeast, you can skip the proofing step entirely and mix it directly into the flour, but the aroma released during the proofing of active dry yeast adds a layer of depth to the entire baking experience. Trust me, smelling that yeasty bubble is half the fun!
Ingredients for Rustic Garlic Rosemary Skillet Bread Recipe
Here’s what you’ll need to make this delicious dish:
- All-Purpose or Bread FlourUse unbleached flour for the best results, as the slight variation in protein will affect the final texture and chewiness of the crust.
- Active Dry YeastEssential for lift and flavor; ensure your yeast is fresh and stored in an airtight container to guarantee proper activation during proofing.
- Warm WaterThe temperature must be between 105°F and 115°F (40°C to 46°C) to activate the yeast without killing the living organisms.
- Fine Sea SaltCrucial for controlling the yeast activity and enhancing the overall flavor; do not substitute table salt as it measures differently.
- Olive OilHigh-quality extra virgin olive oil provides depth to the flavor and helps achieve that beautiful golden-brown color and soft crumb.
- Fresh RosemaryUse fresh sprigs, not dried, as the aromatic oils release far more intensely when baked and infused into the dough.
- Fresh GarlicOnly use fresh cloves, minced finely or pressed, to impart a strong, pungent flavor that defines the rustic nature of this bread.
- Coarse Flaky Salt (Optional)Perfect for sprinkling over the top just before baking to add a burst of salinity and a pleasing crunchy texture.
The full ingredients list, including measurements, is provided in the recipe card directly below.
How to Make Rustic Garlic Rosemary Skillet Bread Recipe
Follow these simple steps to prepare this delicious dish:
Step 1: Activating the Yeast and Preparing the Aromatics
In a large bowl, whisk the active dry yeast into the warm water along with a pinch of sugar (if using). Let this mixture sit for 5 to 10 minutes until it becomes foamy and visibly bubbly—this confirms your yeast is active and ready for action. While the yeast is proofing, finely chop your fresh rosemary and mince the garlic cloves, setting aside approximately two-thirds of the garlic for later use.
Step 2: Mixing the Dough and Initial Rise
Once the yeast is bubbly, stir in the salt, the remaining olive oil, and about half of the prepared rosemary and garlic mixture. Gradually add the flour, mixing with a wooden spoon or spatula until a shaggy, cohesive mass forms. Turn the dough out onto a lightly floured surface and knead gently for just 5 minutes—we are aiming for a sticky, slightly uneven dough, not a perfectly smooth one. Place the dough back into a lightly oiled bowl, cover it with plastic wrap, and let it rise in a warm spot for 60 to 90 minutes, or until it has doubled in size.
Step 3: Infusing the Remaining Garlic Oil
While the dough is finishing its first rise, prepare the infusion oil that will give this skillet bread its characteristic powerful aroma. In a small saucepan, gently heat the remaining olive oil with the rest of the minced garlic and rosemary over low heat for about 5 minutes. Do not let the garlic brown or burn; we are simply infusing the oil with flavor. Remove the pan from the heat and set it aside to cool slightly, ensuring all the flavors meld deeply into the fat.
Step 4: Shaping, Skillet Prep, and Final Proof
Preheat your oven to 425°F (220°C). Pour half of the prepared garlic-rosemary oil directly into the bottom of a 10-inch or 12-inch cast iron skillet, ensuring the oil coats the entire surface evenly. Carefully punch down the risen dough and shape it into a loose round. Place the dough directly into the oiled skillet. Gently press the dough down until it roughly fills the pan, dimpling the top surface with your fingertips. Drizzle the remaining infusion oil over the dough, sprinkle with coarse salt, cover loosely, and let it rest for a final proof of 20 to 30 minutes.
Step 5: Baking the Rustic Masterpiece
Place the skillet into the preheated oven and bake for 25 to 35 minutes, rotating the skillet halfway through, until the bread is deeply golden brown on the top and sounds hollow when tapped. If the top begins to brown too quickly, you can loosely tent it with aluminum foil for the remaining bake time. Once baked, immediately transfer the bread out of the skillet and onto a wire rack to cool completely, preserving that incredible crispy bottom crust.
Transfer to plates and drizzle with extra olive oil for the perfect finishing touch, serving this irresistible loaf warm alongside your favorite hearty meal.
Tips and Tricks for a Perfect Skillet Bread Texture
Baking bread, even rustic, forgiving bread like thisRustic Garlic Rosemary Skillet Bread Recipe, involves a delicate balance of science and kitchen intuition. To move beyond simply following the steps and truly master the technique, focus on temperature control and observation. The most common mistake bakers make is rushing the process, especially during the rising stages. Yeast is highly responsive to ambient temperature; if your kitchen is chilly, your dough will take significantly longer to double. To accelerate this process safely, place your covered bowl in a slightly warm, turned-off oven or near a sunny window.
Humidity Control and Dough Hydration
Dough hydration is another factor that can dramatically alter the final texture. If you live in a very humid climate, you might need slightly less water than the recipe calls for, and conversely, in dry climates, you may need a tablespoon or two extra. The goal is a sticky, manageable dough—it should adhere slightly to your hands but not be impossible to handle. If the dough feels stiff, add water sparingly; if it’s too wet, incorporate small amounts of flour. Remember, a higher hydration dough generally leads to a more open, airy interior crumb, which is ideal for soaking up soups and sauces.
The gentle kneading required here is important. Unlike sourdough or standard sandwich bread that requires extensive gluten development, this rustic loaf benefits from less kneading, which helps maintain a slightly irregular structure. Over-kneading will make the bread tough and chewy in an unpleasant way. Stick to the 5-minute initial kneading and let the long, slow rise do the heavy lifting of developing flavor and structure. When you dimple the dough just before the final proof, ensure you press down firmly enough to create pockets for the infusion oil to settle, enhancing the burst of flavor in every bite.
Serving Suggestions: What to Pair with Garlic Rosemary Bread
The beauty of this aromatic skillet bread lies in its versatility. While it’s certainly robust enough to be the star of the show—especially when served with just a simple dipping oil and balsamic vinegar—it truly shines when complementing a full, flavorful meal. Think about dishes with rich, savory liquids that the crust can happily mop up.
For a fantastic weeknight meal, pair the bread with a slow-cooked beef ragout or a hearty, vegetable-laden Italian wedding soup. The savory notes of the rosemary and garlic cut beautifully through the richness of the meat and broth. Alternatively, embrace the simplicity of Mediterranean flavors. Slice the bread thickly and serve it alongside marinated roasted vegetables, crumbled cheese (if desired), and a bowl of high-quality olive oil seasoned with red pepper flakes and herbs. It transforms a simple appetizer spread into an unforgettable experience. This bread also serves as the perfect base for bruschetta toppings if you slice it horizontally and toast it lightly.
The Art of the Dimple: Getting Maximum Flavor Penetration
One detail often overlooked when making skillet bread is the necessity of dimpling the dough aggressively before the final rise and bake. Those little divots are not just aesthetically pleasing; they are functional. They prevent the dough from rising too high and evenly, creating valleys and peaks that catch and hold the flavorful garlic-rosemary oil. Without proper dimpling, the oil often just slides off the side, resulting in a less intensely flavored top crust. Use three or four fingers, pressing down gently until you nearly reach the bottom of the pan without tearing the dough. This simple action maximizes surface area for the herbs and salt, ensuring every single bite delivers that potent flavor combination.
Reheating and Storing Your Leftovers
While homemade bread rarely lasts long in my house, occasionally, you might find yourself with a slice or two leftover (usually only because I was forced to hide it from myself). The best way to store this bread is at room temperature in a paper bag for up to two days. Avoid refrigeration, as it will quickly dry out the starches and make the bread taste stale faster.
To recapture that initial crackle and warmth, reheating is essential. Preheat your oven or toaster oven to 350°F (175°C). Wrap the bread loosely in aluminum foil and bake for 5 to 10 minutes until warmed through. Alternatively, if you only have slices, a quick toast in a dry skillet or a brief zap in the broiler can revive the crust beautifully. Never microwave it unless you enjoy the sensation of chewing on a sad, spongy disappointment—the microwave annihilates the lovely texture we worked so hard to achieve in thisRustic Garlic Rosemary Skillet Bread Recipe.
The Accidental Discovery of Sunshine on a Plate
I stumbled upon this delightful bread after a power outage forced me to ditch the oven; necessity truly birthed the idea of baking dough directly in my cast iron skillet over the camping stove. The result, this magnificent Rustic Garlic Rosemary Skillet Bread Recipe, tasted like pure comfort.
The Unlikely Star of the Dinner Table
There is something inherently joyful about making bread. It’s primal, meditative, and absolutely guaranteed to make your kitchen smell like the coziest corner of the universe. But let’s be honest, traditional bread recipes can be fussy. They demand precise proofing temperatures, steaming techniques, and a commitment level normally reserved for adopting a pet. This recipe? It’s the rebellion against complication. It’s the simple, delicious cousin that everyone actually wants to invite to the party.
The beauty of the Rustic Garlic Rosemary Skillet Bread Recipe lies in its straightforward nature. You mix it, you let it rise, and then you toss it into a hot skillet, letting the humble cast iron work its magic. What emerges is not just a loaf, but a deeply flavorful, impossibly tender bread with a delightfully rugged crust that practically begs to be torn apart and dipped into good olive oil or used to soak up the last vestiges of a rich stew. Forget the fancy bakery standards; this rustic bread is where flavor meets feasibility.
The Seduction of Simple Ingredients
You might be wondering how something so humble manages to deliver such a knockout punch of flavor. The answer is quality ingredients and the powerful duo of garlic and rosemary. These aren’t subtle background notes; they are the headline act. We infuse the dough itself with minced garlic and fragrant rosemary, ensuring that every single bite delivers that earthy, aromatic warmth.
I first attempted this recipe on a ridiculously cold Tuesday evening when I desperately needed culinary warmth without the usual effort. I had no idea that substituting a searing hot skillet for a conventional oven would unlock a level of texture I’d been chasing for years. The high, direct heat caramelizes the crust beautifully while protecting the moisture inside, leading to that signature chewy-soft interior we all crave in a hearty bread. If you love a bread that is sturdy enough to handle robust flavors yet soft enough to melt in your mouth, your search ends here.
Gathering Your Rustic Ingredients
Before you begin your baking journey, ensure your pantry is stocked with the freshest possible herbs and quality flour. Using older yeast or stale flour can drastically affect the rise and the final texture of this skillet loaf.
Dry Goods Foundation
- 3 cups (360g) all-purpose flour, plus more for dusting
- 1 packet (2 1/4 teaspoons) active dry yeast
- 1 teaspoon granulated sugar
- 1 1/2 teaspoons fine sea salt
Flavor Infusers and Wet Components
- 1 1/4 cups lukewarm water (about 105–115°F)
- 4 tablespoons extra virgin olive oil, divided (2 tbsp for the dough, 2 tbsp for the skillet)
- 4 cloves garlic, finely minced or pressed
- 2 tablespoons fresh rosemary, finely chopped
- 1 teaspoon coarse sea salt (for sprinkling on top)
Mixing and Proofing: The Art of Patience
The preparation for this rosemary bread is delightfully forgiving. Don’t worry about being overly technical; bread making is about intuition, too! Start by activating your yeast. In a large mixing bowl, combine the lukewarm water and sugar. Sprinkle the yeast over the top and let it sit for about five to ten minutes until it becomes foamy. This tells you your yeast is awake and ready for action.
Once foamy, stir in two tablespoons of the olive oil, the minced garlic, and the chopped rosemary. In a separate bowl, whisk together the flour and salt. Gradually add the dry ingredients to the wet mixture, mixing with a wooden spoon or a stand mixer fitted with a dough hook until a shaggy, cohesive dough forms. Knead the dough for about six to eight minutes until it becomes smooth and elastic. It should be slightly tacky but should not stick aggressively to your hands.
Lightly oil a clean bowl and place the dough inside, turning it once to coat. Cover the bowl tightly with plastic wrap or a kitchen towel. Place the bowl in a warm spot and let it rise until it has doubled in size, which usually takes about 60 to 90 minutes, depending on the warmth of your kitchen. Patience is crucial here; a well-proofed dough ensures a light, fluffy crumb.
Perfecting the Cooking Process
The secret lies in heating the cast iron skillet thoroughly before adding the dough, treating it almost like a griddle. This ensures that crispy, golden-brown crust forms instantly, while the bread cooks evenly and maintains a soft, fluffy interior.
Baking Bliss in a Skillet
Once the dough has doubled, gently punch it down to release the air. Turn the dough out onto a lightly floured surface and shape it into a neat, round boule. Now, for the skillet magic: place your 10 or 12-inch cast iron skillet on the stovetop and add the remaining two tablespoons of olive oil. Heat the oil over medium heat until it is shimmering—this should take about three to five minutes. This preheating step is absolutely mandatory for achieving that beautiful, deep crust.
Carefully transfer the dough boule into the hot skillet. If you need to stretch the dough slightly to fit the bottom of the pan, do so gently. Immediately cover the skillet tightly with a lid, preferably one that fits snugly to trap the steam and heat. Reduce the heat to medium-low. This slow, moist heat is what simulates the oven environment and allows the bread to cook fully without burning.
Allow the bread to cook for 15 to 20 minutes on the first side. Resist the urge to peek during the initial cooking phase! Once the timer is up, remove the lid and use a spatula to carefully flip the rustic bread. It should be a rich golden brown color. Sprinkle the top with coarse sea salt. Cover the skillet again and continue to cook for another 10 to 15 minutes, or until the bread sounds hollow when tapped and has reached an internal temperature of 200–210°F. Remove the skillet from the heat and transfer the fragrant loaf immediately to a wire rack to cool completely. Allowing it to cool on the rack prevents the bottom crust from becoming soggy.
Add Your Touch
Swap dried rosemary for fresh thyme or oregano if you crave variation, or mix in some caramelized onions for depth. You can also drizzle the finished bread with balsamic vinegar or spicy honey for an unexpected, savory-sweet finish.
My neighbor tasted this bread hot out of the pan and instantly asked if I was starting a bakery. It was the highest compliment, confirming that simplicity, when done right, is truly sublime.
Expert Bread Baking Tips
- For an ultra-tender crumb, always use lukewarm water when activating the yeast; if the water is too hot, it kills the yeast, resulting in flat bread.
- Don’t skip the second proofing stage in the skillet; this rest allows the dough to relax fully, ensuring maximum height and a light, airy texture.
- Use a high-quality extra virgin olive oil for the skillet—it adds intense flavor to the crust and prevents sticking without needing excess flour.
Storing & Reheating
Store leftover bread wrapped tightly in foil at room temperature for up to three days. To revive the crunchy exterior, simply reheat slices in a hot skillet for a few minutes until they become delightfully crisp again.
Conclusion for Rustic Garlic Rosemary Skillet Bread Recipe
This Rustic Garlic Rosemary Skillet Bread Recipe proves that sophisticated flavor doesn’t require complicated methods or fancy equipment. The combination of pungent garlic and earthy rosemary baked into a perfectly textured crust makes for an unforgettable centerpiece or accompaniment. Embrace the joy of simple baking, fire up that cast iron, and prepare to elevate your standard bread basket. It’s comforting, easy, and undeniably delicious, promising a taste of rustic perfection in every tear-off piece.
Print
Rustic Garlic Rosemary Skillet Bread Recipe
This rustic skillet bread bakes up with a golden, crisp olive oil crust and a soft interior, perfumed with fresh rosemary and garlic. Instructions included. Check nutrition facts here.
- Total Time: 35 minutes
- Yield: 4 servings
Ingredients
- All-Purpose Flour: 3 cups
- Warm Water (105°F-115°F): 1 1/2 cups
- Active Dry Yeast: 2 1/4 teaspoons
- Kosher Salt: 1 1/2 teaspoons
- Olive Oil: 1/4 cup plus 2 tablespoons (divided)
- Fresh Rosemary: 2 tablespoons (finely chopped)
- Garlic: 4 cloves (minced)
Instructions
- Step 1: In a large mixing bowl, combine the warm water and yeast. Let stand for 5-10 minutes until frothy. Add the flour and salt, mixing until a shaggy, cohesive dough forms (it will be sticky). Cover the bowl tightly with plastic wrap and let the dough rise in a warm spot for 1.5 to 2 hours, or until doubled in size.
- Step 2: While the dough rises, prepare the skillet and flavorings. Pour 1/4 cup of olive oil into a 10-inch cast iron skillet, ensuring the bottom and sides are fully coated. In a small separate bowl, mix the remaining 2 tablespoons of olive oil with the minced garlic and chopped rosemary.
- Step 3: Gently deflate the risen dough and transfer it to the prepared cast iron skillet. Using oiled hands, press and stretch the dough until it mostly fills the base of the skillet. Use your fingertips to create deep dimples across the entire surface of the bread.
- Step 4: Drizzle the reserved garlic and rosemary olive oil mixture evenly over the dimpled dough. Let the dough rest in the skillet for a final quick proof (about 20-30 minutes) while you preheat your oven to 400°F (200°C).
- Step 5: Bake the skillet bread on the center rack for 25 to 35 minutes, or until the crust is deep golden brown and the internal temperature reaches 200°F (93°C). Immediately transfer the hot bread from the skillet to a wire rack to cool slightly before serving.
Notes
- For maximum freshness, store any leftovers at room temperature in a tightly sealed container; if keeping longer than two days, slice and freeze the bread to prevent it from drying out.
- To revive the beautiful crispy bottom crust and warm the aromatics, tent slices loosely in foil and heat in a 350°F oven for 8-10 minutes, or toast briefly in a dry skillet.
- Serve this intensely flavored bread alongside a hearty tomato-based soup or a slow-cooked beef stew, or slice thick pieces for dipping into high-quality balsamic vinegar and olive oil.
- When creating the deep dimples, be sure your fingers gently touch the bottom of the skillet; this creates the perfect pockets for the garlic and rosemary oil to pool, distributing flavor throughout the crumb as it bakes.
- Prep Time: 15 minutes
- Cook Time: 20 minutes
- Method: Stovetop
- Cuisine: American

Leave a Comment