
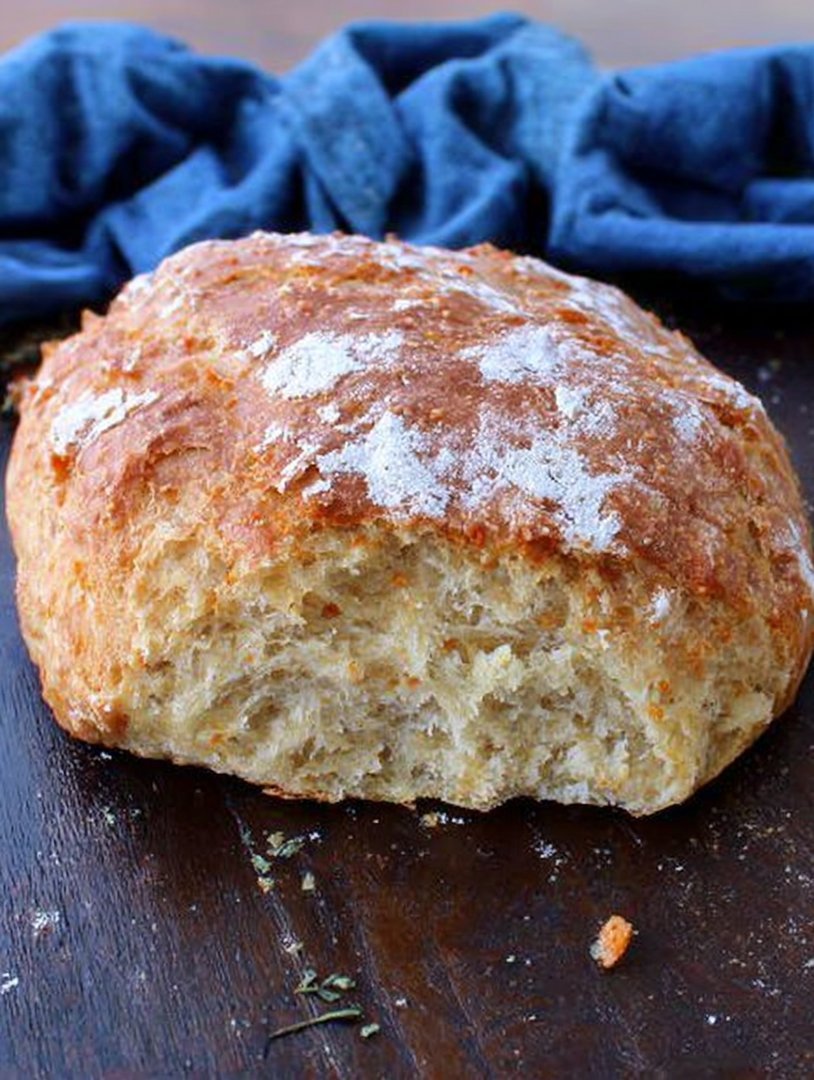
Picture this: golden-brown crust, a symphony of crackles with every slice, and an aroma that could charm even the grumpiest of neighbors. It’s not just bread; it’s an experience. Imagine transforming your kitchen into a Tuscan countryside bakery, all thanks to this wonderfully simple recipe. This rustic Italian crusty bread is perfect for any meal.
- Effortlessly achieve bakery-quality bread with minimal ingredients and easy-to-follow instructions.
- Experience the delightful contrast of a crisp, golden crust and a soft, airy interior with every bite.
- Impress your friends and family with a visually stunning loaf that’s as delicious as it is beautiful.
- Enjoy this versatile bread as a side, sandwich base, or simply slathered with your favorite toppings.
Ingredients for Rustic Italian Crusty Bread
Here’s what you’ll need to make this delicious dish:
- Bread FlourUse bread flour for its higher protein content, which creates a stronger gluten network, resulting in a chewier and more structured bread.
- All-Purpose FlourAdds a bit of tenderness to the dough, balancing the chewiness from the bread flour for the perfect texture.
- Instant YeastEnsures a consistent and reliable rise; just add it directly to the dry ingredients without proofing.
- SaltEnhances the flavor of the bread and controls the yeast activity, contributing to the bread’s overall structure.
- Warm WaterActivates the yeast and hydrates the flour, bringing the dough together into a cohesive mass. Aim for a temperature around 105-115°F (40-46°C).
- Olive OilAdds flavor and helps create a slightly softer crust. Use a good quality extra virgin olive oil for the best taste.
The full ingredients list, including measurements, is provided in the recipe card directly below.
How to Make Rustic Italian Crusty Bread
Follow these simple steps to prepare this delicious dish: Step 1: Mix the Dry Ingredients In a large bowl, whisk together the bread flour, all-purpose flour, instant yeast, and salt. Ensure everything is well combined to evenly distribute the yeast and salt. Step 2: Add Wet Ingredients Add the warm water and olive oil to the dry ingredients. Stir with a wooden spoon or your hands until a shaggy dough forms. The dough will be sticky, and that’s perfectly normal! Step 3: First Rise Cover the bowl with plastic wrap or a damp towel and let it rise in a warm place for 1.5 to 2 hours, or until doubled in size. This allows the yeast to work its magic, developing the bread’s flavor and texture. Step 4: Shape the Dough Gently punch down the dough to release the air. Turn it out onto a lightly floured surface. Shape the dough into a round or oval loaf. Be gentle to maintain the airy texture. Step 5: Second Rise Place the shaped loaf on a baking sheet lined with parchment paper. Cover loosely with plastic wrap and let it rise for another 30-45 minutes. This second rise helps the bread achieve its final light and airy texture. Step 6: Bake Preheat your oven to 450°F (232°C) with a baking stone or Dutch oven inside. Carefully transfer the loaf onto the hot stone or into the Dutch oven. Score the top of the loaf with a sharp knife or lame. If using a Dutch oven, cover it for the first 20 minutes, then remove the lid and bake for another 20-25 minutes, or until the crust is golden brown and the internal temperature reaches 200-210°F (93-99°C). Step 7: Cool and Enjoy Let the bread cool completely on a wire rack before slicing and serving. This allows the internal structure to set, preventing a gummy texture. Serve warm with olive oil and balsamic vinegar, or use for sandwiches. Enjoy the delightful aroma and taste of homemade Rustic Italian Crusty Bread!
Tips for the Perfect Rustic Italian Crusty Bread
Making bread can seem intimidating, but with a few simple tips, you’ll be baking like a pro in no time!
Use Quality Ingredients
The better the ingredients, the better the bread. Invest in good-quality flour and olive oil for the best flavor and texture. Trust me; your taste buds will thank you.
Don’t Overmix the Dough
Overmixing can lead to tough bread. Mix just until the ingredients come together, and let time do the rest. A little patience goes a long way.
Control the Dough Temperature
Yeast loves warmth, but too much heat can kill it. Ensure your water is warm, not hot, and let the dough rise in a warm, draft-free place. A slightly warm oven (turned off!) works wonders.
Score the Dough Properly
Scoring the dough isn’t just for looks; it helps control how the bread expands in the oven. Use a sharp knife or lame to make a deep slash or two on the top of the loaf.
Let It Cool Completely
Resist the urge to slice into the bread while it’s still hot! Letting it cool completely allows the internal structure to set, resulting in a better texture and easier slicing.
Variations to Spice Up Your Rustic Italian Crusty Bread
Want to get a little adventurous? Here are a few ways to customize your rustic Italian crusty bread.
Herb Infusion
Add dried herbs like rosemary, thyme, or oregano to the dough for an herbaceous twist. About 1-2 tablespoons of dried herbs should do the trick. It’s like a garden party in your mouth.
Cheesy Goodness
Fold in grated Parmesan or Asiago cheese into the dough before the second rise. The cheese will melt into the bread, creating pockets of cheesy, savory goodness. Who can resist cheese bread?
Garlic Lover’s Dream
Roast some garlic cloves and mash them into a paste. Mix the garlic paste into the dough for an intensely garlicky flavor. This is perfect for garlic bread aficionados.
Seed Sensations
Sprinkle sesame seeds, poppy seeds, or sunflower seeds on top of the loaf before baking. This adds a nutty flavor and a delightful crunch. Seeded bread is always a crowd-pleaser.
Olive Delight
Fold in chopped Kalamata olives or green olives into the dough. The briny olives add a burst of flavor that complements the crusty bread perfectly. Olive bread is fantastic with a smear of cream cheese.
Serving Suggestions for Rustic Italian Crusty Bread
This bread is incredibly versatile. Here are some ideas to get you started:
Classic Bruschetta
Toast slices of the bread and top with diced tomatoes, basil, garlic, and a drizzle of olive oil. Simple, fresh, and always a hit.
Sandwich Star
Use the bread to make your favorite sandwiches. It’s sturdy enough to hold all sorts of fillings, from deli meats to grilled vegetables.
Soup Companion
Serve slices of the bread alongside a bowl of hearty soup or stew. Perfect for dipping and soaking up all the delicious broth.
Garlic Bread Upgrade
Slice the bread, spread with garlic butter, and bake until golden brown. A classic for a reason.
Bread Basket Staple
Simply slice and serve with a side of olive oil and balsamic vinegar for dipping. A great way to start any meal.
Frequently Asked Questions About Rustic Italian Crusty Bread
Can I use whole wheat flour instead of all-purpose flour?
Yes, you can substitute up to half of the all-purpose flour with whole wheat flour. Keep in mind that whole wheat flour will result in a denser bread.
Can I make the dough ahead of time?
Absolutely! After the first rise, you can refrigerate the dough for up to 24 hours. Just bring it back to room temperature before shaping and baking.
How do I store the bread?
Store the bread in a paper bag at room temperature for up to 2 days. For longer storage, wrap it tightly in plastic wrap and freeze it. Thaw completely before enjoying.
Why is my bread so dense?
Several factors can cause dense bread, including using old yeast, not letting the dough rise enough, or using too much flour. Make sure your yeast is fresh and give the dough ample time to rise.
Can I bake this bread in a regular loaf pan?
While it’s best baked on a stone or in a Dutch oven for that signature crust, you can bake it in a loaf pan. Just adjust the baking time accordingly.
Conclusion: Enjoy Your Homemade Rustic Italian Crusty Bread
There you have it—a simple, yet incredibly satisfying recipe for rustic Italian crusty bread. This isn’t just bread; it’s an experience, a chance to connect with the simple pleasure of baking and the joy of sharing good food with loved ones. So, preheat that oven, gather your ingredients, and get ready to transform your kitchen into a cozy Italian bakery. Happy baking!
Content generation failed due to API limits. Please try again later. Original prompt: IMPORTANT: Write the entire article in English. CRITICAL: Do NOT inclu…
Rustic Italian Crusty Bread: An Artisan Loaf You Can Bake at Home
Embark on a Baking Adventure: The Allure of Rustic Bread
Ever dreamt of filling your kitchen with the irresistible aroma of freshly baked bread, a loaf so enticing it could stop a Roman chariot in its tracks? Well, my friend, prepare to ditch those store-bought slices and embark on a journey to bake your very ownrustic Italian crusty bread. Trust me; this isn’t just baking; it’s an experience.
Why Rustic Bread is the Ultimate Baking Project
Let’s be honest, baking can sometimes feel like advanced chemistry. Butrustic Italian crusty breadlaughs in the face of perfection. Its charm lies in its imperfections – the irregular crumb, the uneven crust, the slightly off-kilter shape. It’s the bread that says, “I’m homemade, and I’m proud!” Plus, the satisfaction of pulling a golden, crackling loaf from your oven is a feeling that’s hard to beat. It’s a symphony of simple ingredients transforming into something extraordinary.
Ingredients: Keeping It Simple, Keeping It Real
The beauty ofrustic Italian crusty breadis that it requires surprisingly few ingredients. We’re talking pantry staples here, folks. No need to sell your prized stamp collection to afford exotic flours. We like to keep things straightforward, like a sunny afternoon in Tuscany.
- 4 cups (500g) bread flour, plus more for dusting
- 2 teaspoons (8g) salt
- 1/2 teaspoon (2g) active dry yeast
- 1 3/4 cups (420ml) lukewarm water
The Star of the Show: Bread Flour
While all-purpose flour can work in a pinch, bread flour is what gives yourrustic Italian crusty breadthat signature chew. The higher protein content develops more gluten, resulting in a sturdier structure and a more satisfying bite. Think of it as the bread’s personal trainer, helping it build strength and endurance.
The Process: From Humble Beginnings to Crusty Glory
Alright, let’s get down to business! Don’t worry; this recipe is more about patience than precision. We’re aiming for that relaxed, “la dolce vita” vibe here.
Step 1: Mix It Up (Gently!)
In a large bowl, whisk together the flour, salt, and yeast. Add the lukewarm water and stir until just combined. The dough will be shaggy and sticky – don’t panic! That’s exactly what we want. It’s like a messy first date; a little awkward, but full of potential.
Step 2: The Bulk Fermentation Tango
Cover the bowl with plastic wrap or a damp towel and let it rest at room temperature for 12-18 hours. This long fermentation process is key to developing the bread’s flavor and airy texture. Think of it as a long, luxurious spa day for your dough. It’s relaxing, rejuvenating, and absolutely essential.
Step 3: Shaping the Dream
Lightly flour a work surface. Gently turn the dough out onto the floured surface. It will be puffy and full of bubbles. Gently shape it into a round or oval loaf. Be careful not to deflate all those precious air pockets! Imagine you’re cradling a baby bird – gentle and supportive.
Step 4: The Second Act: Proofing
Place the shaped loaf on a piece of parchment paper. Cover loosely with plastic wrap or a damp towel and let it proof for another 1-2 hours. The dough should almost double in size. This is the final stretch before baking, like the last few miles of a marathon. Your bread is almost ready to shine!
Step 5: Bake It ‘Til You Make It
Preheat your oven to 450°F (232°C) with a Dutch oven inside. Once the oven is hot, carefully remove the Dutch oven and place the parchment paper with the loaf inside. Cover and bake for 30 minutes. Remove the lid and bake for another 15-20 minutes, or until the crust is deeply golden brown. The internal temperature should reach 200-210°F (93-99°C). This is where the magic happens. The high heat and steam create that incredible crust we all crave.
Step 6: Cool and Conquer
Carefully remove the bread from the Dutch oven and let it cool completely on a wire rack before slicing. I know, the temptation is real, but trust me, it’s worth the wait. Slicing into a warm loaf is a surefire way to end up with a gummy interior. Patience, my friend, patience!
Serving Suggestions: From Simple to Sublime
Okay, yourrustic Italian crusty breadis baked, cooled, and ready to be devoured. Now what? The possibilities are endless!
- Drizzle with olive oil and sprinkle with sea salt.
- Serve alongside your favorite soup or stew.
- Use it to make bruschetta with fresh tomatoes and basil.
- Transform it into gourmet sandwiches.
- Simply enjoy a slice on its own, because sometimes the simplest things are the best.
Conclusion for Rustic Italian Crusty Bread
So there you have it, folks! Your guide to baking the perfectrustic Italian crusty breadright in your own kitchen. With just a few simple ingredients and a little patience, you can create a loaf that’s worthy of a Michelin star (or at least a very enthusiastic thumbs-up from your family and friends). Now go forth and bake, and may your kitchen always be filled with the comforting aroma of freshly baked bread!
Print
Rustic Italian Crusty Bread
1. Crispy, chewy Rustic Italian Crusty Bread awaits! Simple flour, water, yeast, salt & a touch of olive oil create pure magic. Recipe & details inside. 2.
- Total Time: 35 minutes
- Yield: 4 servings
Ingredients
- Bread Flour: 500 grams
- Water: 350 grams (lukewarm)
- Active Dry Yeast: 7 grams (or 1 packet)
- Salt: 10 grams
- Olive Oil: 1 tablespoon (plus extra for greasing)
- Semolina Flour: For dusting
Instructions
- Step 1: In a large bowl, dissolve the yeast in the lukewarm water. Let it stand for 5-10 minutes until foamy.
- Step 2: Add the flour and salt to the yeast mixture. Mix with a wooden spoon or your hands until a shaggy dough forms.
- Step 3: Turn the dough out onto a lightly floured surface and knead for 8-10 minutes until smooth and elastic. Alternatively, mix in a stand mixer with a dough hook for 6-8 minutes.
- Step 4: Place the dough in a lightly oiled bowl, turning to coat. Cover with plastic wrap or a damp cloth and let rise in a warm place for 1-1.5 hours, or until doubled in size.
- Step 5: Gently punch down the dough and turn it out onto a lightly floured surface. Shape the dough into a round or oblong loaf.
- Step 6: Place the loaf on a baking sheet dusted with semolina flour. Cover loosely and let rise for another 30-45 minutes. Preheat oven to 450°F (232°C).
- Step 7: Just before baking, slash the top of the loaf with a sharp knife or razor blade. Bake for 30-35 minutes, or until golden brown and the internal temperature reaches 200-210°F (93-99°C). Let cool on a wire rack before slicing and serving.
Notes
- To keep your crusty bread fresh longer, store it in a paper bag at room temperature, not plastic.
- Reheat slices in a toaster or warm the whole loaf in a 350°F (175°C) oven for 5-10 minutes to restore its crusty texture.
- Serve thick slices of this rustic bread with olive oil and balsamic vinegar for a simple and satisfying appetizer.
- For a truly artisanal crust, lightly mist the oven with water a few times during the first 10 minutes of baking, creating steam.
- Prep Time: 15 minutes
- Cook Time: 20 minutes
- Method: Stovetop
- Cuisine: American
FAQs
Can I use all-purpose flour instead of bread flour for this rustic Italian crusty bread recipe?
While bread flour is preferred for its higher protein content, which leads to a chewier texture, you can substitute all-purpose flour if that’s all you have on hand. Your loaf ofrustic Italian crusty breadmay not be quite as chewy, but it will still be delicious. Consider adding a tablespoon of vital wheat gluten to the all-purpose flour to help improve the texture. Remember, baking is an art, not a science, so feel free to experiment and find what works best for you and your kitchen!
How do I get that super crusty crust on my rustic Italian crusty bread?
The secret to a truly stellar crust lies in the steam. Baking the bread in a Dutch oven traps the moisture, creating a steamy environment that allows the crust to develop properly. If you don’t have a Dutch oven, you can try placing a pan of hot water on the bottom rack of your oven during baking. Also, ensuring your oven is fully preheated to the correct temperature is crucial for achieving that perfect golden-brown, crackly crust on your homemaderustic Italian crusty bread.
What if my rustic Italian crusty bread dough is too sticky to handle?
A sticky dough is perfectly normal for this type of bread, thanks to the high hydration. Resist the urge to add too much extra flour during the shaping process, as this can result in a dry loaf. Instead, lightly flour your hands and your work surface, and use a dough scraper to help you handle the dough. Remember, a little stickiness is a good thing! It contributes to the bread’s open crumb and delightful texture of therustic Italian crusty breadyou want.
How long does rustic Italian crusty bread last?
Homemaderustic Italian crusty breadis best enjoyed fresh, ideally within the first two days. Because it doesn’t contain any preservatives, it tends to dry out faster than store-bought bread. To keep it fresh for longer, store it in a paper bag or loosely wrapped in a clean kitchen towel at room temperature. You can also freeze slices of the bread for later use. Just wrap them tightly in plastic wrap and thaw them before enjoying.


Leave a Comment