

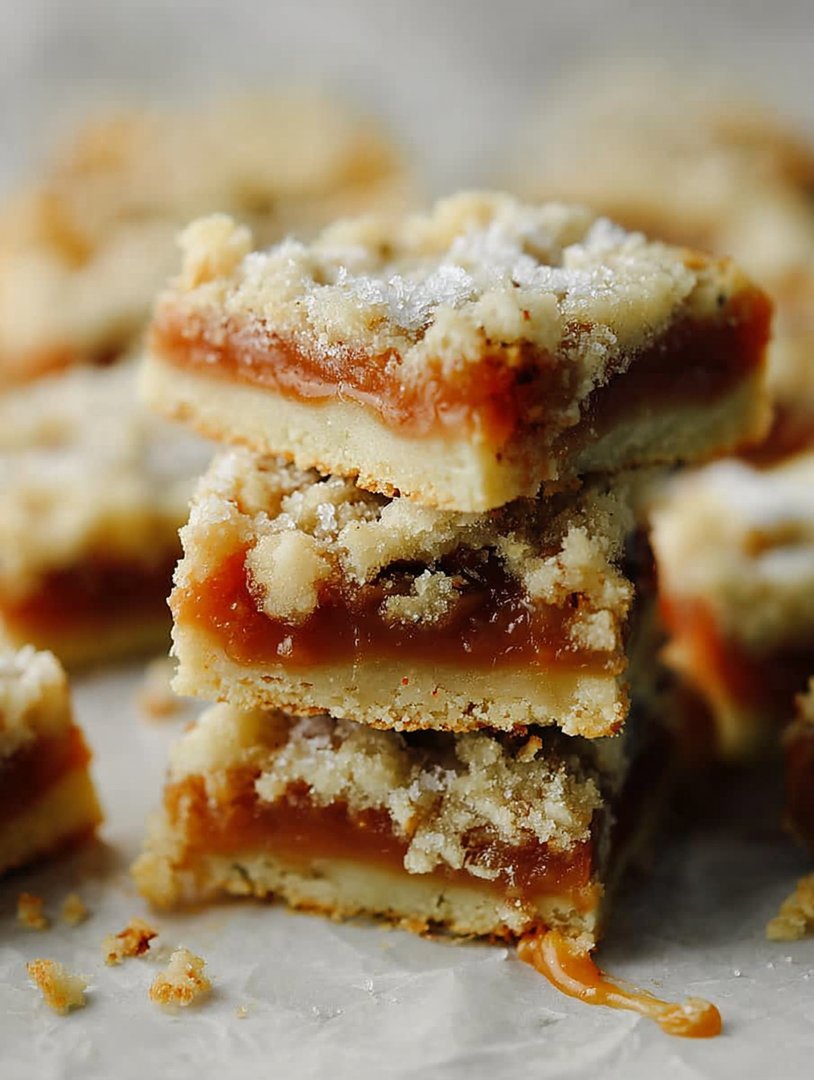
Remember that precise moment you first tasted pure decadence? These glorious Salted Caramel Butter Bars are that memory, solidified into a chewy, buttery shortbread crust topped with the most glorious, smooth salted caramel filling you could ever imagine.
Forget the fear of complex pastry; this is a straightforward recipe that delivers maximum flavor impact. Prepare yourself for the easiest bar recipe that will instantly earn you legendary status at every holiday gathering or casual Friday night dessert table.
- Requires minimal special equipment and follows a simple mix-and-press method, perfect for novice bakers looking for a quick and impressive win.
- The perfect interplay of sweet, gooey caramel, rich brown butter flavor, and a hint of flaky sea salt creates an absolutely addictive and sophisticated profile.
- Presents beautifully with distinct layers, featuring a golden crust, shimmering caramel, and a delicate crackle of salt, making it inherently photogenic.
- Ideal for holiday dessert platters, casual snacking, or elegant presentation when served alongside a scoop of premium vanilla bean ice cream.
The Anatomy of a Perfect Dessert Triumph
My relationship with butter bars started, as most great culinary adventures do, in chaos. It was the night before a major bake sale, and I had promised something “new and jaw-dropping.” My previous attempts at intricate layered desserts ended mostly in weeping and food poisoning rumors, so I desperately needed a simple, show-stopping hero. Enter the concept of the buttery shortbread base, the rich caramel center, and that indispensable pinch of salt that makes everything pop.
The Secret to the Crumbly, Yet Chewy Base
The crust of these bars is not just filler; it is the foundation upon which your caramel empire will rest. We use an extraordinary amount of butter—don’t skimp, this is not the time for self-restraint—mixed with flour and powdered sugar. The magic lies in the texture: you want it crumbly enough to press into the pan, but rich enough that it holds its shape beautifully once baked. The secret weapon here is the inclusion of brown sugar alongside the powdered sugar, which adds a crucial chewiness and a depth of molasses flavor that a purely white sugar crust simply cannot achieve.
Many recipes tell you to simply melt the butter, but for a truly exceptional flavor, I advocate for browning a portion of it. Browning the butter takes an extra five minutes, transforming the standard dairy fat into a nutty, complex, and highly aromatic ingredient that lifts the entire bar from “good” to “unforgettable.” This nutty aroma complements the rich, deep sweetness of the caramel filling perfectly, ensuring that even the base layer is a flavor powerhouse.
Crafting the Gooey, Golden Caramel Filling
Making caramel sometimes carries the reputation of being tricky—a precarious dance between liquid sugar and immediate solidification. But trust me, this recipe uses a foolproof method that minimizes the risk of scorching or crystallization. We focus on a simple mixture of butter, cream, and brown sugar, allowing it to bubble gently until it reaches a thick, luxurious consistency. The key is patience; stirring constantly over medium heat prevents hot spots and ensures smooth, even cooking. Once the caramel thickens and coats the back of a spoon, you know you have achieved perfection.
The final, non-negotiable step before pouring this liquid gold onto the pre-baked shortbread is the inclusion of the flaky sea salt. Don’t use standard iodized salt here; you must use a quality flaky salt, like Maldon. The large, uneven crystals provide pockets of salty crunch that cut through the richness of the butter and sugar, creating the perfect balance—the definition of salted caramel. This touch elevates the entire bar from a standard dessert to a sophisticated treat suitable for any refined palate.
Ingredients for Salted Caramel Butter Bars
Here’s what you’ll need to make this delicious dish:
- All-Purpose FlourThe structural backbone of your crust; measure it correctly by spooning the flour into the measuring cup and leveling off.
- Unsalted ButterEssential for both the shortbread and the caramel; using unsalted allows you to control the exact level of saltiness in the final product.
- Brown SugarProvides depth, moisture, and that desirable chewy texture to both the crust and the filling.
- Powdered SugarEnsures a tender and melt-in-your-mouth texture for the base, contributing to its delicate crumb.
- Heavy CreamNecessary for achieving the rich, smooth, and flowing consistency of the caramel filling; avoid using half-and-half.
- Vanilla PowderAdds a vital aromatic layer that enhances the overall sweetness and complexity of the caramel.
- Flaky Sea SaltCrucial for the “salted” part of the name; use high-quality flakes for both mixing into the caramel and sprinkling on top.
The full ingredients list, including measurements, is provided in the recipe card directly below.
How to Make Salted Caramel Butter Bars
Follow these simple steps to prepare this delicious dish:
Step 1: Prepare the Shortbread Base
Preheat your oven to 350°F (175°C). Grease and line an 8×8 inch square baking dish with parchment paper, leaving an overhang on two sides for easy removal later. In a large mixing bowl, combine the flour, powdered sugar, and brown sugar. Cut the cold unsalted butter into small cubes and use a pastry blender or your fingertips to work the butter into the flour mixture until large, pea-sized crumbs form. Press about two-thirds of this mixture firmly and evenly into the prepared pan, creating the bottom crust. Bake this crust for 15 minutes until the edges are lightly golden, then set it aside to cool slightly while you prepare the filling.
Step 2: Cook the Rich Caramel Filling
While the crust cools, begin the caramel. In a medium, heavy-bottomed saucepan, melt the remaining butter along with the reserved brown sugar and heavy cream over medium heat. Stir constantly until the sugar completely dissolves. Once boiling, reduce the heat slightly and continue to cook, stirring frequently, for about 5 to 7 minutes. The mixture should thicken significantly and achieve a rich amber color. It should register around 220°F (104°C) on a candy thermometer, or pass the soft-ball stage visual test. Remove the caramel from the heat immediately, stir in the vanilla powder, and add a generous pinch of the flaky sea salt.
Step 3: Assemble and Bake the Bars
Carefully pour the hot caramel filling evenly over the partially baked shortbread crust. Gently crumble the remaining one-third of the shortbread mixture over the top of the caramel layer. Do not press the top layer down; you want it light and crumbly. Return the baking dish to the preheated oven. Bake for an additional 20 to 25 minutes, or until the top crumb is golden brown and the caramel is bubbling faintly around the edges.
Step 4: Cooling is Non-Negotiable
This is arguably the most critical step. Once baked, the bars will be molten and gooey—do not attempt to cut them yet! Remove the pan from the oven and place it on a wire rack to cool completely. The caramel needs ample time to set up and achieve its iconic chewiness. For best results, allow the bars to cool at room temperature for at least two hours, or even better, refrigerate them for 30 minutes to firm up before slicing. Sprinkle the top liberally with a final flourish of flaky sea salt right before serving.
Transfer the cooled bars to a cutting board using the parchment paper overhang and slice them into 16 uniform squares for easy enjoyment and sharing.
Troubleshooting and Tips for Flawless Bars
Even though this recipe is incredibly straightforward, there are a few key techniques that separate an excellent batch of buttery caramel squares from a merely acceptable one. Understanding the role of temperature and patience ensures a consistently perfect result every time you make them. Ignoring these small tips often leads to frustratingly runny caramel or bars that fall apart upon cutting.
Why Temperature Control is Your Best Friend
In baking, precision in temperature is often the difference between success and failure, and this is especially true for the caramel filling. If the caramel doesn’t cook long enough, it remains too thin and will seep into the crust completely, resulting in a soggy bottom layer rather than a distinct caramel filling. If it cooks too long, it risks turning brittle and hard, losing that beautiful, signature chew. Aiming for the soft-ball stage (220°F/104°C) is ideal; this provides the perfect viscosity that sets up wonderfully when cooled but remains delightfully chewy at room temperature. Also, ensure the crust is sufficiently cooled before pouring the hot caramel; this separation of temperatures helps maintain the crispness of the shortbread.
Achieving the Cleanest Slice
Cutting perfect squares of gooey desserts can feel like an Olympic sport. The secret to achieving crisp, clean edges lies in extreme patience and the power of cold. After the bars have cooled completely at room temperature, chill them in the refrigerator for 20 to 30 minutes. Once chilled, use a large, sharp knife—preferably one you’ve run under hot water and wiped dry—to slice the bars. The warm, clean knife makes neat cuts through the firm caramel. Wipe the knife clean between every slice to prevent dragging the sticky caramel across the clean edges of the next piece. These steps ensure every square looks professionally made and absolutely irresistible.
Storage and Serving Suggestions
These salted caramel shortbread bars keep remarkably well, making them an excellent choice for baking ahead of time for parties or holiday gifts. Store leftover bars in an airtight container at room temperature for up to five days. If you prefer a firmer texture, they can be refrigerated for up to a week. For longer storage, you can freeze individual bars, wrapped tightly in plastic wrap and then placed in a freezer bag, for up to three months. Thaw them overnight in the refrigerator or briefly at room temperature before serving.
While they are perfect enjoyed on their own, consider elevating them further: warm them slightly in the microwave for ten seconds to soften the caramel, then serve them alongside a scoop of high-quality vanilla ice cream or a dollop of fresh whipped cream. For an autumnal twist, a light dusting of cinnamon on the caramel layer before the final bake adds unexpected warmth and spice.
The Accidental Discovery of Sunshine on a Plate
I was aiming for plain shortbread, but spilled sea salt into my simmering condensed milk. Total panic! That happy accident, however, transformed a simple dessert into these epic, gooey Salted Caramel Butter Bars, instantly becoming a family legend.
There are desserts, and then there areexperiences. This isn’t just a recipe; it’s culinary therapy delivered in a deeply comforting square of buttery goodness. If your day has involved complex spreadsheets, arguing with customer service robots, or merely trying to figure out where your left sock went, you need something reliably, gloriously indulgent. These Salted Caramel Butter Bars are exactly that—a sticky, chewy, melt-in-your-mouth promise that everything will be okay, provided you have enough flaky sea salt on hand.
I call them “liquid gold in solid form.” They combine the crispy edges of a perfect shortbread crust with a thick, unbelievably gooey caramel center, all topped with a delicate crumb. The final sprinkle of salt is non-negotiable; it’s the high-five your taste buds didn’t know they needed. Forget those overly complicated layered desserts; this recipe is simple, straightforward, and produces a staggering amount of happiness per calorie. We are baking magic today, and it’s going to involve a lot of butter, which is always a promising start to any culinary adventure.
The Anatomy of the Perfect Butter Bar
What makes a phenomenal butter bar stand out from a merely good one? It’s all about texture synergy. You need that sturdy, yet tender, buttery foundation. Then comes the star: the thick, rich caramel. If your caramel layer is too thin, the whole thing loses its structural integrity and chewiness. If it’s too thick, you risk tooth-pulling disaster. We aim for that sweet spot—a caramel that holds its shape but oozes wonderfully when you take a bite. Lastly, the topping must be crumbly and slightly sandy, providing a contrast to the dense center. The secret to achieving this harmony lies in proper chilling and precise baking times. Resist the urge to yank them out of the oven early, and definitely resist the urge to cut them immediately (unless you enjoy a hot, buttery avalanche).
We’re using simple, pantry-friendly ingredients here, proving that the most decadent results often come from the humblest beginnings. When people ask for the recipe, they often expect a list of rare, imported components. When I tell them it’s mostly flour, sugar, and an irresponsible amount of butter, their eyes widen. It’s a testament to the fact that when you treat basic ingredients with respect and bake them with love (and maybe a little kitchen chaos), you end up with something extraordinary.
Ingredients for Gooey Salted Caramel Butter Bars
For the Crust and Crumb Topping:
- 2 cups (2 sticks/452g) unsalted butter, softened
- 1 cup granulated sugar
- 4 cups all-purpose flour
- 1 teaspoon vanilla powder
- 1/2 teaspoon salt
For the Salted Caramel Filling:
- 1 (14-ounce) can sweetened condensed milk
- 1/2 cup (1 stick/113g) unsalted butter
- 1/2 cup light brown sugar, packed
- 1/2 teaspoon vanilla powder
- 1/2 teaspoon flaky sea salt, plus extra for sprinkling
Mixing and Baking the Decadent Dessert
Preheat your oven to 350°F (175°C) and line a 9×13 inch baking pan with parchment paper, leaving an overhang on the two long sides to act as handles later. This is crucial for getting the sticky bars out cleanly. If you forget this step, you will likely spend the next hour trying to scrape caramel off the bottom of your pan while shedding a single, salty tear.
Step 1: Preparing the Base Dough
In a large mixing bowl or the bowl of a stand mixer, beat the softened butter and granulated sugar until they are light and fluffy. Scrape down the sides, then mix in the vanilla powder and salt. Gradually add the flour, mixing on low speed until just combined. The mixture will look like coarse crumbs, but when squeezed, it should hold together. You have successfully created the delicious base for your buttery squares.
Step 2: Pressing and Pre-Baking the Crust
Measure out about two-thirds of the dough mixture and press it evenly into the prepared baking pan. Use the bottom of a measuring cup or a flat spatula to ensure the base is firm and level. If the dough is too warm and sticky, chill it for 10 minutes before pressing. Bake this crust layer for 15 minutes, until the edges are just starting to turn light gold. Reserve the remaining one-third of the dough for the topping.
Step 3: Creating the Sticky Caramel Center
While the crust is baking, prepare the caramel. In a medium saucepan, combine the sweetened condensed milk, the half cup of butter, and the light brown sugar. Cook this mixture over medium heat, stirring constantly, until the butter is melted and the sugar is completely dissolved. Bring it to a gentle simmer and cook for about 5 to 7 minutes, stirring continuously to prevent scorching, until the mixture thickens slightly and takes on a rich, slightly darker caramel hue. Remove from heat and stir in the vanilla powder and the half teaspoon of flaky sea salt. This is where the magic happens!
Perfecting the Cooking Process
Start by pressing the crust dough firmly into the pan. While it pre-bakes, prepare the caramel layer—it should be thick but pourable. Crucially, allow the bars to cool completely before cutting them; otherwise, the caramel will run everywhere.
Step 4: Layering and Final Bake
Once the crust is partially baked, pour the warm, glorious caramel mixture evenly over the top. Now, crumble the remaining one-third of the dough mixture over the caramel layer. Try to distribute the crumbs somewhat evenly; gaps are fine, as they allow the caramel to bubble up beautifully. Return the pan to the oven and bake for an additional 20 to 25 minutes, or until the crumb topping is golden brown and the caramel is bubbling slightly around the edges. Do not worry if the center still looks slightly soft—that’s exactly what ensures maximum chewiness.
Add Your Touch
Feeling adventurous? Swap vanilla powder for a little alcohol-free almond extract in the crust for depth. You can also press chocolate chips or toasted pecans into the gooey caramel layer before adding the final crumb topping for extra texture.
Once the bars come out of the oven, immediately and generously sprinkle the entire surface with extra flaky sea salt. This final sprinkling is non-negotiable for achieving the “Salted Caramel Butter Bars” identity. Now, here comes the hardest part of the entire process—waiting. You must let these bars cool completely, which typically takes about 2 hours at room temperature, or about 45 minutes in the refrigerator. If you cut them warm, the caramel will escape its buttery prison, leaving you with a delicious but aesthetically challenged puddle.
Storing & Reheating
Store these luxurious Salted Caramel Butter Bars tightly sealed at room temperature for up to four days. If you prefer them warm, reheat individual servings in the microwave for 15 seconds. Freezing is possible, but they taste best fresh.
Expert Tips for Flawless Caramel Squares
- Always use flaky sea salt, not standard table salt, to get that crystalline crunch that contrasts beautifully with the sticky caramel.
- Do not overbake the base or the top crumbs; they should look barely set and slightly golden brown for maximum chewiness in the final bar.
- For easy removal, use parchment paper with an overhang sling in your baking dish before pressing the crust dough into the pan.
My brother once tried to sneak an entire row of these gooey treats before dinner, claiming they were “pre-dessert research.” They are truly impossible to resist.
Conclusion for Salted Caramel Butter Bars
These decadent Salted Caramel Butter Bars represent the perfect balance of salty, sweet, buttery, and chewy. They require minimal fuss but deliver maximum payoff, making them ideal for gatherings or a simple weekend treat. Remember the golden rules: cool completely before cutting and always use quality flaky salt. Once you master this recipe, you will find yourself the most popular person at every potluck. Enjoy the irresistible joy baked into every single bite of these phenomenal bars.
Print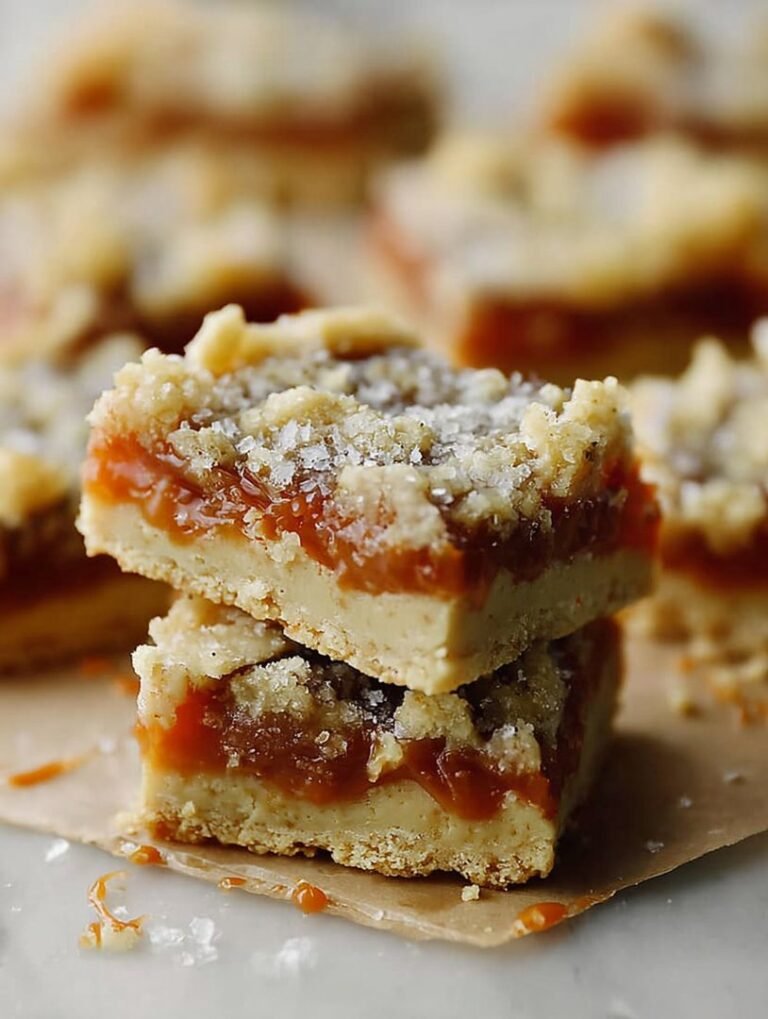
Salted Caramel Butter Bars
These decadent bars feature a golden, crumbly shortbread base topped with rich, stovetop salted caramel and buttery streusel. Simple bake steps and full nutritional breakdown included.
- Total Time: 35 minutes
- Yield: 4 servings
Ingredients
- All-Purpose Flour: 2 cups
- Unsalted Butter: 1 cup (2 sticks), softened
- Granulated Sugar: 1/2 cup
- Light Brown Sugar: 1 cup, packed
- Heavy Cream: 1/2 cup
- Unsalted Butter: 4 tablespoons (1/2 stick), cut into cubes
- Vanilla Bean Paste: 1 teaspoon
- Flaky Sea Salt: 1 teaspoon
Instructions
- Step 1: Preheat the oven to 350°F (175°C). Line a 9×13 inch baking pan with parchment paper, leaving an overhang on two sides. In a large bowl, mix the 2 cups of flour, 1 cup of softened butter, and the granulated sugar until a crumbly dough forms. Press two-thirds of the mixture evenly into the bottom of the prepared pan, reserving the remaining crumbs for the topping.
- Step 2: Bake the shortbread crust for 15-18 minutes, or until the edges are lightly golden. While the crust bakes, prepare the caramel filling on the stovetop.
- Step 3: In a medium saucepan, combine the light brown sugar, heavy cream, and the cubed 4 tablespoons of butter. Bring the mixture to a boil over medium heat, stirring constantly until the sugar is dissolved and the caramel thickens slightly (about 3-4 minutes). Remove from heat and stir in the vanilla powder.
- Step 4: Carefully pour the hot caramel mixture evenly over the par-baked crust. Sprinkle the reserved flour/butter crumbs evenly over the caramel layer.
- Step 5: Return the bars to the oven and bake for an additional 20-25 minutes, or until the caramel is bubbly and the topping crumbs are golden brown. Remove from the oven, immediately sprinkle the surface with the flaky sea salt, and allow the bars to cool completely in the pan before lifting the parchment paper and cutting into squares.
Notes
- For the best texture, store fully cooled bars in an airtight container in the refrigerator for up to one week, allowing them to sit out for 15 minutes before serving.
- Don't skip sprinkling the flaky sea salt immediately after removing the bars from the oven; the residual heat helps the salt crystals adhere perfectly, ensuring that essential salty-sweet bite.
- Enhance the gooey caramel experience by serving a slightly warm square à la mode with a scoop of high-quality vanilla ice cream or a dollop of fresh whipped cream.
- If the bars are refrigerated, warm them gently in a microwave for 10 to 15 seconds per square to slightly melt the caramel filling and soften the shortbread crust.
- Prep Time: 15 minutes
- Cook Time: 20 minutes
- Method: Stovetop
- Cuisine: American


Leave a Comment