
Remember that moment when a regular vegetable platter just wasn’t cutting it? Life demands crunch, spice, and a tangy wake-up call that plain crudités simply cannot provide. TheseSpicy pickled celery sticksdeliver exactly that—a ridiculously simple recipe that transforms humble celery into a condiment king, proving that the best things in life often have a serious kick and glorious crunch.
- This simple recipe requires minimal active cooking time, allowing you to achieve maximum flavor payoff with very little fuss in the kitchen.
- Experience the ultimate flavor synergy where sharp vinegar tang perfectly collides with fiery chili heat and earthy aromatic spices.
- The finished product boasts a vibrant, irresistible green hue and wonderful visual clarity, making it an impressive and appealing garnish.
- These crunchy sticks are incredibly versatile, serving as the ideal zesty complement to roast chicken, beef sandwiches, or a robust cheese board.
The Tale of the Crunch and the Chili
Celery is often the overlooked hero, the humble sidekick in the culinary world. It sits patiently in the fridge drawer, waiting for its destiny to be realized—usually as a dipper for hummus or, regrettably, forgotten until it’s lost its snap. But I’m here to tell you that celery deserves better. It deserves a fiery, transformative bath that elevates it from background noise to center stage. Before I discovered the magic ofSpicy pickled celery sticks, I used to view celery purely as a necessary textural component, like the structural beams of a casserole.
The first time I attempted this recipe, I was skeptical. Could mere boiling vinegar truly revolutionize this stringy stalk? The answer, I learned, is a resounding yes, provided you give it the right supporting cast of aromatics. We are talking about converting a beige snack experience into a flavor supernova. The key to success isn’t patience—because honestly, waiting for pickles to fully develop is agony—but precision in the brine. You want that perfect sweet-and-sour foundation that allows the chili flakes to dance on your tongue without setting your mouth on fire (unless you truly want that, in which case, double the flakes!). This recipe is perfect because it requires very little commitment. You aren’t fermenting for weeks; you are quick-pickling for immediate gratification, transforming basic celery into a vibrant, crunchy, and slightly aggressive snack that pairs beautifully with almost anything savory. It’s the kind of side dish that steals the show, much to the chagrin of the main course. Prepare yourself for compliments, followed by aggressive demands for the recipe. It truly is that addictive.
Ingredients for Spicy Pickled Celery Sticks
Here’s what you’ll need to make this delicious dish:
- Fresh Celery StalksLook for crisp, bright green stalks that snap easily; avoid any that feel rubbery or dull in color, as the crunch is essential here.
- White VinegarUse standard distilled white vinegar (5% acidity); its clean, sharp flavor is necessary to achieve that classic pickled tang without clouding the spices.
- WaterSimple filtered water helps dilute the vinegar’s intensity, creating a balanced brine that still preserves the vegetables effectively.
- Granulated SugarA small amount of sugar is critical for balancing the high acidity of the vinegar, preventing the brine from tasting too harsh or metallic.
- Pickling SaltUse non-iodized pickling salt, as standard table salt can contain anti-caking agents that may cause the brine to become cloudy.
- Garlic ClovesFresh whole garlic cloves sliced in half infuse a deep, savory foundation into the brine that complements the heat and the spices.
- Red Pepper Flakes (Crushed Chili)These flakes are the source of the delightful heat, and you can adjust the quantity based on your personal tolerance for spice and fiery flavor.
- Dill Seeds or Fresh Dill SprigsDill adds that quintessential, classic herbaceous pickle flavor that rounds out the otherwise spicy and sour profile of the brine.
- Black PeppercornsWhole peppercorns provide a subtle, earthy background heat and texture that releases a fresh, sharp aroma upon being heated.
- Mustard SeedsYellow or brown mustard seeds offer a subtle sharpness and a delightful pop of texture when you bite into the finished pickled celery.
The full ingredients list, including measurements, is provided in the recipe card directly below.
The Brining and Pickling Process
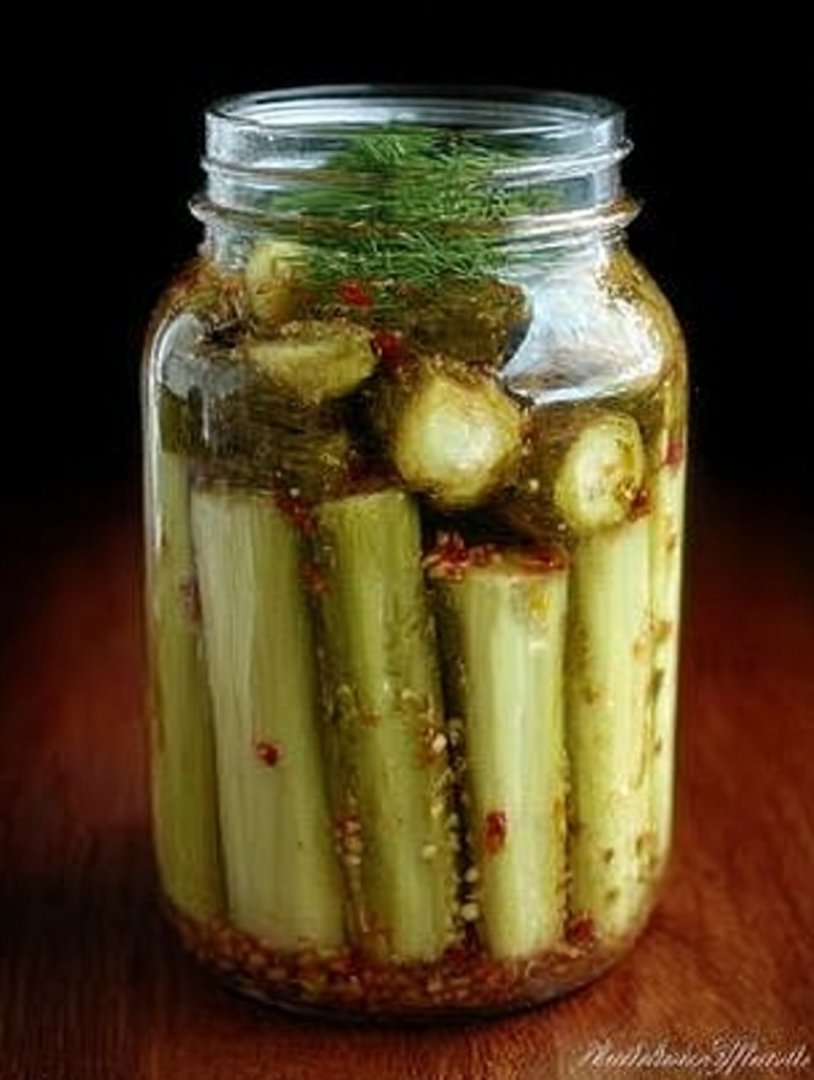
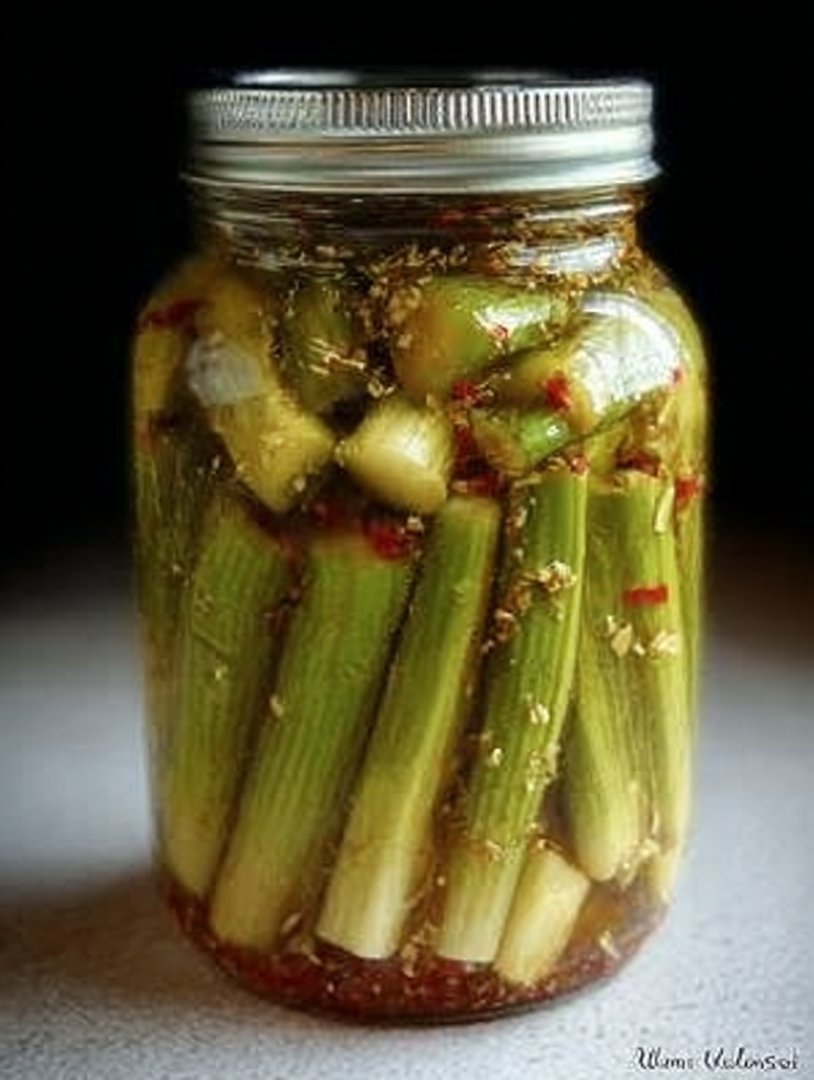
The success of theseSpicy pickled celery stickshinges entirely on the brine and the packing technique. Remember, we are not making mushy pickles; we are aiming for intensely flavored, aggressively crunchy sticks. Before you even think about the spices, ensure your celery is meticulously clean and cut into uniform lengths—about four inches is ideal for fitting snugly into standard mason jars. Uniformity matters because it ensures even pickling and texture consistency throughout the jar.
When preparing the brine, never skimp on the boiling time. You must bring the mixture of water, vinegar, salt, and sugar to a rapid, rolling boil and keep it there for at least two minutes to ensure all the salt and sugar crystals are fully dissolved. If you rush this step, you risk a grainy texture or pockets of unmixed brine, leading to an inconsistent flavor profile once the celery is introduced. Furthermore, using hot brine is crucial for the quick-pickling method; the heat slightly softens the outer layers of the celery, allowing the flavors to penetrate without completely sacrificing the satisfying crunch we crave. A pro tip: always sterilize your jars and lids before starting, not just for safety, but because a clean jar ensures a clearer, more vibrant-looking pickle that will last longer in the refrigerator. Use hot, soapy water followed by a hot rinse, or run them through a hot cycle in the dishwasher. Once packed, these lovely, vibrant sticks should be refrigerated and allowed at least 24 hours—ideally 48—for the flavors to fully meld before you sample them. The wait is the hardest part, but entirely worth it for the ultimate spicy crunch.
How to Make Spicy pickled celery sticks
Follow these simple steps to prepare this delicious dish:
Step 1: Preparing the Celery and Jars
Wash the celery thoroughly and trim the ends. Slice the stalks into pieces approximately 4 inches long; this size works best for standard pint jars. Ensure your jars are sterilized and completely dry. Pack the celery pieces vertically into the jars as tightly as possible without bruising them. Add the garlic cloves, red pepper flakes, dill seeds, mustard seeds, and peppercorns evenly distributed among the packed jars.
Step 2: Creating the Flavorful Brine
In a medium nonreactive saucepan, combine the water, white vinegar, granulated sugar, and pickling salt. Bring the mixture to a full, rolling boil over high heat, stirring continuously until the salt and sugar are completely dissolved. Continue boiling the brine for two full minutes to ensure optimal clarity and consistent flavor profile. This hot brine is essential for the quick-pickling process.
Step 3: Filling and Sealing the Jars
Carefully pour the hot brine directly over the celery sticks in each jar, ensuring that the liquid covers the vegetables completely and reaches about a half-inch below the rim of the jar. Use a non-metallic tool, like a wooden chopstick, to gently push down the celery and release any trapped air bubbles from the jar.
Step 4: Cooling and Refrigeration
Wipe the rims of the jars clean with a damp towel to ensure a proper seal. Place the lids tightly onto the jars. Allow the filled jars to sit on the counter at room temperature until they are completely cool to the touch. Once cooled, immediately transfer the jars to the refrigerator for storage.
Step 5: Waiting for Flavor Development
Although they will technically be pickled immediately, theSpicy pickled celery sticksneed time for the flavor infusion to truly blossom. Wait at least 24 hours before tasting, and ideally 48 hours, to achieve the most potent and balanced flavor combination of spice and tang. They will continue to improve over the first week.
These crunchy, flavorful sticks are perfect served cold alongside rich pulled beef sliders, tucked into thick lamb sandwiches, or featured prominently on any selection of hard and soft cheeses for a fantastic finishing touch.
The Accidental Discovery of Sunshine on a Plate
I was aiming for plain crunchy pickles, but accidentally overloaded the spice jar after a massive sneeze. The result wasn’t a culinary disaster; it was a revelation! These spicy pickled celery sticks, crunchy and bright, were the burst of flavor I never knew my snacking life desperately needed.
Every seasoned snacker knows the feeling of reaching for something crisp, only to be met with limp disappointment. That’s why celery is often overlooked—it’s the reliable, yet slightly dull, friend at the crudité platter. But transforming it into an explosive, tangy, and subtly fiery delight completely changes the game. This recipe didn’t start with meticulous planning; it began with chaos and a desperate need to rescue a batch of brine that looked suspiciously like a volcano was about to erupt inside the jar. What emerged was a vibrant, deeply satisfying snack that pairs perfectly with everything from grilled cheese sandwiches to a quiet afternoon on the porch. Forget the sad, stringy stalks of the past; we are embracing celery’s full, potent potential.
Why Celery is the Ultimate Pickling Vegetable
Pickling typically favors cucumbers, but celery holds a secret weapon: structural integrity. Cucumbers can turn flabby under the heat of the brine, but celery keeps its aggressive, water-retaining crunch, even after weeks submerged in vinegar. This texture is paramount. When you bite into one of these, you want that audible snap—the kind that makes people turn their heads and ask what wonderful thing you are currently demolishing.
Furthermore, celery is a flavor sponge. Its mild, slightly earthy background flavor allows it to absorb the complex spices of the brine without becoming overwhelmed. It’s the perfect canvas for the heat. We are introducing chili flakes, perhaps a few slices of fresh jalapeño, and aromatic elements like garlic cloves and bay leaves. Unlike denser vegetables, the celery absorbs the brine quickly, meaning you don’t have to wait an eternity for that robust, spicy flavor profile to develop. You get maximum flavor payoff with minimal waiting time. Within 24 hours, these celery sticks become fully infused with sunshine and a subtle, delightful heat that lingers just long enough to demand another bite. It’s the snack that talks back, and frankly, we are here for the conversation.
Perfecting the Cooking Process
Start by blanching the celery briefly to maintain its vibrant green color and perfect crunch. While the celery cools, bring your pickling brine to a rolling boil, ensuring the sugar and salt fully dissolve before pouring it over the tightly packed celery sticks.
Crafting the Perfect Brine for Spicy Pickled Celery Sticks
The brine is the heart and soul of any pickled creation, and for these spicy pickled celery sticks, balance is crucial. We seek a powerful tanginess that brightens the celery, a sweetness that balances the acidity, and heat that doesn’t overpower the vegetal notes. The choice of vinegar truly matters here. While standard distilled white vinegar provides a sharp, clean tang, blending it with apple cider vinegar introduces a subtle fruitiness and depth that makes the brine taste more sophisticated and complex.
We combine the vinegars with water, fine sea salt, and a touch of granulated sugar. Don’t skimp on the sugar, even if you prefer savory pickles; it is necessary not just for flavor, but to buffer the harsh acidity of the vinegar. The magic, of course, comes from the heat. I rely on a mix of red pepper flakes and whole dried chilies (like arbol or cascabel) for a layered spiciness that heats the tongue without causing immediate regret. Ensure your spices steep long enough in the boiling brine—at least two full minutes—to release their essential oils before cooling.
The Science of the Crunch: Blanching Techniques
The secret to incredibly crispy pickled vegetables isn’t just about the ingredient quality; it’s about temperature control. Celery, while sturdy, benefits greatly from a quick dip in boiling water followed immediately by an ice bath. This process, known as blanching, deactivates enzymes that cause vegetables to soften over time.
To execute this technique perfectly, cut your celery into uniform stick lengths, approximately four inches. Prepare a large bowl of ice water next to your stove. Drop the celery into fiercely boiling water for precisely 60 to 90 seconds. Any longer, and you risk making them mushy. Use a slotted spoon to transfer them immediately into the ice bath. This rapid cooling locks in the color and preserves that spectacular, aggressive crunch, ensuring your homemade crunchy vegetables will survive the pickling process intact and ready to deliver maximum textural pleasure.
Add Your Touch
Swap out the chili flakes for smoked paprika for a milder, deeper flavor profile. Try adding thin slices of fresh ginger for an Asian twist, or toss in a few sprigs of dill to marry the heat with traditional savory notes.
If you find yourself without standard white sugar, substituting honey or maple syrup adds a wonderful depth to the brine, though you might need to adjust the quantities slightly to achieve the desired balance. For those who enjoy an intense level of garlicky flavor, consider roasting the garlic cloves before adding them to the brine; this removes the sharp bite while intensifying the sweet, earthy garlic essence. Furthermore, feel free to experiment with aromatic whole spices. Star anise, peppercorns, and mustard seeds all bring unique layers of warmth. The beauty of quick pickling is its flexibility; it forgives small adjustments and encourages culinary adventure.
-
Always sterilize your glass jars properly before packing the celery to prevent spoilage and ensure the crispness of the final product lasts longer.
-
Use a tamper or weighted lid inside the jar to keep all the celery fully submerged under the brine, which is key to consistent pickling.
-
Allow the brine to cool slightly, about 10 minutes, after boiling, before pouring it over the celery to avoid cooking the vegetable excessively.
My grandmother once confessed she started pickling only because it allowed her to justify owning more beautiful jars; the spicy celery recipe became her star player, always gone within two days of making a batch.
Storing & Reheating
Store these zingy sticks in an airtight glass jar, fully submerged in the brine, in the refrigerator for up to three weeks. Do not reheat! Their entire appeal relies on that signature, glorious, cold crunch straight from the fridge.
While these savory sticks maintain their quality for several weeks, they typically reach their peak flavor maturity between days three and seven. Keep the jar tightly sealed to prevent the vinegar aromas from escaping into your refrigerator, thus protecting your other foods from accidental pickling. If the brine level drops below the celery tops, simply mix a small amount of extra vinegar and water (a 2:1 ratio) to top it off, ensuring all those wonderful spices remain moist and active. If you notice any cloudiness in the liquid or softening of the celery, it’s a sign that they might be past their prime, though homemade pickles rarely last long enough for that to happen.
Conclusion for Spicy pickled celery sticks
Embracing the world of quick pickles, especially with something as crisp and rewarding as celery, guarantees a delightful boost to your snack rotation. These spicy pickled celery sticks deliver an incredible balance of heat, tang, and crunch that satisfies those deep cravings for brightness and intensity. We learned that the proper blanching technique is non-negotiable for preserving texture, and customizing the aromatic spices allows for endless creativity in the brine. Whether you serve them alongside savory main dishes or simply devour them straight from the jar, these vibrant, zesty sticks are a must-try for anyone seeking a low-effort, high-impact culinary triumph. Start packing those jars today!
Print
Spicy pickled celery sticks
Achieve crisp, tangy crunch with these quick-brined celery sticks. The hot vinegar brine dissolves the sugar and salt instantly, ensuring rapid flavor infusion.
- Total Time: 35 minutes
- Yield: 4 servings 1x
Ingredients
- 1 large bunch celery (about 8–10 stalks), washed and cut into 3-inch sticks
- 1 cup distilled white vinegar
- 1 cup filtered water
- 1 tablespoon kosher salt
- 1 teaspoon granulated sugar
- 2 teaspoons red pepper flakes
- 4 cloves garlic, peeled and smashed
- 1 teaspoon whole black peppercorns
Instructions
- Step 1: Sterilize a quart-sized jar or two pint-sized jars by washing them thoroughly in hot, soapy water, or running them through a dishwasher cycle. Wash and trim the celery sticks, ensuring they are cut to fit vertically inside the jars, leaving about 1/2 inch of headspace.
- Step 2: Combine the vinegar, water, kosher salt, and sugar in a small saucepan. Bring the mixture to a rolling boil over medium-high heat, stirring until the salt and sugar are completely dissolved. Remove the brine from the heat immediately.
- Step 3: Distribute the garlic cloves, red pepper flakes, and black peppercorns evenly into the bottom of the prepared jars. Tightly pack the celery sticks vertically into the jars, ensuring a snug fit.
- Step 4: Carefully pour the hot brine mixture over the packed celery and spices, ensuring that the liquid fully covers the celery sticks and still leaves at least 1/4 inch of headspace at the top of the jar.
- Step 5: Tap the jars gently on the counter to release any trapped air bubbles. Seal the jars tightly with the lids and let them cool completely at room temperature before transferring them to the refrigerator.
- Step 6: Allow the celery to pickle in the refrigerator for at least 48 hours before serving for optimal spicy flavor and crunch. The pickled celery will keep refrigerated for up to 3 weeks.
Notes
- For maximum depth of flavor, try to resist sampling the celery until it has been refrigerated for at least one full week—the wait is worth the developed spice and vinegar punch.
- These spicy sticks are the ultimate Bloody Mary garnish, but they also cut through the richness beautifully when served alongside hearty sandwiches or a creamy cheese board.
- To guarantee the crispiest sticks, place the cut celery pieces in a bowl of ice water for 30 minutes before packing them into the jars; this quick ice bath ensures maximum crunch retention.
- If you prefer a milder kick, halve the red pepper flakes but always keep the whole black peppercorns, as they contribute essential aromatic depth, not just heat.
- Prep Time: 15 minutes
- Cook Time: 20 minutes
- Method: Stovetop
- Cuisine: American


Leave a Comment