

The aroma of sweet, savory glaze hitting perfectly roasted florets is the kind of magic reserved for the best weeknight meals. This is exactly what you get with these incredibleTeriyaki Cauliflower Power Bowls.
Forget sad desk lunches; these vibrant, texture-rich meals deliver maximum flavor and serious nutritional punch, transforming dinner prep from a chore into a joy.
- Effortless preparation allows you to roast the star components while you assemble the remaining fresh, colorful bowl ingredients with minimal fuss.
- Experience an irresistible flavor profile balancing umami-rich teriyaki sauce with the satisfying crispness of perfectly caramelized vegetables.
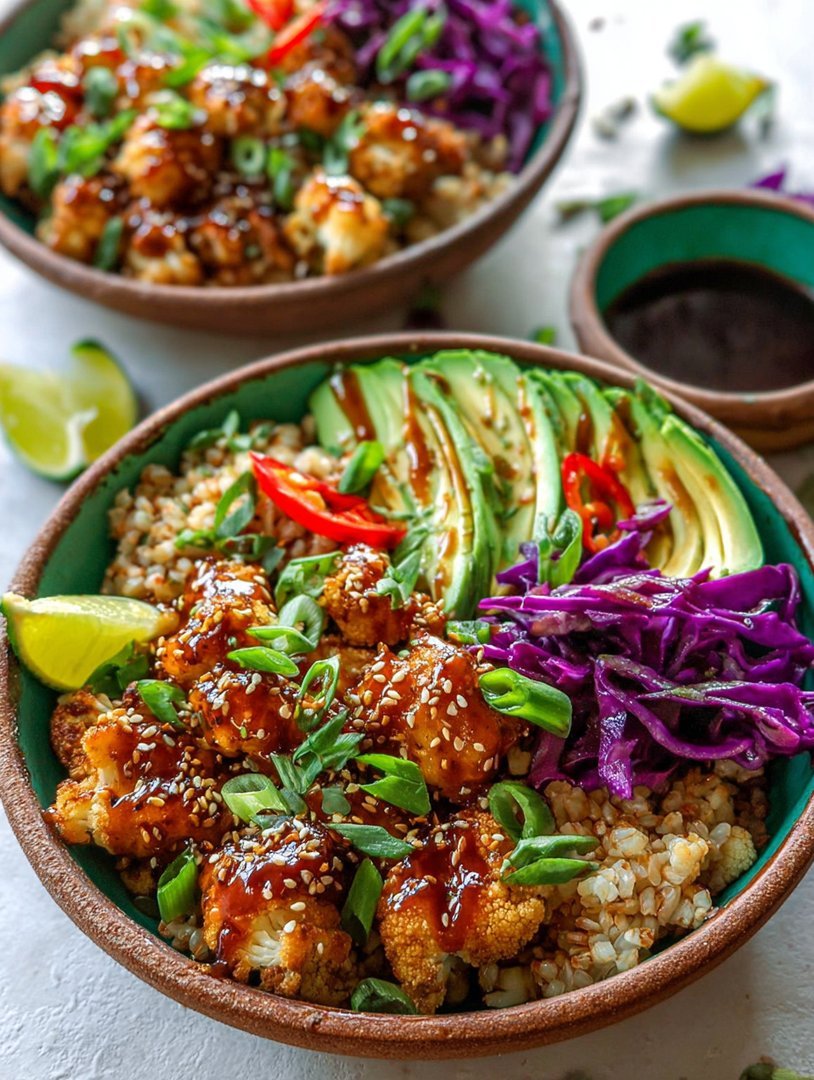
- These gorgeous bowls showcase vivid greens, deep reds, and glossy brown florets, guaranteeing an Instagram-worthy and visually appealing plate every time.
- Customize your bowls easily by swapping out grains or adding different proteins, making this recipe incredibly versatile for weekly meal planning.
The Unexpected Romance of Cauliflower and Teriyaki
Cauliflower used to get a bad rap. It sat sadly on crudité platters, waiting for someone to dip it awkwardly into ranch dressing. It was the wallflower of the vegetable world. But then, roasted cauliflower arrived, and everything changed. Roasting transforms that humble head into something nutty, sweet, and deeply caramelized. When you introduce teriyaki sauce to roasted cauliflower, sparks fly.
I first discovered this powerhouse combination during a week when my fridge looked suspiciously empty, save for a massive head of cauliflower that was glaring at me from the crisper drawer. I usually reserve teriyaki for chicken or maybe salmon, but necessity is the mother of inventive dinner. I tossed the chopped florets liberally with the thick, sticky glaze, added a sprinkle of ginger, and popped it into the oven. The result was pure genius. Crispy on the outside, tender on the inside, and drenched in that addictive sweet and salty sauce, this wasn’t just a side dish—it was the main event. Combining it with fluffy quinoa, vibrant shredded carrots, and creamy avocado cemented its status as the ultimate quick meal. You will find yourself craving the textures and flavors in these easy-to-prepare bowls.
This recipe is built around maximizing texture and minimizing effort. While the cauliflower roasts, you simply chop, slice, and assemble the fresh toppings. This efficient workflow means you move from zero to dinner hero in under forty minutes. The key is ensuring the cauliflower has plenty of space on the baking sheet so it roasts rather than steams, giving it that crucial textural bite that contrasts beautifully with the soft grains below. Mastering the roast is the secret to elevating these simple ingredients into a truly satisfying dish that everyone will love.
Why Power Bowls Reign Supreme in the Kitchen
The concept of the power bowl, or Buddha bowl, is less about a specific recipe and more about a philosophy of eating. It represents balance, variety, and customizable nutrition served attractively in a deep dish. It’s essentially a culinary free-for-all, but organized and delicious. These bowls are the antithesis of boring meal prep because every spoonful delivers a different flavor and texture experience—a crunch from a seed, the creaminess of avocado, the sharp bite of pickled ginger, and the savory foundation of the Teriyaki Cauliflower.
From a practical standpoint, the power bowl structure makes meal planning remarkably easy. You need five elements: a base (grain), a protein/main feature, a selection of raw or cooked vegetables, a healthy fat (like nuts or avocado), and a compelling dressing. Our base uses brown rice or quinoa, providing complex carbohydrates and fiber. The roasted cauliflower offers our rich, flavor-bomb center. We then pile on fresh vegetables for color and vitamins. This structure prevents decision fatigue at 5:00 PM and ensures you consume a rainbow of nutrients without feeling like you are eating “health food.” You are simply enjoying a deeply flavorful and satisfying dinner.
Furthermore, these bowls are champions of leftovers. You can cook a large batch of the rice or quinoa and roast enough teriyaki cauliflower for three days worth of lunches. Store the components separately—grains, roasted vegetables, and raw toppings—and only combine them just before serving. This crucial step prevents the vegetables from wilting and the rice from becoming soggy, guaranteeing a fresh, restaurant-quality meal even on day three. The scalability of this recipe makes it perfect for busy professionals or anyone trying to streamline their weeknight routine while maintaining high flavor standards.
Customizing Your Bowl: Toppings and Textures
While the core recipe focuses on the gorgeous interplay between sweet teriyaki and hearty cauliflower, the true joy of the power bowl lies in customization. Think of the recipe as a starting point, a beautifully designed canvas awaiting your personal touches. Elevating these bowls involves integrating various textures, ensuring a mix of soft, creamy, crunchy, and crisp components in every bite. This contrast is what keeps the palate engaged and prevents the dish from feeling heavy or monotonous.
Enhancing the Grain Base
Do you prefer chewy grains? Use farro or barley. Need a faster option? Instant couscous works wonderfully. To add an extra layer of flavor complexity, try cooking your grain in vegetable broth instead of plain water. You could also mix in a splash of rice vinegar and a sprinkle of sesame seeds into the cooked rice for a simple, homemade sushi rice effect. This small addition significantly boosts the overall savory depth of the Teriyaki Cauliflower Power Bowls.
Adding Alternative Proteins
While the cauliflower is the star, you may want additional protein for extra staying power. Firm tofu, cubed and pan-fried until golden, absorbs the teriyaki flavor beautifully. Alternatively, strips of grilled chicken breast or even shredded beef, tossed lightly in a complementary ginger-soy marinade, make excellent additions. For a plant-based boost, consider adding shelled edamame or black beans, which provide structure and a creamy texture.
The Magic of Crunchy Toppings
Never skip the crunch. Crunchy toppings are non-negotiable in a power bowl. Try toasted slivered almonds, crispy fried onions (not the canned kind, but freshly crisped in oil), or chopped peanuts. For a lighter crunch, throw in some finely shredded cabbage or a handful of mung bean sprouts. A drizzle of sriracha or a homemade chili garlic sauce provides that final, satisfying spicy kick that balances the sweetness of the glaze.
Ingredients for Teriyaki Cauliflower Power Bowls
Here’s what you’ll need to make this delicious dish:
- CauliflowerSelect a firm, white head of cauliflower, cutting it into uniform, bite-sized florets so they roast evenly and caramelize properly.
- Soy Sauce or TamariThis provides the crucial salty, umami backbone for the teriyaki glaze; use tamari for a gluten-free option if needed.
- Brown Sugar or Maple SyrupEssential for sweetness and creating that thick, glossy, sticky texture when the sauce reduces during roasting.
- Ginger and GarlicUse fresh minced ginger and garlic for the most aromatic and pungent flavor base, crucial for an authentic teriyaki taste.
- Rice VinegarA splash of this provides necessary acidity to brighten the sauce and balance the rich sweetness and saltiness.
- Sesame OilUsed both for roasting the cauliflower and as a finishing drizzle, adding a distinctive toasted, nutty aroma to the final dish.
- Starch (Cornstarch or Arrowroot)This thickening agent helps turn the liquid sauce mixture into a syrupy glaze that clings perfectly to the florets.
- GrainsUse cooked brown rice or quinoa as the base of the bowl, ensuring they are slightly cooled before assembly for better texture.
- Fresh VegetablesElements like shredded carrots, thinly sliced cucumbers, and avocado slices add freshness, color, and contrasting coolness.
- GarnishSesame seeds, sliced scallions, and perhaps a spicy dressing complete the aesthetic and flavor profile of the power bowl.
The full ingredients list, including measurements, is provided in the recipe card directly below.
How to Make Teriyaki Cauliflower Power Bowls
Follow these simple steps to prepare this delicious dish:
-
Step 1: Prepare the Teriyaki Glaze
In a small saucepan, combine the soy sauce, brown sugar or maple syrup, minced ginger, minced garlic, rice vinegar, and water. Heat the mixture over medium heat until it just begins to simmer. In a separate tiny bowl, mix the starch with one tablespoon of cold water to create a slurry. Whisk the slurry into the simmering sauce and cook for about one minute until the glaze thickens enough to coat the back of a spoon; set aside.
-
Step 2: Roast the Cauliflower
Preheat your oven to 425°F (220°C). Toss the cauliflower florets with one tablespoon of sesame oil, salt, and pepper, then spread them in a single layer on a parchment-lined baking sheet. Roast the florets for 15 minutes until they begin to soften and lightly brown around the edges.
-
Step 3: Glaze and Finish Roasting
Remove the baking sheet from the oven and drizzle about half of the prepared teriyaki glaze over the roasted cauliflower. Toss gently to coat every floret thoroughly. Return the cauliflower to the oven and roast for an additional 8 to 10 minutes until the glaze is sticky, dark, and perfectly caramelized.
-
Step 4: Assemble the Power Bowls
Place a generous scoop of the cooked grain (rice or quinoa) into the bottom of each serving bowl. Arrange the fresh vegetables—shredded carrots, cucumber slices, and avocado—neatly around the perimeter of the bowl, ensuring a colorful presentation.
-
Step 5: Final Touches and Serving
Place a heaping mound of the sticky, roasted teriyaki cauliflower directly onto the center of the grain base. Drizzle any remaining teriyaki glaze over the cauliflower and sprinkle generously with sliced scallions and toasted sesame seeds.
Transfer to plates and drizzle with sauce for the perfect finishing touch.
Troubleshooting and Meal Prep Strategies
These Teriyaki Cauliflower Power Bowls are incredibly flexible, but a few strategic moves can ensure perfection every time. Avoiding soggy components is paramount for maintaining the integrity of a great power bowl. Never mix the hot, roasted elements with the cold, fresh elements until you are literally ready to eat.
Storage and Reheating
When preparing this dish for meal prep, store the cooked grains, the roasted cauliflower, and the fresh toppings in separate airtight containers in the refrigerator. The teriyaki cauliflower reheats beautifully in an oven or air fryer, allowing the crisp edges to reform without becoming mushy. Avoid microwaving the cauliflower if you want to preserve its texture. The fresh vegetables, like avocado and cucumber, should be sliced right before serving to prevent browning and wilting.
Achieving Maximum Caramelization
If your cauliflower comes out steamed instead of crispy, you might have overcrowded the pan. Always use two baking sheets if necessary to ensure the florets have adequate space. Also, avoid adding the glaze too early. Applying the teriyaki sauce halfway through the roasting process ensures the cauliflower has time to develop that essential char before the sugary glaze potentially starts to burn.
Meal Prep Pairing Ideas
To keep the week interesting, rotate your grain and topping choices. Monday might feature brown rice and edamame, while Wednesday uses quinoa and adds some spicy pickled jalapeños. This simple rotation keeps your palate excited, making healthy eating feel effortless and preventing that dreaded meal-prep monotony that often sabotages long-term plans.
Frequently Asked Questions About Power Bowls
What is the best type of rice to use for power bowls?
Brown rice or short-grain brown rice works excellently because they maintain a satisfying chewiness and structure, unlike white rice which can become too soft when chilled and later reheated.
Can I make the teriyaki sauce ahead of time?
Absolutely, you can prepare the teriyaki glaze up to five days in advance and store it in a sealed container in the refrigerator; reheating it slightly before glazing the cauliflower helps it flow easily.
How can I add heat to these Teriyaki Cauliflower Power Bowls?
To introduce spice, incorporate a teaspoon of chili flakes into the teriyaki glaze before thickening, or drizzle the finished bowl with a spicy mayo or sriracha directly before eating.
Is it possible to freeze the roasted teriyaki cauliflower?
While technically possible, freezing the cauliflower is not recommended because the freeze-thaw process compromises the crispy texture and leaves the florets quite watery and mushy upon reheating.
Welcome, fellow culinary adventurers, to the tale of a bowl that changed everything. You know the drill: It’s Tuesday, you’re tired, and the idea of cooking anything that doesn’t involve a microwave feels like scaling Mount Everest. You need something fast, healthy, and—most importantly—packed with so much flavor that your taste buds throw a spontaneous parade. Enter the humble yet heroic cauliflower.
For years, cauliflower was relegated to the sad side dish category, often boiled into submission or hidden in creamy, calorie-dense sauces. But we’re here to declare that cauliflower deserves its crown, particularly when it’s crispy, caramelized, and drenched in a sticky, savory teriyaki glaze. This recipe isn’t just dinner; it’s an absolute culinary reset. It’s the ultimate grab-and-go meal prep solution, guaranteed to banish mid-week dining fatigue.
I first developed this recipe after a disastrous attempt at a takeout order where the delivery driver appeared to have biked through a hurricane. My food was unrecognizable mush. Necessity, as they say, is the mother of invention, and I realized I needed a dish that was so resilient, so flavor-forward, and so easy to assemble that it beat any delivery service hands down. The result? These spectacularTeriyaki Cauliflower Power Bowls, anchored by fluffy quinoa, tender chicken, and that glorious, crispy cauliflower.
The Secrets to Spectacular Teriyaki Cauliflower
The magic in this recipe lies in the preparation of the cauliflower. We aren’t boiling it; we are blasting it. Roasting the florets at a high temperature achieves a beautiful char, giving the vegetable a nutty depth and a fantastic textural contrast. This texture is essential for absorbing the homemade teriyaki sauce without becoming soggy. Once the cauliflower is properly roasted, it can stand up to anything—even being tossed vigorously during assembly.
Crafting the Perfect Umami Glaze
Forget the bottled stuff laden with questionable stabilizers and corn syrup. Our teriyaki sauce is simple, quick, and boasts incredible depth. It uses good quality soy sauce, fresh ginger, garlic, and a touch of honey or maple syrup for that essential sweetness. Instead of using cooking grape juice with vinegar, we achieve tang and balance with rice vinegar and a splash of low-sodium chicken broth, which helps the glaze thicken into a glossy sheen without needing excessive starch. This sauce is not just for the cauliflower; you’ll want to drizzle it over everything in the bowl, creating cohesive flavor synergy.
The chicken component is straightforward. We use thin strips of chicken breast or thigh, quickly seared and tossed in a reserved portion of the teriyaki glaze. If you prefer a completely plant-based bowl, substitute firm, pressed tofu and roast it right alongside the cauliflower. The goal is efficiency, so everything should hit the table around the same time, ready for assembly into your custom power bowl masterpiece.
Ingredients for Teriyaki Cauliflower Power Bowls
- For the Cauliflower and Base:
- 1 large head of cauliflower, cut into bite-sized florets
- 2 tablespoons olive oil
- Salt and freshly cracked black pepper
- 2 cups cooked quinoa or brown rice
- 1 cup shelled edamame, steamed
- 1 cup shredded carrots
- 1/2 cup thinly sliced red cabbage (for crunch)
- 2 boneless, skinless chicken breasts (or 1 block firm tofu), sliced
- 1 teaspoon sesame oil (for searing)
- For the Homemade Teriyaki Sauce:
- 1/2 cup low-sodium soy sauce
- 1/4 cup honey or maple syrup
- 2 tablespoons rice vinegar
- 1 tablespoon finely grated fresh ginger
- 2 cloves garlic, minced
- 1/2 cup chicken broth or vegetable broth
- 1 teaspoon sesame oil
- 1 tablespoon cornstarch or arrowroot powder dissolved in 2 tablespoons cold water (slurry)
Simple Steps for Assembly and Flavor
Achieving the perfect Teriyaki Cauliflower Power Bowls requires a little coordination, but don’t worry—it’s entirely manageable. Think of your kitchen as a high-powered, well-oiled machine for the next 30 minutes. The roasting takes the longest, so let’s get that vegetable hero into the heat first. While the cauliflower transforms, you can efficiently handle the grains, protein, and sauce.
Instructions
- Prepare and Roast the Cauliflower:Preheat your oven to 400°F (200°C). Toss the cauliflower florets with 2 tablespoons of olive oil, salt, and pepper. Spread them in a single layer on a large baking sheet. Roast for 20 to 25 minutes, flipping halfway, until tender and lightly charred.
- Make the Teriyaki Sauce:While the cauliflower roasts, combine the soy sauce, honey, rice vinegar, ginger, garlic, broth, and sesame oil in a small saucepan. Bring the mixture to a simmer over medium heat. Whop the heat down and stir in the cornstarch slurry. Stir constantly until the sauce thickens and becomes glossy, about 1 minute. Remove from heat and reserve 1/4 cup of the sauce for the chicken.
- Cook the Chicken:Heat 1 teaspoon of sesame oil in a skillet over medium-high heat. Sear the chicken strips until fully cooked and golden brown. Reduce the heat and toss the chicken in the reserved 1/4 cup of teriyaki sauce until coated.
- Glaze the Cauliflower:Once the cauliflower is done roasting, remove it from the oven and transfer it to a large bowl. Pour half of the remaining teriyaki sauce over the hot florets and gently toss until every piece is glossy and coated.
- Build the Power Bowls:Distribute the cooked quinoa or rice evenly among four serving bowls. Arrange the teriyaki cauliflower, glazed chicken, steamed edamame, shredded carrots, and red cabbage attractively on top of the grains.
- Serve:Drizzle the remaining teriyaki sauce over the entire bowl just before serving. Garnish with a sprinkle of sesame seeds or chopped green onions if desired.
Perfecting the Cooking Process
To maximize efficiency, start cooking the quinoa or rice first, as grains take the longest passive time. Immediately toss the cauliflower and slide it into the preheated oven. Use the 20 minutes of roasting time to sear the chicken, prepare the sauce, and chop all your remaining fresh garnishes, ensuring everything finishes simultaneously.
Add Your Touch
These bowls are incredibly versatile! Try swapping the chicken for seared lamb strips or turkey mince, or use sweet potato chunks instead of some of the cauliflower. Boost the flavor by adding a teaspoon of chili garlic sauce to the teriyaki, or incorporate creamy avocado slices and toasted cashews for texture.
Storing & Reheating
For superior meal prepping, store the cooked grains, glazed cauliflower, and chicken in separate airtight containers. This prevents the components from becoming mushy. Reheat the grains and protein gently in a skillet or microwave, reserving the fresh elements like cabbage and carrots until just before serving to maintain their crispness.
I once served these bowls to my notoriously picky nephew, Leo. He thought the cauliflower was some fancy exotic nut. Success! He now requests theseTeriyaki Cauliflower Power Bowlsweekly.
Expert Tips for Flawless Bowls
- Don’t overcrowd the baking sheet when roasting the cauliflower; space ensures crispiness, not steaming, which is critical for good texture.
- Use freshly grated ginger in your sauce. It provides a sharp, vibrant flavor that cannot be matched by any pre-minced, bottled alternatives.
- Wait until the very end to coat the cauliflower with the teriyaki sauce to prevent the sugars in the glaze from burning during the roasting time.
Frequently Asked Questions About Power Bowls
Can I prepare the teriyaki sauce ahead of time?
Absolutely, the teriyaki sauce is excellent for prepping in advance. You can make a double batch and store it in a sealed jar in the refrigerator for up to one week. Give it a quick whisk before using it, as the ingredients may settle slightly.
What other vegetables work well in these power bowls?
Try adding roasted broccoli, bell peppers, or even cubes of butternut squash. You could also blanch some green beans or snap peas for a fresh, bright green addition that requires minimal cooking time.
How long do the Teriyaki Cauliflower Power Bowls last as meal prep?
When stored properly in separate, sealed containers, these power bowls will maintain their quality for three to four days in the refrigerator, making them perfect for your work week lunch routine.
Is there a good substitute for quinoa?
Yes, you can substitute quinoa with any neutral-flavored grain. Excellent choices include brown rice, farro, or even pearled barley. If you want a lower-carb option, use riced cauliflower as the base.
Conclusion for Teriyaki Cauliflower Power Bowls
Ultimately, the Teriyaki Cauliflower Power Bowls represent the perfect marriage of convenience, robust flavor, and satisfying nutrition. This vibrant dish proves that healthy eating doesn’t have to be boring or restrictive; it can be bold, savory, and incredibly satisfying. Whether you’re meal prepping for a busy week or simply craving a punchy, plant-forward dinner tonight, these bowls deliver on all fronts. They are completely customizable, allowing you to swap out grains and toppings based on your mood or pantry stock. Embrace the glorious crunch of the glazed cauliflower and enjoy a vibrant, globally inspired dish that truly lives up to its “power” status.
Print
Teriyaki Cauliflower Power Bowls
Roast perfect cauliflower florets in a maple-ginger teriyaki glaze until caramelized and sticky. This hearty, plant-based bowl is easy for weeknights. Full instructions and nutrition facts included.
- Total Time: 35 minutes
- Yield: 4 servings 1x
Ingredients
- 1 large head cauliflower, cut into bite-sized florets
- 2 Tbsp olive oil
- 1/4 cup low-sodium soy sauce (or tamari)
- 2 Tbsp maple syrup
- 1 tsp ground ginger
- 1 cup dry brown rice
- 1 cup frozen shelled edamame
- 1 tsp sesame seeds, for garnish
Instructions
- Step 1: Preheat the oven to 400°F (200°C). Cook the brown rice according to package instructions, setting it aside once done.
- Step 2: Toss the cauliflower florets with olive oil, salt, and pepper. Spread the seasoned cauliflower in a single layer on a lined baking sheet and roast for 15 minutes.
- Step 3: While the cauliflower roasts, prepare the teriyaki glaze by whisking together the soy sauce, maple syrup, and ground ginger in a small bowl.
- Step 4: Remove the cauliflower from the oven, pour the teriyaki glaze over the florets, and toss gently to ensure an even coating. Return the cauliflower to the oven and roast for an additional 8-10 minutes until caramelized and tender.
- Step 5: Steam or microwave the shelled edamame according to package instructions.
- Step 6: To assemble the power bowls, divide the cooked brown rice among serving bowls. Top the rice equally with the roasted teriyaki cauliflower and the steamed edamame. Sprinkle with sesame seeds and serve immediately.
Notes
- Store leftover roasted cauliflower and rice separately in airtight containers for up to 4 days, recombining only when ready to eat for the best texture.
- Reheat the leftover teriyaki cauliflower in an air fryer or toaster oven at 350°F (175°C) for about 5 minutes to restore a pleasant crispness that microwaving typically takes away.
- For extra richness and color, serve the bowl topped with a drizzle of sriracha mayo, or add some sliced avocado to balance the glaze's sweetness.
- To achieve deep caramelization, do not overcrowd the cauliflower in the first roasting step, and always wait until the second stage to apply the glaze, preventing the florets from steaming instead of roasting.
- Prep Time: 15 minutes
- Cook Time: 20 minutes
- Method: Stovetop
- Cuisine: American
FAQs
How do I ensure my Teriyaki Cauliflower Power Bowls stay crispy?
Achieving crispy cauliflower is key to a perfect bowl. Roast your florets at a high temperature (around 425°F or 220°C) and avoid overcrowding the baking sheet; steam is the enemy of crunch! Toss them lightly in oil and seasoning, roasting until golden brown before glazing. Crucially, only add the homemade teriyaki sauce during the last few minutes of roasting, or simply drizzle it on afterward. This prevents the cauliflower from becoming soggy and guarantees that satisfying textural contrast in your Teriyaki Cauliflower Power Bowls. This method ensures your dish retains its delightful crunch.
What are the best grain bases for a veggie power bowl?
Power bowls offer fantastic versatility when it comes to grains. While brown rice is a classic, try experimenting with quinoa for an added protein punch, or perhaps some nutty farro if you prefer a chewier texture. Basmati rice works wonderfully if you want a lighter, fluffier base. For a low-carb option, skip the grain entirely and use finely shredded cabbage or extra riced cauliflower. Choose a base that complements the savory and sweet profile of the teriyaki glaze without overpowering the star ingredient, the glazed cauliflower.
Can I make the teriyaki sauce less sweet or spicier for this dish?
Absolutely! Customizing the teriyaki sauce is part of the fun. If you find the recipe too sweet, reduce the maple syrup or brown sugar slightly and increase the vinegar or fresh lemon juice for brightness and tang. To add a serious kick, stir in a teaspoon of sriracha or chili garlic paste, or perhaps some finely grated fresh ginger for aromatic warmth. Always taste as you go; that way, you can adjust the balance of salty soy, sweet glaze, and spicy heat until it perfectly suits your palate and makes your veggie power bowl sing.
Are these Teriyaki Cauliflower Power Bowls suitable for meal prepping?
Teriyaki Cauliflower Power Bowls are brilliant for meal prep throughout the week. To maintain maximum quality, it is essential to store the main components separately. Keep the prepared teriyaki cauliflower in one container, the cooked grains in another, and the fresh toppings—such as chopped scallions or sesame seeds—stored separately until serving time. When reheating the cauliflower, use an oven or air fryer briefly to restore some crispness, rather than a microwave, which can lead to sogginess. This separation ensures maximum freshness and prevents ingredients from wilting or melding prematurely.


Leave a Comment