
I remember the day I decided that sad desk lunch syndrome was officially over, realizing that only the incredibly vibrant and satisfyingTeriyaki Chicken Wrap Recipecould save me from another bland afternoon.
This recipe isn’t just about mixing soy sauce and ginger; it’s about crafting a perfectly sweet and savory experience, all neatly packaged in a handheld miracle ready for your next adventure.
- This lightning-fast preparation makes it the ideal weeknight dinner solution when your energy tank is running dangerously close to empty.
- Experience the delightful crunch of fresh vegetables perfectly balanced by the sticky, robust sweetness of the homemade teriyaki glaze.
- The stunning visual presentation, featuring vibrant greens and glistening chicken, makes this dish look far more complicated than it actually is.
- Incredibly versatile, this wrap easily transitions from a speedy lunch to a hearty, wholesome dinner, adapting to your family’s needs.
The Redemption Arc of the Lunch Box
For years, my lunch routine was a tragic comedy of errors. Picture this: me, staring sadly into a lukewarm container of leftovers that had lost their zest, or, worse, a hastily assembled, dry sandwich. It was a culinary crisis, truly. My coworkers, bless their hearts, would occasionally offer pitying glances as I gnawed on a piece of cardboard-flavored misery. The only solution, I realized, wasn’t just to eat better, but to eat excitingly better—something that would make Monday feel a little more like Friday.
The inspiration struck during a particularly dreary Tuesday when I was scrolling through old family cookbooks. There was a faint notation next to a grilled chicken recipe: “Needs more zip. Try the Japanese glaze!” That little note launched a delicious obsession. I realized the secret wasn’t just using great chicken, but pairing it with a deeply complex, glossy teriyaki sauce and wrapping it all up with fresh, crunchy textures. This transformation rescued my midday mealtime from utter mediocrity and frankly, improved my overall mood by about 75%. If you need a hero in your lunch bag, prepare yourself, because theTeriyaki Chicken Wrap Recipeis about to wear a cape.
Crafting the Perfect Teriyaki Glaze: Sweet, Savory, and Sticky
Forget the store-bought bottles that taste vaguely of molasses and regret. We are building a truly magnificent teriyaki glaze from the ground up, and I promise, it takes minimal effort for maximum flavor payoff. The key to a great glaze is balance. We need the salty umami from the soy sauce substitute, the zing of fresh ginger, the mellow sweetness provided by a brown sugar or maple syrup replacement, and a touch of heat from crushed red pepper flakes, if you dare. This glaze isn’t watery; it’s a luscious, thick coating that adheres lovingly to every piece of chicken, ensuring each bite delivers that perfect sticky, savory sweetness we crave.
The beauty of making your own sauce is that you control the thickness. By allowing the mixture to simmer gently and then introducing a cornstarch slurry—that miraculous white liquid—you transform the liquid into a beautiful, mirror-like glaze. If you prefer a richer, darker sauce, add a splash of white grape vinegar near the end of the cooking process. Simmer the chicken cubes in this glaze for the last few minutes of cooking, and they become intensely flavorful nuggets ready to anchor our wrap masterpiece. This process takes simple chicken breast or thigh meat and turns it into something truly extraordinary.
The Art of the Assembly: Texture is Everything
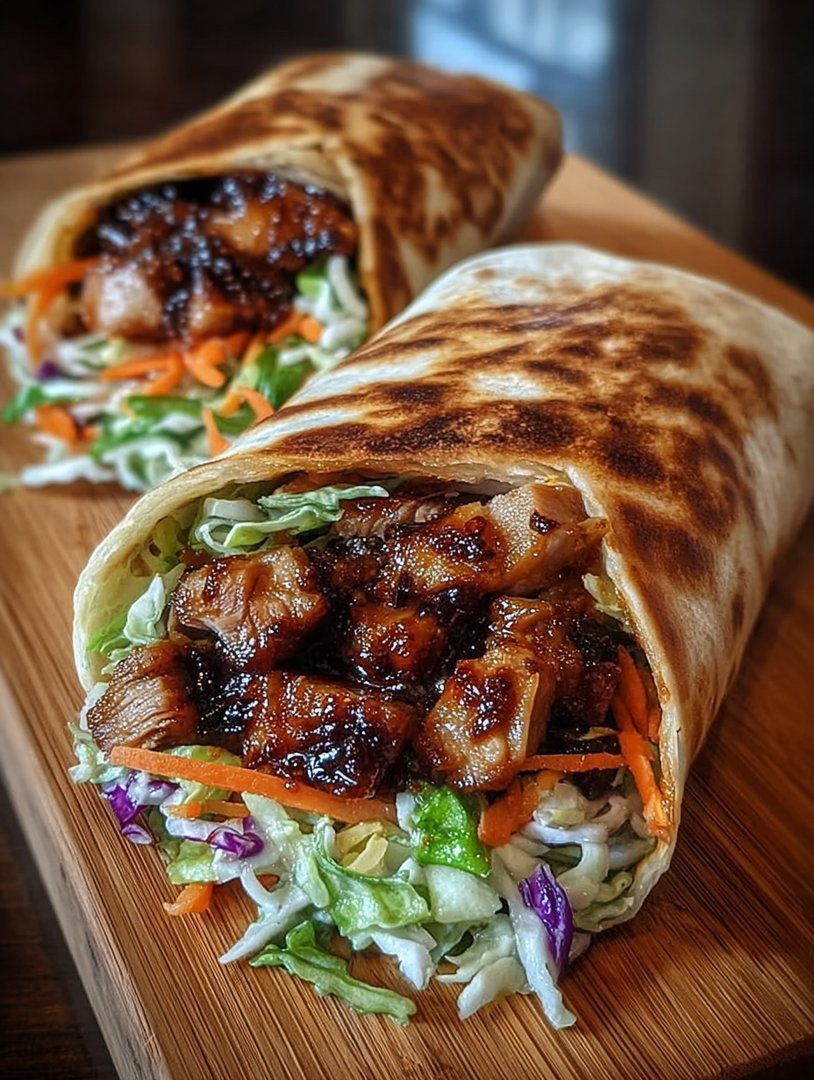
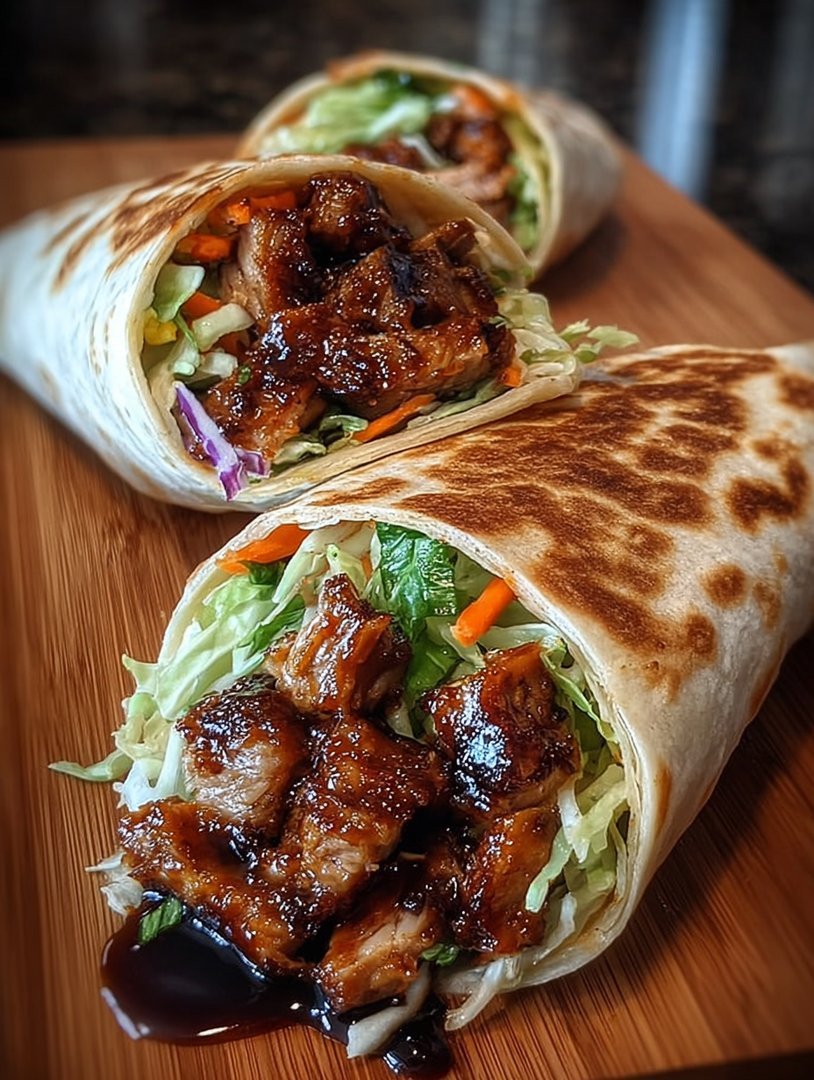
A wrap fails when it’s soft throughout, like eating a flavorless pillow. To ensure success, we must treat texture as a critical component. You need three distinct textural elements: the warm, tender chicken, the soft, pliable tortilla, and the glorious crunch of fresh vegetables. I highly recommend incorporating shredded red cabbage for an architectural foundation and a pleasant snap. Add matchstick carrots and some finely sliced scallions. If you’re feeling particularly ambitious, toast your tortilla slightly on a dry pan before assembly; this adds a subtle smokiness and prevents the wrap from becoming soggy too quickly.
Assembling the perfect wrap requires strategic layering. Start with a thin layer of sauce or mayo spread on the tortilla, acting as the protective moisture barrier. Next, layer your crunchiest vegetables, followed by the warm, glistening teriyaki chicken, and finish with a sprinkle of toasted sesame seeds. Roll it tightly, ensuring the ends are folded in neatly like a culinary burrito expert. This combination of hot, sweet chicken with cool, crisp veggies creates a dynamic sensory experience that elevates this simple lunch far beyond its humble beginnings. It’s flavor engineering at its finest, giving the simple Teriyaki Chicken Wrap Recipe its star status.
We are aiming for a high-quality, quick meal that satisfies deep cravings without demanding hours in the kitchen. Whether you’re meal-prepping for the week ahead or whipping up a fast dinner after a grueling day, this recipe delivers on its promise of flavor, speed, and genuine excitement. Now, let’s gather the components for this handheld culinary delight.
Ingredients for Teriyaki Chicken Wrap Recipe
Here’s what you’ll need to make this delicious dish:
- Boneless, Skinless Chicken Breast or ThighsCut into 1-inch cubes for quick cooking and maximizing the surface area for the glaze.
- Soy Sauce AlternativeUse a high-quality coconut aminos or tamari to provide that necessary deep umami base without gluten.
- Brown Sugar Substitute or Maple SyrupThis supplies the rich, caramelized sweetness crucial for the traditional teriyaki flavor profile.
- Fresh Ginger and GarlicMinced finely, these aromatic superstars provide the pungent depth and warmth that differentiates a great glaze from an average one.
- Rice VinegarA splash of this light vinegar brightens the sauce and cuts through the sweetness, achieving perfect flavor balance.
- CornstarchEssential for mixing with cold water to create a slurry that thickens the glaze to that desirable, sticky consistency.
- Large Flour Tortillas or Lettuce WrapsChoose large, pliable tortillas for easy wrapping, or opt for crisp butter lettuce for a lighter, low-carb option.
- Shredded Cabbage and CarrotsThese foundational vegetables provide the necessary crunch and textural contrast against the soft chicken.
- Toasted Sesame Seeds and ScallionsUsed as a garnish, these elements add visual appeal and a final subtle nutty flavor to the assembly.
The full ingredients list, including measurements, is provided in the recipe card directly below.
How to Make Teriyaki Chicken Wrap Recipe
Follow these simple steps to prepare this delicious dish:
-
Prepare the Chicken and Teriyaki Base
Pat the cubed chicken dry thoroughly and set it aside. In a medium bowl, whisk together the soy sauce alternative, maple syrup, minced ginger and garlic, rice vinegar, and a pinch of red pepper flakes. Reserve about a quarter cup of this mixture for later, using the rest to marinate the chicken for at least 15 minutes, or up to 4 hours in the refrigerator.
-
Sear the Chicken
Heat 1 tablespoon of high-heat oil (like avocado or vegetable oil) in a large skillet or wok over medium-high heat. Remove the chicken from the marinade (discarding the marinade liquid) and sear the chicken cubes until they are nicely browned on all sides, usually about 5 to 7 minutes. Ensure the chicken reaches an internal temperature of 165°F (74°C).
-
Thicken and Glaze the Sauce
While the chicken is cooking, mix 1 tablespoon of cornstarch with 2 tablespoons of cold water in a tiny bowl to create the slurry. Once the chicken is fully cooked, reduce the heat to low. Pour the reserved quarter cup of teriyaki base into the skillet, then immediately whisk in the cornstarch slurry. Stir constantly until the sauce thickens and becomes glossy, which should take less than one minute.
-
Coat the Chicken
Toss the cooked, seared chicken gently in the thickened, glistening teriyaki glaze until every piece is beautifully coated and sticky. Remove the skillet from the heat immediately to prevent the glaze from becoming too stiff or burning.
-
Assemble the Wraps
Lay out your tortillas or lettuce cups. If using tortillas, lightly spread a protective layer of mayonnaise or a thin layer of additional sauce down the center. Layer the shredded cabbage and carrots, followed by a generous portion of the warm teriyaki chicken. Top with sliced scallions and a sprinkle of toasted sesame seeds.
-
Fold and Serve
Fold the sides of the tortilla inward over the filling, then roll tightly from the bottom upward, securing the delicious contents inside. Slice the wrap in half diagonally for an excellent presentation. Transfer to plates and drizzle with extra sauce or serve with a side of Asian-inspired slaw for the perfect finishing touch.
Tips and Customizations for Your Perfect Wrap
Once you master the basicTeriyaki Chicken Wrap Recipe, you can begin experimenting with various ingredients and techniques to perfectly tailor the meal to your preferences. The beauty of a wrap lies in its adaptability; it’s a vehicle for creativity!
Swapping Out Proteins and Base
While chicken is a classic choice, feel free to substitute it with thinly sliced beef sirloin or even cubes of firm tofu for a plant-based option. The preparation method remains largely the same: sear the protein first, then finish it by coating it completely in the homemade teriyaki glaze. If you are avoiding bread or tortillas entirely, use large, sturdy leaves of butter lettuce, iceberg lettuce, or even steamed collard greens as your wrap base. Lettuce wraps offer a refreshing coolness and a satisfying crunch, making the dish feel significantly lighter and brighter.
Boosting Flavor and Crunch
If you love heat, incorporate a teaspoon of sriracha or chili garlic sauce directly into the teriyaki glaze when you are whisking the ingredients together. For an additional layer of flavor, consider adding finely chopped cilantro or mint leaves to the filling just before wrapping—it adds a fresh, herbaceous element that contrasts beautifully with the savory glaze. Don’t underestimate the power of nuts; adding a handful of chopped peanuts or cashews inside the wrap provides an unexpected, delightful crunch and a subtle richness that enhances the entire experience.
Meal Prep and Storage Strategies
This recipe is an absolute champion for meal preparation, provided you follow one crucial rule: store the wet components separately from the dry ones. Cook and glaze the chicken fully, then store it in an airtight container in the refrigerator for up to four days. Chop all your vegetables—the cabbage, carrots, and scallions—and keep them in a separate container, perhaps even mixing them together for ease of assembly. When lunchtime rolls around, simply warm the chicken slightly, assemble the wrap with the fresh veggies, and you avoid the dreaded soggy wrap situation entirely. This preparation method guarantees a fresh, crisp, and delicious midday meal every time, making that sad desk lunch syndrome a distant, laughable memory.
This simple yet stunning dish proves that quick cooking doesn’t mean compromising on complex, satisfying flavors. Enjoy the process and the spectacular results!
We all have those nights where the fridge stares back, utterly empty of inspiration, yet teeming with random bits of produce and that one lonely chicken breast. My mission that evening wasn’t culinary greatness; it was survival. I was aiming for ‘edible,’ but what I accidentally created was a phenomenon—the ultimate quick fix that tasted like a summer vacation tucked into a convenient shell.
The Accidental Discovery of Sunshine on a Plate
I needed dinner fast, armed only with leftover chicken and a sudden craving for something sticky and savory. The result, this magnificentTeriyaki Chicken Wrap Recipe, was a total fluke, blending crispy fresh vegetables with a rich, homemade glaze that truly brightened up an otherwise gloomy Tuesday evening.
This recipe isn’t just about slapping some sauce on poultry; it’s about crafting a perfectly balanced bite. It’s the kind of meal that silences the dinner table—not because everyone is being polite, but because they are fiercely focused on devouring every last crumb. If you thought wraps were strictly reserved for cold deli meats and sadness, prepare for a joyous awakening.
Ingredients: The Essential Cast Members
The beauty of the Teriyaki Chicken Wrap Recipe lies in the simplicity of its components, requiring standard pantry items that transform into something truly extraordinary. Skip the store-bought sauces; we are building a glaze from scratch that packs a wallop of flavor.
For the Sticky-Sweet Teriyaki Glaze
- 1/2 cup Soy Sauce (low sodium preferred)
- 1/2 cup Water or Chicken Broth
- 1/4 cup Brown Sugar, packed
- 2 tablespoons Rice Vinegar
- 1 tablespoon Fresh Ginger, grated
- 2 cloves Garlic, minced
- 1 tablespoon Sesame Oil
- 2 teaspoons Cornstarch mixed with 2 tablespoons cold water (slurry)
The Wrap Filling: Chicken and Veggies
- 1.5 lbs Boneless, Skinless Chicken Breast or Thighs, cut into 1-inch pieces
- 1 tablespoon Olive Oil
- 1 cup Shredded Carrots
- 1 cup Shredded Cabbage (Napa or Green)
- 1 Red Bell Pepper, thinly sliced
- 4 Green Onions, sliced
Assembly Line Staples
- 8-10 Large Tortillas or Wraps (Whole wheat or flour)
- Sesame Seeds for garnish (optional)
Preparing the Star of the Show: The Chicken
The key to succulent chicken is a quick, hot sear. We want color and texture before we introduce the glaze. Pat the chicken pieces completely dry. This is a non-negotiable step; moisture steams the meat instead of searing it, leading to a duller result.
Heat your olive oil in a large skillet or wok over medium-high heat until shimmering. Add the chicken, ensuring you do not overcrowd the pan. Cook in batches if necessary. Sear the pieces for about 3 to 4 minutes per side until beautifully golden brown and cooked through. Once cooked, set the chicken aside on a plate; we will use the same skillet to build the sauce, capturing all those flavorful browned bits, known affectionately as ‘fond,’ left behind.
Perfecting the Cooking Process
Start by searing the seasoned chicken quickly to lock in moisture and flavor before preparing the simple teriyaki glaze in the same pan. While the sauce simmers to reduce and thicken, take the time to slice the fresh vegetables thinly for the crunchiest, most delightful wraps.
Glaze Alchemy: The Magic Sauce
To make the incredible sticky sauce, drain off any excess oil from the skillet, leaving the fond. Reduce the heat to medium-low. Add the soy sauce, water or broth, brown sugar, rice vinegar, ginger, garlic, and sesame oil to the pan. Stir constantly until the sugar completely dissolves, bringing the mixture to a gentle simmer.
Allow the sauce to bubble gently for about five minutes. This time allows the flavors to truly meld. Once the sauce has slightly reduced, whisk the cornstarch slurry vigorously and pour it into the simmering mixture. Stir continuously; the sauce will thicken almost instantly, transforming into that glossy, luxurious teriyaki texture we crave. Remove the pan from the heat immediately.
Assembling the Ultimate Teriyaki Chicken Wrap Recipe
Now, gently fold the cooked chicken pieces back into the glorious glaze. Toss everything until the chicken is thoroughly coated in the rich, sticky sauce. This is where the magic happens, ensuring every bite bursts with flavor.
To assemble your wraps, warm the tortillas briefly—either in a dry pan or microwave—to make them more pliable and less likely to crack. Lay a tortilla flat, placing a generous line of the shredded carrots, cabbage, and sliced bell peppers just below the center. Top the vegetables with a hefty spoonful of the glazed chicken mixture and sprinkle with fresh green onions and sesame seeds. Fold the sides in, and then roll the wrap tightly from the bottom upward. Slice diagonally and watch them disappear!
Add Your Touch
Swap standard wraps for lettuce cups for a lighter, low-carb option, or introduce a spicy kick with a dash of chili-garlic sauce into the glaze mixture. You could also substitute the chicken with sliced beef or turkey for a satisfying variation on this brilliant recipe.
Storing & Reheating
Store leftover teriyaki chicken mixture separately from the vegetables and wraps in airtight containers for up to three days. Reheat the chicken gently on the stovetop or in the microwave before assembling fresh wraps with crunchy, chilled vegetables to maintain maximum texture and flavor.
Expert Tips for Flavor Perfection
-
Don’t skip the cornstarch slurry step; it’s essential for achieving that restaurant-quality, thick, glossy glaze that adheres perfectly to the tender chicken.
-
Toast your sesame seeds lightly in a dry pan before sprinkling them on; this simple step significantly enhances their nutty aroma and deepens the overall flavor profile.
-
Always shred your own cabbage and carrots fresh instead of buying pre-shredded bags; the crispness makes all the difference in the final texture of the wrap.
I once served these wraps at a casual backyard gathering, and my notoriously picky nephew, who usually only eats plain pasta, asked for the recipe—a truly historical event that confirmed this meal’s universal appeal.
Conclusion for Teriyaki Chicken Wrap Recipe
The beauty of thisTeriyaki Chicken Wrap Recipeis its ability to deliver complexity and satisfying flavor in a remarkably short amount of time. We learned that the secret lies in building the homemade, deeply flavored glaze and perfectly searing the chicken beforehand. This wrap is a versatile, delicious option, perfect for quick weeknight dinners or even easy lunch prep.
Whether you follow the recipe exactly or use the suggested variations, you are guaranteed a meal that is anything but boring. Embrace the simplicity and the sticky goodness of these teriyaki wraps, and prepare for them to become a permanent fixture in your weekly rotation.
Print
Teriyaki Chicken Wrap Recipe
Skip takeout! This speedy Teriyaki Chicken Wrap delivers savory glazed chicken cooked in fragrant sesame oil, paired with crunchy cabbage in minutes. Full instructions and nutrition details provided.
- Total Time: 35 minutes
- Yield: 4 servings 1x
Ingredients
- 1 pound boneless, skinless chicken breast, cubed
- 1/2 cup prepared teriyaki sauce
- 4 large flour tortillas or wraps
- 1 tablespoon sesame oil
- 2 cups shredded mixed cabbage (coleslaw mix)
- 1/2 cup shredded carrot
- 1 teaspoon toasted sesame seeds
Instructions
- Step 1: Heat the sesame oil in a large skillet or wok over medium-high heat. Add the cubed chicken breast and sauté for 5-7 minutes, stirring occasionally, until the chicken is fully cooked through and golden brown.
- Step 2: Reduce the heat to low. Pour the prepared teriyaki sauce over the cooked chicken and stir continuously until the chicken is thoroughly coated and the sauce has slightly reduced and thickened (about 1-2 minutes). Remove the skillet from the heat.
- Step 3: In a separate bowl, prepare the crunchy slaw filling by gently tossing together the shredded cabbage and shredded carrot.
- Step 4: Slightly warm the flour tortillas in a microwave for 10-15 seconds or heat them individually in a dry skillet for 30 seconds per side, making them more pliable for rolling.
- Step 5: Lay a warmed tortilla flat. Spoon one-quarter of the teriyaki chicken mixture down the center, leaving room on the edges. Top the chicken with a generous portion of the cabbage/carrot mixture and sprinkle with toasted sesame seeds before folding in the sides and rolling the wrap up tightly. Slice in half diagonally to serve.
Notes
- Store leftover teriyaki chicken and the separate slaw mix in airtight containers in the refrigerator for up to three days, assembling wraps only when ready to eat to prevent sogginess.
- Reheat the chicken mixture in a skillet over medium heat, adding a splash of water or extra teriyaki sauce if the sauce has tightened up and appears too sticky while chilled.
- Pair this savory wrap with a small side of sliced cucumber tossed lightly in rice vinegar and a pinch of salt for a bright, cooling contrast.
- To ensure maximum crispness and prevent the wrap from tearing, always warm the tortillas so they are pliable, and roll them as tightly as possible without squeezing out the filling.
- Prep Time: 15 minutes
- Cook Time: 20 minutes
- Method: Stovetop
- Cuisine: American


Leave a Comment